


授权简介
前面我们了解的用户登录认证,不管是用户密码还是图像验证码都是为了让系统知道你是谁,你可以在这个系统中做什么事情,这个情况就是叫做授权。
其实也就是你是否能够控制访问某个url路径。
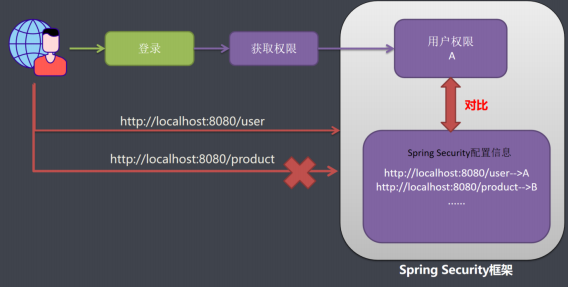
我们在应用系统中,如果想要控制用户权限,需要2部分数据
- 系统配置信息数据,写着系统里面哪些url,每个url需要哪些权限才可以被访问;
- 另一份数据就是用户权限信息:请求用户拥有权限,系统用户发送一个请求,系统配置信息和用户权限进行对比,如果对比成功则允许被访问。
SpringSecurity授权
内置权限表达式
|
表达式 |
说明 |
|
permitAll |
指定任何人都允许访问。 |
|
denyAll |
指定任何人都不允许访问。 |
|
anonymous |
指定匿名用户允许访问。 |
|
rememberMe |
指定已记住的用户允许访问。 |
|
authenticated |
指定任何经过身份验证的用户都允许访问,不包含 anonymous。 |
|
fullyAuthenticated |
指定经过身份验证的用户允许访问,不包含 anonymous 和 rememberMe。 |
|
hasRole(role) |
指定需要特定的角色的用户允许访问,会自动在角色前面插入 。 |
|
hasAnyRole(role1,role2) |
指定需要任意一个角色的用户允许访问,会自动在角色前面插入 。 |
|
hasAuthority(authority) |
指定需要特定的权限的用户允许访问。 |
|
hasAnyAuthority(authority1,authority2) |
指定需要任意一个权限的用户允许访问。 |
|
hasIpAddress(ip) |
指定需要特定的 IP 地址可以访问。 |
url安全表达式
- 自定义权限不足类
@Component
public class MyAccessHandler implements AccessDeniedHandler {

    @Override
    public void handle(HttpServletRequest httpServletRequest, HttpServletResponse httpServletResponse, AccessDeniedException e) throws IOException, ServletException {
        httpServletResponse.setStatus(HttpServletResponse.SC_FORBIDDEN);
        httpServletResponse.setContentType("text/html;charset=UTF-8");
        httpServletResponse.getWriter().write("权限不足");
    }
}
- 设置url访问权限
        // 权限控制, 只有ADMIN角色的用户才能访问/user/**
        http.authorizeRequests().antMatchers("/user/**").hasRole("ADMIN");
        // 权限控制, 只有ADMIN或者PRODUCT角色的用户才能访问/product/**, 并且只能从127.0.0.1访问
        http.authorizeRequests().antMatchers("/product/**").access("hasRole('ADMIN,PRODUCT')and hasIpAddress('127.0.0.1')");
        // 拒绝访问处理
        http.exceptionHandling().accessDeniedHandler(accessDeniedHandler);
- 设置用户对于的角色权限
        // 先声明一个权限集合, 因为构造方法里面不能传入null
        Collection<GrantedAuthority> authorities = new ArrayList<>();
        if ("admin".equalsIgnoreCase(user.getUsername())) {
            authorities.add(new SimpleGrantedAuthority("ROLE_ADMIN"));
        } else {
            authorities.add(new SimpleGrantedAuthority("ROLE_PRODUCT"));
        }
在web安全表达式中引用自定义Bean授权
- 自定义授权类
/**
 * 自定义授权类
 */
@Component
public class MyAuthorizationService {
    /**
     * 检查用户是否有对应的访问权限
     *
     * @param authentication 登录用户
     * @param request 请求对象
     * @return
     */
    public boolean check(Authentication authentication, HttpServletRequest
            request) {
        User user = (User) authentication.getPrincipal();
// 获取用户所有权限
        Collection<GrantedAuthority> authorities = user.getAuthorities();
// 获取用户名
        String username = user.getUsername();
// 如果用户名为admin,则不需要认证
        if (username.equalsIgnoreCase("admin")) {
            return true;
        } else {
// 循环用户的权限, 判断是否有ROLE_ADMIN权限, 有返回true
            for (GrantedAuthority authority : authorities) {
                String role = authority.getAuthority();
                if ("ROLE_ADMIN".equals(role)) {
                    return true;
                }
            }
        }
        return false;
    }
}
- 配置类
//使用自定义Bean授权
http.authorizeRequests().antMatchers("/user/**").
access("@myAuthorizationService.check(authentication,request)");
- 携带路径变量
    /**
    * 检查用户是否有对应的访问权限
    *
    * @param authentication 登录用户
    * @param request 请求对象
    * @param id 参数ID
    * @return
    */
    public boolean check(Authentication authentication, HttpServletRequest request, Integer id) {
        if (id > 10) {
            return false;
        }
        return true;
    }
//使用自定义Bean授权,并携带路径参数
http.authorizeRequests().antMatchers("/user/delete/{id}").
access("@myAuthorizationService.check(authentication,request,#id)");
Method安全表达式
针对方法级别的访问控制比较复杂,spring security提供了4种注解分别是@PreAuthorize,@PostAuthorize,@PreFilter,@PostFilter;
- 开启方法级别的注解配置
@Configuration
@EnableGlobalMethodSecurity(prePostEnabled = true)
public class SecurityConfiguration extends WebSecurityConfigurerAdapter
- 在方法上使用注解
    @RequestMapping("/findAll")
    @PreAuthorize("hasRole('ADMIN')")//需要ADMIN权限
    public String findAll(Model model) {
        List<User> userList = userService.list();
        model.addAttribute("userList", userList);
        return "user_list";
    }
    /**
     * 用户修改页面跳转
     *
     * @return
     */
    @RequestMapping("/update/{id}")
    @PreAuthorize("#id<10")//针对参数权限限定 id<10可以访问
    public String update(@PathVariable Integer id, Model model) {
        User user = userService.getById(id);
        model.addAttribute("user", user);
        return "user_update";
    }
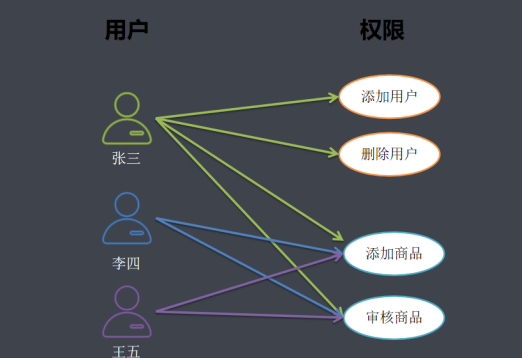
RBAC权限模型简介
- 用户:系统接口及访问的操作者
- 权限:能够访问某接口或者做某操作的授权资格
- 角色:具有一类相同操作权限的总称
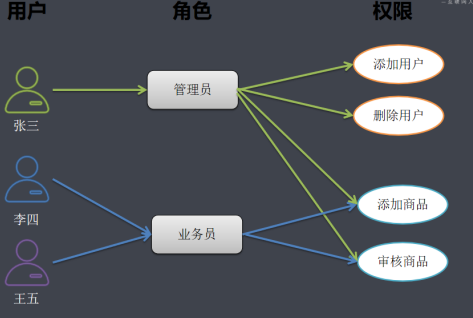
RBAC的演化进程
用户与权限直接关联
用户与角色关联
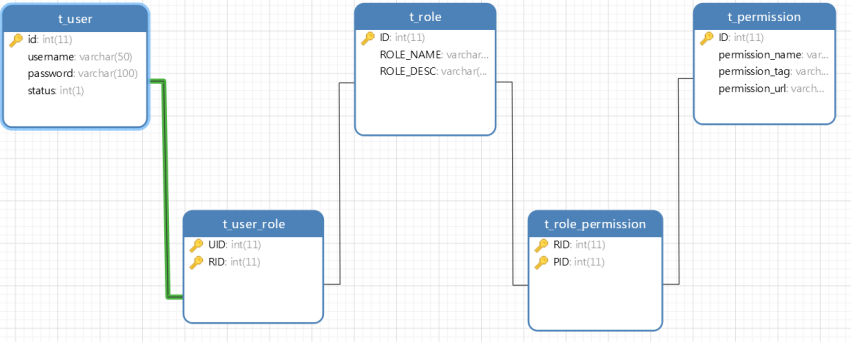
基于RBAC设计权限表结构
- 一个用户有一个或者多个角色
- 一个用户包含多个用户
- 一个角色有多种权限
- 一个权限属于多个角色、
1. 动态查询用户对应的权限(Mapper 层)
import com.baomidou.mybatisplus.core.mapper.BaseMapper;
import com.tapou.domain.Permission;
import org.apache.ibatis.annotations.Select;
import java.util.List;

public interface PermissionMapper extends BaseMapper<Permission> {
    /**
     * 根据用户ID查询权限
     * @param id 用户ID
     * @return 用户对应的权限列表
     */
    @Select("SELECT p.* FROM permission p,t_role_permission rp,t_role r,t_user_role ur,t_user u " +
            "WHERE u.id = #{id} AND ur.user_id = u.id AND ur.role_id = r.id AND rp.role_id = r.id AND rp.permission_id = p.id")
    List<Permission> findByUserId(Integer id);
}
2. 给用户授权(权限装配)
// 先声明一个权限集合(避免空指针)
Collection<GrantedAuthority> authorities = new ArrayList<>();
// 调用service查询用户的权限列表
List<Permission> permissions = permissionService.findByUserId(user.getId());
for (Permission permission : permissions) {
    // 将权限添加到认证对象中
    authorities.add(new SimpleGrantedAuthority(permission.getPermissionTag()));
}
3. 设置请求访问权限(全局权限拦截)
// 查询数据库中所有权限列表
List<Permission> permissions = permissionService.list();
for (Permission permission : permissions) {
    // 为指定请求路径,配置“需拥有对应权限才能访问”
    http.authorizeRequests()
        .antMatchers(permission.getPermissionUrl()) // 请求路径
        .hasAuthority(permission.getPermissionTag()); // 所需权限
}
基于页面端标签的权限控制
- 首先需要引入配置文件
<!--添加thymeleaf为SpringSecurity提供的标签 依赖 -->
<dependency>
  <groupId>org.thymeleaf.extras</groupId>
  <artifactId>thymeleaf-extras-springsecurity5</artifactId>
  <version>3.0.4.RELEASE</version>
</dependency>
- 在html中申请使用
!DOCTYPE html>
<html xmlns:th="http://www.thymeleaf.org"
xmlns:sec="http://www.thymeleaf.org/extras/spring-security">
常用 SpringSecurity 标签属性介绍
|
标签属性 |
说明 |
|
|
判断用户是否已登录认证(引号内参数固定为 |
|
|
获取当前用户的用户名(引号内参数固定为 |
|
|
判断当前用户是否拥有指定角色(引号内参数为角色名称)。 |
|
|
判断当前用户是否拥有指定权限(引号内参数为权限名称)。 |
SpringSecurity标签的使用示例
<div class="leftnav">
    <div class="leftnav-title">
        <!-- 判断用户是否已认证(登录) -->
        <div sec:authorize="isAuthenticated()">
            <!-- 获取当前用户名 -->
            <span sec:authentication="name"></span>
            <img src="images/y.jpg" class="radius-circle rotate-hover" height="50" alt="">
        </div>
    </div>
    <!-- 判断用户是否拥有“user:findAll”权限 -->
    <div sec:authorize="hasAuthority('user:findAll')">
        <dl>
            <dt><span class="icon-user"></span>系统管理</dt>
            <dd style="display:block">
                <ul>
                    <!-- 有权限则显示“用户管理”链接 -->
                    <li><a href="/user/findAll" target="right"><span class="icon-caret-right"></span>用户管理</a></li>
                    <li><a href="javascript:void(0)" onclick="toCors()" target="right">
                        <span class="icon-caret-right"></span>跨域测试</a>
                    </li>
                </ul>
            </dd>
        </dl>
    </div>
    <!-- 判断用户是否拥有“product:findAll”权限 -->
    <div sec:authorize="hasAuthority('product:findAll')">
        <dl>
            <dt><span class="icon-pencil-square-o"></span>数据管理</dt>
            <dd>
                <ul>
                    <!-- 有权限则显示“商品管理”链接 -->
                    <li><a href="/product/findAll" target="right"><span class="icon-caret-right"></span>商品管理</a></li>
                </ul>
            </dd>
        </dl>
    </div>
</div>


 5万+
5万+

 被折叠的 条评论
为什么被折叠?
被折叠的 条评论
为什么被折叠?
 到【灌水乐园】发言


