


系统:Centos6.7
fastdfs:到https://github.com/happyfish100下载,都下载最新的:fastdfs-master、libfastcommon-master、fastdfs-nginx-module-master,避免版本问题
Linux终端工具:xshell、xftp
Linux ip:192.168.1.207
fastdfs安装
上传相关包到/opt下,如图

安装zip、unzip
          [root@fastdfs2 opt]# yum install -y unzip zip

   解压fastdfs-master.zip

          [root@fastdfs2 opt]# unzip -o fastdfs-master.zip -d /usr/local

   编译安装fast

          [root@fastdfs2 opt]# cd /usr/local/fastdfs-master

          [root@fastdfs2 fastdfs-master]# ./make.sh

          报错:./make.sh: line 146: perl: command not found

   安装perl

          [root@fastdfs2 fastdfs-master]# yum -y install perl

          再运行./make.sh,报错:make: cc:命令未找到

   安装gcc

          [root@fastdfs2 fastdfs-master]# yum install gcc-c++

          再运行./make.sh,仍出现如下错误:
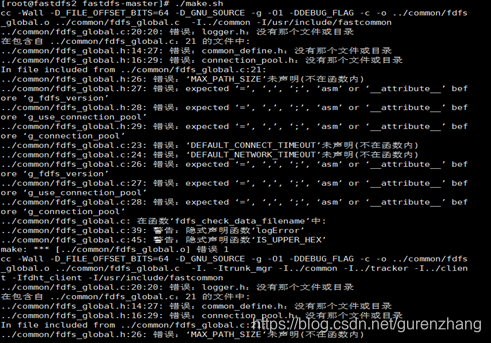
缺少libfastcommon中的相关基础库
   安装libfastcommon

          解压libfastcommon-master.zip

                 [root@fastdfs2 fastdfs-master]# cd /opt

                 [root@fastdfs2 opt]# unzip -o libfastcommon-master.zip -d /usr/local

          安装libfastcommon

                 [root@fastdfs2 opt]# cd /usr/local/libfastcommon-master/

                 [root@fastdfs2 libfastcommon-master]# ./make.sh

                 [root@fastdfs2 libfastcommon-master]# ./make.sh install

   再装fastdfs

          [root@fastdfs2 local]# cd /usr/local/fastdfs-master/

          [root@fastdfs2 fastdfs-master]# ./make.sh

          [root@fastdfs2 fastdfs-master]# ./make.sh install

   拷贝配置文件

          将fastdfs安装目录下的conf下的文件拷贝到/etc/fdfs/下

          [root@fastdfs2 fastdfs-master]# cp -r conf/* /etc/fdfs/

   自此fastdfs安装完成了,接下来配置trackerd和storaged,并启动它们。
fdfs可执行命令
[root@fastdfs2 fdfs]# ll /usr/bin/fdfs*
View Code
配置并启动trackerd
修改trackerd.conf
          不改也可以,但是要保证/home/yuqing/fastdfs路径存在

          [root@fastdfs2 fdfs]# cd /etc/fdfs/

          [root@fastdfs2 fdfs]# vi tracker.conf

          将base_path=/home/yuqing/fastdfs改成base_path=/data/fastdfs

   创建trackerd数据、日志目录

          [root@fastdfs2 fdfs]# mkdir -p /data/fastdfs

   启动trackerd

          [root@fastdfs2 fdfs]# /usr/bin/fdfs_trackerd /etc/fdfs/tracker.conf restart

          查看trackerd进程,如下图:

说明trackered已经启动起来;其实也可以查看日志:/data/fastdfs/logs/trackerd.log,来判断trackerd是否正常启动起来。
配置并启动storaged
修改storage.conf
          [root@fastdfs2 fdfs]# cd /etc/fdfs/

          [root@fastdfs2 fdfs]# vi storage.conf

          base_path=/home/yuqing/fastdfs改为:base_path=/data/fastdfs

          store_path0=/home/yuqing/fastdfs改为:store_path0=/data/fastdfs/storage

          tracker_server=192.168.209.121:22122改为:tracker_server=192.168.1.207:22122,这个ip改成自己的

   创建storaged数据、日志目录

          [root@fastdfs2 fdfs]# mkdir -p /data/fastdfs/storage

   启动storaged

          [root@fastdfs2 fdfs]# /usr/bin/fdfs_storaged /etc/fdfs/storage.conf restart

          查看storaged进程,如下图:

说明storaged已经启动起来;其实也可以查看日志:/data/fastdfs/logs/storaged.log来判断storaged是否正常启动起来。
上传图片测试
本地(win环境)安装fastdfs连接驱动
从https://github.com/happyfish100/fastdfs-client-java下载源码,我下载的是zip包,解压后目录如下图:
maven本地安装:mvn clean install

当然也可以用ant构建:ant clean package
书写测试代码
代码结构如图

fdfs_client_mine.conf:
View Code
FastdfsClientTest.java:
View Code
上传图片:mygirl.jpg
执行测试代码,当输出如下信息时,表示上传成功:
View Code
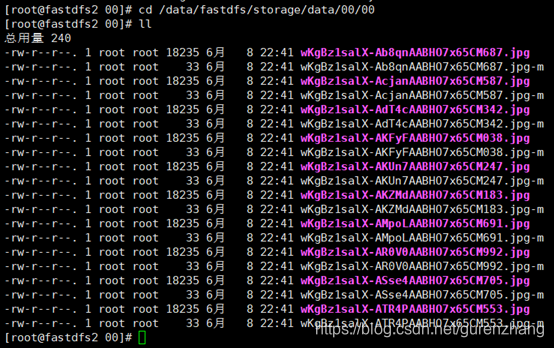
我们到服务器上看看,图片确实已经上传了,如下图:
由于现在还没有和nginx整合无法使用http下载。
FastDFS 和nginx整合
fastdfs-nginx-module安装
          解压

                 [root@fastdfs2 00]# cd /opt

                 [root@fastdfs2 opt]# unzip -o fastdfs-nginx-module-master.zip -d /usr/local

          拷贝配置文件

                 [root@fastdfs2 opt]# cd /usr/local/fastdfs-nginx-module-master/src

                 [root@fastdfs2 src]# cp mod_fastdfs.conf /etc/fdfs/

          编辑配置文件

                 [root@fastdfs2 src]# cd /etc/fdfs/

                 [root@fastdfs2 fdfs]# vi mod_fastdfs.conf

                 base_path=/tmp改成:base_path=/data/fastdfs

                 tracker_server=tracker:22122改成:tracker_server=192.168.1.207:22122

                 url_have_group_name = false改成:url_have_group_name = true;#url中包含group名称

                 store_path0=/home/yuqing/fastdfs改成:store_path0=/data/fastdfs/storage

   nginx安装

          nginx依赖包安装

                 [root@fastdfs2 fdfs]# cd /opt

                 [root@fastdfs2 opt]# yum -y install zlib zlib-devel openssl openssl--devel pcre pcre-devel

          解压nginx

                 [root@fastdfs2 opt]# tar -zxvf nginx-1.13.12.tar.gz

          安装nginx并添加fastdfs模块

                 [root@fastdfs2 opt]# cd nginx-1.13.12

                 [root@fastdfs2 nginx-1.13.12]# ./configure --prefix=/usr/local/nginx --add-module=/usr/local/fastdfs-nginx-module-master/src

                 [root@fastdfs2 nginx-1.13.12]# make

                 [root@fastdfs2 nginx-1.13.12]# make install

          检查nginx模块

                 [root@fastdfs2 nginx-1.13.12]# cd /usr/local/nginx/sbin/

                 [root@fastdfs2 sbin]# ./nginx -V
nginx version: nginx/1.13.12
uilt by gcc 4.4.7 20120313 (Red Hat 4.4.7-18) (GCC)
configure arguments: --prefix=/usr/local/nginx --add-module=/usr/local/fastdfs-nginx-module-master/src
已经把fastdfs模块添加进去了。
          配置nginx配置文件

                 [root@fastdfs2 sbin]# cd /usr/local/nginx/conf

                 [root@fastdfs2 conf]# vi nginx-fdfs.conf

                 内容如下,ip注意改成自己的:
View Code
启动nginx
                 [root@fastdfs2 conf]# cd /usr/local/nginx/sbin/

                 [root@fastdfs2 sbin]# ./nginx -c /usr/local/nginx/conf/nginx-fdfs.conf

   访问图片

          文件路径在上面的上传图片的测试代码中有输入,我们进行拼装下:

          http://192.168.1.207/group1/M00/00/00/wKgBz1salX-ATR4PAABHO7x65CM553.jpg
总结
1、fastdfs相关包推荐直接到官网下载,能避免因为版本而造成的问题
2、上传成功而访问却出现nginx:400问题,极有可能url_have_group_name = false没有改成:url_have_group_name = true;
大家搭建的时候一定要细心再细心,也祝大家能够顺利的完成!(我是搭建了一段时间,中间各种小插曲)


 1967
1967

 被折叠的 条评论
为什么被折叠?
被折叠的 条评论
为什么被折叠?
 到【灌水乐园】发言


