


 本文详细介绍了使用Stolon实现PostgreSQL高可用性的步骤,包括启动etcd、初始化集群、启动sentinel和keeper、设置proxy以及连接测试和状态检查。通过这种方式,能够在多台服务器上创建一个自动故障切换的PostgreSQL集群。
作者:XuYuchong
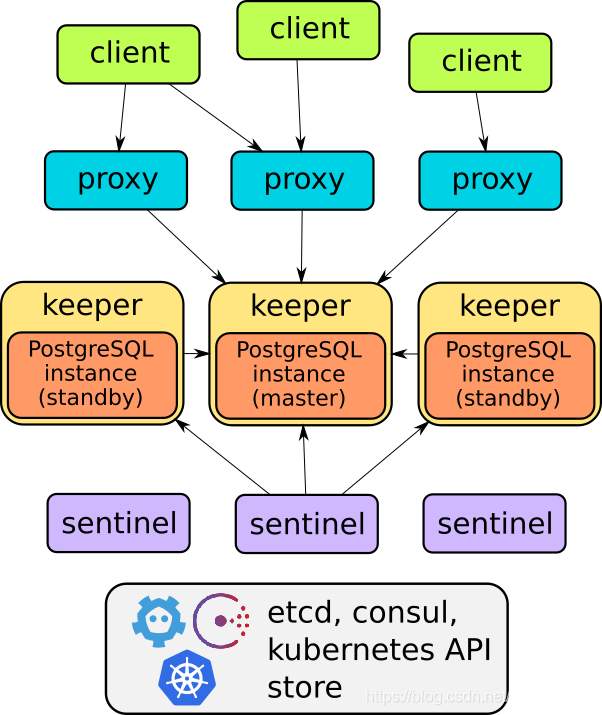
软件架构:
环境基础信息:
| etcd | 192.168.5.220 | 2379 | |
| postgres0 | 192.168.0.200 | 5432 | master |
| postgres1 | 192.168.0.220 | 5432 | |
| postgres2 | 192.168.0.220 | 5433 | |
| proxy | 192.168.5.220 | 25432 |
软件信息:
etcd Version: 3.3.11
stolon-v0.17.0-linux-amd64.tar.gz
postgresql-12.3.tar.bz2
01,启动etcd(本次测试使用单台etcd)
etcd --listen-client-urls 'http://0.0.0.0:2379' --advertise-client-urls 'http://0.0.0.0:2379'
02,集群初始化
stolonctl --cluster-name stolon-cluster --store-backend=etcdv3 --store-endpoints=
http://192.168.5.220:2379
  init
[root@db01 ~]# stolonctl --cluster-name stolon-cluster --store-backend=etcdv3 --store-endpoints=http://192.168.5.220:2379  init
WARNING: The databases managed by the keepers will be overwritten depending on the provided cluster spec.
Are you sure you want to continue? [yes/no] yes
03,启动sentinel(可以启动多台,只有一台为LEADER,当一台故障自动切换)
stolon-sentinel --cluster-name stolon-cluster --store-backend=etcdv3 --store-endpoints=
http://192.168.5.220:2379
04,启动数据库
#启动postgres0(第一启动的为主数据库)
stolon-keeper --cluster-name stolon-cluster --store-backend=etcdv3 --store-endpoints=
http://192.168.5.220:2379
 --uid postgres0 --data-dir data/postgres0 --pg-su-password=supassword --pg-repl-username=repluser --pg-repl-password=replpassword --pg-listen-address=192.168.5.200
#启动postgres1(备)
stolon-keeper --cluster-name stolon-cluster --store-backend=etcdv3 --store-endpoints=
http://192.168.5.220:2379
 --uid postgres1 --data-dir data/postgres1 --pg-su-password=supassword --pg-repl-username=repluser --pg-repl-password=replpassword --pg-listen-address=192.168.5.220
#启动postgres2(备)
stolon-keeper --cluster-name stolon-cluster --store-backend=etcdv3 --store-endpoints=
http://192.168.5.220:2379
 --uid postgres2 --data-dir data/postgres2 --pg-su-password=supassword --pg-repl-username=repluser --pg-repl-password=replpassword --pg-listen-address=192.168.5.220 --pg-port 5433
05,启动proxy:
stolon-proxy --cluster-name stolon-cluster --store-backend=etcdv3

--listen-address 192.168.5.220
--port 25432
#登录连接测试
#psql --host 192.168.5.220 --port 25432 postgres -U postgres
#密码:supassword
06,状态检查:
stolonctl --cluster-name=stolon-cluster --store-backend=etcdv3 --store-endpoints=http://192.168.5.220:2379 status
stolonctl --cluster-name=stolon-cluster --store-backend=etcdv3 --store-endpoints=http://192.168.5.220:2379 clusterdata read
=== Active sentinels ===
ID        LEADER
527b42f1    true
f2c54a73    false
=== Active proxies ===
ID
d808c772
=== Keepers ===
UID        HEALTHY    PG LISTENADDRESS    PG HEALTHY    PG WANTEDGENERATION    PG CURRENTGENERATION
postgres0    true    192.168.5.200:5432    true        2            2
postgres1    true    192.168.5.220:5432    true    3    3
postgres2    true    192.168.5.220:5433    true    5    5
=== Cluster Info ===
Master Keeper: postgres2
===== Keepers/DB tree =====
postgres2 (master)
├─postgres1
└─postgres0
07,切换,不支持手动切换.
*禁止转载,可转发(转发文章请注明出处)


 634
634

 被折叠的 条评论
为什么被折叠?
被折叠的 条评论
为什么被折叠?
 到【灌水乐园】发言


