Kotlin-KCP的应用-第二篇

Andorid&Kotlin编译速度原理剖析(上) 可以看到在每次的运行构建编译后会对每个gradleTask进行耗时的打印,因此可以针对耗时任务严重的Task做针对性的优化处理还可以针对耗时超过一定时间的任务做监控,如果触发了临界值就会做报警处理这样就保证了以后的Task一直处于较低的耗时,因为内容比较多这个监控方案第二章的时候会详细讲解。其他生命周期的方法以省略,具体代码如下:@Override@Override@Override复制代码四、编译优化常规方案俗话说的好“预先善其事,必先利其器”、“磨刀不误砍柴工” 、“先谋而后动”等。 阅读详情

Kotlin-KCP的应用-第二篇

前言

接Kotlin-KCP的应用-第一篇,本文是第二篇,以下是本文的目标:

  1. 记录如何简单搭建 KCP 开发环境
  2. 使用 KCP 解决第一篇中的问题

何为KCP?为何不使用KSP?

KSP

KSP 即 Kotlin Symbol Processing(Kotlin符号处理器),KSP 目前只能生成代码,不能修改字节码,第一篇中的问题需要修改字节码,因此 KSP 不能满足需求

KCP

KCP 即 Kotlin Compiler Plugin(Kotlin编译器插件),在 kotlinc 过程中提供 hook 时机,在此期间可以生成代码、修改字节码等

标准的 KCP 架构如下1:
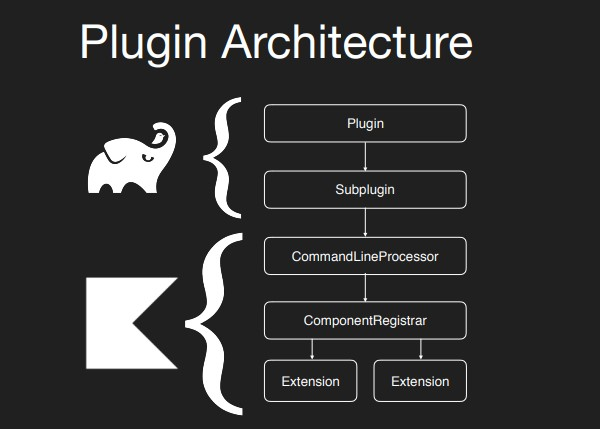
KCP架构

Plugin

  • Gradle 插件,与 Kotlin 无关,在 build.gradle 脚本中提供一个入口
  • 通过 Gradle 扩展设置配置信息

Subplugin

  • 介于 Gradle 和 Kotlin 直接的 APIs 接口
  • 读取 Gradle 扩展配置信息并写入 SubpluginOptions
  • 定义编译器插件的唯一ID
  • 定义 Kotlin 插件的 Maven 坐标信息,便于编译器下载它

CommandLinProcessor

  • 设置 Kotlin 插件唯一 ID
  • 读取 kotlinc -Xplugin 参数
  • 读取 SubpluginOptions 配置信息,并写入 CompilerConfigurationKeys

ComponentRegistrar

  • 读取 CompilerConfigurationKeys
  • 注册 Extension 到各编译流程

Extension

  • 生成代码
  • 修改字节码
  • 多种类型的扩展,比如
    • ExpressionCodegenExtension
    • ClassBuilderInterceptorExtension
    • StorageComponentContainerContributor
    • IrGenerationExtension

实现KCP

目标

根据 KCP 的架构,下面一一进行实现
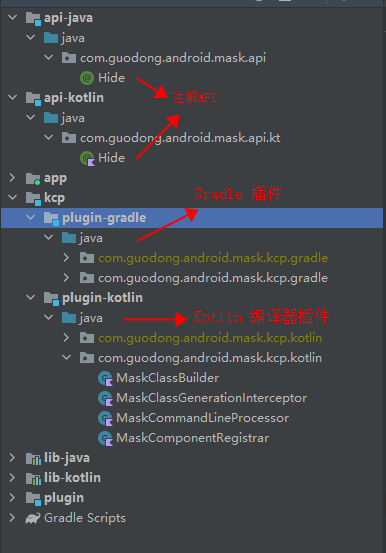
image-20220512095927050

上图是本仓库架构,旨在通过 KCP 在 Java 字节码中 @Hide 注解目标上设置 ACC_SYNTHETIC 标识,使其在 Java 中不能正常调用,达到隐藏 API 的效果

build.gradle - project level

在项目级别的 build.gradle 脚本中配置插件依赖

buildscript {
    // 配置 Kotlin 插件唯一ID
    ext.kotlin_plugin_id = "com.guodong.android.mask.kcp"
    
    // 配置 Kotlin 插件版本
    ext.plugin_version = 'x.x.x'
}

plugins {
    // 配置 Gradle 发布插件,可以不再写 META-INF
    id("com.gradle.plugin-publish") version "0.16.0" apply false
    
    // 配置生成 BuildConfig 插件
    id("com.github.gmazzo.buildconfig") version "3.0.3" apply false
    id 'org.jetbrains.kotlin.jvm' version '1.6.10' apply false
}

plugin-gradle

接下来编写 Gradle 插件,此插件对应 KCP 架构中的 Plugin 和 Subplugin

首先配置下 build.gradle.kts 脚本

build.gradle.kts - module level
plugins {
    id("java-gradle-plugin")
    kotlin("jvm")
    id("com.github.gmazzo.buildconfig")
}

dependencies {
    implementation(kotlin("gradle-plugin-api"))
}

buildConfig {
    // 配置 BuildConfig 的包名
    packageName("com.guodong.android.mask.kcp.gradle")
    
    // 设置 Kotlin 插件唯一 ID
    buildConfigField("String", "KOTLIN_PLUGIN_ID", "\"${rootProject.extra["kotlin_plugin_id"]}\"")
    
    // 设置 Kotlin 插件 GroupId
    buildConfigField("String", "KOTLIN_PLUGIN_GROUP", "\"com.guodong.android\"")
    
    // 设置 Kotlin 插件 ArtifactId
    buildConfigField("String", "KOTLIN_PLUGIN_NAME", "\"mask-kcp-kotlin-plugin\"")
    
    // 设置 Kotlin 插件 Version
    buildConfigField("String", "KOTLIN_PLUGIN_VERSION", "\"${rootProject.extra["PLUGIN_VERSION"]}\"")
}

gradlePlugin {
    plugins {
        create("Mask") {
            id = rootProject.extra["kotlin_plugin_id"] as String // `apply plugin: "com.guodong.android.mask.kcp"`
            displayName = "Mask Kcp"
            description = "Mask Kcp"
            implementationClass = "com.guodong.android.mask.kcp.gradle.MaskGradlePlugin" // 插件入口类
        }
    }
}

tasks.withType<KotlinCompile> {
    kotlinOptions.jvmTarget = "1.8"
}
MaskGradlePlugin

创建 MaskGradlePlugin 实现 KotlinCompilerPluginSupportPlugin 接口

class MaskGradlePlugin : KotlinCompilerPluginSupportPlugin {

    override fun apply(target: Project) = with(target) {
        logger.error("Welcome to guodongAndroid mask kcp gradle plugin.")
        
        // 此处可以配置 Gradle 插件扩展
        // 本插件没有配置项, 无需配置扩展
    }

    // 是否适用, 默认True
    override fun isApplicable(kotlinCompilation: KotlinCompilation<*>): Boolean = true

    // 获取 Kotlin 插件唯一ID
    override fun getCompilerPluginId(): String = BuildConfig.KOTLIN_PLUGIN_ID

    // 获取 Kotlin 插件 Maven 坐标信息
    override fun getPluginArtifact(): SubpluginArtifact = SubpluginArtifact(
        groupId = BuildConfig.KOTLIN_PLUGIN_GROUP,
        artifactId = BuildConfig.KOTLIN_PLUGIN_NAME,
        version = BuildConfig.KOTLIN_PLUGIN_VERSION,
    )

    // 读取 Gradle 插件扩展信息并写入 SubpluginOption
    // 本插件没有扩展信息,所以返回空集合
    override fun applyToCompilation(kotlinCompilation: KotlinCompilation<*>): Provider<List<SubpluginOption>> {
        val project = kotlinCompilation.target.project
        return project.provider { emptyList() }
    }
}

至此 Gradle 插件编写完成,是不是很简单😄

plugin-kotlin

接下来编写 Kotlin 编译器插件,此插件对应 KCP 架构中的 CommandLineProcessor 、 ComponentRegistrar 和 Extension

首先配置下 build.gradle.kts 脚本

build.gradle.kts - module level
plugins {
    kotlin("jvm")
    kotlin("kapt")
    id("com.github.gmazzo.buildconfig")
}

dependencies {
    // 依赖 Kotlin 编译器库
    compileOnly("org.jetbrains.kotlin:kotlin-compiler-embeddable")

    // 依赖 Google auto service
    kapt("com.google.auto.service:auto-service:1.0")
    compileOnly("com.google.auto.service:auto-service-annotations:1.0")
}

buildConfig {
    // 配置 BuildConfig 的包名
    packageName("com.guodong.android.mask.kcp.kotlin")
    
    // 设置 Kotlin 插件唯一 ID
    buildConfigField("String", "KOTLIN_PLUGIN_ID", "\"${rootProject.extra["kotlin_plugin_id"]}\"")
}

tasks.withType<KotlinCompile> {
    kotlinOptions.jvmTarget = "1.8"
}

根据 KCP 架构,下面实现 CommandLineProcessor

MaskCommandLineProcessor

创建 MaskCommandLineProcessor 实现 CommandLineProcessor 接口

@AutoService(CommandLineProcessor::class)
class MaskCommandLineProcessor : CommandLineProcessor {

    // 配置 Kotlin 插件唯一 ID
    override val pluginId: String = BuildConfig.KOTLIN_PLUGIN_ID

    // 读取 `SubpluginOptions` 参数,并写入 `CliOption`
    // 本插件没有配置信息,返回空集合
    override val pluginOptions: Collection<AbstractCliOption> = emptyList()
    
    // 处理 `CliOption` 写入 `CompilerConfiguration`
    // 本插件没有配置信息,此处没有实现
    override fun processOption(
        option: AbstractCliOption,
        value: String,
        configuration: CompilerConfiguration
    ) {
        super.processOption(option, value, configuration)
    }
}

CommandLineProcessor 编写完成

接下来实现 ComponentRegistrar

MaskComponentRegistrar

创建 MaskComponentRegistrar 实现 ComponentRegistrar 接口

@AutoService(ComponentRegistrar::class)
class MaskComponentRegistrar : ComponentRegistrar {

    override fun registerProjectComponents(
        project: MockProject,
        configuration: CompilerConfiguration
    ) {
        // 获取日志收集器
        val messageCollector =
            configuration.get(CLIConfigurationKeys.MESSAGE_COLLECTOR_KEY, MessageCollector.NONE)

        // 输出日志,查看是否执行
        // CompilerMessageSeverity.INFO - 没有看到日志输出
        // CompilerMessageSeverity.ERROR - 编译过程停止执行
        messageCollector.report(
            CompilerMessageSeverity.WARNING,
            "Welcome to guodongAndroid mask kcp kotlin plugin"
        )

        // 此处在 `ClassBuilderInterceptorExtension` 中注册扩展
        ClassBuilderInterceptorExtension.registerExtension(
            project,
            MaskClassGenerationInterceptor(messageCollector)
        )
    }
}

最后实现 Extension

MaskClassGenerationInterceptor

创建 MaskClassGenerationInterceptor 实现 ClassBuilderInterceptorExtension 接口

class MaskClassGenerationInterceptor(
    private val messageCollector: MessageCollector,
) : ClassBuilderInterceptorExtension {

    // 拦截 ClassBuilderFactory
    override fun interceptClassBuilderFactory(
        interceptedFactory: ClassBuilderFactory,
        bindingContext: BindingContext,
        diagnostics: DiagnosticSink
        // 自定义 ClassBuilderFactory 委托给 源ClassBuilderFactory
    ): ClassBuilderFactory = object : ClassBuilderFactory by interceptedFactory {
        
        // 复写 newClassBuilder,自定义 ClassBuilder
        override fun newClassBuilder(origin: JvmDeclarationOrigin): ClassBuilder {
            // 传入源ClassBuilder
            return MaskClassBuilder(messageCollector, interceptedFactory.newClassBuilder(origin))
        }
    }
}
MaskClassBuilder

创建 MaskClassBuilder 继承 DelegatingClassBuilder,实现 getDelegate 方法,复写 newField 和 newMethod 方法

getDelegate
class MaskClassBuilder(
    private val messageCollector: MessageCollector,
    private val delegate: ClassBuilder
) : DelegatingClassBuilder() {

    // @Hide注解的完全限定名(fully qualified name)
    private val annotations: List<FqName> = listOf(
        FqName("com.guodong.android.mask.api.kt.Hide"),
        FqName("com.guodong.android.mask.api.Hide")
    )

    // 返回代理
    override fun getDelegate(): ClassBuilder = delegate
}
newField

处理 @Hide 注解目标为字段

class MaskClassBuilder(
    private val messageCollector: MessageCollector,
    private val delegate: ClassBuilder
) : DelegatingClassBuilder() {

    // @Hide注解的完全限定名(fully qualified name)
    private val annotations: List<FqName> = listOf(
        FqName("com.guodong.android.mask.api.kt.Hide"),
        FqName("com.guodong.android.mask.api.Hide")
    )

    override fun newField(
        origin: JvmDeclarationOrigin,
        access: Int,
        name: String,
        desc: String,
        signature: String?,
        value: Any?
    ): FieldVisitor {
        // 判断描述符是否是字段
        val field = origin.descriptor as? FieldDescriptor
        	?: return super.newField(origin, access, name, desc, signature, value)

        // 判断字段上是否有`@Hide`注解
        if (annotations.none { field.annotations.hasAnnotation(it) }) {
            return super.newField(origin, access, name, desc, signature, value)
        }

        // 输出字段源访问标志
        messageCollector.report(
            CompilerMessageSeverity.WARNING,
            "Mask Class = ${delegate.thisName}, fieldName = $name, originalAccess = $access"
        )

        // 增加`ACC_SYNTHETIC`标识
        val maskAccess = access + Opcodes.ACC_SYNTHETIC

        // 输出字段Mask后访问标志
        messageCollector.report(
            CompilerMessageSeverity.WARNING,
            "Mask Class = ${delegate.thisName}, fieldName = $name, maskAccess = $maskAccess"
        )

        // 传入Mask后访问标志
        return super.newField(origin, maskAccess, name, desc, signature, value)
    }

}
newMethod

处理 @Hide 注解目标为方法/函数,处理逻辑与字段类似

override fun newMethod(
    origin: JvmDeclarationOrigin,
    access: Int,
    name: String,
    desc: String,
    signature: String?,
    exceptions: Array<out String>?
): MethodVisitor {
    // 判断是否是方法/函数描述符
    val function = origin.descriptor as? FunctionDescriptor
    	?: return super.newMethod(origin, access, name, desc, signature, exceptions)

    // 判断方法/函数上是否有`@Hide`注解
    if (annotations.none { function.annotations.hasAnnotation(it) }) {
        return super.newMethod(origin, access, name, desc, signature, exceptions)
    }

    // 输出方法/函数源访问标志
    messageCollector.report(
        CompilerMessageSeverity.WARNING,
        "Mask Class = ${delegate.thisName}, methodName = $name, originalAccess = $access"
    )

    // 增加`ACC_SYNTHETIC`标识
    val maskAccess = access + Opcodes.ACC_SYNTHETIC

    // 输出方法/函数Mask后访问标志
    messageCollector.report(
        CompilerMessageSeverity.WARNING,
        "Mask Class = ${delegate.thisName}, methodName = $name, maskAccess = $maskAccess"
    )

    // 传入Mask后访问标志
    return super.newMethod(origin, maskAccess, name, desc, signature, exceptions)
}

至此 Kotlin 编译器插件完成:happy:

应用KCP

build.gradle - project level

buildscript {
    ext.plugin_version = 'x.x.x'
    dependencies {
        classpath "com.guodong.android:mask-kcp-gradle-plugin:${plugin_version}"
    }
}

lib-kotlin/build.gradle - module level

# lib-kotlin
plugins {
    id 'com.android.library'
    id 'kotlin-android'
    id 'kotlin-kapt'
    id 'maven-publish'
    // id 'com.guodong.android.mask' // use kcp
    id 'com.guodong.android.mask.kcp'
}

lib-kotlin

interface InterfaceTest {

    // 使用api-kt中的注解
    @Hide
    fun testInterface()
}
class KotlinTest(a: Int) : InterfaceTest {

    // 使用api-kt中的注解
    @Hide
    constructor() : this(-2)

    companion object {

        @JvmStatic
        fun newKotlinTest() = KotlinTest()
    }

    private val binding: LayoutKotlinTestBinding? = null

    // 使用api-kt中的注解
    var a = a
        @Hide get
        @Hide set

    fun getA1(): Int {
        return a
    }

    fun test() {
        a = 1000
    }

    override fun testInterface() {
        println("Interface function test")
    }
}
app
# MainActivity.java

private void testKotlinLib() {
    // 创建对象时不能访问无参构造方法,可以访问有参构造方法或访问静态工厂方法
    KotlinTest test = KotlinTest.newKotlinTest();
    // 调用时不能访问`test.getA()`方法,仅能访问`getA1()方法
    Log.e(TAG, "testKotlinLib: before --> " + test.getA1());
    test.test();
    Log.e(TAG, "testKotlinLib: after --> " + test.getA1());
    
    test.testInterface();
    
    InterfaceTest interfaceTest = test;
    // Error - cannot resolve method 'testInterface' in 'InterfaceTest'
    interfaceTest.testInterface();
}

happy:happy:

参考文献


  1. [Writing Your First Kotlin Compiler Plugin (jetbrains.com)](https://resources.jetbrains.com/storage/products/kotlinconf2018/slides/5_Writing Your First Kotlin Compiler Plugin.pdf) ↩︎


BuildKonfig:Kotlin多平台项目的BuildConfig 立即下载

相关推荐

Avellaneda & Stoikov模型实战解析:如何动态调整做市策略参数

本文深入解析Avellaneda & Stoikov模型在动态调整做市策略参数中的应用,重点探讨库存状态、剩余时间、风险系数和订单深度等核心参数的实战技巧。通过加密货币市场的实际案例,展示如何根据市场波动和流动性动态调整参数,提升做市策略的盈利能力和风险控制水平。

weixin_29070861的博客 202

安卓Kotlin: 获取配置,BuildConfig类找不到

今天要使用环境变量,访问不到BuildConfig类,import导包也找不到类,具体设置如下:但是buildConfig文件却能看到,已经生成。

简单Cere 939

Flutter 完整学习文档 - 从入门到精通

Widget 就像乐高积木,Flutter 中所有的东西都是 Widget。一个按钮是 Widget,一段文字是 Widget,甚至布局、边距、对齐方式也是 Widget!"万物皆 Widget"

zwjapple的专栏 2316

BuildKonfig 使用教程

BuildKonfig 是一个用于 Kotlin Multiplatform Project (KMPP) 的 Gradle 插件,旨在生成 BuildConfig 对象。这个插件允许你在 Kotlin 多平台项目中存储和访问构建变量,如 API 密钥等敏感信息。通过 BuildKonfig,你可以将这些信息安全地存储在 `local.properties` 文件中,并在代码中轻松访问它们。 #...

gitblog_00340的博客 619

《生成式AI引发的“认知污染”:社交媒体虚假信息的治理困局》

认知污染与生成式AI“认知污染”指信息环境被大量虚假、误导性内容所充斥,干扰公众对事实的认知判断。在社交媒体时代,虚假信息的生产和传播门槛大幅降低,呈现出工业化、规模化的趋势。近年兴起的生成式人工智能(Generative AI)技术,如大型语言模型(LLM)和深度伪造(deepfake),更是加剧了这一问题。AI可以自动生成看似真实的文本、图像、音视频,将虚假信息批量生产并快速散播到社交平台上。

那谁的博客 5912

BUSCO评估基因组的完整性

因为数据库收集的时候找的就是在不同的物种间都是单拷贝的基因,所以说在评估的物种里面应该也是单拷贝的状态才对。基因组层面评估:先去基因组上预测这些基因,再去做评估,如果说给他是一个注释好的基因集,这个时候提供的是一个蛋白集合,它就直接是去进行同源搜索,再去评估,看BUSCO数据库里面的这些单拷贝基因有或者无;首先,tblastn也是同源搜索,同源搜索之后,去对转录本进行读码框预测,预测完的结果还是去进行hmmsearch的搜索(hmmsearch是做蛋白质结构域搜索的),最终拿到BUSCO评估结果。

qq_64400864的博客 2959

Kotlin-KCP的应用-第一篇

前言 KCP的应用计划分两篇,本文是第一篇 本文主要记录从发现问题到使用KCP解决问题的折腾过程,下一篇记录KCP的应用 背景 Kotlin 号称百分百兼容 Java ,所以在 Kotlin 中一些修饰符,比如 internal ,在编译后放在纯 Java 的项目中使用(没有Kotlin环境),Java 仍然可以访问被 internal 修饰的类、方法、字段等 在使用 Kotlin 开发过程中需要对外提供 SDK 包,在 SDK 中有一些 API 不想被外部调用,并且已经添加了 internal 修饰,但是

孫小逗 1377

pymol 动画简单制作,gif、mp4导出

参考: https://www.youtube.com/watch?v=G77K9Lro8js1、直接Movie下Program下,Camera Loop下Nutate下选择,这里选择30degover4 sec;如果要动画过渡自然,可以在这4sec后面再Append 1sec;如果需要两个视角,既可以再把窗口蛋白定位到比如配体,不用管中间过程怎么定位过去配体,再Program下,Camera Loop下Nutate下选择,这里选择30degover4 sec添加;最后如果要整体形成个循环播放,可以在这4s

weixin_42357472的博客 8436

Kotlin-KCP的应用-修改SDK版本号

背景 在 SDK 开发中,一般会暴露获取 SDK 版本号的接口,获取的版本号一般为 String 类型,比如: // sdk接口 interface Sdk { fun getVersion(): String } // sdk调用方 sdk.getVersion() 上述方式可以通过在 gradle.properties 中配置版本号,然后在 build.gradle 中读取版本号生成至 BuildConfig.java 中,例如: // gradle.properties VERSION=1

孫小逗 1192

OpenHarmony深度定制:从系统到模块的全景剖析与自定义模块实战

目标:在中新增一个算法库,让产品可直接调用。关闭不用的 20+ 系统部件,ROM 缩小 50 %;为自家芯片新增专用驱动模块,快速点亮开发板;内将核心算法库以部件形式集成,实现商业闭源。万物互联时代,差异化才是护城河。

m0_67505153的博客 1032

[系统安全] 三十二.恶意代码检测(2)常用技术详解及总结

前文从产业界和学术界分别详细讲解恶意代码攻击溯源的相关知识,在学术界方面,用类似于综述来介绍攻击追踪溯源的不同方法;在产业界方面,主要参考李东宏老师从企业恶意样本分析的角度介绍溯源工作。这篇文章将详细总结恶意代码检测技术,包括恶意代码检测的对象和策略、特征值检测技术、校验和检测技术、启发式扫描技术、虚拟机检测技术和主动防御技术。希望这篇文章对您有所帮助,如果文章中存在错误、理解不到位或侵权的地方,还请告知作者与海涵。且看且珍惜,加油~

杨秀璋的专栏 1万+

深入浅出 Compose Compiler(1) Kotlin Compiler & KCP

Compose 的语法简洁、代码效率非常高,这主要得益于 Compose Compiler 的一系列编译期魔法,帮开发者生成了很多样板代码。但编译期插桩也阻碍了我们对于 Compose 运行原理的认知,想要真正读懂 Compose 就必须先了解它的 Compiler。本系列文章将带大家揭开 Compose Compiler 的神秘面纱。Compose 是一个 Kotlin Only 框架,所以 Compose Compiler 的本质是一个 KCP(Kotlin Compiler Plugin)。

移动端开发干货分享 2575

22、用户界面流程(UI Flow)全解析

本文全面解析了用户界面流程(UI Flow)的概念、创建步骤及其在系统设计中的应用。通过示例和操作步骤,详细介绍了如何确定屏幕范围、识别屏幕、创建过渡和标记触发器,并阐述了UI Flow在导航识别、验证、可用性优化、测试用例开发和需求推导中的重要作用。文章还结合问答系统案例,展示了UI Flow的实际应用价值,帮助读者深入理解并有效运用这一工具提升系统用户体验。

rice5的博客 153

Kotlin 元编程之 KSP 全面突破

没想到吧,这世上除了元宇宙,还有元编程,如果没有接触过,可能会有点懵,不过没关系,简单的说就是用代码来生成代码。实现元编程的传统常见手段主要是使用 APT注解处理器 +JavaPoet组合拳,如果你是作为一名Android 开发者,一定在曾经或者现在使用过很多知名的开源库,比如ARouter等,这些都是基于 注解处理器 +JavaPoet的方式实现的元编程,是的,虽然元编程这个词很高大上,但是可能你已经默默的使用了很多年了。

川峰的博客 5082

深度学习工具包 DeepLearningToolbox

深度学习工具包Deprecation notice.-----This toolbox is outdated and no longer maintained.There are much better tools available for deep learning than this toolbox, e.g. [Theano](http://deeplearning.net/software/theano/), [torch](http://torch.ch/) or [tensorflow](http://www.tensorflow.org/)I would suggest you use one of the tools mentioned above rather than use this toolbox.Best, Rasmus.DeepLearnToolbox================A Matlab toolbox for Deep Learning.Deep Learning is a new subfield of machine learning that focuses on learning deep hierarchical models of data.It is inspired by the human brain's apparent deep (layered, hierarchical) architecture.A good overview of the theory of Deep Learning theory is[Learning Deep Architectures for AI](http://www.iro.umontreal.ca/~bengioy/papers/ftml_book.pdf)For a more informal introduction, see the following videos by Geoffrey Hinton and Andrew Ng.* [The Next Generation of Neural Networks](http://www.youtube.com/watch?v=AyzOUbkUf3M) (Hinton, 2007)* [Recent Developments in Deep Learning](http://www.youtube.com/watch?v=VdIURAu1-aU) (Hinton, 2010)* [Unsupervised Feature Learning and Deep Learning](http://www.youtube.com/watch?v=ZmNOAtZIgIk) (Ng, 2011)If you use this toolbox in your research please cite [Prediction as a candidate for learning deep hierarchical models of data](http://www2.imm.dtu.dk/pubdb/views/publication_details.php?id=6284)```@MASTERSTHESIS\{IMM2012-06284, author = "R. B. Palm", title = "Prediction as a candidate for learning deep hierarchical models of data", year = "2012",}```Contact: rasmusbergpalm at gmail dot comDirectories included in the toolbox-----------------------------------`NN/` - A library for Feedforward Backpropagation Neural Networks`CNN/` - A library for Convolutional Neural Networks`DBN/` - A library for Deep Belief Networks`SAE/` - A library for Stacked Auto-Encoders`CAE/` - A library for Convolutional Auto-Encoders`util/` - Utility functions used by the libraries`data/` - Data used by the examples`tests/` - unit tests to verify toolbox is workingFor references on each library check REFS.mdSetup-----1. Download.2. addpath(genpath('DeepLearnToolbox'));Example: Deep Belief Network---------------------```matlabfunction test_example_DBNload mnist_uint8;train_x = double(train_x) / 255;test_x = double(test_x) / 255;train_y = double(train_y);test_y = double(test_y);%% ex1 train a 100 hidden unit RBM and visualize its weightsrand('state',0)dbn.sizes = [100];opts.numepochs = 1;opts.batchsize = 100;opts.momentum = 0;opts.alpha = 1;dbn = dbnsetup(dbn, train_x, opts);dbn = dbntrain(dbn, train_x, opts);figure; visualize(dbn.rbm{1}.W'); % Visualize the RBM weights%% ex2 train a 100-100 hidden unit DBN and use its weights to initialize a NNrand('state',0)%train dbndbn.sizes = [100 100];opts.numepochs = 1;opts.batchsize = 100;opts.momentum = 0;opts.alpha = 1;dbn = dbnsetup(dbn, train_x, opts);dbn = dbntrain(dbn, train_x, opts);%unfold dbn to nnnn = dbnunfoldtonn(dbn, 10);nn.activation_function = 'sigm';%train nnopts.numepochs = 1;opts.batchsize = 100;nn = nntrain(nn, train_x, train_y, opts);[er, bad] = nntest(nn, test_x, test_y);assert(er < 0.10, 'Too big error');```Example: Stacked Auto-Encoders---------------------```matlabfunction test_example_SAEload mnist_uint8;train_x = double(train_x)/255;test_x = double(test_x)/255;train_y = double(train_y);test_y = double(test_y);%% ex1 train a 100 hidden unit SDAE and use it to initialize a FFNN% Setup and train a stacked denoising autoencoder (SDAE)rand('state',0)sae = saesetup([784 100]);sae.ae{1}.activation_function = 'sigm';sae.ae{1}.learningRate = 1;sae.ae{1}.inputZeroMaskedFraction = 0.5;opts.numepochs = 1;opts.batchsize = 100;sae = saetrain(sae, train_x, opts);visualize(sae.ae{1}.W{1}(:,2:end)')% Use the SDAE to initialize a FFNNnn = nnsetup([784 100 10]);nn.activation_function = 'sigm';nn.learningRate = 1;nn.W{1} = sae.ae{1}.W{1};% Train the FFNNopts.numepochs = 1;opts.batchsize = 100;nn = nntrain(nn, train_x, train_y, opts);[er, bad] = nntest(nn, test_x, test_y);assert(er < 0.16, 'Too big error');```Example: Convolutional Neural Nets---------------------```matlabfunction test_example_CNNload mnist_uint8;train_x = double(reshape(train_x',28,28,60000))/255;test_x = double(reshape(test_x',28,28,10000))/255;train_y = double(train_y');test_y = double(test_y');%% ex1 Train a 6c-2s-12c-2s Convolutional neural network %will run 1 epoch in about 200 second and get around 11% error. %With 100 epochs you'll get around 1.2% errorrand('state',0)cnn.layers = { struct('type', 'i') %input layer struct('type', 'c', 'outputmaps', 6, 'kernelsize', 5) %convolution layer struct('type', 's', 'scale', 2) %sub sampling layer struct('type', 'c', 'outputmaps', 12, 'kernelsize', 5) %convolution layer struct('type', 's', 'scale', 2) %subsampling layer};cnn = cnnsetup(cnn, train_x, train_y);opts.alpha = 1;opts.batchsize = 50;opts.numepochs = 1;cnn = cnntrain(cnn, train_x, train_y, opts);[er, bad] = cnntest(cnn, test_x, test_y);%plot mean squared errorfigure; plot(cnn.rL);assert(er<0.12, 'Too big error');```Example: Neural Networks---------------------```matlabfunction test_example_NNload mnist_uint8;train_x = double(train_x) / 255;test_x = double(test_x) / 255;train_y = double(train_y);test_y = double(test_y);% normalize[train_x, mu, sigma] = zscore(train_x);test_x = normalize(test_x, mu, sigma);%% ex1 vanilla neural netrand('state',0)nn = nnsetup([784 100 10]);opts.numepochs = 1; % Number of full sweeps through dataopts.batchsize = 100; % Take a mean gradient step over this many samples[nn, L] = nntrain(nn, train_x, train_y, opts);[er, bad] = nntest(nn, test_x, test_y);assert(er < 0.08, 'Too big error');%% ex2 neural net with L2 weight decayrand('state',0)nn = nnsetup([784 100 10]);nn.weightPenaltyL2 = 1e-4; % L2 weight decayopts.numepochs = 1; % Number of full sweeps through dataopts.batchsize = 100; % Take a mean gradient step over this many samplesnn = nntrain(nn, train_x, train_y, opts);[er, bad] = nntest(nn, test_x, test_y);assert(er < 0.1, 'Too big error');%% ex3 neural net with dropoutrand('state',0)nn = nnsetup([784 100 10]);nn.dropoutFraction = 0.5; % Dropout fraction opts.numepochs = 1; % Number of full sweeps through dataopts.batchsize = 100; % Take a mean gradient step over this many samplesnn = nntrain(nn, train_x, train_y, opts);[er, bad] = nntest(nn, test_x, test_y);assert(er < 0.1, 'Too big error');%% ex4 neural net with sigmoid activation functionrand('state',0)nn = nnsetup([784 100 10]);nn.activation_function = 'sigm'; % Sigmoid activation functionnn.learningRate = 1; % Sigm require a lower learning rateopts.numepochs = 1; % Number of full sweeps through dataopts.batchsize = 100; % Take a mean gradient step over this many samplesnn = nntrain(nn, train_x, train_y, opts);[er, bad] = nntest(nn, test_x, test_y);assert(er < 0.1, 'Too big error');%% ex5 plotting functionalityrand('state',0)nn = nnsetup([784 20 10]);opts.numepochs = 5; % Number of full sweeps through datann.output = 'softmax'; % use softmax outputopts.batchsize = 1000; % Take a mean gradient step over this many samplesopts.plot = 1; % enable plottingnn = nntrain(nn, train_x, train_y, opts);[er, bad] = nntest(nn, test_x, test_y);assert(er < 0.1, 'Too big error');%% ex6 neural net with sigmoid activation and plotting of validation and training error% split training data into training and validation datavx = train_x(1:10000,:);tx = train_x(10001:end,:);vy = train_y(1:10000,:);ty = train_y(10001:end,:);rand('state',0)nn = nnsetup([784 20 10]); nn.output = 'softmax'; % use softmax outputopts.numepochs = 5; % Number of full sweeps through dataopts.batchsize = 1000; % Take a mean gradient step over this many samplesopts.plot = 1; % enable plottingnn = nntrain(nn, tx, ty, opts, vx, vy); % nntrain takes validation set as last two arguments (optionally)[er, bad] = nntest(nn, test_x, test_y);assert(er < 0.1, 'Too big error');```[![Bitdeli Badge](https://d2weczhvl823v0.cloudfront.net/rasmusbergpalm/deeplearntoolbox/trend.png)](https://bitdeli.com/free "Bitdeli Badge")

WINCC7.3破解文件

WINCC7.3硬件够破解文件,有需要的下载!WINCC7.3硬件够破解文件,有需要的下载!

Kotlin 移动端跨平台是种怎样的体验

前言 近些年,移动端无论是在技术还是在市场方面都已经逐步成熟,效率成为各家争夺存量 、开拓疆土的利器,因而跨平台技术的热度也如日中天。其中Flutter算得上是跨平台技术的网红,易上手、UI像素级同步、性能优异,引起一大波粉丝(各大厂)为它打call,各大厂商都为Flutter社区带来了很大贡献,迅速扩大了它的技术生态。实不相瞒,个人也是Flutter的小粉丝,既然Flutter这么好,那我还在...

a357664853的专栏 1251

华为的C语言编程规范.pdf

华为技术有限公司内部技术规范。本规范制定了编写C语言程序的基本原则、规则和建议。从代码的清晰、简洁、可测试、安全、程序效率、可移植各个方面对C语言编程作出了具体指导。

Sword - 为 Kotlin 函数增加代理功能(一)

Sword:一个可以给 Kotlin 函数增加代理的第三方库,基于 KCP 实现。

m0_64420071的博客 331

TMS_WebGMaps_1.9.8.0_Full_Source

TMS_WebGMaps_1.9.8.0_Full_Source 全源码 delphi cbuilder

社区说 | Kotlin 编译器插件: 我们究竟在期待什么?

活动时间7月8日(本周四)20:00pm-21:00pm活动日程20:00-20:45《Kotlin 编译器插件:我们究竟在期待什么?》对比常见的 Kotlin 元编程的方案,包括反射、注...

Android开发者 394

社区说 | Kotlin 编译器插件:我们究竟在期待什么?

活动时间7月8日(本周四)20:00pm-21:00pm活动日程20:00-20:45《Kotlin 编译器插件:我们究竟在期待什么?》对比常见的 Kotlin 元编程的方案,包括反射、注...

谷歌开发者 571

拥抱Kotlin Symbol Processing(KSP),手把手带你实现Kotlin的专有注解处理

好玩系列 | 拥抱Kotlin Symbol Processing(KSP),项目实战 写在最前 这一篇,我们抱着拥抱新事物的心态,尝试一些新事物。笔者在这一次历程中,对三项事物进行了尝鲜: 手动迁移一个小规模的Gradle项目,由 Groovy Script 转为 Kotlin Script Kotlin Symbol Processing Kotlin Poet 这次的 重点是KSP ,Kotlin Poet学习成本比较低,迁移 Kotlin Script 仅仅是比较繁琐。 既然要实战,那么就需要一

leobert.lan的博客 2625

Kotlin Symbol Processing(KSP)使用初体验

近日,android官方发布了Kotlin Symbol Processing(KSP)的alpha版本。 Announcing Kotlin Symbol Processing (KSP) Alpha 为什么使用KSP? 很多人在使用Kotlin时的痛点之一就是编译速度过慢。 很多常见的三方库都通过注解简化模板代码,例如Room、Dagger、Retrofit等, Kotlin使用KAPT处理注解,KAPT没有专门的注解处理器,需要借助APT实现的,因为APT只能处理Java,所以KAPT需要生成A.

移动端开发干货分享 7556

@Compose 注解到底做了什么?了解一下

/ 今日科技快讯 /近日,由IDC、浪潮信息、清华大学全球产业研究院联合编制的《2021-2022全球计算力指数评估报告》在北京发布,量化揭示了全球主要国家GDP、数字经济与计算力...

郭霖 447

手把手带你实现Kotlin的专有注解处理

/ 今日科技快讯 /据TechWeb消息,国外媒体报道称,分析师估计,由于需求增加,电动汽车制造商特斯拉今年第二季度可能交付约20万辆汽车,同比增长100%。今年4月初,特斯拉宣布...

郭霖 1160

Kotlin cacheable - 缓存一切函数

在 Kotlin 中,Lazy 是我们经常用到的操作,当我们需要用到时才创建对象,只需要一个 lazy 即可搞定,如下:

大模型训练 1021

从 Kotlin 到 KSP 再到项目实践 KtorfitX:一段探索之路

本文讲述了作者从初识Kotlin到深入探索KSP技术的历程。2021年接触Kotlin后,作者逐渐从使用语法糖转向研究其生态扩展能力,特别是KSP技术。基于KSP,作者开发了ktorfitx项目,解决了Kotlin Multiplatform中网络请求重复编码的问题。这段经历让作者深刻体会到技术真正的价值在于解放开发者创造力,而非单纯追求语法优雅。文章展现了Kotlin从语言到开发平台的演进,以及如何通过技术创新解决实际问题。

a2965502228的博客 507
上一篇: Kotlin-KCP的应用-第一篇
下一篇: Java并发编程-Android的UI框架为什么是单线程的
guodongAndroid
博客等级 码龄10年 16粉丝 19原创
评论
成就一亿技术人!
拼手气红包6.0元
还能输入1000个字符
 
 条评论被折叠 查看
添加红包

请填写红包祝福语或标题

个

红包个数最小为10个

元

红包金额最低5元

当前余额3.43元 前往充值 >
需支付:10.00元
成就一亿技术人!
领取后你会自动成为博主和红包主的粉丝 规则
hope_wisdom
发出的红包
实付元
使用余额支付
点击重新获取
扫码支付
钱包余额 0

抵扣说明:

1.余额是钱包充值的虚拟货币,按照1:1的比例进行支付金额的抵扣。
2.余额无法直接购买下载,可以购买VIP、付费专栏及课程。

余额充值