


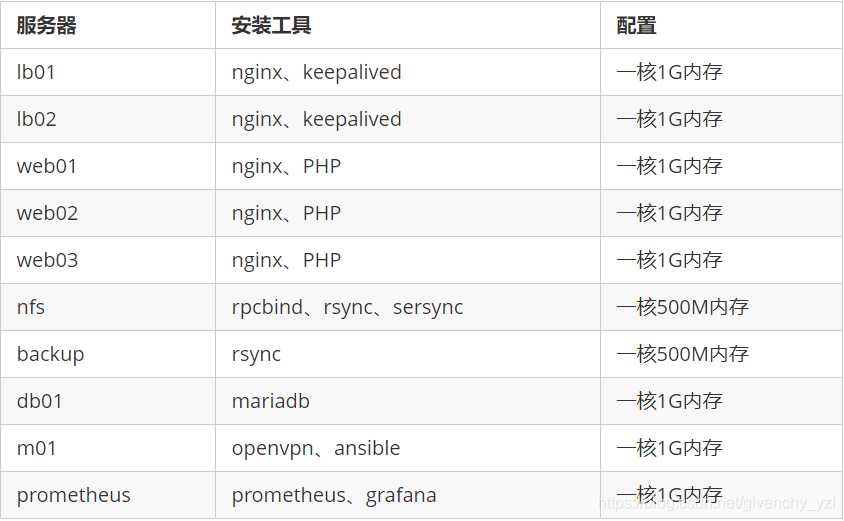
环境准备:
在m01配置openvpn
#运行客户端脚本
[root@m01 ~]# sh openvpn_server.sh
echo "安装openvpn和证书工具"
yum -y install openvpn  && yum -y install easy-rsa
echo "生成服务器配置文件"
cp /usr/share/doc/openvpn-2.4.11/sample/sample-config-files/server.conf /etc/openvpn/
echo "准备证书签发相关文件"
cp -r /usr/share/easy-rsa/ /etc/openvpn/easy-rsa-server
echo "准备签发证书相关变量的配置文件"
cp /usr/share/doc/easy-rsa-3.0.8/vars.example /etc/openvpn/easy-rsa-server/3/vars
echo "建议修改给CA和OpenVPN服务器颁发的证书的有效期,可适当加长"
echo "初始化服务端PKI生成PKI相关目录和文件"
cd /etc/openvpn/easy-rsa-server/3
./easyrsa init-pki
echo "创建CA证书"
./easyrsa build-ca nopass
cat pki/serial
echo "生成服务端证书"
./easyrsa gen-req server nopass
echo "签发服务端证书"
./easyrsa sign server server
echo "创建 Diffie-Hellman 密钥"
./easyrsa gen-dh
cat > /etc/openvpn/server.conf <<EOF
port 1194
proto tcp
dev tun
ca  /etc/openvpn/certs/ca.crt
cert  /etc/openvpn/certs/server.crt
key  /etc/openvpn/certs/server.key  # This file should be kept secret
dh  /etc/openvpn/certs/dh.pem
server 10.8.0.0 255.255.255.0
push "route 172.16.1.0 255.255.255.0"
keepalive 10 120
cipher AES-256-CBC
compress lz4-v2
push "compress lz4-v2"
max-clients 2048
user openvpn
group openvpn
status  /var/log/openvpn/openvpn-status.log
log-append   /var/log/openvpn/openvpn.log
verb 3
mute 20
EOF
echo "openvpn 日志文件"
mkdir -p /var/log/openvpn
echo "openvpn 服务端文件"
mkdir -p /etc/openvpn/certs
cp /etc/openvpn/easy-rsa-server/3/pki/issued/server.crt /etc/openvpn/certs/
cp /etc/openvpn/easy-rsa-server/3/pki/private/server.key /etc/openvpn/certs/
cp /etc/openvpn/easy-rsa-server/3/pki/ca.crt /etc/openvpn/certs/
cp /etc/openvpn/easy-rsa-server/3/pki/dh.pem /etc/openvpn/certs/
echo "修改内核参数"
echo net.ipv4.ip_forward = 1 >> /etc/sysctl.conf
sysctl -p
echo "安装IPtables-services"
yum install iptables-services -y
systemctl disable --now firewalld
systemctl start iptables
echo "清除防火墙默认规则"
iptables -F
echo "添加openVPN网络转发规则"
iptables -t nat -A POSTROUTING -s 10.8.0.0/24 -j MASQUERADE
#service iptables save  永久生效
echo "查看iptables获取规则"
iptables -vnL -t nat
#2   104 MASQUERADE  all  --  *      *       10.8.0.0/24          0.0.0.0/0
#有且只有此一行
echo "重启OpenVpn"
systemctl daemon-reload
systemctl enable --now openvpn@server
echo "查看路由规则"
route -n


#客户端脚本
[root@m01 ~]# sh openvpn_client.sh
read -p "请输入用户的姓名拼音(如:${NAME}): " NAME
read -p "请输入远程代理IP(如:${IP}): " IP
echo "客户端证书环境"
cp -r /usr/share/easy-rsa/ /etc/openvpn/easy-rsa-client
cp /usr/share/doc/easy-rsa-3.0.8/vars.example /etc/openvpn/easy-rsa-client/3/varsa
cd /etc/openvpn/easy-rsa-client/3
echo "初始化pki证书目录"
./easyrsa init-pki
echo "生成客户端证书"
./easyrsa gen-req ${NAME} nopass
echo "将客户端证书同步到服务端"
cd /etc/openvpn/easy-rsa-server/3
./easyrsa import-req /etc/openvpn/easy-rsa-client/3/pki/reqs/${NAME}.req ${NAME}
echo "查看客户端证书"
ll pki/reqs/${NAME}.req /etc/openvpn/easy-rsa-client/3/pki/reqs/${NAME}.req
echo "签发客户端证书,请输入:yes"
./easyrsa sign client ${NAME}
echo "查看证书"
cat pki/index.txt
ll pki/certs_by_serial/
cat pki/issued/${NAME}.crt
echo "创建客户端配置文件"
mkdir -p /etc/openvpn/client/${NAME}
cd /etc/openvpn/client/${NAME}
cat > /etc/openvpn/client/${NAME}/${NAME}.ovpn <<EOF
client
dev tun
proto tcp
remote ${IP} 1194
resolv-retry infinite
nobind
ca ca.crt
cert ${NAME}.crt
key ${NAME}.key
remote-cert-tls server
cipher AES-256-CBC
verb 3
EOF
cp /etc/openvpn/easy-rsa-client/3/pki/private/${NAME}.key .
cp /etc/openvpn/easy-rsa-server/3/pki/issued/${NAME}.crt .
cp /etc/openvpn/easy-rsa-server/3/pki/ca.crt .
echo "打包用户证书"
tar -czvf ${NAME}.tar.gz ./
echo "重启OpenVpn"
systemctl daemon-reload
systemctl enable --now openvpn@server

#如果已经配好openvpn,运行以下脚本开启路由转发
[root@m01 ~]# sh start_route.sh
systemctl stop iptables && systemctl start iptables
iptables -F
iptables -t nat -A POSTROUTING -s 10.8.0.0/24 -j MASQUERADE
iptables -vnL -t nat
systemctl daemon-reload
做解析
[root@m01 ~]# vim /etc/hosts
127.0.0.1 localhost localhost.localdomain localhost4 localhost4.localdomain4
::1 localhost localhost.localdomain localhost6 localhost6.localdomain6
172.16.1.5 lb01
172.16.1.6 lb02
172.16.1.7 web01
172.16.1.8 web02
172.16.1.9 web03
172.16.1.31 nfs
172.16.1.41 backup
172.16.1.51 db
172.16.1.61 m01
172.16.1.71 prometheus
做免密
[root@m01 ~]# sh ssh.sh
ssh-keygen -R 172.16.1.5
ssh-keygen -R 172.16.1.6
ssh-keygen -R 172.16.1.7
ssh-keygen -R 172.16.1.8
ssh-keygen -R 172.16.1.9
ssh-keygen -R 172.16.1.31
ssh-keygen -R 172.16.1.41
ssh-keygen -R 172.16.1.51
ssh-keygen -R 172.16.1.71
yum install expect -y
for ip in ‘lb01’ ‘lb02’ ‘web01’ ‘web02’ ‘web03’ ‘backup’ ‘nfs’ ‘db’ ‘m01’ ‘prometheus’
do
expect -c "
spawn ssh-copy-id -i root@$ip
expect {
“(yes/no)” {send “yes\r”;exp_continue}
“password” {send “1\r”;exp_continue}
} "
done
配置主机清单
[root@m01 ~]# vim /etc/ansible/hosts
[lb]
172.16.1.5
172.16.1.6
[web]
172.16.1.7
172.16.1.8
172.16.1.9
[nfs]
172.16.1.31
[backup]
172.16.1.41
[db]
172.16.1.51
[m01]
172.16.1.61
[prometheus]
172.16.1.71
安装ansible、并创建角色
#安装ansible
[root@m01 ~]# yum install -y ansible

#创建backup角色
[root@m01 ~]# ansible-galaxy init backup

#创建nfs角色
[root@m01 ~]# ansible-galaxy init nfs

#创建mariadb角色
[root@m01 ~]# ansible-galaxy init maria

#创建nginx角色
[root@m01 ~]# ansible-galaxy init nginx

#创建php角色
[root@m01 ~]# ansible-galaxy init php

#创建package角色
[root@m01 ~]# ansible-galaxy init package

#创建prometheus角色
[root@m01 ~]# ansible-galaxy init prometheus

#创建prometheus-db角色
[root@m01 ~]# ansible-galaxy init prometheus-db

#创建prometheus-web角色
[root@m01 ~]# ansible-galaxy init prometheus-web

#创建负载均衡角色
[root@m01 ~]# ansible-galaxy init lb
配置backup角色
#编辑任务清单
[root@m01 tasks]# vim main.yml
- include: create_user.yml
- include: install.yml
- include: rsync_conf.yml
- include: rsync_passwd.yml
- include: create_dir.yml
- include: start.yml
#创建用户
[root@m01 tasks]# vim create_user.yml
- name: create user
  user:
    name: www
    uid: 1000
#安装rsync
[root@m01 tasks]# vim install.yml
- name: install rsync
  yum:
    name: rsync
    state: installed
#编辑rsync配置文件
[root@m01 tasks]# vim rsync_conf.yml
- name: write rsync conf
  template:
    src: rsync.conf.j2
    dest: /etc/rsyncd.conf
#下面为rsync配置文件内容
[root@m01 ansible]# vim roles/backup/templates/rsync.conf.j2
uid = www
gid = www
port = 873
fake super = yes
use chroot = no
max connections = 200
timeout = 600
ignore errors
read only = false
list = false
auth users = yzl
secrets file = /etc/rsync.passwd
log file = /var/log/rsyncd.log
[database]
comment = welcome to oldboyedu database!
path = /backup/database
#创建rsync服务端密码文件
    [root@m01 tasks]# vim rsync_passwd.yml
- name: create rsync passwd
  copy:
    content: yzl:123
    dest: /etc/rsync.passwd
    mode: 0600
    #创建模块目录
[root@m01 roles]# vim backup/tasks/create_dir.yml
- name: create database directory
  file:
    path: /backup/database
    state: directory
    owner: www
#启动rsync
[root@m01 tasks]# vim start.yml
- name: start rsyncd
  service:
    name: rsyncd
    state: started
配置nfs角色
#编辑任务清单
[root@m01 ansible]# vim roles/nfs/tasks/main.yml
- include: create_user.yml
- include: install.yml
- include: create_passwd.yml
- include: write_exports.yml
- include: create_dir.yml
- include: unarchive_niushop.yml
- include: chown.yml
- include: start.yml
- include: showmount.yml
- include: unarchive.yml
- include: write_confxml.yml
- include: run_sersync.yml
#创建用户
[root@m01 tasks]# vim create_user.yml
- name: Create User
  user:
    name: "{

   { USER_NAME }}"
    uid: "{

   { UID }}"
#定义变量
[root@m01 roles]# vim nfs/defaults/main.yml
USER_NAME: www
UID: 1000
#安装rsync
[root@m01 tasks]# vim install.yml
- name: install rsync
  yum:
    name: rsync,nfs-utils,rpcbind
    state: installed
#创建rsync客户端软件
[root@m01 tasks]# vim create_passwd.yml
- name: create rsync.passwd
  copy:
    content: 123
    dest: /etc/rsync.passwd
    mode: 0600
#编辑创建挂载点的文件
[root@m01 tasks]# vim write_exports.yml
- name: write exports
  template:
    src: exports.j2
    dest: /etc/exports
#创建挂载点
[root@m01 roles]# vim nfs/templates/exports.j2
/nfs/web 172.16.1.0/24(rw,sync,all_squash,anonuid=1000,anongid=1000)
/nfs/datase 172.16.1.0/24(rw,sync,all_squash,anonuid=1000,anongid=1000)
#创建目录
[root@m01 tasks]# vim create_dir.yml
- name: create dir
  file:
    path: "{

   { item }}"
    state: directory
  with_items:
    - /nfs
    - /nfs/web
    - /nfs/database
#解压项目包
[root@m01 tasks]# vim unarchive_shopxo.yml
- name: unzip niushop
  unarchive:
    src: zongzhige-shopxo-master.zip
    dest: /nfs/web
    copy: yes
#授权目录
[root@m01 tasks]# vim chown.yml
- name: chown www
  shell:
    cmd: "chown -R www.www /nfs"
#开启nfs服务
[root@m01 tasks]# vim start.yml
- name: start nfs rpcbind service
  shell:
    cmd: "systemctl start nfs rpcbind"
#查看挂载点(此步可省略)
[root@m01 tasks]# vim showmount.yml
- name: showmount point
  shell:
    cmd: "showmount -e"
#解压sersync (此处opt可去掉,将压缩包放入角色的file文件下即可)
[root@m01 tasks]# vim unarchive.yml
- name: unarchive sersync
  unarchive:
    src: /opt/sersync.gz
    dest: /nfs
#编写sersync配置文件
[root@m01 tasks]# vim write_confxml.yml
- name: write confxml.xml
  template:
    src: confxml.j2
    dest: /nfs/GNU-Linux-x86/confxml.xml
#sersync配置内容
[root@m01 roles]# vim nfs/templates/confxml.j2
<?xml version="1.0" encoding="ISO-8859-1"?>
<head version="2.5">
    <host hostip="localhost" port="8008"></host>
    <debug start="false"/>
    <fileSystem xfs="false"/>
    <filter start="false">
	<exclude expression="(.*)\.svn"></exclude>
	<exclude expression="(.*)\.gz"></exclude>
	<exclude expression="^info/*"></exclude>
	<exclude expression="^static/*"></exclude>
    </filter>
    <inotify>
	<delete start="true"/>
	<createFolder start
最低0.47元/天 解锁文章


 1083
1083


 到【灌水乐园】发言


