


 本文分享了使用AVM框架开发的第一个企业内部员工管理系统,涵盖考勤打卡、通知推送、消息提醒等功能,使用了Flex布局、amap地图和消息模块,以及PHP+Bootstrap+Easyui的开发组合。
这是用AVM框架开发的第一个项目,踩了很多的坑,但是也成长了很多。
本项目主要是针对企业内部员工使用,除了大部分OA办公常用的功能模块,也有部分定制化的功能模块。后台用的PHP+BootStrap+Easyui(PS:是不是感觉很久远的技术了)。
思维导图
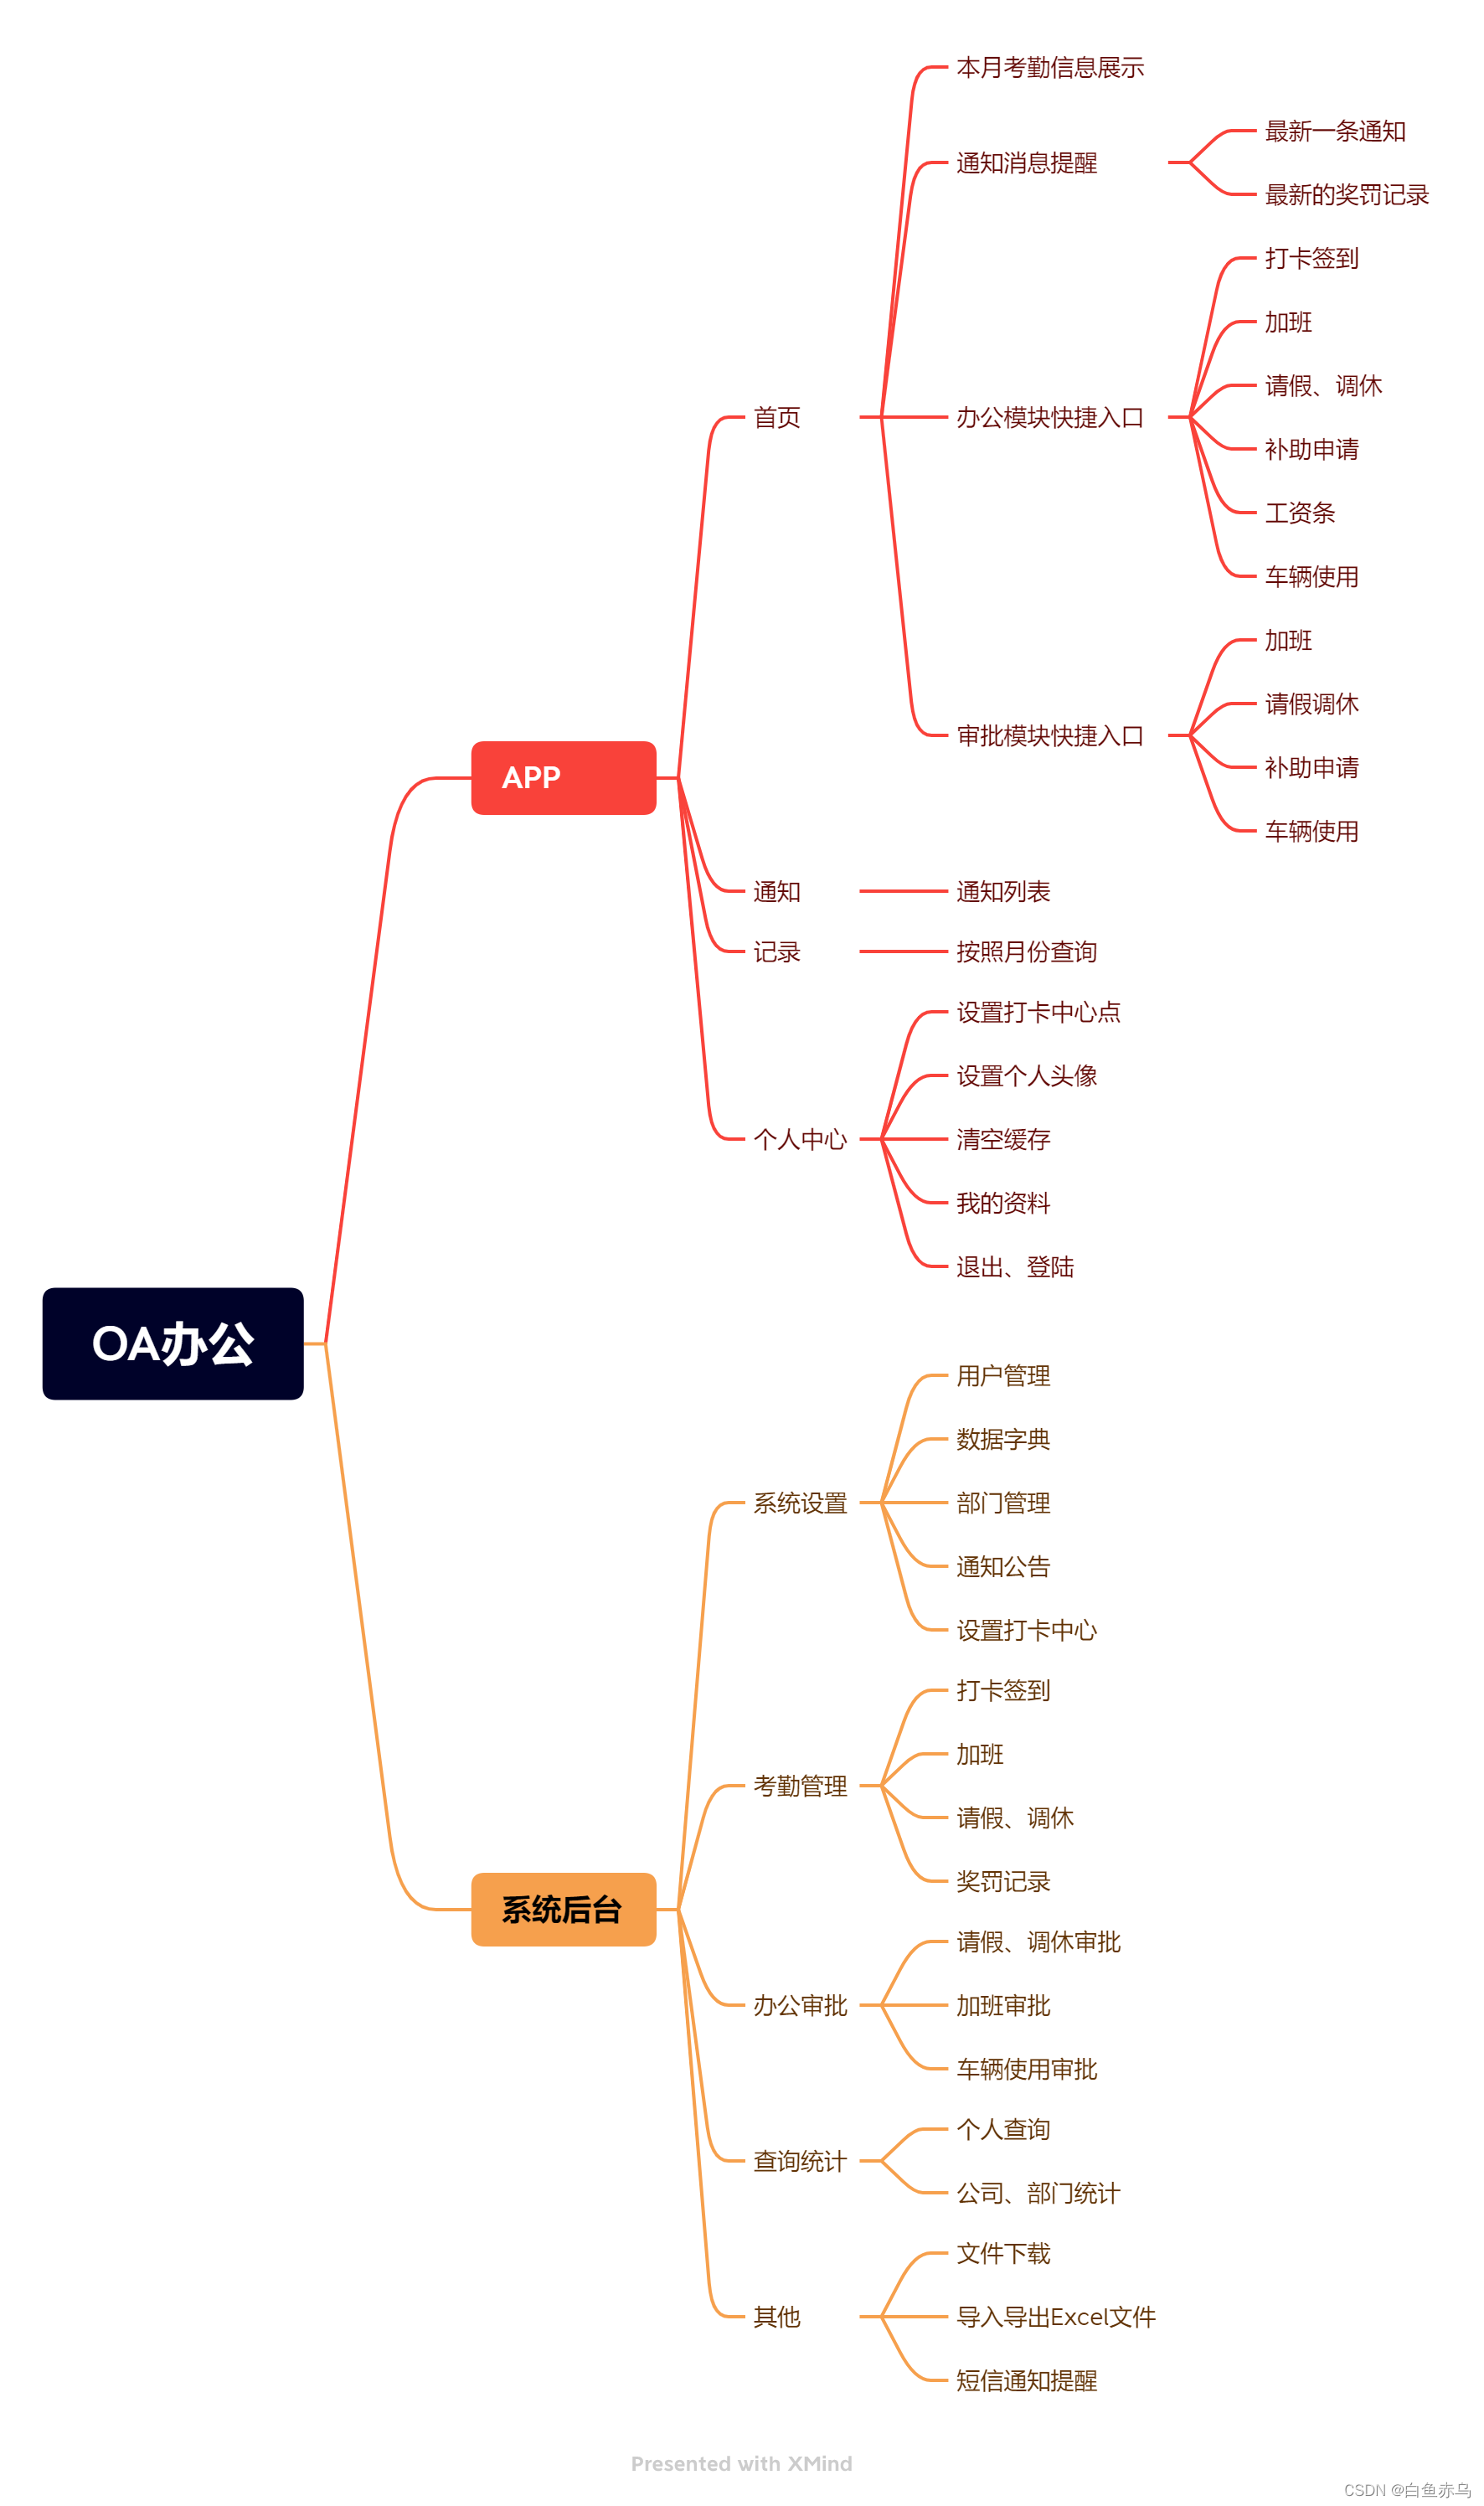
功能介绍
1.考勤打卡签到,加班打卡签到
2.办公流程申请、审批
3.通知下发、短信消息提醒
4.个人考勤记录查询,按月统计、钻取查询明细
技术要点
Flex布局,amap地图应用,消息推送,短信提醒。
应用模块
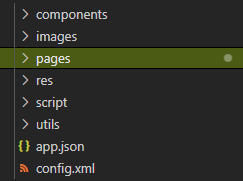
项目目录
开发介绍
首页导航
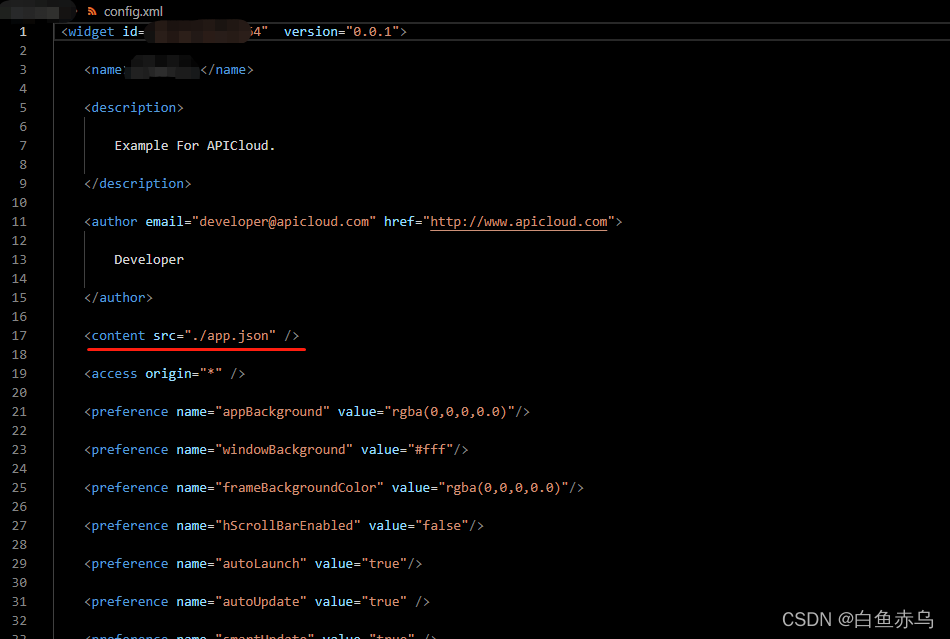
系统首页使用tabLayout,可以将相关参数配置在JSON文件中,再在config.xml中将content的值设置成该JSON文件的路径。如果底部导航没有特殊需求这里强烈建议大家使用tabLayout为APP进行布局,官方已经将各类手机屏幕及不同的分辨率进行了适配,免去了很多关于适配方面的问题。
{
    "name": "root",
    "hideNavigationBar": false,
    "bgColor": "#fff",
    "navigationBar": {
        "background": "#1492ff",
        "shadow": "rgba(0,0,0,0)",
        "color": "#fff",
        "fontSize": 18,
        "hideBackButton": true
    },
    "tabBar": {
        "background": "#fff",
        "shadow": "#eee",
        "color": "#5E5E5E",
        "selectedColor": "#1492ff",
        "textOffset": 3,
        "fontSize": 11,
        "scrollEnabled": true,
        "index": 0,
		"preload": 1,
        "frames": [{
            "name": "home",
            "url": "./pages/index/index.stml",
            "title": "首页"
        }, {
            "name": "notice",
            "url": "./pages/notice/notice.stml",
            "title": "通知"
        }, {
            "name": "records",
            "url": "./pages/records/records.stml",
            "title": "记录"
        }, {
            "name": "user",
            "url": "./pages/wode/wode.stml",
            "title": "我的"
        }],
        "list": [{
            "text": "首页",
            "iconPath": "./images/toolbar/icon-home.png",
            "selectedIconPath": "./images/toolbar/icon-home-selected.png"
        }, {
            "text": "通知",
            "iconPath": "./images/toolbar/icon-notice.png",
            "selectedIconPath": "./images/toolbar/icon-notice-selected.png"
        }, {
            "text": "记录",
            "iconPath": "./images/toolbar/icon-records.png",
            "selectedIconPath": "./images/toolbar/icon-records-selected.png"
        }, {
            "text": "我的",
            "iconPath": "./images/toolbar/icon-user.png",
            "selectedIconPath": "./images/toolbar/icon-user-selected.png"
        }]
    }
}
接口调用
将接口调用和接口配置分别封装了2个JS插件,model.js和config.js。这样来统一管理,避免了在每个页面进行接口调用的时候都重复写一遍代码,有效的简化了每个功能页面的代码量,只需要在回调里专注写自己的业务逻辑即可。
插件引用
import {Model} from "../../utils/model.js"
import {Config} from "../../utils/config.js"
config.js
class Config{
    constructor(){}
}
Config.restUrl = 'http://127.0.0.1/index.php/Home/Api';

Config.queryrecordsbymonth ='/queryrecordsbymonth';//获取用户本月考勤记录
//省略
export {Config};
model.js
import {Config} from './config.js';

class Model {
  constructor() {}
}

/*获取用户本月考勤记录 */
Model.queryrecordsbymonth = function (param, callback){
  param.url = Config.queryrecordsbymonth;
  param.method = 'post';
  this.request(param, callback);
}

/*省略*/

Model.request = function(p, callback) {
  var param = p;
  if (!param.headers) {
      param.headers = {};
  }
  // param.headers['x-apicloud-mcm-key'] = 'SZRtDyzM6SwWCXpZ';
  if (param.data && param.data.body) {
      param.headers['Content-Type'] = 'application/json; charset=utf-8';
  }
  if (param.url) {
      param.url = Config.restUrl + param.url;
  }

  api.ajax(param, function(ret, err) {
      callback && callback(ret, err);
  });
}

export {Model};
页面中调用接口
            //获取当前用户的本月考勤记录
			recordsbymonth() {
				const params = {
					data:{
						values:{
							userid: api.getPrefs({sync: true,key: 'userid'}),
							secret: Config.secret
						}
					}
				}
				Model.queryrecordsbymonth(params, (res,err) => {
					console.log(JSON.stringify(res));
					console.log(JSON.stringify(err));
					if (res && res.flag == "Success") {
						this.data.dk = res.data.dk;
						this.data.cd = res.data.cd;
						this.data.zt = res.data.zt;
						this.data.tx = res.data.tx;
						this.data.qj = res.data.qj;
					}
					else{
						this.data.dk = 0;
						this.data.cd = 0;
						this.data.zt = 0;
						this.data.tx = 0;
						this.data.qj = 0;
					}
					api.hideProgress();
				});
			},
消息推送
消息推动采用了官方的push模块,因为产生消息提醒的事件都是在APP中进行触发,所有就用了官方的push模块;如果存在后台系统操作产生消息提醒的,官方的push模块就不适用了,需要用Jpush等三方消息推送平台模块,配合后台SDK进行消息推送。
用户绑定
//判断是否绑定推送
				if(api.getPrefs({sync: true,key:'pushstatus'})!='02'){
					var push = api.require('push');
					push.bind({
						userName: api.getPrefs({sync: true,key:'name'}),
						userId: api.getPrefs({sync: true,key:'id'})
					}, function(ret, err){
						if( ret ){
							// alert( JSON.stringify( ret) );
							api.toast({
								msg:'推送注册成功!'
							});
							//设置推送绑定状态,启动的时候判断一下
							api.setPrefs({key:'pushstatus',value:'02'});
						}else{
							// alert( JSON.stringify( err) );
							api.toast({
								msg:'推送注册失败!'
							})
							api.setPrefs({key:'pushstatus',value:'01'});
						}
					});
				}
推送消息
//发送抄送通知
			copypush(){
				const params = {
				data:{
						values:{
							secret: Config.secret,
							content:'有一条早晚加班申请已审批完成!'
						}
					}
				}
				Model.createcopytousermessage(params, (res,err) => {
					// console.log(JSON.stringify(res));
					// console.log(JSON.stringify(err));
					if (res && res.flag == "Success") {
						var users = res.data.join(',');
						var now = Date.now();
						var appKey = $sha1.sha1("A61542********" + "UZ" + "6B2246B9-A101-3684-5A34-67546C3545DA" + "UZ" + now) + "." + now;

						api.ajax({
							url : 'https://p.apicloud.com/api/push/message',
							method : "post",
							headers: {
								"X-APICloud-AppId": "A615429********",
								"X-APICloud-AppKey": appKey,
								"Content-Type": "application/json"
							},
							dataType: "json",
							data: {
								"body": {
									"title": "消息提醒",
									"content": '有一条早晚加班申请已审批完成!',
									"type": 2, //– 消息类型,1:消息 2:通知
									"platform": 0, //0:全部平台,1:ios, 2:android
									"userIds":users
								}
							}
						}, (ret, err)=> {
							// console.log(JSON.stringify(ret))
							// console.log(JSON.stringify(err))
						});
					}
				});
			}
Flex布局
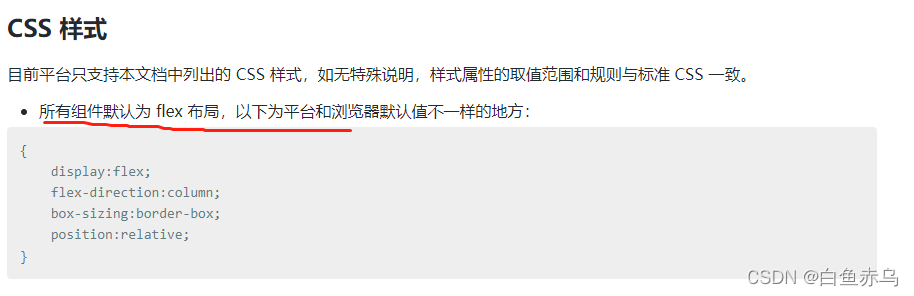
flex布局在AVM开发中是重中之重!还是那句话,flex布局写好,有CSS基础,根本就不需要用UI组件,完全可以实现UI的设计稿。
关于flex布局推荐一下阮一峰老师的教程,多读几遍多用,自然就会用的得心应手!
通知公告
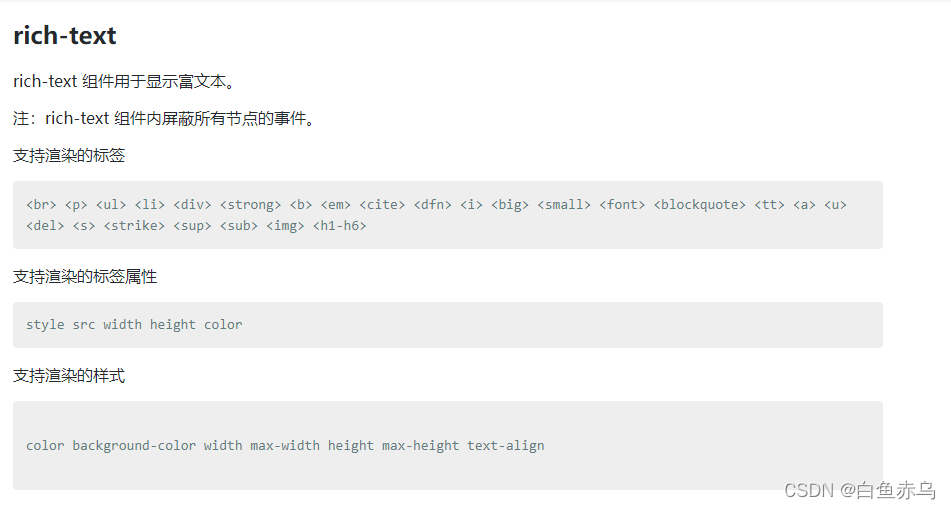
由于通知公告的内容是在后台通过富文本编辑器编辑的内容,其中会有样式布局的元素,不再是单纯的文字展示,这里使用了AVM中的rich-text组件,这个组件能很好的支持一些html元素标签,能完美的把富文本编辑的内容展现出来。
<template name='notice_info'>
    <scroll-view class="main" scroll-y>
	 	<text class="title">{this.data.title}</text>
		<text class="subtitle">{this.data.author}|{this.data.sj}</text>
        <rich-text class="content" nodes={this.data.content}></rich-text>
    </scroll-view>
</template>
数据列表及分页查询
数据列表的展示,采用scroll-view标签,通过onrefresherrefresh,onrefresherrefresh出发的事件中进行数据列表的刷新,和分页查询。refresher-triggered这个属性来设置当前下拉刷新状态,true 表示下拉刷新已经被触发,false 表示下拉刷新未被触发。如果想默认下拉刷新一下可以在apiready中将之设置为true,以此来代替执行数据刷新操作。
如果列表中的每一项的元素较少,而且没有样式的特殊要求,也可以使用list-view来实现。
下面是以通知公告列表的完整页面代码。其他页面的列表基本功能都是一致的,只是在每一项的样式及参数个数存在差异。
<template>
	<scroll-view class="main" scroll-y enable-back-to-top refresher-enabled refresher-triggered={refresherTriggered} onrefresherrefresh={this.onrefresherrefresh} onscrolltolower={this.onscrolltolower}>
		<view class="item-box">
			<view class="item" data-id={item.id} onclic
最低0.47元/天 解锁文章


 651
651

 被折叠的 条评论
为什么被折叠?
被折叠的 条评论
为什么被折叠?
 到【灌水乐园】发言


