


 本文介绍了SpringCloud中的@RefreshScope注解的作用和实现原理,用于实现在微服务配置中心场景下Bean中属性的动态刷新。当Nacos等配置中心发生改变时,@RefreshScope注解的Bean会自动刷新,无需重启服务。文章通过源码分析了如何通过Scope代理模式和Environment变量更新来达到动态刷新配置的效果。
点击上方“芋道源码”,选择“设为星标”
管她前浪,还是后浪?
能浪的浪,才是好浪!
每天 10:33 更新文章,每天掉亿点点头发...
源码精品专栏

概述
RefeshScope这个注解想必大家都用过,在微服务配置中心的场景下经常出现,他可以用来刷新Bean中的属性配置,那大家对他的实现原理了解吗?它为什么可以做到动态刷新呢?
基于 Spring Boot + MyBatis Plus + Vue & Element 实现的后台管理系统 + 用户小程序,支持 RBAC 动态权限、多租户、数据权限、工作流、三方登录、支付、短信、商城等功能
项目地址:https://github.com/YunaiV/ruoyi-vue-pro
视频教程:https://doc.iocoder.cn/video/
注解的作用
@RefreshScope注解是Spring Cloud中的一个注解,用来实现Bean中属性的动态刷新。
/**
 * Convenience annotation to put a <code>@Bean</code> definition in
 * {@link org.springframework.cloud.context.scope.refresh.RefreshScope refresh scope}.
 * Beans annotated this way can be refreshed at runtime and any components that are using
 * them will get a new instance on the next method call, fully initialized and injected
 * with all dependencies.
 *
 * @author Dave Syer
 *
 */
@Target({ ElementType.TYPE, ElementType.METHOD })
@Retention(RetentionPolicy.RUNTIME)
@Scope("refresh")
@Documented
public @interface RefreshScope {

 /**
  * @see Scope#proxyMode()
  * @return proxy mode
  */
 ScopedProxyMode proxyMode() default ScopedProxyMode.TARGET_CLASS;

}
上面是
RefreshScope的源码,该注解被@Scope注解使用,@Scope用来比较Spring Bean的作用域,具体使用参考相关文章。注解的属性
proxyMode默认使用TARGET_CLASS作为代理。
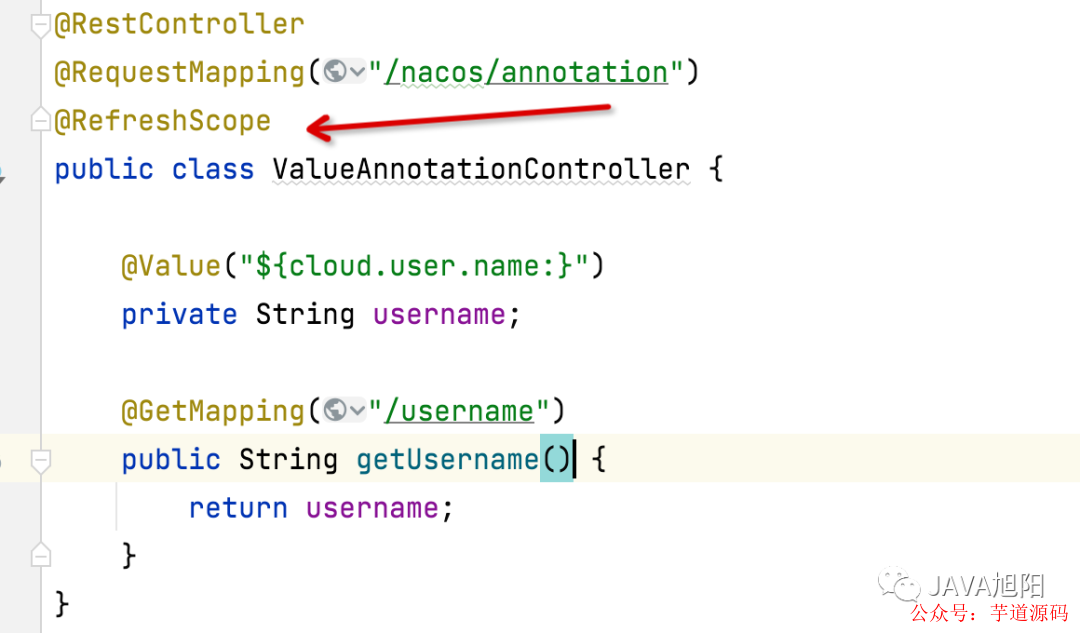
实例
controller中添加
@RefreshScope
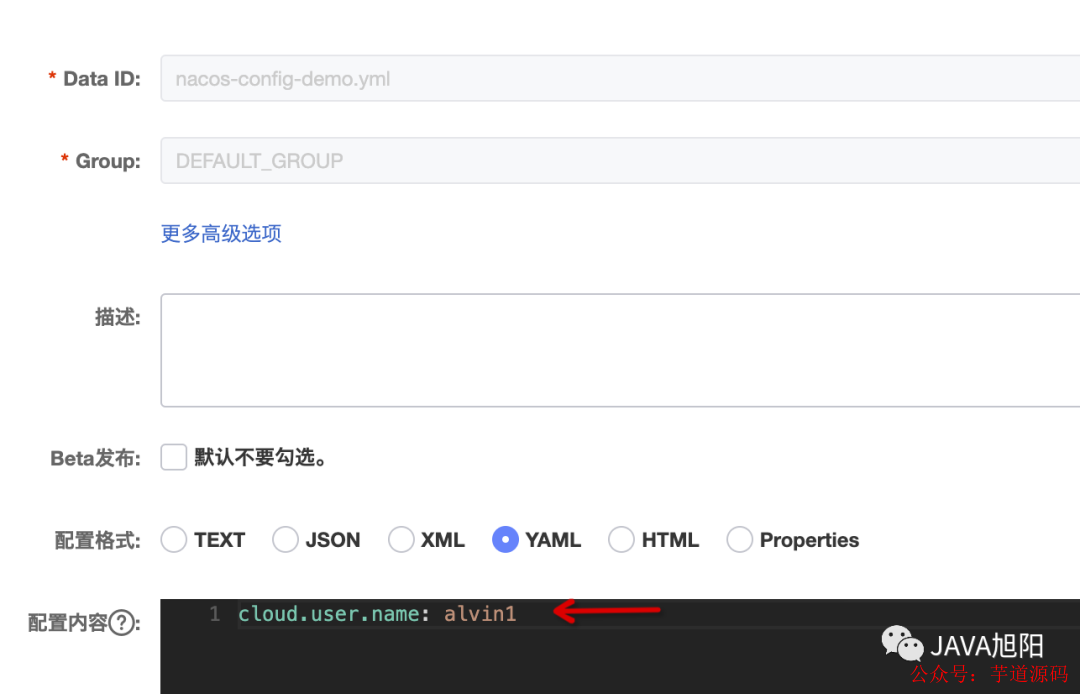
nacos配置中心中配置

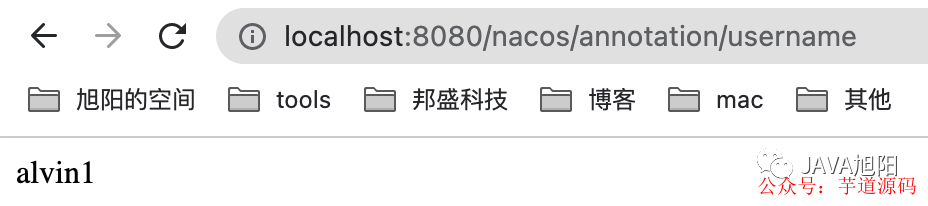
验证, 修改配置中心后,可以不重启动,刷新配置

去掉
@RefreshScope就不会自动刷新。
代码地址: https://github.com/alvinlkk/awesome-springcloud-demo/tree/master/springcloud-nacos/springcloud-nacos-config
基于 Spring Cloud Alibaba + Gateway + Nacos + RocketMQ + Vue & Element 实现的后台管理系统 + 用户小程序,支持 RBAC 动态权限、多租户、数据权限、工作流、三方登录、支付、短信、商城等功能
项目地址:https://github.com/YunaiV/yudao-cloud
视频教程:https://doc.iocoder.cn/video/
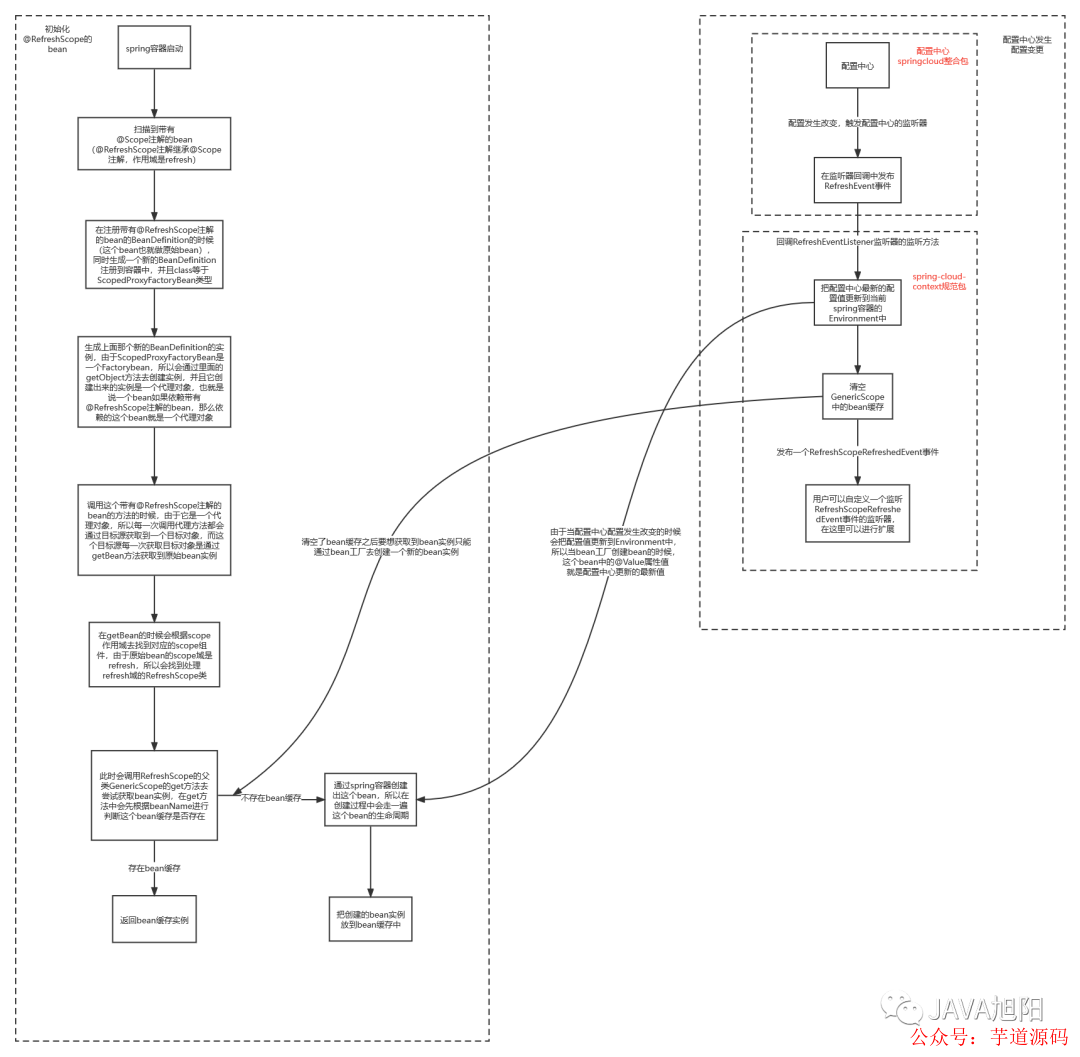
原理解析
为了实现动态刷新配置,主要就是想办法达成以下两个核心目标:
让Spring容器重新加载Environment环境配置变量
Spring Bean重新创建生成
@RefreshScope主要就是基于@Scope注解的作用域代理的基础上进行扩展实现的,加了@RefreshScope注解的类,在被Bean工厂创建后会加入自己的refresh scope 这个Bean缓存中,后续会优先从Bean缓存中获取,当配置中心发生了变更,会把变更的配置更新到spring容器的Environment中,并且同事bean缓存就会被清空,从而就会从bean工厂中创建bean实例了,而这次创建bean实例的时候就会继续经历这个bean的生命周期,使得@Value属性值能够从Environment中获取到最新的属性值,这样整个过程就达到了动态刷新配置的效果。
获取RefreshScope注解的Bean
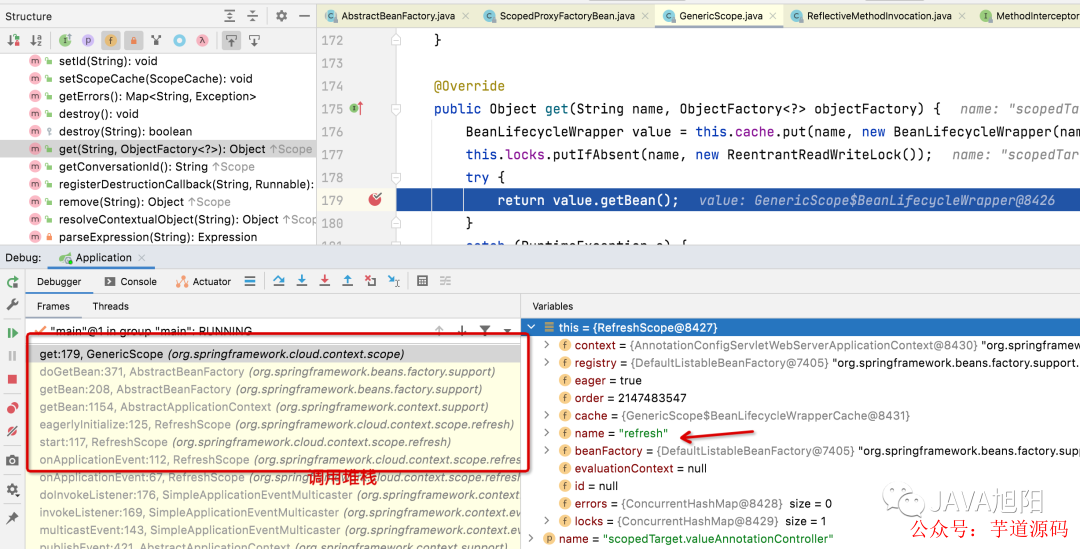
通过打上断点查看堆栈可知:
因为Class被加上了
@RefreshScope注解,那么这个BeanDefinition信息中的scope为refresh,在getBean的的时候会单独处理逻辑。
public abstract class AbstractBeanFactory extends FactoryBeanRegistrySupport implements ConfigurableBeanFactory {

protected <T> T doGetBean(
   String name, @Nullable Class<T> requiredType, @Nullable Object[] args, boolean typeCheckOnly)
   throws BeansException {

    // 如果scope是单例的情况, 这里不进行分析
    if (mbd.isSingleton()) {
     .....
    }
                // 如果scope是prototype的情况, 这里不进行分析
    else if (mbd.isPrototype()) {
     ......
    }
                // 如果scope是其他的情况,本例中是reresh
    else {
     String scopeName = mbd.getScope();
     if (!StringUtils.hasLength(scopeName)) {
      throw new IllegalStateException("No scope name defined for bean '" + beanName + "'");
     }
                    // 获取refresh scope的实现类RefreshScope,这个类在哪里注入,我们后面讲
     Scope scope = this.scopes.get(scopeName);
     if (scope == null) {
      throw new IllegalStateException("No Scope registered for scope name '" + scopeName + "'");
     }
     try {
                        // 这边是获取bean,调用的是RefreshScope中的的方法
      Object scopedInstance = scope.get(beanName, () -> {
       beforePrototypeCreation(beanName);
       try {
        return createBean(beanName, mbd, args);
       }
       finally {
        afterPrototypeCreation(beanName);
       }
      });
      beanInstance = getObjectForBeanInstance(scopedInstance, name, beanName, mbd);
     }
     catch (IllegalStateException ex) {
      throw new ScopeNotActiveException(beanName, scopeName, ex);
     }
    }
   }
   catch (BeansException ex) {
    beanCreation.tag("exception", ex.getClass().toString());
    beanCreation.tag("message", String.valueOf(ex.getMessage()));
    cleanupAfterBeanCreationFailure(beanName);
    throw ex;
   }
   finally {
    beanCreation.end();
   }
  }

  return adaptBeanInstance(name, beanInstance, requiredType);
 }

}2.RefreshScope继承成了GenericScope类,最终调用的的是GenericScope的get方法
public class GenericScope
  implements Scope, BeanFactoryPostProcessor, BeanDefinitionRegistryPostProcessor, DisposableBean {
                 @Override

  public Object get(String name, ObjectFactory<?> objectFactory) {
  // 将bean添加到缓存cache中
        BeanLifecycleWrapper value = this.cache.put(name, new BeanLifecycleWrapper(name, objectFactory));
  this.locks.putIfAbsent(name, new ReentrantReadWriteLock());
  try {
            // 调用下面的getBean方法
   return value.getBean();
  }
  catch (RuntimeException e) {
   this.errors.put(name, e);
   throw e;
  }
 }

private static class BeanLifecycleWrapper {

  public Object getBean() {
            // 如果bean为空,则创建bean
   if (this.bean == null) {
    synchronized (this.name) {
     if (this.bean == null) {
      this.bean = this.objectFactory.getObject();
     }
    }
   }
            // 否则返回之前创建好的bean
   return this.bean;
  }
            }
        }
小结:
从这边的代码中可以印证了上面的说法,创建后的Bean会缓存到scope的cache中,优先从缓存中获取,如果缓存中是null, 则重新走一遍create bean的流程。
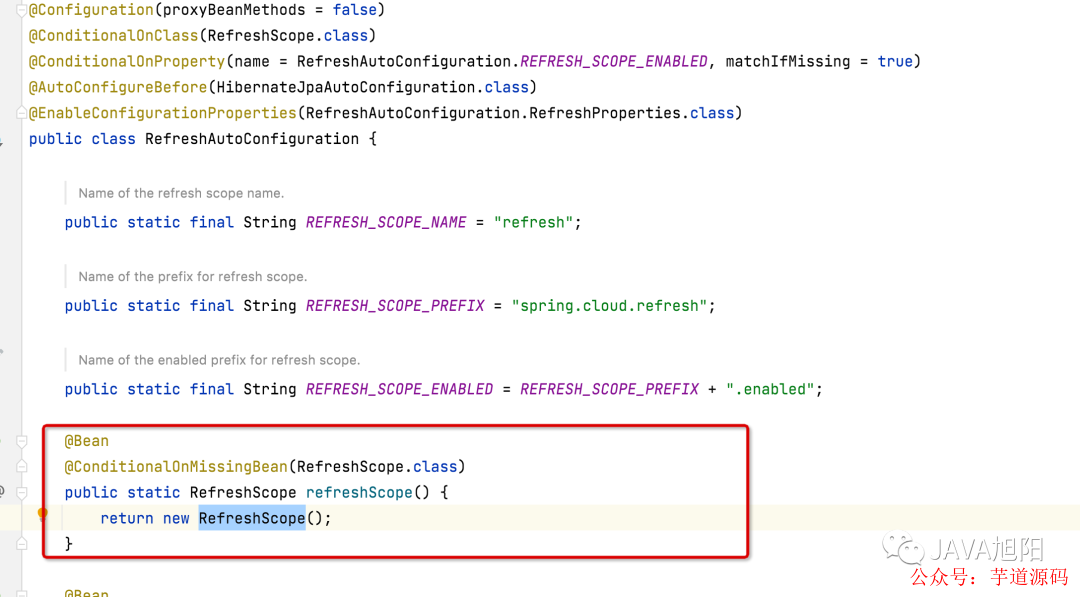
RefeshScope Bean的创建
上面的在getBean的时候依赖到RefreshScope这个Bean,那么这个Bean是在什么时候加入到Spring Bean中的呢?答案就是RefreshAutoConfiguration。
配置中心刷新后刷新Bean缓存

配置中心发生变化后,会收到一个
RefreshEvent事件,RefreshEventListner监听器会监听到这个事件。
public class RefreshEventListener implements SmartApplicationListener {


........

 public void handle(RefreshEvent event) {
  if (this.ready.get()) { // don't handle events before app is ready
   log.debug("Event received " + event.getEventDesc());
            // 会调用refresh方法,进行刷新
   Set<String> keys = this.refresh.refresh();
   log.info("Refresh keys changed: " + keys);
  }
 }

}

// 这个是ContextRefresher类中的刷新方法
public synchronized Set<String> refresh() {
        // 刷新spring的envirionment 变量配置
  Set<String> keys = refreshEnvironment();
        // 刷新其他scope
  this.scope.refreshAll();
  return keys;
 }
refresh方法最终调用destroy方法,清空之前缓存的bean
public class RefreshScope extends GenericScope
  implements ApplicationContextAware, ApplicationListener<ContextRefreshedEvent>, Ordered {

 @ManagedOperation(description = "Dispose of the current instance of all beans "
   + "in this scope and force a refresh on next method execution.")
 public void refreshAll() {
  // 调用父类的destroy
        super.destroy();
  this.context.publishEvent(new RefreshScopeRefreshedEvent());
 }
}


@Override
 public void destroy() {
  List<Throwable> errors = new ArrayList<Throwable>();
  Collection<BeanLifecycleWrapper> wrappers = this.cache.clear();
  for (BeanLifecycleWrapper wrapper : wrappers) {
   try {
    Lock lock = this.locks.get(wrapper.getName()).writeLock();
    lock.lock();
    try {
                    // 这里主要就是把之前的bean设置为null, 就会重新走createBean的流程了
     wrapper.destroy();
    }
    finally {
     lock.unlock();
    }
   }
   catch (RuntimeException e) {
    errors.add(e);
   }
  }
  if (!errors.isEmpty()) {
   throw wrapIfNecessary(errors.get(0));
  }
  this.errors.clear();
 }
总结
上面是这个RefreshScope实现动态刷新大致的原理,其中里面还有很多细节,可能需要留给大家自己debug去深入理解。
欢迎加入我的知识星球,一起探讨架构,交流源码。加入方式,长按下方二维码噢:

已在知识星球更新源码解析如下:

最近更新《芋道 SpringBoot 2.X 入门》系列,已经 101 余篇,覆盖了 MyBatis、Redis、MongoDB、ES、分库分表、读写分离、SpringMVC、Webflux、权限、WebSocket、Dubbo、RabbitMQ、RocketMQ、Kafka、性能测试等等内容。
提供近 3W 行代码的 SpringBoot 示例,以及超 4W 行代码的电商微服务项目。
获取方式:点“在看”,关注公众号并回复 666 领取,更多内容陆续奉上。
文章有帮助的话,在看,转发吧。
谢谢支持哟 (*^__^*)


 1476
1476

 被折叠的 条评论
为什么被折叠?
被折叠的 条评论
为什么被折叠?
 到【灌水乐园】发言


