


 本文详细介绍如何使用 Spring Boot 创建并部署一个简单的 Web 应用,包括项目搭建、配置及基本功能实现。
第一步 : 创建 Maven 工程或者 IDEA 创建 Spring Boot 项目。
第二步:添加依赖:
<?xml version="1.0" encoding="UTF-8"?>
<project xmlns="http://maven.apache.org/POM/4.0.0" xmlns:xsi="http://www.w3.org/2001/XMLSchema-instance"
	xsi:schemaLocation="http://maven.apache.org/POM/4.0.0 http://maven.apache.org/xsd/maven-4.0.0.xsd">
	<modelVersion>4.0.0</modelVersion>

	<groupId>com.test</groupId>
	<artifactId>hello2</artifactId>
	<version>0.0.1-SNAPSHOT</version>
	<packaging>jar</packaging>

	<name>hello2</name>
	<description>Demo project for Spring Boot</description>

	<parent>
		<groupId>org.springframework.boot</groupId>
		<artifactId>spring-boot-starter-parent</artifactId>
		<version>1.5.7.RELEASE</version>
		<relativePath/> <!-- lookup parent from repository -->
	</parent>

	<properties>
		<project.build.sourceEncoding>UTF-8</project.build.sourceEncoding>
		<project.reporting.outputEncoding>UTF-8</project.reporting.outputEncoding>
		<java.version>1.8</java.version>
	</properties>

	<dependencies>
		<dependency>
			<groupId>org.springframework.boot</groupId>
			<artifactId>spring-boot-starter-web</artifactId>
		</dependency>

		<dependency>
			<groupId>org.springframework.boot</groupId>
			<artifactId>spring-boot-starter-test</artifactId>
			<scope>test</scope>
		</dependency>
	</dependencies>

	<build>
		<plugins>
			<plugin>
				<groupId>org.springframework.boot</groupId>
				<artifactId>spring-boot-maven-plugin</artifactId>
			</plugin>
		</plugins>
	</build>


</project>
第三步: 主类Hello2Application:
import org.springframework.boot.SpringApplication;
import org.springframework.boot.autoconfigure.EnableAutoConfiguration;
import org.springframework.stereotype.Controller;
import org.springframework.web.bind.annotation.RequestMapping;
import org.springframework.web.bind.annotation.ResponseBody;

@EnableAutoConfiguration
@Controller
public class Hello2Application {


	@RequestMapping("/hello")
	@ResponseBody
	public String hello(){
		return "hello Spring Boot !";
	}

	public static void main(String[] args) {
		SpringApplication.run(Hello2Application.class, args);
		System.out.println("---------应用启动完成!--------");
	}
}
第四步 : 启动应用,程序会启动自带的Tomcat ,默认端口是 8080 ,并且可以在日志文件中找到自己映射的地址。
Starting Hello2Application on DESKTOP-EAEE93N with PID 50484 (E:\ideaS
No active profile set, falling back to default profiles: default
Refreshing org.springframework.boot.context.embedded.AnnotationConfigE
Tomcat initialized with port(s): 8080 (http)
Starting service [Tomcat]
Starting Servlet Engine: Apache Tomcat/8.5.20
Initializing Spring embedded WebApplicationContext
Root WebApplicationContext: initialization completed in 5061 ms
Mapping servlet: 'dispatcherServlet' to [/]
Mapping filter: 'characterEncodingFilter' to: [/*]
Mapping filter: 'hiddenHttpMethodFilter' to: [/*]
Mapping filter: 'httpPutFormContentFilter' to: [/*]
Mapping filter: 'requestContextFilter' to: [/*]
Looking for @ControllerAdvice: org.springframework.boot.context.embedd
Mapped "{[/hello]}" onto public java.lang.String com.test.hello2.Hello
Mapped "{[/error]}" onto public org.springframework.http.ResponseEntit
Mapped "{[/error],produces=[text/html]}" onto public org.springframewo
Mapped URL path [/webjars/**] onto handler of type [class org.springfr
Mapped URL path [/**] onto handler of type [class org.springframework.
Mapped URL path [/**/favicon.ico] onto handler of type [class org.spri
Registering beans for JMX exposure on startup
Tomcat started on port(s): 8080 (http)
Started Hello2Application in 7.282 seconds (JVM running for 8.103)
第五步 : 访问应用:http://localhost:8080/hello
hello Spring Boot !
======================================================
SpringBoot 2.X web 项目
初步要求: jdk1.8+
-
一 项目初步启动
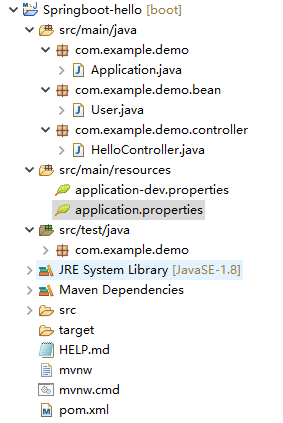
1.1 创建项目
创建maven工程或者 创建spring starter project 项目
项目目录:springboot-hello -src.main.java -com.example.demo - Application.java -com.example.demo.controller - HelloController.java -src.main.resources -src.test.java -pom.xmlpom.xml 文件应包含
- parent : spring-boot-starter-parent
- dependency: spring-boot-starter
- dependency: spring-boot-starter-web
- plugin :spring-boot-maven-plugin
完整pom.xml文件:
	<?xml version="1.0" encoding="UTF-8"?>
	<project xmlns="http://maven.apache.org/POM/4.0.0"
	xmlns:xsi="http://www.w3.org/2001/XMLSchema-instance"
	xsi:schemaLocation="http://maven.apache.org/POM/4.0.0 http://maven.apache.org/xsd/maven-4.0.0.xsd">
	<modelVersion>4.0.0</modelVersion>
	<parent> <!-- 必要 -->
		<groupId>org.springframework.boot</groupId>
		<artifactId>spring-boot-starter-parent</artifactId>
		<version>2.1.4.RELEASE</version>
		<relativePath />
	</parent>
	<groupId>com.example</groupId>
	<artifactId>Springboot-hello</artifactId>
	<version>0.0.1-SNAPSHOT</version>
	<name>Springboot-hello</name>
	<description>Demo project for Spring Boot</description>

	<properties>
		<java.version>1.8</java.version> <!-- Springboot 2.X 要求 1.8以上-->
	</properties>

	<dependencies>
		<dependency>
			<groupId>org.springframework.boot</groupId>
			<artifactId>spring-boot-starter</artifactId>
		</dependency>
		<dependency>
			<groupId>org.springframework.boot</groupId>
			<artifactId>spring-boot-starter-web</artifactId>
		</dependency>
		<dependency>
			<groupId>org.springframework.boot</groupId>
			<artifactId>spring-boot-starter-test</artifactId>
			<scope>test</scope>
		</dependency>

	</dependencies>

	<build>
		<plugins>
			<plugin>
				<groupId>org.springframework.boot</groupId>
				<artifactId>spring-boot-maven-plugin</artifactId>
			</plugin>
		</plugins>
	</build>

</project>
Application.java
package com.example.demo;

import org.springframework.boot.SpringApplication;
import org.springframework.boot.autoconfigure.SpringBootApplication;

@SpringBootApplication
public class Application {

	public static void main(String[] args) {
		SpringApplication.run(Application.class, args);
		System.out.println("==============  项目启动  =============== ");
	}
}
HelloController.java
package com.example.demo.controller;

import org.slf4j.Logger;
import org.slf4j.LoggerFactory;
import org.springframework.web.bind.annotation.RequestMapping;
import org.springframework.web.bind.annotation.ResponseBody;
import org.springframework.web.bind.annotation.RestController;

import com.example.demo.bean.User;

/**
 * @author dingsj
 * */
@RestController
public class HelloController {

	Logger logger = LoggerFactory.getLogger(HelloController.class);

	@RequestMapping("hello")
	@ResponseBody
	public User hello() {

		return "hello";
	}
}
1.2运行 Application.java
  .   ____          _            __ _ _
 /\\ / ___'_ __ _ _(_)_ __  __ _ \ \ \ \
( ( )\___ | '_ | '_| | '_ \/ _` | \ \ \ \
 \\/  ___)| |_)| | | | | || (_| |  ) ) ) )
  '  |____| .__|_| |_|_| |_\__, | / / / /
 =========|_|==============|___/=/_/_/_/
 :: Spring Boot ::        (v2.1.4.RELEASE)

2019-04-30 10:57:57.828  INFO 5648 --- [           main] com.example.demo.Application             : Starting Application on DESKTOP-EAEE93N with PID 5648 (E:\Eclipse4Space\Springboot-hello\target\classes started by dingsj in E:\Eclipse4Space\Springboot-hello)
2019-04-30 10:57:57.833  INFO 5648 --- [           main] com.example.demo.Application             : No active profile set, falling back to default profiles: default
2019-04-30 10:57:59.298  INFO 5648 --- [           main] o.s.b.w.embedded.tomcat.TomcatWebServer  : Tomcat initialized with port(s): 8080 (http)
2019-04-30 10:57:59.332  INFO 5648 --- [           main] o.apache.catalina.core.StandardService   : Starting service [Tomcat]
2019-04-30 10:57:59.332  INFO 5648 --- [           main] org.apache.catalina.core.StandardEngine  : Starting Servlet engine: [Apache Tomcat/9.0.17]
2019-04-30 10:57:59.471  INFO 5648 --- [           main] o.a.c.c.C.[Tomcat].[localhost].[/]       : Initializing Spring embedded WebApplicationContext
2019-04-30 10:57:59.471  INFO 5648 --- [           main] o.s.web.context.ContextLoader            : Root WebApplicationContext: initialization completed in 1578 ms
2019-04-30 10:57:59.812  INFO 5648 --- [           main] o.s.s.concurrent.ThreadPoolTaskExecutor  : Initializing ExecutorService 'applicationTaskExecutor'
2019-04-30 10:58:00.097  INFO 5648 --- [           main] o.s.b.w.embedded.tomcat.TomcatWebServer  : Tomcat started on port(s): 8080 (http) with context path ''
2019-04-30 10:58:00.101  INFO 5648 --- [           main] com.example.demo.Application             : Started Application in 2.807 seconds (JVM running for 3.943)
==============  项目启动  ===============
- 二 项目改造
以上并没有任何参数设置,这是springboot默认了很多参数,比如默认使用Tomcat,端口是8080等,想要自定义参数,可以使用其默认的配置文件【src/main/resources/application.properties】
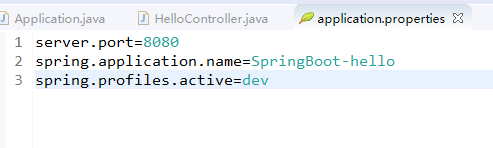
例如端口号,应用名,指定项目运行时获取的配置文件环境:
server.port=8080
spring.application.name=SpringBoot-hello
spring.profiles.active=dev
上面应用启动,调用 http://localhost:8080/hello 时返回的是一个字符串,若是返回实体,可以建一个实体测试类 User.java。
package com.example.demo.bean;

/**
 * @author dingsj
 * */
public class User {

	private String id;
	private String name;
	private String addr;

	public String getId() {
		return id;
	}
	public void setId(String id) {
		this.id = id;
	}
	public String getName() {
		return name;
	}
	public void setName(String name) {
		this.name = name;
	}
	public String getAddr() {
		return addr;
	}
	public void setAddr(String addr) {
		this.addr = addr;
	}
	@Override
	public String toString() {
		return "User [id=" + id + ", name=" + name + ", addr=" + addr + "]";
	}
	public User(String id, String name, String addr) {
		super();
		this.id = id;
		this.name = name;
		this.addr = addr;
	}
	public User() {
	}

}
改造 HelloController.java:
package com.example.demo.controller;

import org.slf4j.Logger;
import org.slf4j.LoggerFactory;
import org.springframework.web.bind.annotation.RequestMapping;
import org.springframework.web.bind.annotation.ResponseBody;
import org.springframework.web.bind.annotation.RestController;

import com.example.demo.bean.User;

/**
 * @author dingsj
 * */
@RestController
public class HelloController {

	Logger logger = LoggerFactory.getLogger(HelloController.class);

	@RequestMapping("hello")
	@ResponseBody
	public User hello() {
		logger.info("Hello Controller run ....");
		User user = new User("U10000001","Test","北京市丰台区");
		return user;
	}
}
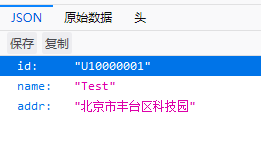
项目重启后,访问 http://localhost:8080/hello :
上面配置文件中指定了一个项目启动时自动加载的文件spring.profiles.active=dev
– > application-dev.properties :
test.prop.id=U100000002
test.prop.name=Test_prop
test.prop.addr=BeiJingHaiyinglu
在项目中加载这些参数,只需要直接注入即可:
package com.example.demo.controller;

import org.slf4j.Logger;
import org.slf4j.LoggerFactory;
import org.springframework.beans.factory.annotation.Value;
import org.springframework.web.bind.annotation.RequestMapping;
import org.springframework.web.bind.annotation.ResponseBody;
import org.springframework.web.bind.annotation.RestController;

import com.example.demo.bean.User;

/**
* @author dingsj
* */
@RestController
public class HelloController {

   @Value("${test.prop.id}")
   private String id;
   @Value("${test.prop.name}")
   private String name;
   @Value("${test.prop.addr}")
   private String addr;

   Logger logger = LoggerFactory.getLogger(HelloController.class);

   @RequestMapping("hello")
   @ResponseBody
   public User hello() {
   	logger.info("Hello Controller run ....");
   	User user = new User("U10000001","Test","北京市丰台区科技园");

   	User user2 = new User(id,name,addr);
   	logger.info("User : " + user2.toString());

   	return user;
   }
}
重启,访问项目,日志打印 User 信息(最后一行):
  .   ____          _            __ _ _
 /\\ / ___'_ __ _ _(_)_ __  __ _ \ \ \ \
( ( )\___ | '_ | '_| | '_ \/ _` | \ \ \ \
 \\/  ___)| |_)| | | | | || (_| |  ) ) ) )
  '  |____| .__|_| |_|_| |_\__, | / / / /
 =========|_|==============|___/=/_/_/_/
 :: Spring Boot ::        (v2.1.4.RELEASE)

2019-04-30 14:20:26.347  INFO 17072 --- [           main] com.example.demo.Application             : Starting Application on DESKTOP-EAEE93N with PID 17072 (E:\Eclipse4Space\Springboot-hello\target\classes started by dingsj in E:\Eclipse4Space\Springboot-hello)
2019-04-30 14:20:26.354  INFO 17072 --- [           main] com.example.demo.Application             : The following profiles are active: dev
2019-04-30 14:20:28.136  INFO 17072 --- [           main] o.s.b.w.embedded.tomcat.TomcatWebServer  : Tomcat initialized with port(s): 8080 (http)
2019-04-30 14:20:28.174  INFO 17072 --- [           main] o.apache.catalina.core.StandardService   : Starting service [Tomcat]
2019-04-30 14:20:28.175  INFO 17072 --- [           main] org.apache.catalina.core.StandardEngine  : Starting Servlet engine: [Apache Tomcat/9.0.17]
2019-04-30 14:20:28.346  INFO 17072 --- [           main] o.a.c.c.C.[Tomcat].[localhost].[/]       : Initializing Spring embedded WebApplicationContext
2019-04-30 14:20:28.346  INFO 17072 --- [           main] o.s.web.context.ContextLoader            : Root WebApplicationContext: initialization completed in 1824 ms
2019-04-30 14:20:28.692  INFO 17072 --- [           main] o.s.s.concurrent.ThreadPoolTaskExecutor  : Initializing ExecutorService 'applicationTaskExecutor'
2019-04-30 14:20:29.017  INFO 17072 --- [           main] o.s.b.w.embedded.tomcat.TomcatWebServer  : Tomcat started on port(s): 8080 (http) with context path ''
2019-04-30 14:20:29.033  INFO 17072 --- [           main] com.example.demo.Application             : Started Application in 3.422 seconds (JVM running for 4.944)
==============  项目启动  ===============
2019-04-30 14:21:00.276  INFO 17072 --- [nio-8080-exec-1] o.a.c.c.C.[Tomcat].[localhost].[/]       : Initializing Spring DispatcherServlet 'dispatcherServlet'
2019-04-30 14:21:00.276  INFO 17072 --- [nio-8080-exec-1] o.s.web.servlet.DispatcherServlet        : Initializing Servlet 'dispatcherServlet'
2019-04-30 14:21:00.286  INFO 17072 --- [nio-8080-exec-1] o.s.web.servlet.DispatcherServlet        : Completed initialization in 10 ms
2019-04-30 14:21:00.320  INFO 17072 --- [nio-8080-exec-1] c.e.demo.controller.HelloController      : Hello Controller run ....
2019-04-30 14:21:00.320  INFO 17072 --- [nio-8080-exec-1] c.e.demo.controller.HelloController      : User : User [id=U100000002, name=Test_prop, addr=BeiJingHaiyinglu]
下面添加 thymeleaf模板,将HelloController.java 中的 User信息显示页面上,
此时需要更改 其控制器注解 由 @RestController 改变为 @Controller,因为前者会把返回内容当做json 串直接返回。
- 添加 thymeleaf 依赖
<dependency> <groupId>org.springframework.boot</groupId> <artifactId>spring-boot-starter-thymeleaf</artifactId> </dependency> - 在配置文件中添加模板参数
# thymeleaf静态资源配置
# 默认路径
spring.thymeleaf.prefix=classpath:/templates/
# 后缀
spring.thymeleaf.suffix=.html
# 模板格式
spring.thymeleaf.mode=HTML5
spring.thymeleaf.encoding=UTF-8
spring.thymeleaf.servlet.content-type=text/html
spring.thymeleaf.enabled=true
spring.thymeleaf.cache=false
- 在resources 下新建 templates目录,并在里面创建index.html 页面

- 修改 HelloController
package com.example.demo.controller;

import org.slf4j.Logger;
import org.slf4j.LoggerFactory;
import org.springframework.beans.factory.annotation.Value;
import org.springframework.stereotype.Controller;
import org.springframework.ui.Model;
import org.springframework.web.bind.annotation.RequestMapping;

import com.example.demo.bean.User;

/**
 * @author dingsj
 * */
@Controller
public class HelloController {

	@Value("${test.prop.id}")
	private String id;
	@Value("${test.prop.name}")
	private String name;
	@Value("${test.prop.addr}")
	private String addr;

	Logger logger = LoggerFactory.getLogger(HelloController.class);

	@RequestMapping("hello")
	public String hello(Model model) {
		logger.info("Hello Controller run ....");
		User user = new User("U10000001","Test","北京市丰台区科技园");

		User user2 = new User(id,name,addr);
		logger.info("User : " + user2.toString());
		model.addAttribute("user", user);              //  传给页面
		return "index";
	}
}
5 .编辑index.html:
<!DOCTYPE html>
<html>
<head>
<meta charset="UTF-8">
<title>Insert title here</title>
</head>
<body>
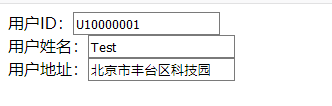
用户ID:<input th:value="${user.id}"/> <br/>
用户姓名:<input th:name="${user.name}" th:value="${user.name}"/> <br/>
用户地址:<input th:value="${user.addr}"/>
</body>
</html>
- 启动项目访问 http://localhost:8080/hello
- 项目地址:
git@github.com:DingSJ/Springboot-hello.git


 5225
5225

 被折叠的 条评论
为什么被折叠?
被折叠的 条评论
为什么被折叠?
 到【灌水乐园】发言


