


蓝牙常见名称和缩写
- BLE:(Bluetooth low energy)蓝牙4.0设备因为低耗电,也叫BLE
- peripheral,central:外设和中心设备,发起链接的是central(一般是指手机),被链接的设备是peripheral(运动手环),也可两个手机,一个座位外设一个作为中心设备
- service and characteristic:(服务和特征)每个设备会提供服务和特征,类似于服务端的API,但是结构不同.每个设备会有很多服务,每个服务中包含很多字段,这些字段的权限一般分为读(read),写(write),通知(notify)几种,就是我们连接设备后具体需要操作的内容
- Description:每个characteristic可以对应一个或者多个Description用于描述characteristic的信息或属性(eg.范围,计量单位)
蓝牙基础知识
-
CoreBluetooth框架的核心其实是俩东西:peripheral和central,对应他们分别有一组相关的API和类
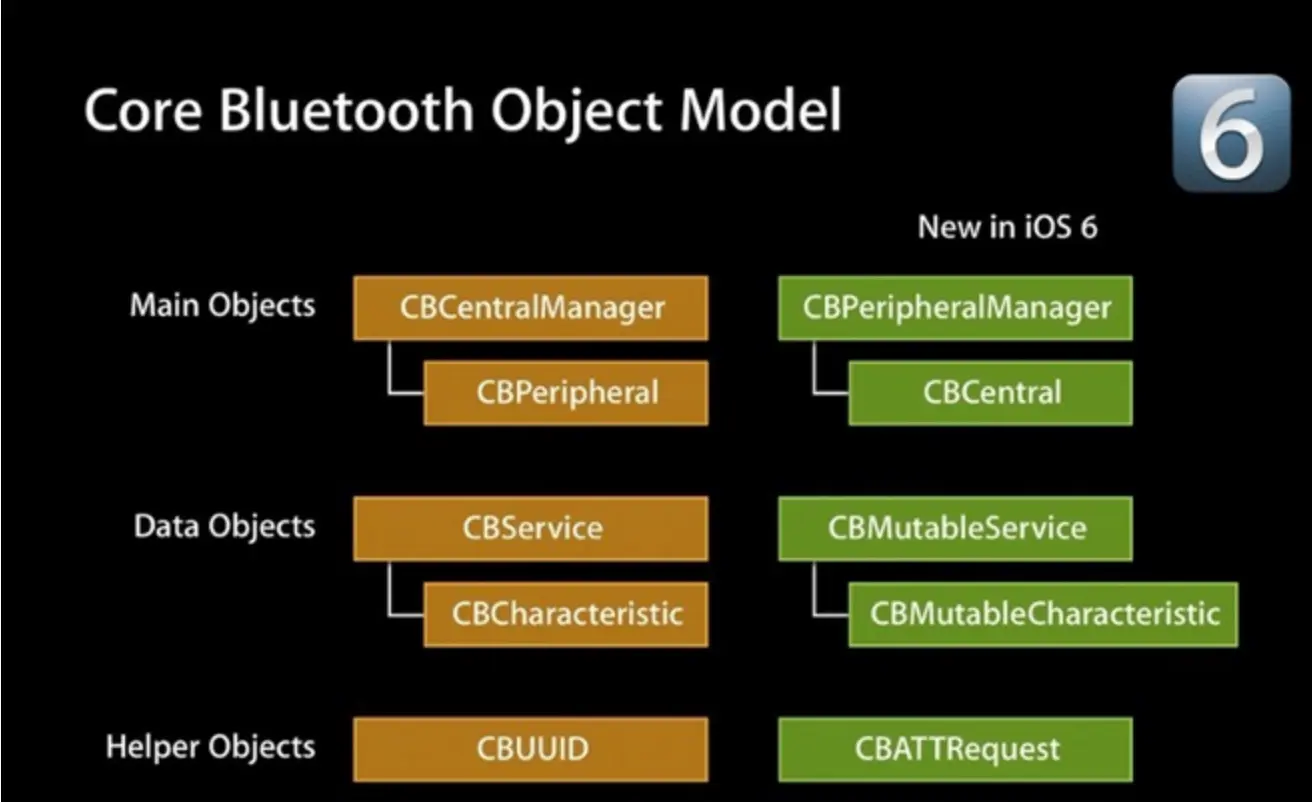 结构图
- 这两组api粉笔对应不同的业务常见:左侧叫中心模式,就是以你的app作为中心,连接其他的外设的场景;而右侧称为外设模式,使用手机作为外设连接其他中心设备操作的场景
- 服务和特征(service and characteristic)
typedef NS_OPTIONS(NSUInteger, CBCharacteristicProperties) {
    CBCharacteristicPropertyBroadcast                                                = 0x01,
    CBCharacteristicPropertyRead                                                    = 0x02,
    CBCharacteristicPropertyWriteWithoutResponse                                    = 0x04,
    CBCharacteristicPropertyWrite                                                    = 0x08,
    CBCharacteristicPropertyNotify                                                    = 0x10,
    CBCharacteristicPropertyIndicate                                                = 0x20,
    CBCharacteristicPropertyAuthenticatedSignedWrites                                = 0x40,
    CBCharacteristicPropertyExtendedProperties                                        = 0x80,
    CBCharacteristicPropertyNotifyEncryptionRequired NS_ENUM_AVAILABLE(NA, 6_0)        = 0x100,
    CBCharacteristicPropertyIndicateEncryptionRequired NS_ENUM_AVAILABLE(NA, 6_0)    = 0x200
};-
外设,服务,特征的关系
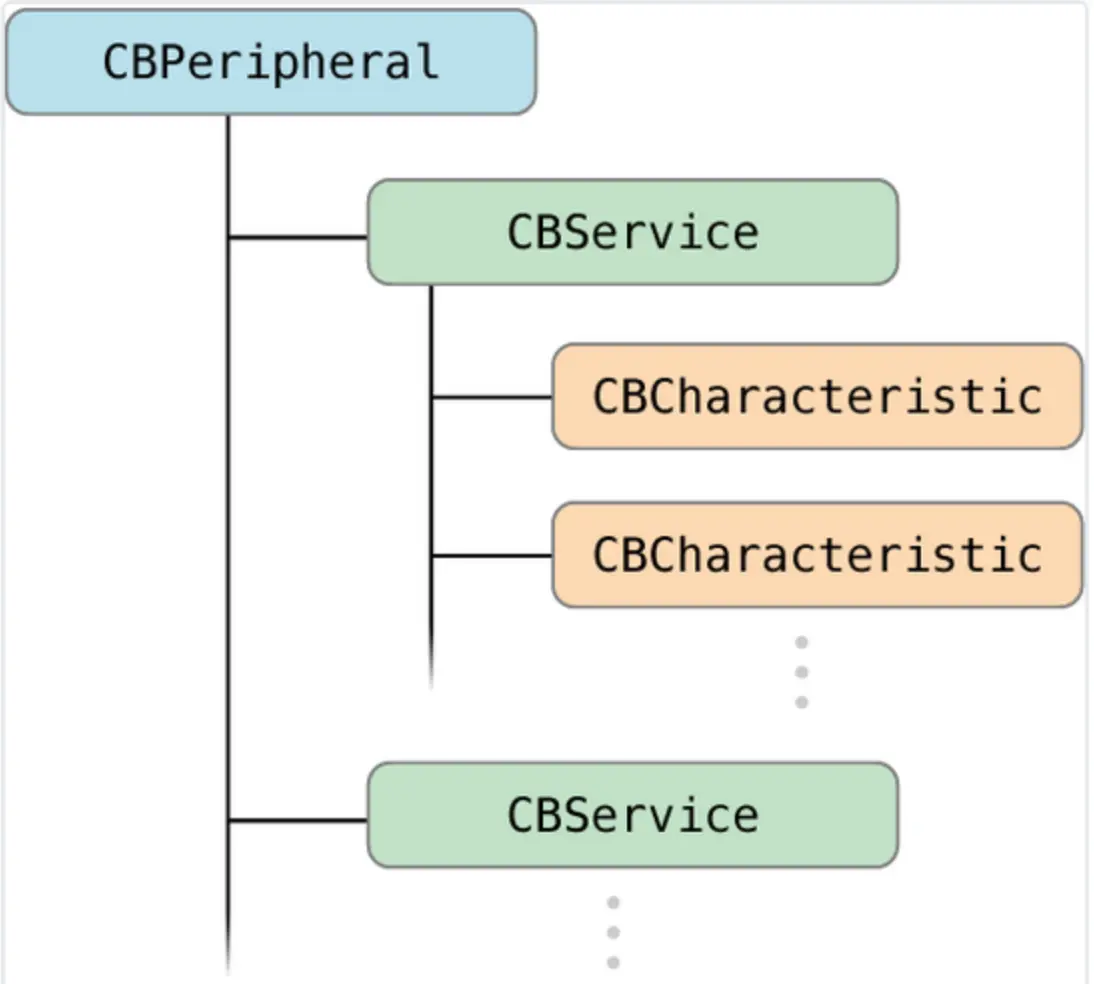 外设,服务,特征关系
BLE中心模式流程
- 1.建立中心角色
- 2.扫描外设(Discover Peripheral)
- 3.连接外设(Connect Peripheral)
- 4.扫描外设中的服务和特征(Discover Services And Characteristics)
- 4.1 获取外设的services
- 4.2 获取外设的Characteristics,获取characteristics的值,,获取Characteristics的Descriptor和Descriptor的值
- 5.利用特征与外设做数据交互(Explore And Interact)
- 6.订阅Characteristic的通知
- 7.断开连接(Disconnect)
BLE外设模式流程
- 1.启动一个Peripheral管理对象
- 2.本地peripheral设置服务,特征,描述,权限等等
- 3.peripheral发送广告
- 4.设置处理订阅,取消订阅,读characteristic,写characteristic的代理方法
蓝牙设备的状态
- 1.待机状态(standby):设备没有传输和发送数据,并且没有连接到任何外设
2.广播状态(Advertiser):周期性广播状态
3.扫描状态(Scanner):主动搜索正在广播的设备
4.发起链接状态(Initiator):主动向扫描设备发起连接
5.主设备(Master):作为主设备连接到其它设备.
6.从设备(Slave):作为从设备链接到其它设备
BLE中心模式流程-coding,手机作为中心设备发现链接外设
实现步骤
1.导入CB头文件,建立主设备管理类,设置主设备代理
import UIKit
import CoreBluetooth
class ViewController: UIViewController
{

    /// 中心管理者
    var cMgr: CBCentralManager!

    /// 外设
    var per: CBPeripheral?
    var readWriteCharicter: CBCharacteristic?


    override func viewDidLoad()
    {
        super.viewDidLoad()

    }


    @IBAction func startConnectiOthers(_ sender: Any)
    {
        cMgr = CBCentralManager(delegate: self, queue: DispatchQueue.main)
    }

    @IBAction func disConnectOthers(_ sender: Any)
    {
        guard per == nil else
        {
            return
        }
        cMgr.cancelPeripheralConnection(per!)
    }
    @IBAction func writeDataClick(_ sender: Any)
    {
        let valueDic = ["name":"SuLuo", "age":"18"]
        let readWriteData = try? JSONSerialization.data(withJSONObject: valueDic, options: [])
        periheral(perheral: per!, writeData: readWriteData!, forCharacteristic: readWriteCharicter!)
    }
}
 //MARK:- 中心管理者的代理 -
extension ViewController: CBCentralManagerDelegate
{
    //更新状态
    func centralManagerDidUpdateState(_ central: CBCentralManager)
    {
        switch central.state
        {
            case .poweredOff:
                print("poweredOff")
            case .poweredOn:
                print("poweredOn")
                //开始扫描周围的外设
                //第一个参数nil就是扫描周围所有的外设,扫描到外设后会进入didDiscoverPeripheral
                central.scanForPeripherals(withServices: nil, options: nil)
            case .resetting:
                print("resetting")
            case .unauthorized:
                print("unauthorized")
            case .unsupported:
                print("unsupported")
            default:
                print("others")
        }
    }

    //扫描到外部设备
    func centralManager(_ central: CBCentralManager, didDiscover peripheral: CBPeripheral, advertisementData: [String : Any], rssi RSSI: NSNumber)
    {
        //一般会根据advertisementData来过滤出我们想要连接的外设(当然,信号强度RSSI也可以作为过滤凭据)kCBAdvDataLocalName
        print("peripheral\(peripheral)\n; advertisementData\(advertisementData); rssi\(RSSI)\n **************")
        //过滤设备接下来可以连接设备
        //如果你没有设备,可以下载一个app叫lightbule的app去模拟一个设备
        //这里自己去设置下连接规则,我设置的是二维码扫描到的运动手环的设备号
        // 判断设备号是否扫描到
        guard let periheralName = peripheral.name  else
        {
            print("没有名字")
            return;
        }

        if periheralName.contains("5s")
        {
            print("找到设备")
            //5.1停止扫描
            central.stopScan()
            //5.2将外设存入外设数组,(1~7)个
            self.per = peripheral;
            //5.3请求连接
            central.connect(peripheral, options: nil)
        }
        else
        {
            print("没有扫描到设备,重新扫描")
        }
    }
    //6连接外设的状态
    //6.1连接成功的代理
    func centralManager(_ central: CBCentralManager, didConnect peripheral: CBPeripheral)
    {
        print("连接\(peripheral.name) 成功 ")

        //7.与外设进行信息交互,设置的peripheral代理CBPeripheralDelegate
        peripheral.delegate = self
        //扫描外设Services,成功后会进入方法:-(void)peripheral:(CBPeripheral *)peripheral didDiscoverServices:(NSError *)error{
        peripheral.discoverServices(nil)

    }
    //6.2连接失败
    func centralManager(_ central: CBCentralManager, didFailToConnect peripheral: CBPeripheral, error: Error?)
    {
        guard error == nil else
        {
            print("连接失败")
            return
        }

    }

    //6.3连接丢失取消连击
    func centralManager(_ central: CBCentralManager, didDisconnectPeripheral peripheral: CBPeripheral, error: Error?)
    {
        print("连接丢失")
    }


}
 //MARK:- 外设的代理 -
extension ViewController: CBPeripheralDelegate
{
    //7.1发现外设的服务
    func peripheral(_ peripheral: CBPeripheral, didDiscoverServices error: Error?)
    {
        guard error == nil else
        {
            print("服务有错误")
            return
        }
        for server in (peripheral.services)!
        {
            // 7.2 扫描外设服务中的每一个特征 peripheral:didDiscoverCharacteristicsForService
            //扫描每个service的Characteristics,扫描到后会进入方法: -(void)peripheral:(CBPeripheral *)peripheral didDiscoverCharacteristicsForService:(CBService *)service error:(NSError *)error
            print("外设服务UUID = \(server.uuid)")
            print("******************************")
           //判断服务
            if server.uuid == CBUUID(string: "FFE0") //FFF0服务1 里面有两个特征一个 通知 一个读写FFE0 服务2
            {
                peripheral.discoverCharacteristics(nil, for: server)
            }

        }

    }
    //7.3扫描到外设服务中的特征值
    func peripheral(_ peripheral: CBPeripheral, didDiscoverCharacteristicsFor service: CBService, error: Error?)
    {
        guard error == nil else
        {
            print("服务特征有错误")
            return
        }
        print("扫描到服务\(service.uuid)特征数目\(service.characteristics?.count)")
        for character in (service.characteristics)!
        {
            print("特征的UUID:\(character.uuid)")
             // 7.4 外设检索特征的描述
            //搜索Characteristic的Descriptors,读到数据会进入方法:-(void)peripheral:(CBPeripheral *)peripheral didDiscoverDescriptorsForCharacteristic:(CBCharacteristic *)characteristic error:(NSError *)error
            // 扫描外设特征的描述
            peripheral.discoverDescriptors(for: character)
            if character.uuid.uuidString == "FFF1"
            {
                print("这是一个notify特征可以订阅")
//                periheral(periheral: per! , setNotifyValueForCharacteristic: character)
                periheral(periheral: per!, cancleNotifyValueForCharacteristic: character)
            }

            //7.5读取特征的值
            guard character.properties.contains(.read) else
            {
                print("特征不可读")
                continue
            }
            print("读取外部特征的值")
            //获取Characteristic的值,读到数据会进入方法:-(void)peripheral:(CBPeripheral *)peripheral didUpdateValueForCharacteristic:(CBCharacteristic *)characteristic error:(NSError *)error
            // 外设读取特征的值
            peripheral.readValue(for: character)
            //写数据
            guard character.properties.contains([.read,.write]) else
            {
               print("该特征不具备读写")
               continue
            }
            //写操作

//            let dataDic = try? JSONSerialization.jsonObject(with: data!, options: [])
//            print("读写数据\(dataDic)")
            if character.uuid.uuidString == "FFF2"
            {
                readWriteCharicter = character
            }

        }
        print("******************服务\(service.uuid)的特征扫描完毕********************")
    }

    // 7.6 外设发现了特征中的描述
    // 发现特征Characteristics的描述Descriptor
    func peripheral(_ peripheral: CBPeripheral, didDiscoverDescriptorsFor characteristic: CBCharacteristic, error: Error?)
    {
        guard error == nil else
        {
            print("DiscoverDescriptorsFor characteristic Error")
            return
        }
        for des in characteristic.descriptors!
        {
            print("特征描述.uuid:\(des.uuid)")
            //读取特征的描述,读到之后会执行
            // didUpdateValueFor descriptor:
            peripheral.readValue(for: des)

        }
        print("******************特征\(characteristic.uuid)中的描述完毕************")

    }

       //MARK: 7.7更新特征value
    // 读取到特征characteristic的值
    func peripheral(_ peripheral: CBPeripheral, didUpdateValueFor characteristic: CBCharacteristic, error: Error?)
    {
        //读取到了特征值
        //打印出characteristic的UUID和值
        //!注意,value的类型是NSData,具体开发时,会根据外设协议制定的方式去解析数据
        guard error == nil else
        {
            print("特征值有错")
         return
        }
        if characteristic.uuid.uuidString == "FFF2"
        {
            let newValue = characteristic.value
            print("new\(newValue)")
        }
        print("服务\(characteristic.service.uuid)的特征")
        //!注意,value的类型是NSData,具体开发时,会根据外设协议制定的方式去解析数据
        let valueString = String(data: characteristic.value!, encoding: .utf8)

        print("特征的.uuid=\(characteristic.uuid);特征的value=\(valueString)")

        print("******************读取特征\(characteristic.uuid)值完毕************")

    }
    // 获取Characteristics的 descriptor的值
    //读取到外部设备特征的描述
    func peripheral(_ peripheral: CBPeripheral, didUpdateValueFor descriptor: CBDescriptor, error: Error?)
    {
        //打印出DescriptorsUUID 和value
        //这个descriptor都是对于characteristic的描述,一般都是字符串,所以这里我们转换成字符串去解析

//        print("服务\(descriptor.characteristic.service.uuid)]\n特征uuid=\(descriptor.characteristic.uuid);\n特征描述的value=\(descriptor.value)")
       // print("******************特征描述扫描完毕************")

    }
       //MARK: - 写数据回调 -
    func peripheral(_ peripheral: CBPeripheral, didWriteValueFor characteristic: CBCharacteristic, error: Error?)
    {
        print("写数据完成\(characteristic.uuid)")
        if characteristic.uuid.uuidString == "FFF2"
        {
            peripheral.discoverCharacteristics([characteristic.uuid], for: characteristic.service)
        }

    }

    func peripheral(_ peripheral: CBPeripheral, didModifyServices invalidatedServices: [CBService])
    {

    }


       //MARK: 手动去写数据
    func periheral(perheral: CBPeripheral,  writeData data: Data , forCharacteristic charicteristic: CBCharacteristic) -> ()
    {
        /*
        typedef NS_OPTIONS(NSUInteger, CBCharacteristicProperties) {
            CBCharacteristicPropertyBroadcast                                                = 0x01,
            CBCharacteristicPropertyRead                                                    = 0x02,
            CBCharacteristicPropertyWriteWithoutResponse                                    = 0x04,
            CBCharacteristicPropertyWrite                                                    = 0x08,
            CBCharacteristicPropertyNotify                                                    = 0x10,
            CBCharacteristicPropertyIndicate                                                = 0x20,
            CBCharacteristicPropertyAuthenticatedSignedWrites                                = 0x40,
            CBCharacteristicPropertyExtendedProperties                                        = 0x80,
            CBCharacteristicPropertyNotifyEncryptionRequired NS_ENUM_AVAILABLE(NA, 6_0)        = 0x100,
            CBCharacteristicPropertyIndicateEncryptionRequired NS_ENUM_AVAILABLE(NA, 6_0)    = 0x200
        };
         打印出特征的权限(characteristic.properties),可以看到有很多种,这是一个NS_OPTIONS的枚举,可以是多个值
         常见的又read,write,noitfy,indicate.知道这几个基本够用了,前俩是读写权限,后俩都是通知,俩不同的通知方式
         */
        // 只有特征的properties中有写的属性时候,才写
        if charicteristic.properties.contains(.write)
        {
            // 这句才是正宗的核心代码
            perheral.writeValue(data, for: charicteristic, type: .withResponse)
        }
    }

     //MARK:- 自定义订阅和取消 -

    func periheral(periheral:CBPeripheral, setNotifyValueForCharacteristic characteristic: CBCharacteristic)
    {
        guard characteristic.properties.contains(.notify) else
        {
            print("特征属性必须要wirte")
            return
        }
        print("订阅特征")
        periheral.setNotifyValue(true, for: characteristic)
    }

    //取消订阅
    func periheral(periheral:CBPeripheral, cancleNotifyValueForCharacteristic characteristic: CBCharacteristic)
    {
        guard characteristic.properties.contains(.notify) else
        {
            print("特征属性必须要notify")
            return
        }
        periheral.setNotifyValue(false, for: characteristic)
    }

    ///断开连接
    func centralMangerStopScan(manager: CBCentralManager, didConnectWithPeriheral periheral: CBPeripheral)
    {
        //停止扫描
        cMgr.stopScan()
        //断开连接
        cMgr.cancelPeripheralConnection(periheral)
    }
}
BLE-periphral外设模式流程,手机作为外设 被其他的设备发现链接
peripheral模式的流程
- 1.引入CoreBluetooth框架,初始化peripheralManager
- 2.设置peripheralManager中的内容
- 3.开启广播advertising
- 4.对central的操作进行响应
- 4.1 读characteristics请求
- 4.2 写characteristics请求
- 4.4 订阅和取消订阅characteristics
具体操作步骤
import UIKit
import CoreBluetooth

let Service1StrUUID = "FFF0"
let Service2StrUUID = "FFE0"

let notiyCharacteristicStrUUID = "FFF1"
let readwriteCharacteristicStrUUID = "FFF2"
let readCharacteristicStrUUID = "FFE1"

let LocalNameKey = "SHLPriheralManagerDemo"
class ViewController: UIViewController
{

    @IBOutlet weak var timeLabel: UILabel!
    /// 外设管理者
    var priheralManager:CBPeripheralManager!
    ///定时器更新订阅特征的值
    var timer: Timer?
    //给外作为外设的自己添加两个服务
    @objc lazy var services :[CBMutableService] =
    {
        // 特征描述的UUID
        let characteristicDescritonUUID = CBUUID(string: CBUUIDCharacteristicUserDescriptionString)
//                    let characteristicDescritonUUID = CBUUID(string: "RWD001")

        //通知的特征UUID
        let notifyCharacteristicUUID = CBUUID(string: notiyCharacteristicStrUUID)
        // 读写特征的UUID
        let readwriteCharacteristicUUID =  CBUUID(string: readwriteCharacteristicStrUUID)
        // 只读特征的UUID
        let readCharacteristicUUID = CBUUID(string: readwriteCharacteristicStrUUID)

        let server1UUID = CBUUID(string: Service1StrUUID)
        let server2UUID = CBUUID(string: Service2StrUUID)

        //初始化一个特征描述
        let description1 = CBMutableDescriptor(type: characteristicDescritonUUID, value: "这是一个可读写的服务特征")
        // 可通知的特征
        let notifyCharacteristic = CBMutableCharacteristic(type: notifyCharacteristicUUID, properties: .notify, value: nil, permissions: .readable)

         // 可读写的特征

        let readwriteCharacteristic = CBMutableCharacteristic(type: readwriteCharacteristicUUID, properties: [.read,.write], value: nil, permissions: [.readable, .writeable])

        // 设置特征的描述
        readwriteCharacteristic.descriptors = [description1]

        //只读特征
        let valueDic = ["name":"SuLuo", "age":"18"]
        var readWriteData = try? JSONSerialization.data(withJSONObject: valueDic, options: [])
        let readCharacteristic = CBMutableCharacteristic(type: readCharacteristicUUID, properties: .read, value: readWriteData, permissions: .readable)

        //初始化服务1
        let server1 = CBMutableService(type: server1UUID, primary: true)
        // 为服务1设置俩特征(通知, 带描述的读写)
        server1.characteristics = [notifyCharacteristic, readwriteCharacteristic]

         // 初始化服务2,并且添加一个只读特征
        let server2 = CBMutableService(type: server2UUID, primary: true)
        server2.characteristics = [readCharacteristic]
        return [server1, server2]
    }()


    @IBAction func startPriheralMode(_ sender: UIButton)
    {
        //开启外设 完成后会执行peripheralManagerDidUpdateState
        self.priheralManager = CBPeripheralManager(delegate: self, queue: DispatchQueue.main)
    }

}

extension ViewController: CBPeripheralManagerDelegate
{
    // CBPeripheralManager初始化后会触发的方法
    func peripheralManagerDidUpdateState(_ peripheral: CBPeripheralManager)
    {
        if peripheral.state == .poweredOn
        {
            //代开设备成功
            // 配置各种服务入CBPeripheralManager
            setupPeriheral()
        }else
        {
            print("打开设备失败")
        }
    }
    //给外设管理者添加服务
    func peripheralManager(_ peripheral: CBPeripheralManager, didAdd service: CBService, error: Error?)
    {
        print("新的服务\(service)")
        // 由于添加了两次ser,所以方法会调用两次
        var i = 0
        if (error == nil)
        {
            i += 1
        }
        //开启广播
        // 当第二次进入方法时候,代表两个服务添加完毕,此时要用到2,由于没有扩展性,所以新增了可变数组,记录添加的服务数量

        let adv = [CBAdvertisementDataLocalNameKey:LocalNameKey, CBAdvertisementDataServiceUUIDsKey: services.map{$0.uuid}] as [String : Any]
        peripheral.startAdvertising(adv)

    }
    //开启广播后会执行
    func peripheralManagerDidStartAdvertising(_ peripheral: CBPeripheralManager, error: Error?)
    {
        guard error == nil else
        {
            print("广播发生错误\(error)")
            return
        }
        print("外设已经开启广播")

    }

    //对central的操作做出响应
    // 外设收到读的请求,然后读特征的值赋值给request
    func peripheralManager(_ peripheral: CBPeripheralManager, didReceiveRead request: CBATTRequest)
    {
      // 判断是否可读
        print("收到读数据请求")
        guard request.characteristic.properties.contains(.read) else
        {
            print("读不被允许")
            peripheral.respond(to: request, withResult: .readNotPermitted)
            return
        }
        peripheral.respond(to: request, withResult: .success)

    }

    // 外设收到写的请求,然后读request的值,写给特征
    func peripheralManager(_ peripheral: CBPeripheralManager, didReceiveWrite requests: [CBATTRequest])
    {
        //遍历请求
        for request in requests
        {
            //根据请求特征的属性判断是否可写
            guard request.characteristic.properties.contains(.write) else
            {
                peripheral.respond(to: request, withResult: .readNotPermitted)
                continue
            }
            //拿到请求的中数据
            let data = request.value
            print("修改的数据\(request.value)")

            //请此数据写入请求的特征中(需要注意特征类型转换)
            let mchr = request.characteristic as! CBMutableCharacteristic
            mchr.value = data
            // 4.2.4 发送修改后的请求和成功出去
            peripheral.respond(to: request, withResult: .success)

        }

    }

    // 与CBCentral的交互
    // 订阅特征
    func peripheralManager(_ peripheral: CBPeripheralManager, central: CBCentral, didSubscribeTo characteristic: CBCharacteristic)
    {
         // 4.3.1 既然被订阅,就要定时更新特征中的值
        print("收到订阅请求\(Thread.current)")
        timer = Timer(timeInterval: 5.0, target: self, selector: #selector(updataNotifyCharacteristic(timer:)), userInfo: characteristic, repeats: true)
        RunLoop.current.add(timer!, forMode: .default)


    }
    //中心设备取消订阅
    func peripheralManager(_ peripheral: CBPeripheralManager, central: CBCentral, didUnsubscribeFrom characteristic: CBCharacteristic)
    {
        print("设备取消订阅")

    }

    @objc func updataNotifyCharacteristic(timer: Timer)
    {
         // 将数据随着时间进行更新
        let now = Date()
        let formatter = DateFormatter()
        formatter.dateFormat = "yy-MM-dd HH:mm:ss"
        let nowStr = formatter.string(from: now)
        //转换成C类型String
        let dataStr = nowStr.data(using: String.Encoding.utf8)
        // 发送一个更新的特征值给订阅了特征的中心设备

        let characterictic = timer.userInfo as! CBMutableCharacteristic
        print(nowStr)

        // 发送一个更新的特征值给订阅了特征的中心设备
        priheralManager.updateValue(dataStr!, for: characterictic, onSubscribedCentrals: nil)

        timeLabel.text = nowStr

    }


    //MARK: - 私有方法 -
    func setupPeriheral()
    {
        // 添加服务进外设管理者
        // 添加操作会触发代理方法peripheralManager:didAddService:error:
        for server in services
        {
            priheralManager.add(server)
        }
    }


} 1904


 扫一扫


 被折叠的 条评论
为什么被折叠?
 到【灌水乐园】发言


