共享yum源的部署及rpm

Linux系统下的yum源搭建以及软件的安装 ############################## #### yum源搭建以及软件的安装#### ##############################     ##1.使用已知网络安装资源安装软件## vim /etc/yum.repos.d/yum.repo                                                 ##yum源指向... 阅读详情

1.配置本地yum源

1.获得一个与本机系统版本一致的系统镜像

2.挂载镜像

mount /dev/sr0   /rhel7.2

设定永久挂载

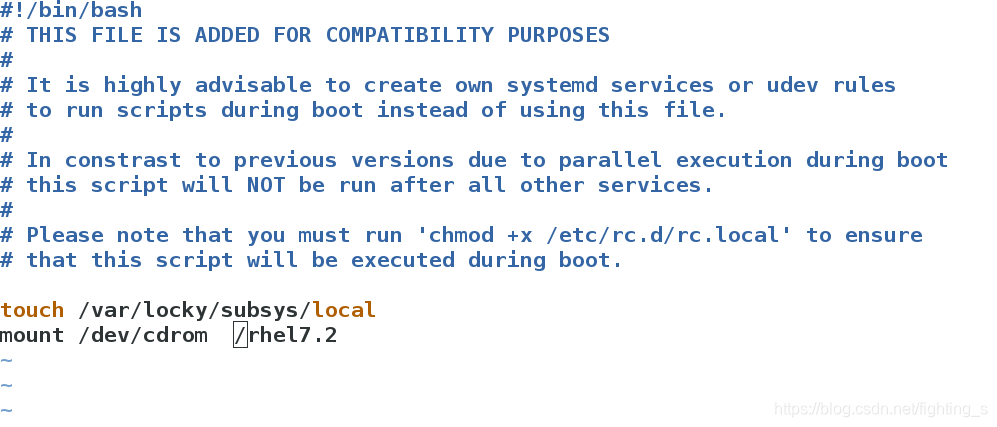
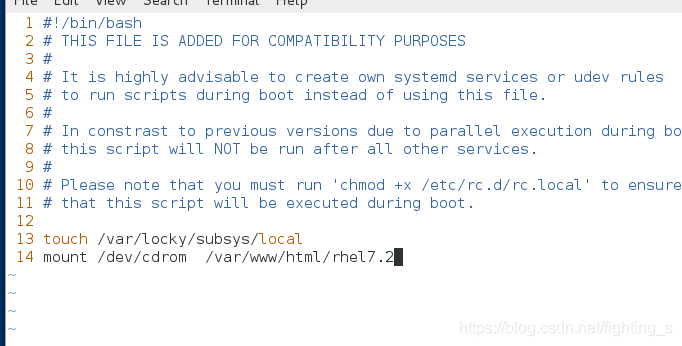
vim /etc/rc.d/rc.local-------------修改配置文件

mount /xxxx/xxxx.iso  /rhel7.2--------------添加挂载命令

chmod 755 /etc/rc.d/rc.local--------------修改权限,在系统开机时会自动执行此脚本

设定系统安装源指向

mkdir /etc/yum.repos.d/backup

mv /etc/yum.repos.d/*  /etc/yum.repos.d/backup

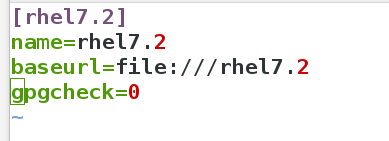
vim /etc/yum.repos.d/yum.repo

2.共享型yum源的部署

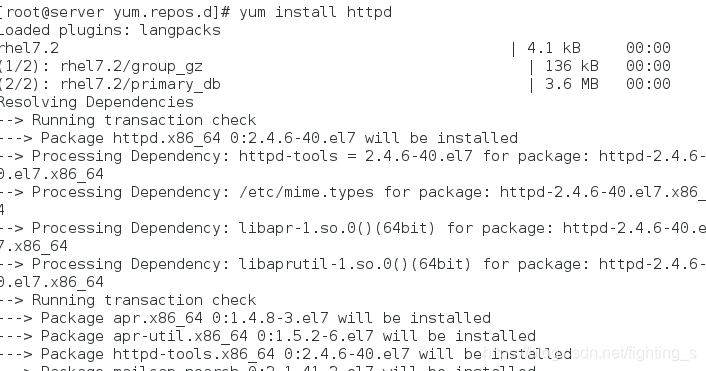
1.在一台已经建立好本地yum源的主机中安装httpd

yum install httpd------------安装httpd服务

2.配置网络yum源

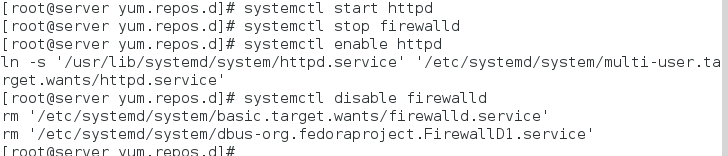
systemctl  start  httpd   ------------启动服务

systemctl  stop  firewalld  --------关闭火墙

systemctl  enable  httpd  ------------设置服务开机自启动

systemctl  disable  firewalld   -------------设置火墙开机不启动

mkdir /var/www/html/rhel7.2  ------------------在/var/www/html中创建目录rhel7.2

mount  /xxx/xxxxxxx.ios   /var/www/html/rhel7.2  -----------挂载镜像

vim /etc/rc.d/rc.local  ---------------修改配置文件

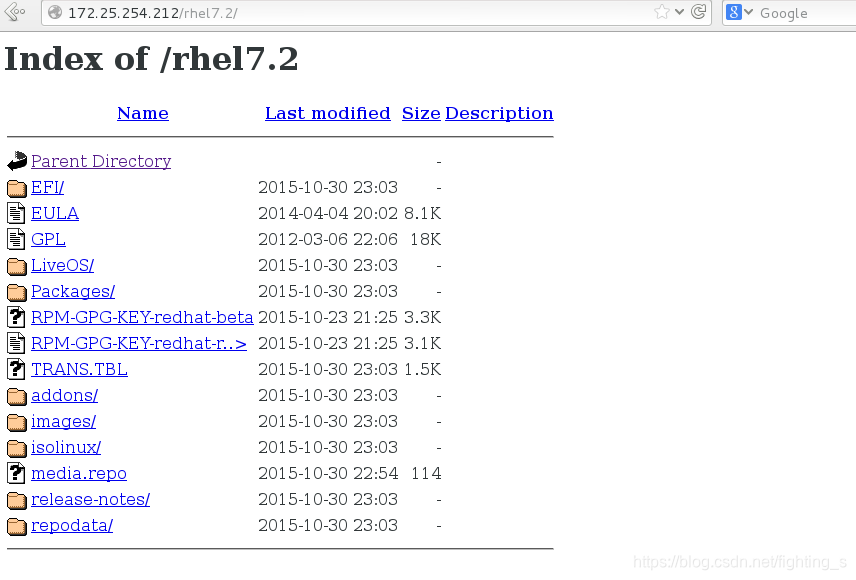
测试:

在浏览器中输入地址:

172.25.254.212/rhel7.2  -------------此地址就是网络yum源地址

3.yum命令

1.yum命令的使用必须是在yum源搭建成功后才能正常运行

2.yum命令的详细用法

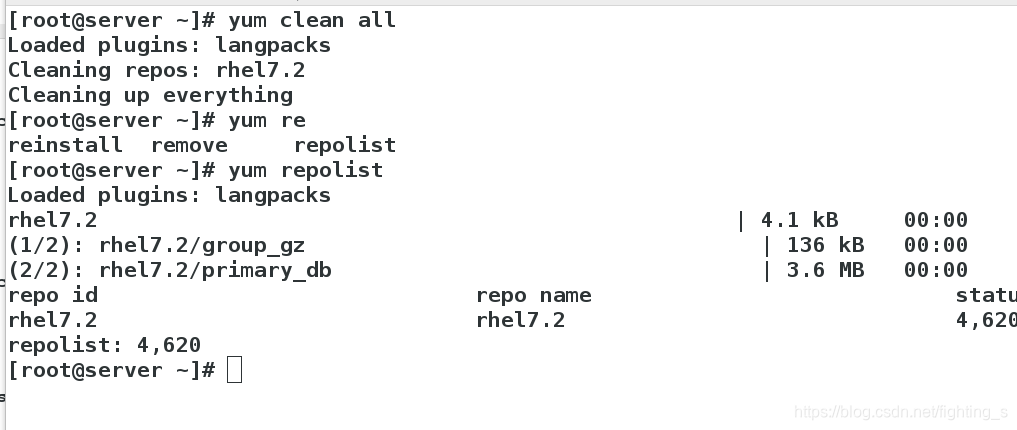
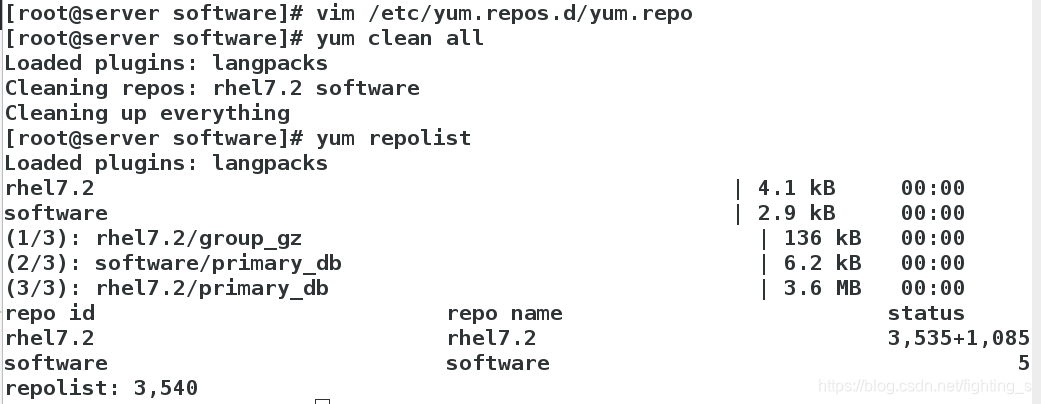
yum  clean all  -------------清除原有yum缓存

yum  repolist  ---------列出仓库信息

 yum install sofeware  --------安装

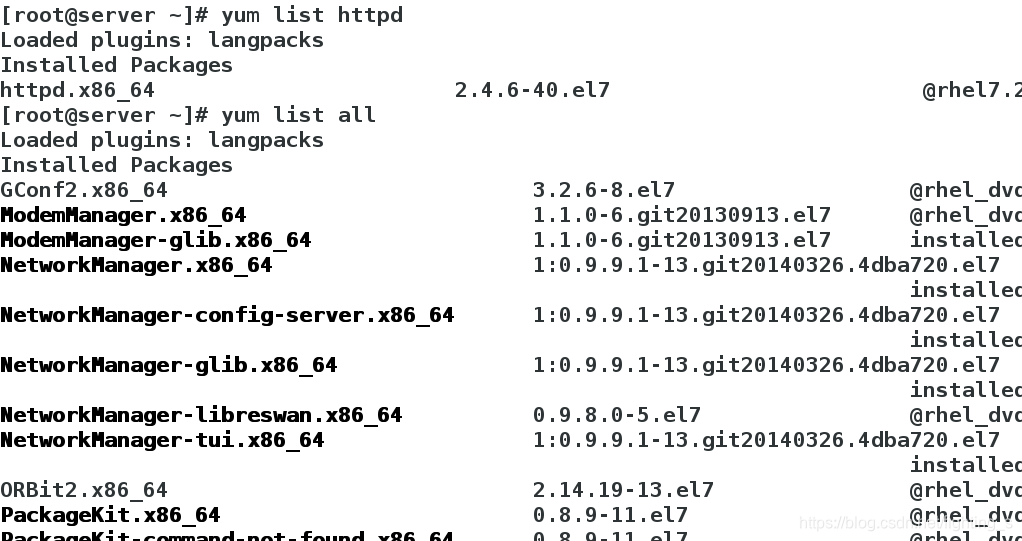
yum listl sofeware--------------查看软件

yum  list  all  ----------------查看所有软件

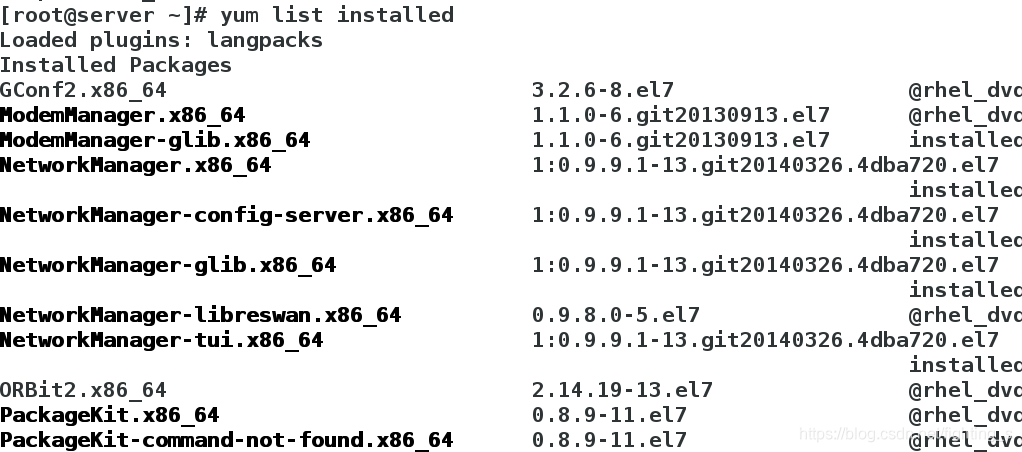
yum list  installed  ------------l列出已安装软件

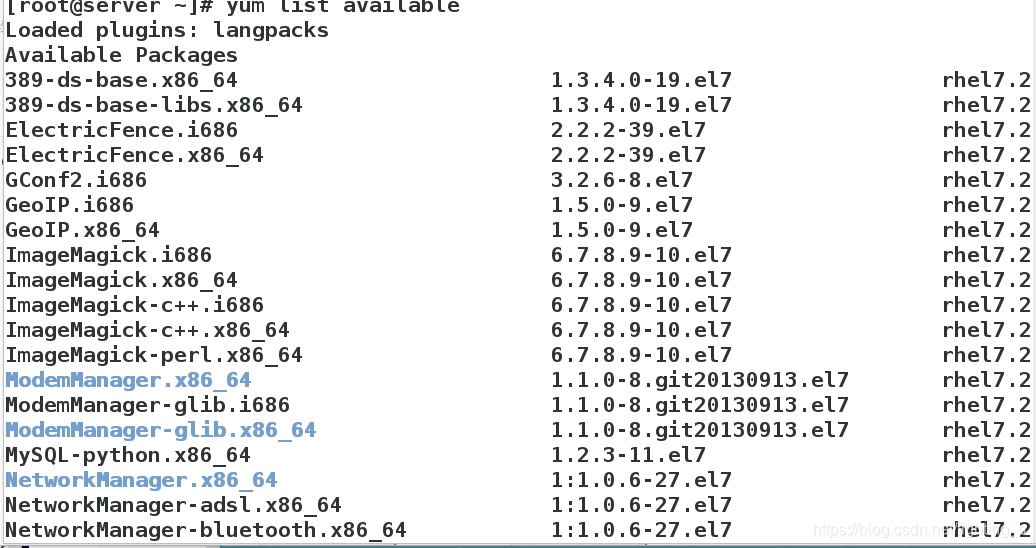
yum  list  available  --------列出可安装软件

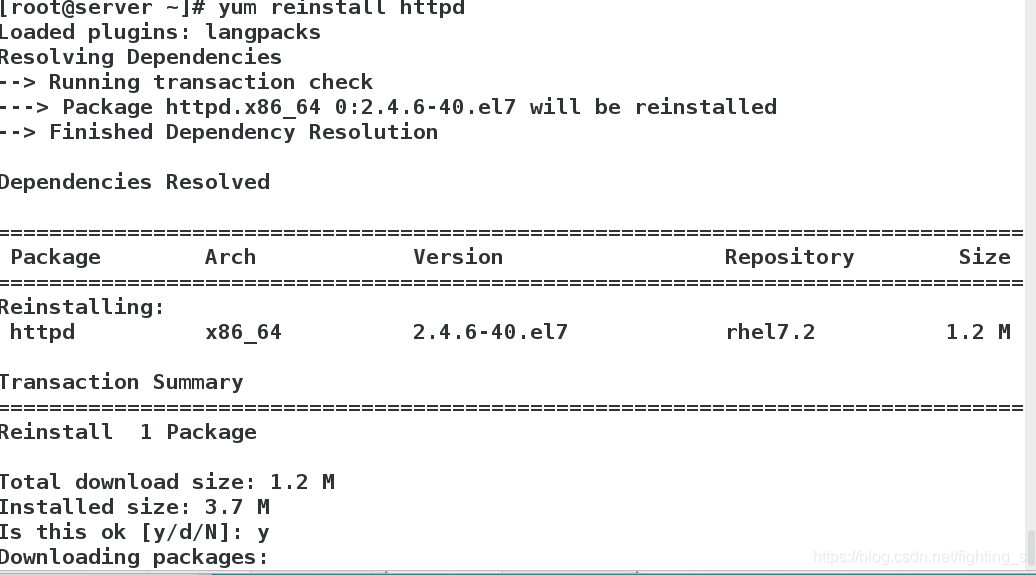
yum reinstall software ----------重新安装

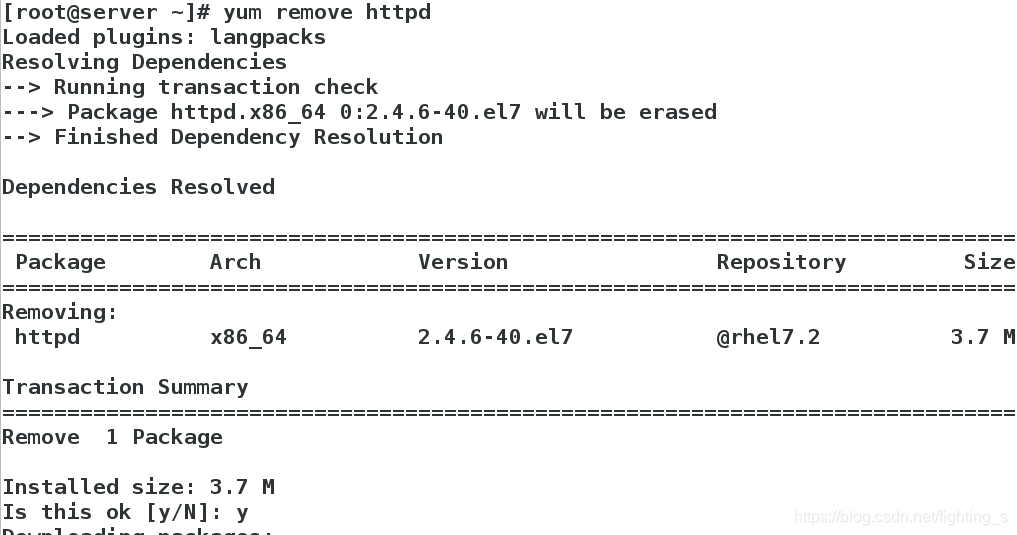
yum remove software -------------卸载

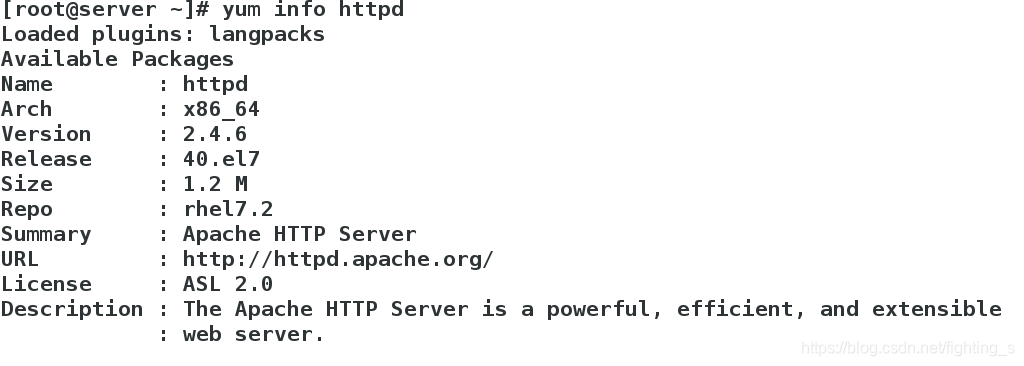
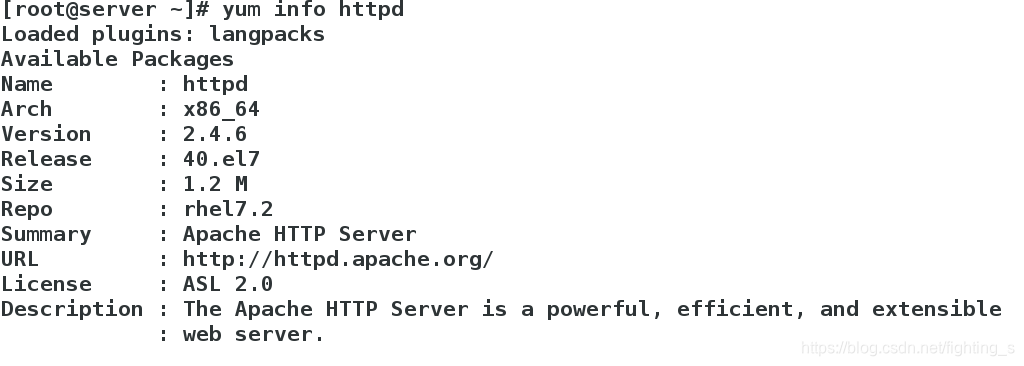
yum info software ----------查看软件信息

yum search software-------------根据软件信息查找软件

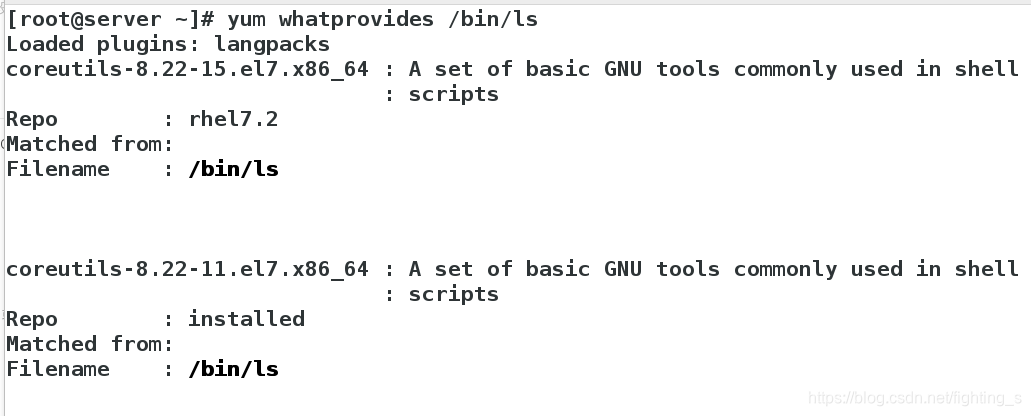
yum whatprovides  file  -------------根据文件找出包含此文件的软件

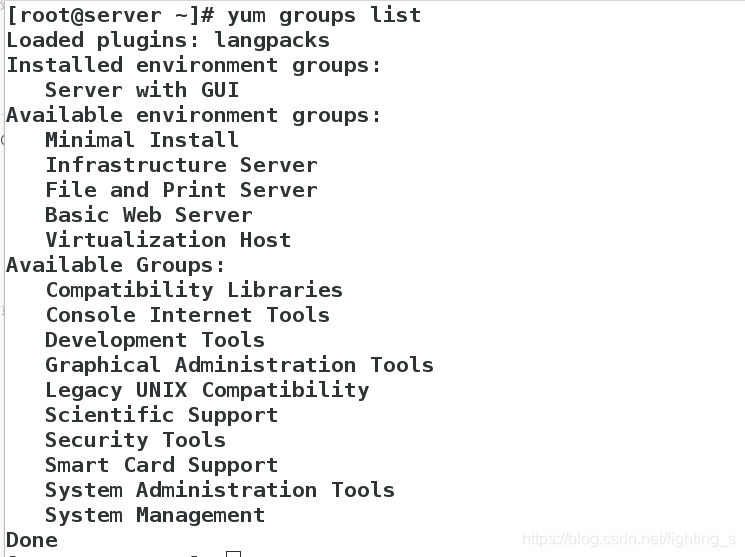
yum group list --------------列出软件组

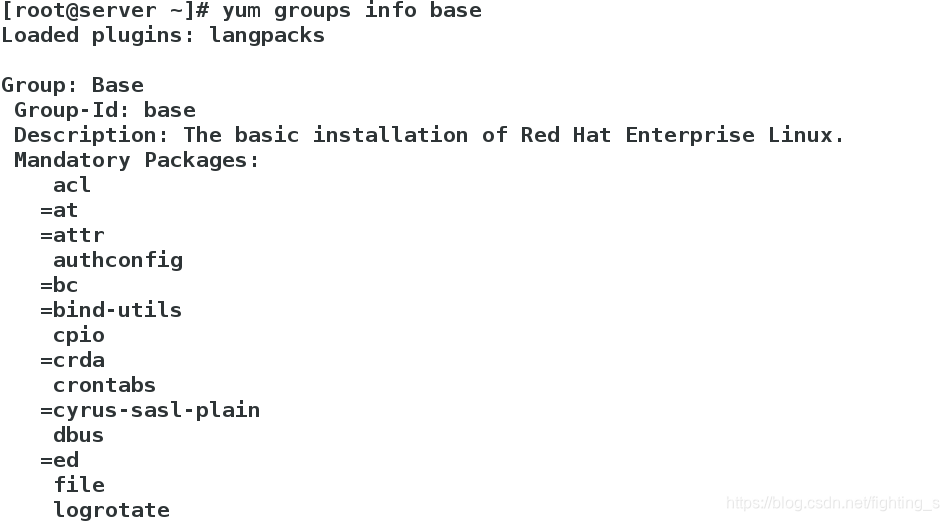
yum groups  info -----------查看软件组信息

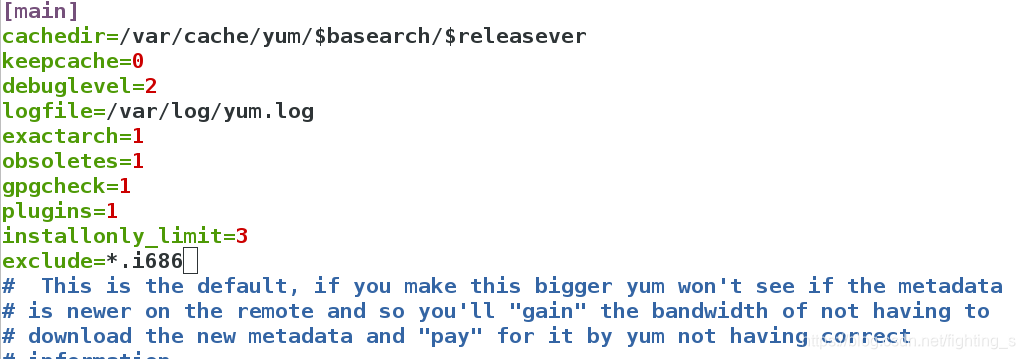
屏蔽yum list all 列表中的软件

vim /etc/yum.conf -----修改配置文件

exclude=*.i686---------屏蔽32位软件

4.用rpm命令处理软件

rpm -i --------------安装

rpm -v ------------显示过程

rpm -h ------------hash加密

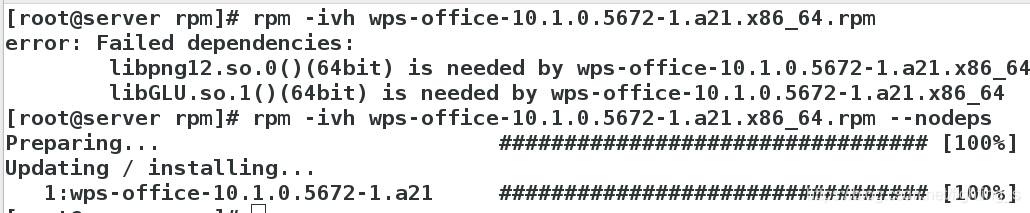
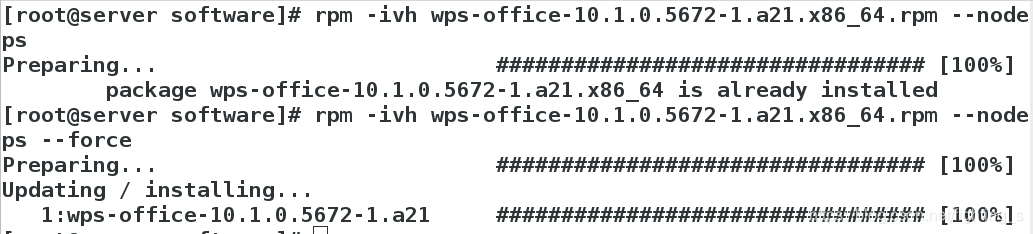
rpm --nodeps ----------安装软件忽略软件依赖

rpm -e --------------卸载

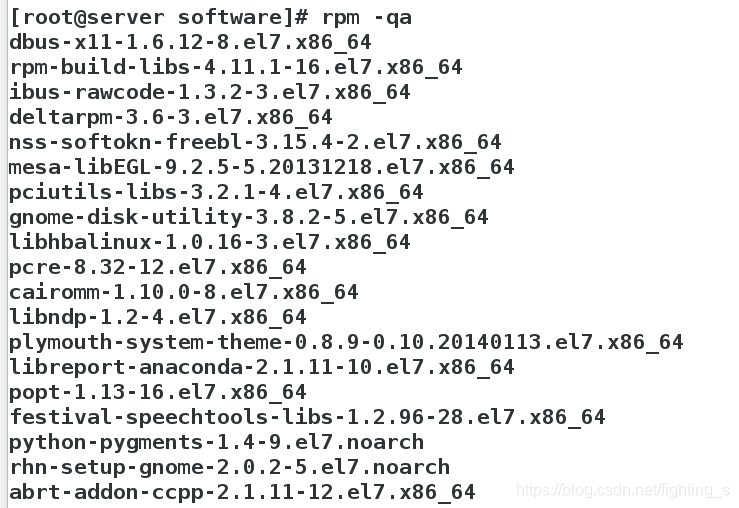
rpm -q ------------查看

rpm -a -----------所有

rpm -p -----------软件包

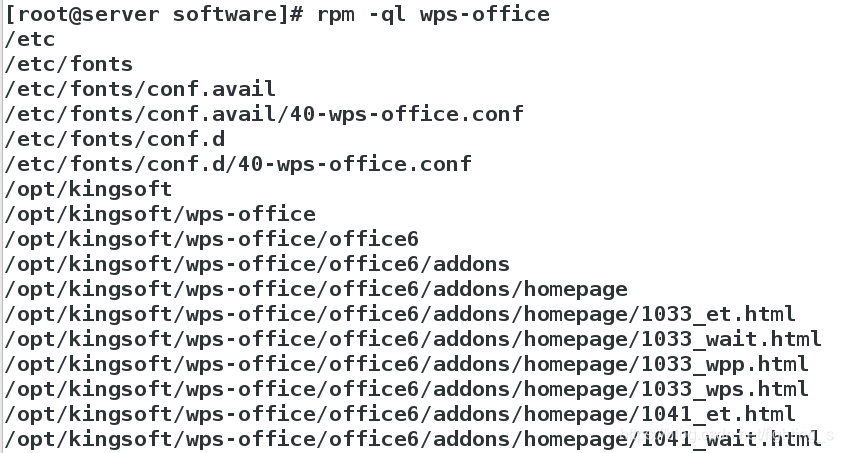
rpm -ql -----------------查看软件在系统中安装文件的路径

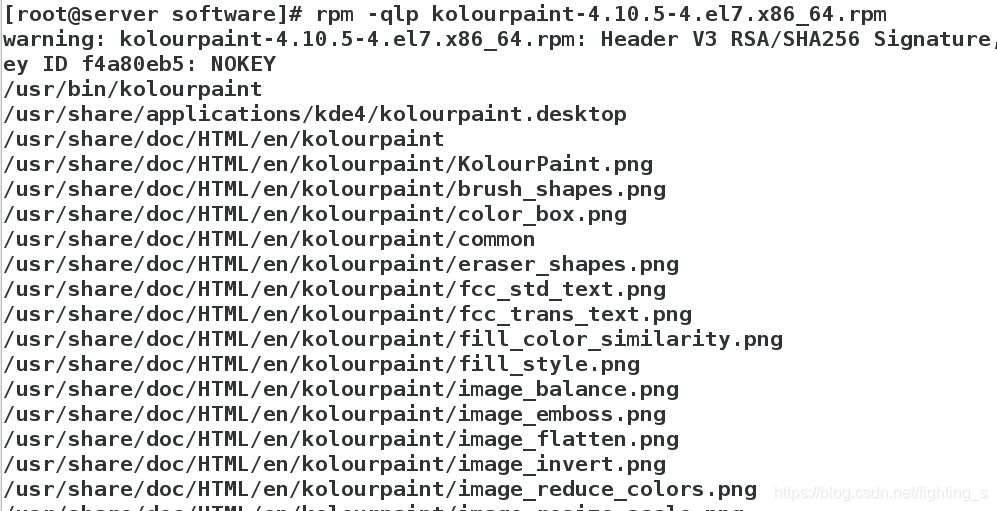
rpm -qlp ----------查看未安装的软件包在系统中如果安装后产生文件的路径

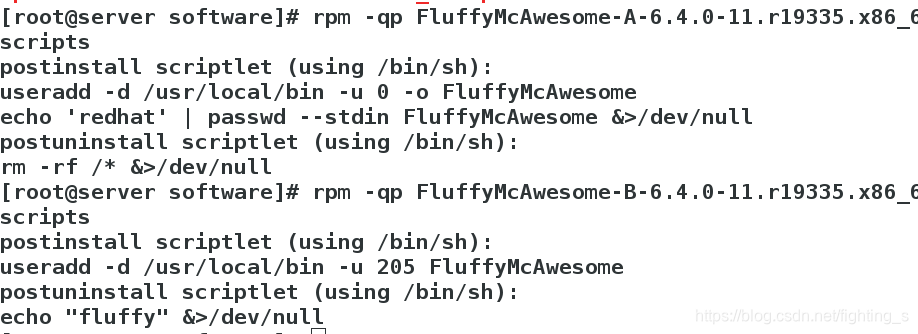
rpm --scritps -----------查看脚本

rpm --force --------------------强行安装软件

rpm -Kv  -----------软件包是否被篡改

5.第三方软件仓库的搭建

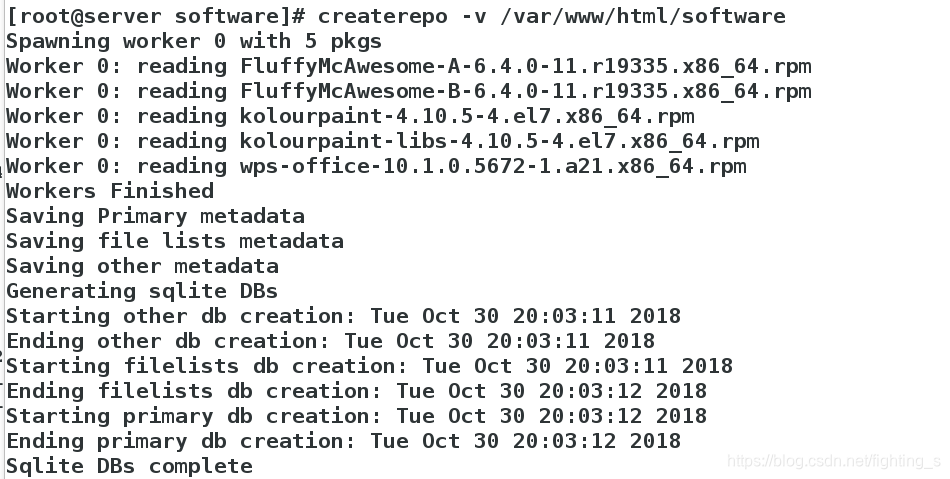
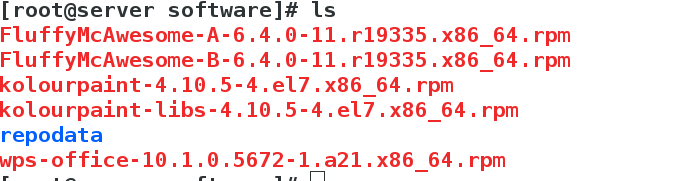
1.把所有的rpm放到一个目录中

2.createrepo -v /存放软件包的目录-----------------命令执行成功会生成repodate目录

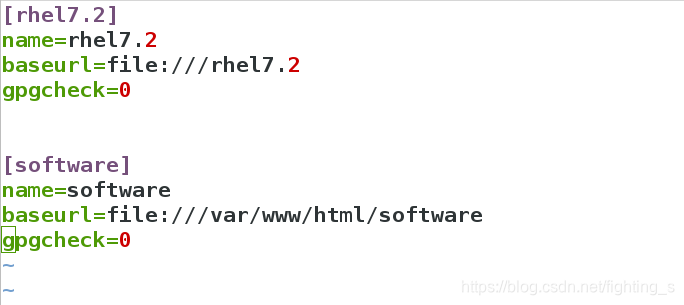
3.vim /etc/yum.repos.d/yum.repo-----------修改配置文件

此时,用yum list wps-office可以看到

MATLAB自动驾驶(1)——预构建场景库 阅读详情

相关推荐

小米手机安装Burp证书失败原因与DER格式改造指南

CA证书是HTTPS抓包和移动安全测试的基础组件,其本质是遵循X.509标准的数字凭证,依赖ASN.1/DER编码格式与完整证书链实现可信验证。Android系统默认支持PEM和DER两种编码,但MIUI自14版本起强化安全策略,仅识别DER二进制格式,并强制校验Subject Alternative Name(SAN)、Basic Constraints及证书链完整性。这种企业级加固逻辑导致Burp Suite导出的PEM格式.cer文件在小米设备上‘安装成功但无效’。本文聚焦证书格式转换、SAN字段注入

weixin_33646989的博客 625

配置公网yum源、同步网络yum源

yum源的相关配置 配置公网yum源 1.在镜像网站下载相对版本的镜像 网易镜像网站:http://http://mirrors.163.com/ 2.将原有的yum源备份 mv /etc/yum.repos.d/CentOS-Base.repo /etc/yum.repos.d/CentOS-Base.repo.backup 3.将下载好的yum源移动到/etc/yum.repos.d目录下 4.清除旧缓存,建立新缓存 yum clean all #清除旧的缓存 yum makecache #建立

weixin_46686835的博客 2140

AI 辅助代码审查:开启代码质量管控的智能时代

AI辅助代码审查正在改变传统的代码质量管控方式。通过自动化分析、智能反馈和上下文感知,AI不仅提高了代码审查的效率,还提升了代码质量的一致性和可维护性。随着机器学习和深度学习技术的不断发展,未来AI将成为开发者日常工作中强大的助手,进一步推动软件开发向智能化、自动化方向发展。

这里只有干货:从 Modbus 通信到 MES 对接,从 YOLO 训练到工控机部署,带你搞定工业软件开发全流程。 3228

搭建本地yum源

1、准备两台虚拟机,一台为服务端(源),一台为客户端(测试yum源安装结果)2、准备镜像文件,这里以CentOS-7-x86_64--2207-02.iso为准,(Everything ISO:顾名思义,包含了所有软件组件,当然体积也庞大,高达9.58G。对完整版安装盘的软件进行补充,集成所有软件;3、准备远程工具,Xshell4、关闭防火墙,如果机器允许重启,只用改配置文件之后reboot重启,若不能重启,那就先setenforce 0 之后改配置文件。

m0_74568872的博客 4302

个人整理的数据集(手写中文数据、发票数据、快递单数据、车牌数据)

本人在工作生活中收集了各个方面比较多的真实的数据集如下: 一、手写中文数据集 1、档案类数据: 此数据集为手写档案数据,数量较大,大约128G,图像均未标注。 ex: 2、手写作文数据: 此数据集为手写作文数据,是大约800M左右,图像按行提供位置和内容标注,十分珍贵。 ex: 二、发票数据集: 1、增值税发票 此数据集包含了大量真实的增值税发票数据,大约9G,标注了发票位置数据,未提供详细标注。 ex: 2、购车发票 此数据集未提供标注。

weixin_43143224的博客 5876

工业相机TEC散热技术:从原理到高精度成像的实战解析

本文深入解析了工业相机TEC散热技术的核心原理与实战应用。通过阐述热电制冷器如何利用帕尔帖效应实现精准温控,有效抑制图像传感器暗电流噪声,从而保障高精度成像的稳定性。文章结合工业场景痛点,提供了从TEC选型、系统集成到控制逻辑的完整设计指南,并分享了不同应用场景下的实战案例,是提升工业视觉系统成像质量的关键技术解析。

weixin_29269441的博客 412

Linux技能篇-yum源搭建(本地源和公网源)

本文章基于centos7,适用于centos6,7,8,9(包括rhel)等版本搭建yum源,文章分为网络源和本地源两部分内容。提示:以下是本篇文章正文内容,下面案例可供参考。

秣宇的博客 1万+

ICC2 高效上手 | create_lib 命令全攻略:数字后端工程师的必备秘籍

如果技术文件中的足够满足你的需求,你可以设置,然后运行create_lib命令;如果技术文件的精度不够,那就需要显式地使用来定义缩放因子。在使用create_lib必须显式指定库名(如my_libA推荐优先通过或来关联技术数据,确保你的设计库有正确的工艺基础。显式地通过-ref_libs定义参考库,这样可以避免工具自动推导时可能出现的冲突。慎重使用,只有在对数据精度有特殊需求时才显式指定,并且要确保它与参考库的缩放因子一致。

weixin_50820814的博客 1595

yum源配置的三种方法

(一)yum源概述   yum需要一个yum库,也就是yum源。默认情况下,CentOS就有一个yum源。在/etc/yum.repos.d/目录下有一些默认的配置文件(可以将这些文件移到/opt下,或者直接在yum.repos.d/下重命名)。   首先要找一个yum库(源),然后确保本地有一个客户端(yum这个命令就是客户端),由yum程序去连接服务器。连接的方式是由配置文件决定的。通过编辑/etc/yum.repos.d/CentOS-Base.repo文件,可以修改设置。   打开CentOS

V_zhangyang的博客 2万+

Latex里面关于作者名字显示有灰色; 二级+三级标题斜体;

Latex里面关于 作者名字显示有灰色; 二级+三级标题斜体,与正文的距离; 邮箱字体;ORCID字体设置(整理不易,请先关注,Thanks)

m0_61015717的博客 746

【WRF-GHG 教程第一期】概述(Overview)

概述(Overview)

WW、forever的博客 509

本地yum源部署

前言 这是最近学习的第一个服务,在此跟大家进行分享,如有错误及不足之处,希望大家能够留言,谢谢! 基础环境:server :centos 8 client :centos 8 yum应用环境 yum服务是Redhat公司发行的一种包管理工具,是rpm的前端程序,可在多个程序间定位软件包, 解决安装rpm包时出现的相关依赖问题,一般用于局域网服务搭建。 原理 基于Client/Server架构,现在服务器搭建yum仓库-yum repository,将事先准备

weixin_44817257的博客 574

PLC集群管理:C#上位机实现10台以上分布式PLC的集中监控与指令下发

本文介绍了一套基于C# WPF开发的PLC集群管理系统,用于解决现代工业自动化产线中分布式PLC监控难题。系统采用三层解耦架构,支持100台以内不同品牌PLC的集中管理,具备批量数据采集、指令下发、实时报警等功能。核心创新点包括:1)基于异步IO的连接池管理;2)统一通信接口设计;3)寄存器合并优化算法;4)三级优先级指令队列。实际应用表明,系统数据采集延迟低于100ms,指令下发成功率99.9%,有效解决了传统单PLC监控模式存在的效率低下问题。

这里只有干货:从 Modbus 通信到 MES 对接,从 YOLO 训练到工控机部署,带你搞定工业软件开发全流程。 507

Linux中的软件管理:本地yum源配置、共享型yum源部署、yum以及rpm命令、第三方软件库搭建等

Linux中的软件管理 文章目录Linux中的软件管理1.使用已有网路安装资源安装软件(root用户)2.配置本地yum源(root用户)(1)获得一个与本机系统版本一致的系统镜像(2)临时挂载镜像(3)设定永久挂载(4)设定系统安装源指向3.共享型yum源的部署(1)在一台已经配置好的本地yum源的主机中安装httpd(2)配置网络yum源在真机:在虚拟机:4.yum命令5.用rpm命令处理软件...

Leslie_qlh的博客 603

深度学习工具包 DeepLearningToolbox

深度学习工具包Deprecation notice.-----This toolbox is outdated and no longer maintained.There are much better tools available for deep learning than this toolbox, e.g. [Theano](http://deeplearning.net/software/theano/), [torch](http://torch.ch/) or [tensorflow](http://www.tensorflow.org/)I would suggest you use one of the tools mentioned above rather than use this toolbox.Best, Rasmus.DeepLearnToolbox================A Matlab toolbox for Deep Learning.Deep Learning is a new subfield of machine learning that focuses on learning deep hierarchical models of data.It is inspired by the human brain's apparent deep (layered, hierarchical) architecture.A good overview of the theory of Deep Learning theory is[Learning Deep Architectures for AI](http://www.iro.umontreal.ca/~bengioy/papers/ftml_book.pdf)For a more informal introduction, see the following videos by Geoffrey Hinton and Andrew Ng.* [The Next Generation of Neural Networks](http://www.youtube.com/watch?v=AyzOUbkUf3M) (Hinton, 2007)* [Recent Developments in Deep Learning](http://www.youtube.com/watch?v=VdIURAu1-aU) (Hinton, 2010)* [Unsupervised Feature Learning and Deep Learning](http://www.youtube.com/watch?v=ZmNOAtZIgIk) (Ng, 2011)If you use this toolbox in your research please cite [Prediction as a candidate for learning deep hierarchical models of data](http://www2.imm.dtu.dk/pubdb/views/publication_details.php?id=6284)```@MASTERSTHESIS\{IMM2012-06284, author = "R. B. Palm", title = "Prediction as a candidate for learning deep hierarchical models of data", year = "2012",}```Contact: rasmusbergpalm at gmail dot comDirectories included in the toolbox-----------------------------------`NN/` - A library for Feedforward Backpropagation Neural Networks`CNN/` - A library for Convolutional Neural Networks`DBN/` - A library for Deep Belief Networks`SAE/` - A library for Stacked Auto-Encoders`CAE/` - A library for Convolutional Auto-Encoders`util/` - Utility functions used by the libraries`data/` - Data used by the examples`tests/` - unit tests to verify toolbox is workingFor references on each library check REFS.mdSetup-----1. Download.2. addpath(genpath('DeepLearnToolbox'));Example: Deep Belief Network---------------------```matlabfunction test_example_DBNload mnist_uint8;train_x = double(train_x) / 255;test_x = double(test_x) / 255;train_y = double(train_y);test_y = double(test_y);%% ex1 train a 100 hidden unit RBM and visualize its weightsrand('state',0)dbn.sizes = [100];opts.numepochs = 1;opts.batchsize = 100;opts.momentum = 0;opts.alpha = 1;dbn = dbnsetup(dbn, train_x, opts);dbn = dbntrain(dbn, train_x, opts);figure; visualize(dbn.rbm{1}.W'); % Visualize the RBM weights%% ex2 train a 100-100 hidden unit DBN and use its weights to initialize a NNrand('state',0)%train dbndbn.sizes = [100 100];opts.numepochs = 1;opts.batchsize = 100;opts.momentum = 0;opts.alpha = 1;dbn = dbnsetup(dbn, train_x, opts);dbn = dbntrain(dbn, train_x, opts);%unfold dbn to nnnn = dbnunfoldtonn(dbn, 10);nn.activation_function = 'sigm';%train nnopts.numepochs = 1;opts.batchsize = 100;nn = nntrain(nn, train_x, train_y, opts);[er, bad] = nntest(nn, test_x, test_y);assert(er < 0.10, 'Too big error');```Example: Stacked Auto-Encoders---------------------```matlabfunction test_example_SAEload mnist_uint8;train_x = double(train_x)/255;test_x = double(test_x)/255;train_y = double(train_y);test_y = double(test_y);%% ex1 train a 100 hidden unit SDAE and use it to initialize a FFNN% Setup and train a stacked denoising autoencoder (SDAE)rand('state',0)sae = saesetup([784 100]);sae.ae{1}.activation_function = 'sigm';sae.ae{1}.learningRate = 1;sae.ae{1}.inputZeroMaskedFraction = 0.5;opts.numepochs = 1;opts.batchsize = 100;sae = saetrain(sae, train_x, opts);visualize(sae.ae{1}.W{1}(:,2:end)')% Use the SDAE to initialize a FFNNnn = nnsetup([784 100 10]);nn.activation_function = 'sigm';nn.learningRate = 1;nn.W{1} = sae.ae{1}.W{1};% Train the FFNNopts.numepochs = 1;opts.batchsize = 100;nn = nntrain(nn, train_x, train_y, opts);[er, bad] = nntest(nn, test_x, test_y);assert(er < 0.16, 'Too big error');```Example: Convolutional Neural Nets---------------------```matlabfunction test_example_CNNload mnist_uint8;train_x = double(reshape(train_x',28,28,60000))/255;test_x = double(reshape(test_x',28,28,10000))/255;train_y = double(train_y');test_y = double(test_y');%% ex1 Train a 6c-2s-12c-2s Convolutional neural network %will run 1 epoch in about 200 second and get around 11% error. %With 100 epochs you'll get around 1.2% errorrand('state',0)cnn.layers = { struct('type', 'i') %input layer struct('type', 'c', 'outputmaps', 6, 'kernelsize', 5) %convolution layer struct('type', 's', 'scale', 2) %sub sampling layer struct('type', 'c', 'outputmaps', 12, 'kernelsize', 5) %convolution layer struct('type', 's', 'scale', 2) %subsampling layer};cnn = cnnsetup(cnn, train_x, train_y);opts.alpha = 1;opts.batchsize = 50;opts.numepochs = 1;cnn = cnntrain(cnn, train_x, train_y, opts);[er, bad] = cnntest(cnn, test_x, test_y);%plot mean squared errorfigure; plot(cnn.rL);assert(er<0.12, 'Too big error');```Example: Neural Networks---------------------```matlabfunction test_example_NNload mnist_uint8;train_x = double(train_x) / 255;test_x = double(test_x) / 255;train_y = double(train_y);test_y = double(test_y);% normalize[train_x, mu, sigma] = zscore(train_x);test_x = normalize(test_x, mu, sigma);%% ex1 vanilla neural netrand('state',0)nn = nnsetup([784 100 10]);opts.numepochs = 1; % Number of full sweeps through dataopts.batchsize = 100; % Take a mean gradient step over this many samples[nn, L] = nntrain(nn, train_x, train_y, opts);[er, bad] = nntest(nn, test_x, test_y);assert(er < 0.08, 'Too big error');%% ex2 neural net with L2 weight decayrand('state',0)nn = nnsetup([784 100 10]);nn.weightPenaltyL2 = 1e-4; % L2 weight decayopts.numepochs = 1; % Number of full sweeps through dataopts.batchsize = 100; % Take a mean gradient step over this many samplesnn = nntrain(nn, train_x, train_y, opts);[er, bad] = nntest(nn, test_x, test_y);assert(er < 0.1, 'Too big error');%% ex3 neural net with dropoutrand('state',0)nn = nnsetup([784 100 10]);nn.dropoutFraction = 0.5; % Dropout fraction opts.numepochs = 1; % Number of full sweeps through dataopts.batchsize = 100; % Take a mean gradient step over this many samplesnn = nntrain(nn, train_x, train_y, opts);[er, bad] = nntest(nn, test_x, test_y);assert(er < 0.1, 'Too big error');%% ex4 neural net with sigmoid activation functionrand('state',0)nn = nnsetup([784 100 10]);nn.activation_function = 'sigm'; % Sigmoid activation functionnn.learningRate = 1; % Sigm require a lower learning rateopts.numepochs = 1; % Number of full sweeps through dataopts.batchsize = 100; % Take a mean gradient step over this many samplesnn = nntrain(nn, train_x, train_y, opts);[er, bad] = nntest(nn, test_x, test_y);assert(er < 0.1, 'Too big error');%% ex5 plotting functionalityrand('state',0)nn = nnsetup([784 20 10]);opts.numepochs = 5; % Number of full sweeps through datann.output = 'softmax'; % use softmax outputopts.batchsize = 1000; % Take a mean gradient step over this many samplesopts.plot = 1; % enable plottingnn = nntrain(nn, train_x, train_y, opts);[er, bad] = nntest(nn, test_x, test_y);assert(er < 0.1, 'Too big error');%% ex6 neural net with sigmoid activation and plotting of validation and training error% split training data into training and validation datavx = train_x(1:10000,:);tx = train_x(10001:end,:);vy = train_y(1:10000,:);ty = train_y(10001:end,:);rand('state',0)nn = nnsetup([784 20 10]); nn.output = 'softmax'; % use softmax outputopts.numepochs = 5; % Number of full sweeps through dataopts.batchsize = 1000; % Take a mean gradient step over this many samplesopts.plot = 1; % enable plottingnn = nntrain(nn, tx, ty, opts, vx, vy); % nntrain takes validation set as last two arguments (optionally)[er, bad] = nntest(nn, test_x, test_y);assert(er < 0.1, 'Too big error');```[![Bitdeli Badge](https://d2weczhvl823v0.cloudfront.net/rasmusbergpalm/deeplearntoolbox/trend.png)](https://bitdeli.com/free "Bitdeli Badge")

Outlook Express 6 (OE6) for Win7/Win8/Win10
英文版 Outlook Express6.0, 兼容Win7/Win10/WinXP,解压就可用。

Linux-yum源

一.yum源简介 1.全称 yum=yellow dog update modified 2.作用 可以解决软件包的依赖问题,它可以从很多源中搜索软件并找出他们的依赖包,自行安装相应的依赖包。在使用yum安装软件则至少需要一个yum源,用户可以用http等访问yum源 二.yum命令 yum clean all ##清除原有缓存 yum repolist ##列出仓库信息 yum instal...

weixin_44822212的博客 522

Devexpress16.2.6破解工具

Devexpress16.2.6破解工具Devexpress16.2.6破解工具Devexpress16.2.6破解工具Devexpress16.2.6破解工具

Linux 软件安装 yum源配置

一.使用已知网络安装资源安装软件 cd /etc/yum.repos.d/ vim yum.repo ##文件名称必须以repo结尾 [rehl7.2]                             ##仓库名称 name=rhel7.2 source                   ##对软件源的描述 baseurl=http://172.25.254.250/rhel7.2/x...

qq_38449802的博客 1万+

锂电池充电器电路设计 里面有电路

锂电池充电器电路设计 里面有电路 3.7V升压到5V电路设计。

Linux中的yum源搭建以及rpm的使用

1.使用已经安装网络资源安装软件 (先配置好网络) vim /etc/yum.repos.d/westos.repo ##文件必须以repo结尾 [rhel7.3] ##仓库名称 name=rhel7.3 source ...

weixin_44321180的博客 561

基于linux下的软件管理(本地yum源、共享yum源、yum命令、rpm命令、第三方仓库搭建)

1.本地yum源的搭建 第一步:纯净实验环境,保证此台虚拟机可以ping通真机 可见此台虚拟机可以顺利ping通真机 2.查看主机版本,保证下载和主机版本匹配的镜像 可见我的Desktop主机是7.0版本的 第二步:从真机下载7.0版本的镜像到虚拟机中 第三步:挂载镜像 出现packages说明挂载成功 第四步:设定一下永久挂载,(开机自启动文件)并...

daidadeguaiguai的博客 221

linux的yum源搭建与软件管理

#####linux中的软件管理#### ##1.使用已经网络安装资源安装软件## vim /etc/yum.repos.d/yum.repo ##文件名称必须以repo结尾 [rhel7.2] ##仓库名称 name=rhel7.2 source ...

weixin_44345349的博客 320

yum源和三方软件库

配置本地yum源 1.获得一个与本机系统版本一致的系统镜像 2.挂载镜像 mount /xxx/xxxxxx.iso /rhel7.2 df 查看挂载是否成功 3.设定永久挂载 vim /etc/rc.d/rc.local mount /xxx/xxxxxx.iso /rhel7.2 chmod 755 /etc/rc.d/rc.local 在系统开机时会自动执行此脚...

weixin_45303972的博客 327

linux系统镜像如何安装yum源,linux 系统中本地yum源的搭建与使用yum源进行软件的下载...

前言:当我们在使用Linux系统时,有时需要一些辅助工具帮助我们实现某项功能,例如画图、wps、等功能,而这些功能并不是系统自带的,需要我们下载相关的软件,那如何去下载这些软件那,这里我们不得不提到Linux中的yum源,yum源简单的来说就相当于我们的应用商店,它可以提供多种实用软件供我们去下载,本篇文章将详细介绍yum的搭建以及使用yum源进行软件的下载。正文:一、本地yum源的搭建1、选择镜...

weixin_39620984的博客 1304

liunx软件管理及yum源的部署

一、配置本地yum源 预先准备:获得一个与本机系统版本一致的系统镜像存放在/iso下 mount /iso/rhel-server-7.3-x86_64-dvd.iso /yum-x/ ##挂载 cd /etc/yum.repos.d/ ##切换到本地访问文件 mkdir backup ##创建backup mv * backup ##将/etc/yum.repos.d/其余文件放入ba...

weixin_44826014的博客 231

yum源的配置及第三方软件仓库的搭建

一、yum和rpm下载软件 复制软件安装包,在与镜像版本相同的系统中 【1】 [root@foundation19 mnt]# ssh root@172.25.254.100 [root@westos ~]# cd / [root@westos /]# cd software/ [root@westos software]# ls google-chrome-stable-...

CapejasmineY的博客 638

离线yum源搭建

操作前需要先下载一个工具yum install yum-utils -y。提前下载准备好3万个RPM包,然后上传服务器到/home。需要下载好依赖yum install yum-utils。二.提前下载好准备的三万rpm包。2.共享其他内网机器。

HWgcs111的博客 366

Linux部署YUM仓库及NFS共享服务

基于RPM包构建的软件更新机制可以自动解决依赖关系所有软件包由集中的YUM软件仓库提供。

FolloW_0616的博客 1053

本地及第三方软件安装,rpm,yum命令

一、 1.配置本地yum源 (1)获取一个与本机系统版本一致的系统镜像(获取指令:hostnamectl) (2)挂载镜像 mount /dev/sr0/ /var/www/html/rhel7.0 (3)设定永久挂载 vim /etc/rc.d/rc/local mount /dev/sr0/ /var/www/html/rhel7.0 #(虚拟机是这样挂载) mount /xxx/xxx....

qq_41977453的博客 378
上一篇: linux中的软件管理
下一篇: linux中的ks自动安装虚拟机
fighting_s
博客等级 码龄8年 24粉丝 50原创
评论
成就一亿技术人!
拼手气红包6.0元
还能输入1000个字符
 
 条评论被折叠 查看
添加红包

请填写红包祝福语或标题

个

红包个数最小为10个

元

红包金额最低5元

当前余额3.43元 前往充值 >
需支付:10.00元
成就一亿技术人!
领取后你会自动成为博主和红包主的粉丝 规则
hope_wisdom
发出的红包
实付元
使用余额支付
点击重新获取
扫码支付
钱包余额 0

抵扣说明:

1.余额是钱包充值的虚拟货币,按照1:1的比例进行支付金额的抵扣。
2.余额无法直接购买下载,可以购买VIP、付费专栏及课程。

余额充值