


 本文介绍Hibernate自动建表功能及配置方法,详细解释了hibernate.hbm2ddl.auto属性的四种取值及其作用,并提供了Spring整合Hibernate的配置示例。
hibernate自动建表的功能还得益于sessionFactory的一个hibernateProperties属性,这里面有个字段名叫
hibernate.hbm2ddl.auto。他可以取以下四个值:update/create/validate/create-drop。他们分别代表以下含义:
validate:加载hibernate时,验证并创建数据库表结构。
create:每次加载hibernate,就会重新建表,这样就会导致数据表中如果有数据就会丢失。
create-drop:加载hibernate,创建表,退出时,删除表,与create一样,每次需要重建表。
update:加载hibernate,自动更新数据库表,如果有变动则更新,没有就什么都不做,这个符合开发和部署需求,最常用的一种。
如下图所示,在spring整合hibernate中,我们需要配置一个sessionFactory,大致信息如下:
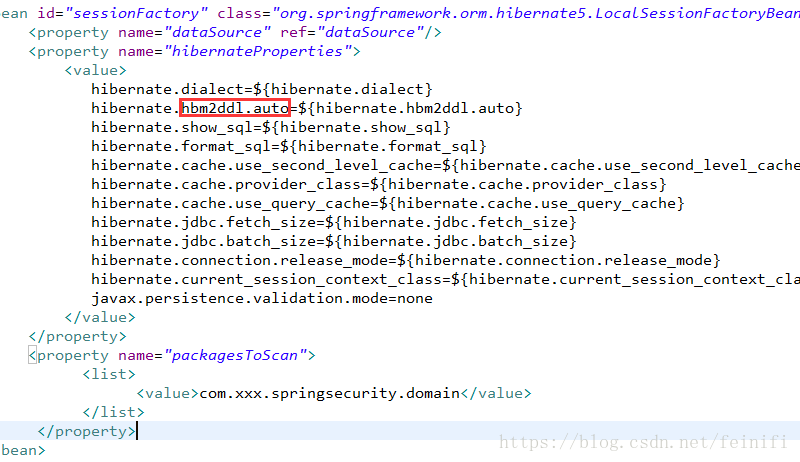
其中,关系到自动建表的关键语句在hibernate.hbm2ddl.auto属性上,另外,还需要配置packagesToScan,告诉hibernate去哪里找实体来生成表。
配置成功之后,一般情况下,我们会通过一个小代码,测试一下,能否连接数据库,能否建表。
package com.xxx.security.test;
import javax.sql.DataSource;
import org.springframework.context.ApplicationContext;
import org.springframework.context.support.ClassPathXmlApplicationContext;
public class JDBCTest {
	private static ApplicationContext context;
	static{
		context = new ClassPathXmlApplicationContext("classpath:spring.xml");
	}

	public static void testDataSource(){
		DataSource dataSource = context.getBean(DataSource.class);
		System.out.println(dataSource);
	}

	public static void main(String[] args) {
		testDataSource();
	}

}
运行以上测试代码,正常情况下,打印结果如下:
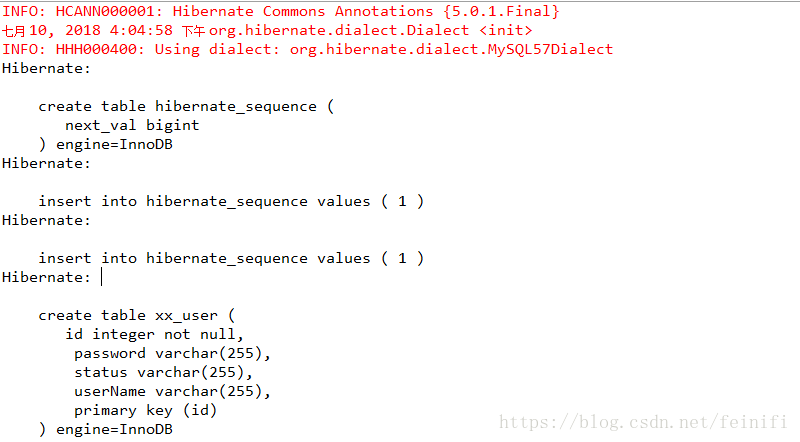
建表成功。
完整的spring.xml配置文件如下:
<?xml version="1.0" encoding="UTF-8"?>
<beans xmlns="http://www.springframework.org/schema/beans"
	xmlns:context="http://www.springframework.org/schema/context"
	xmlns:xsi="http://www.w3.org/2001/XMLSchema-instance"
	xmlns:aop="http://www.springframework.org/schema/aop"
	xmlns:p="http://www.springframework.org/schema/p"
	xmlns:tx="http://www.springframework.org/schema/tx"
	xsi:schemaLocation="http://www.springframework.org/schema/beans http://www.springframework.org/schema/beans/spring-beans-4.2.xsd
		http://www.springframework.org/schema/context http://www.springframework.org/schema/context/spring-context-4.2.xsd
		http://www.springframework.org/schema/aop http://www.springframework.org/schema/aop/spring-aop-4.3.xsd
		http://www.springframework.org/schema/tx http://www.springframework.org/schema/tx/spring-tx-4.3.xsd"
	default-autowire="byName">
    <bean id="propertyConfigurer" class="org.springframework.beans.factory.config.PropertyPlaceholderConfigurer">
         <property name="locations">
              <list>
                    <value>classpath:jdbc.properties</value>
              </list>
         </property>
    </bean>
    <bean id="dataSource" class="org.springframework.jdbc.datasource.DriverManagerDataSource">
         <property name="driverClassName" value="${jdbc.driver}"/>
         <property name="url" value="${jdbc.url}"/>
         <property name="username" value="${jdbc.username}"/>
         <property name="password" value="${jdbc.password}"/>
    </bean>
    <bean id="sessionFactory" class="org.springframework.orm.hibernate5.LocalSessionFactoryBean">
         <property name="dataSource" ref="dataSource"/>
         <property name="hibernateProperties">
             <value>
                hibernate.dialect=${hibernate.dialect}
		hibernate.hbm2ddl.auto=${hibernate.hbm2ddl.auto}
		hibernate.show_sql=${hibernate.show_sql}
		hibernate.format_sql=${hibernate.format_sql}
		hibernate.cache.use_second_level_cache=${hibernate.cache.use_second_level_cache}
		hibernate.cache.provider_class=${hibernate.cache.provider_class}
		hibernate.cache.use_query_cache=${hibernate.cache.use_query_cache}
		hibernate.jdbc.fetch_size=${hibernate.jdbc.fetch_size}
		hibernate.jdbc.batch_size=${hibernate.jdbc.batch_size}
		hibernate.connection.release_mode=${hibernate.connection.release_mode}
		hibernate.current_session_context_class=${hibernate.current_session_context_class}
		javax.persistence.validation.mode=none
             </value>
         </property>
         <property name="packagesToScan">
               <list>
                     <value>com.xxx.springsecurity.domain</value>
               </list>
          </property>
    </bean>
    <bean id="transactionManager" class="org.springframework.orm.hibernate5.HibernateTransactionManager">
          <property name="sessionFactory" ref="sessionFactory"/>
    </bean>

    <context:component-scan base-package="com.xxx.springsecurity">
         <context:include-filter type="regex" expression="com\.xxx\.springsecurity\.dao\..*"/>
         <context:include-filter type="regex" expression="com\.xxx\.springsecurity\.service\..*"/>
         <context:exclude-filter type="regex" expression="com\.xxx\.springsecurity\.dao\.DomainDao"/>
    </context:component-scan>

    <tx:advice id="txAdvice" transaction-manager="transactionManager">
         <tx:attributes>
              <tx:method name="save*" propagation="REQUIRED"/>
              <tx:method name="update*" propagation="REQUIRED"/>
              <tx:method name="delete*" propagation="REQUIRED"/>
              <tx:method name="*" propagation="NOT_SUPPORTED" read-only="true"/>
         </tx:attributes>
    </tx:advice>
    <aop:config>
          <aop:pointcut expression="execution(* com.xxx.springsecurity.service.*Service.*(..))" id="serviceOperation"/>
          <aop:advisor advice-ref="txAdvice" pointcut-ref="serviceOperation"/>
    </aop:config>
</beans>


 570
570

 被折叠的 条评论
为什么被折叠?
被折叠的 条评论
为什么被折叠?
 到【灌水乐园】发言


