


 本文详细记录了一次从webpack3升级到webpack4的实践过程,包括升级依赖、修改配置、解决报错和优化步骤。通过升级,提高了构建速度和开发体验,如配置mode、使用SplitChunksPlugin替换CommonsChunkPlugin、移除extract-text-webpack-plugin并引入mini-css-extract-plugin等。
文章目录
记一次webpack3升级到webpack4的实践过程
参考:https://segmentfault.com/a/1190000022693214###
准备工作
- 备份好文件,本文使用 git 管理项目,切换到一个新分支
旧项目实在是太老了,依赖webpack3 webpack-merge webpack-dev-serve 都是很老旧的版本。
内容修改后重新编译,需要将近20秒,开发实在太卡,很影响效率。升级项目迫在眉睫。
更新过程
- 升级到
webpack@4.46.0webpack4 最新版 - 升级相关依赖,注意要兼容webpack4版本
- 升级
html-webpack-plugin@4 - 升级
vue-loader@14.2.4 - 配置 mode 属性
- 移除 CommonsChunkPlugin,
production环境默认使用SplitChunksPlugin分割代码 - 移除 extract-text-webpack-plugin,引入
mini-css-extract-plugin并配置 css-loader - babel 配置 commonjs 转换 es2015 modules ,
babel-plugin-transform-es2015-modules-commonjs yarn dev开发环境可用yarn build打包可用- 移除不用到的依赖包
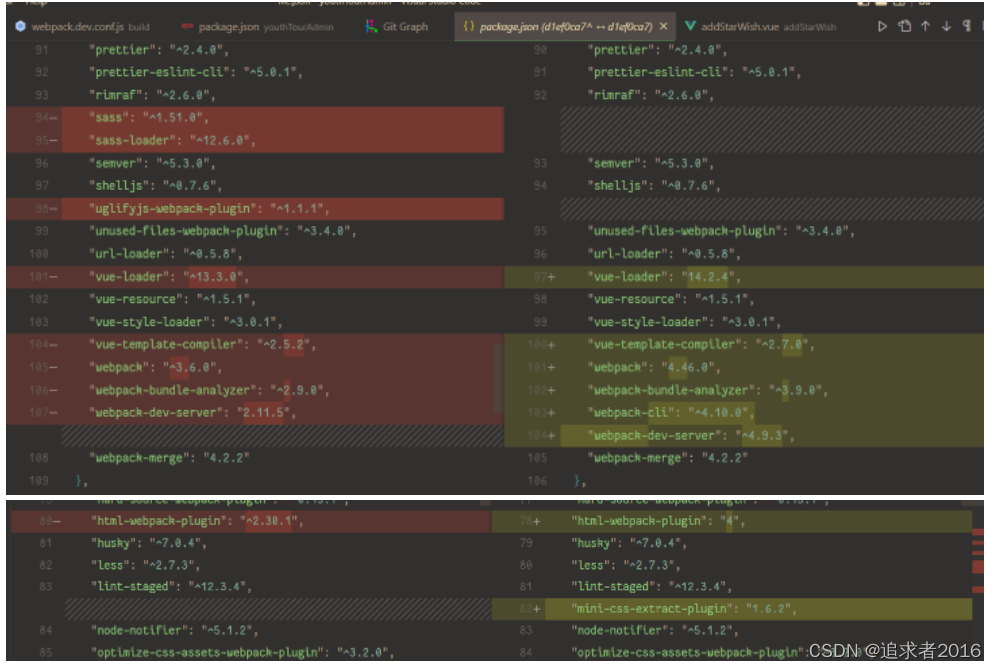
1. webpack3与webpack4依赖对比
// webpack3
-"html-webpack-plugin": "^2.30.1",
-"vue-loader": "^13.3.0",
-"vue-style-loader": "^3.0.1",
-"vue-template-compiler": "^2.5.2",
-"webpack": "^3.6.0",
-"webpack-bundle-analyzer": "^2.9.0",
-"webpack-dev-server": "2.11.5",
-"webpack-merge": "4.1.0"

// webpack4
+"html-webpack-plugin": "4",
+"mini-css-extract-plugin": "1.6.2",
+"vue-loader": "14.2.4",
+"vue-style-loader": "^3.0.1",
+"vue-template-compiler": "^2.7.0",
+"webpack": "4.46.0",
+"webpack-bundle-analyzer": "^3.9.0",
+"webpack-cli": "^4.10.0",
+"webpack-dev-server": "^4.9.3",
+"webpack-merge": "4.2.2",
+"babel-plugin-transform-es2015-modules-commonjs": "^6.26.2"
升级依赖版本
2. 修改 webpack.dev.conf.js
const devWebpackConfig = merge(baseWebpackConfig, {
+ mode: 'development',
// 可选配置,修改编译默认输出信息
+stats: {
+  all: false,
+  colors: true,
+  // 添加错误信息
+  errors: true,
+  // 添加时间信息
+  timings: true,
+  // 添加 webpack 版本信息
+  version: true,
+  // 添加警告
+  warnings: true,
+},
... 省略其他配置
devServer: {
+client: {
+  logging: 'warn',
+  overlay: config.dev.errorOverlay
+    ? { warnings: false, errors: true }
+    : false,
+},
+static: path.posix.join(__dirname, '..', config.dev.assetsPublicPath),
historyApiFallback: {
  rewrites: [
    { from: /.*/, to: path.posix.join(config.dev.assetsPublicPath, 'index.html') },
  ],
},
host: HOST || config.dev.host,
port: PORT || config.dev.port,
open: config.dev.autoOpenBrowser,
proxy: config.dev.proxyTable,
- devServer 删除其他配置项
}
... 省略其他配置
})
3. 修改 build/utils.js 文件
移除 extract-text-webpack-plugin,引入 mini-css-extract-plugin 并配置 css-loader
// build/utils.js
-const ExtractTextPlugin = require('extract-text-webpack-plugin')
+const MiniCssExtractPlugin = require("mini-css-extract-plugin")

...

// Extract CSS when that option is specified
// (which is the case during production build)
if (options.extract) {
-  return ExtractTextPlugin.extract({
-    use: loaders,
-    fallback: 'vue-style-loader',
-    publicPath: '../../'
-  })
+  return [MiniCssExtractPlugin.loader].concat(loaders)
} else {
  return ['vue-style-loader'].concat(loaders)
}
配置到这一步,如果没有意外,yarn dev 可以正常跑起来
一般都会出现意外,此时打开页面发现报错
4. babel 配置 commonjs 转换 es2015 modules
处理报错:
exports is not defined问题
配置 babel .babelrc 文件
// .babelrc
"plugins": [
+    "transform-es2015-modules-commonjs"
]
此时项目终于可以正常跑起来了,干杯!
尝试 yarn build 报错,打包不了。
5. 修改 webpack.prod.conf.js
-const ExtractTextPlugin = require('extract-text-webpack-plugin')
const OptimizeCSSPlugin = require('optimize-css-assets-webpack-plugin')
-const UglifyJsPlugin = require('uglifyjs-webpack-plugin')
+const MiniCssExtractPlugin = require("mini-css-extract-plugin")

const webpackConfig = merge(baseWebpackConfig, {
+  mode: 'production',
...
output: {
    ...
-    chunkFilename: utils.assetsPath('js/[id].[chunkhash].js')
+   chunkFilename: utils.assetsPath('js/[name].[chunkhash].js')
    ...
}
...
-  new UglifyJsPlugin({
-    uglifyOptions: {
-      compress: {
-        drop_console: true,
-        drop_debugger: false,
-        warnings: false,
-        pure_funcs: ['console.log'] // 移除console
-      }
-    },
-    sourceMap: config.build.productionSourceMap,
-    parallel: true
-  }),
...
-  new ExtractTextPlugin({
-    filename: utils.assetsPath('css/[name].[contenthash].css'),
-    // Setting the following option to `false` will not extract CSS from codesplit chunks.
-    // Their CSS will instead be inserted dynamically with style-loader when the codesplit chunk has been loaded by webpack.
-    // It's currently set to `true` because we are seeing that sourcemaps are included in the codesplit bundle as well when it's `false`,
-    // increasing file size: https://github.com/vuejs-templates/webpack/issues/1110
-    allChunks: true,
-  }),
+  new MiniCssExtractPlugin({filename: utils.assetsPath('css/[name].[contenthash].css')}),
})
...
  new HtmlWebpackPlugin({
    filename: config.build.index,
    template: 'index.html',
    inject: true,
    favicon:'static/logo.ico',
-    minify: {
-      removeComments: true,
-      collapseWhitespace: true,
-      removeAttributeQuotes: true
-      // more options:
-      // https://github.com/kangax/html-minifier#options-quick-reference
-    },
-    // necessary to consistently work with multiple chunks via CommonsChunkPlugin
-    chunksSortMode: 'dependency'
  }),
...
移除 CommonsChunkPlugin
-   // enable scope hoisting
-   new webpack.optimize.ModuleConcatenationPlugin(),
-   // split vendor js into its own file
-   // 抽出第三方库,命名vendor,不需要加chunkhash,因为他很少变化
-   // minChunk 判断哪些模块可以抽出来合并成ventor,这里只要是从node_module出来就抽
-   // 注意一定要放在mainfest的前面
-   new webpack.optimize.CommonsChunkPlugin({
-     name: 'vendor',
-     minChunks (module) {
-       // any required modules inside node_modules are extracted to vendor
-       return (
-         module.resource &&
-         /\.js$/.test(module.resource) &&
-         module.resource.indexOf(
-           path.join(__dirname, '../node_modules')
-         ) === 0
-       )
-     }
-   }),
-   // extract webpack runtime and module manifest to its own file in order to
-   // prevent vendor hash from being updated whenever app bundle is updated
-   new webpack.optimize.CommonsChunkPlugin({
-     name: 'manifest',
-     minChunks: Infinity
-   }),
-   // This instance extracts shared chunks from code splitted chunks and bundles them
-   // in a separate chunk, similar to the vendor chunk
-   // see: https://webpack.js.org/plugins/commons-chunk-plugin/#extra-async-commons-chunk
-   new webpack.optimize.CommonsChunkPlugin({
-     name: 'app',
-     async: 'vendor-async',
-     children: true,
-     minChunks: 3
-   }),
再运行 yarn build 输出打包成功
验证更新结果
运行 yarn dev 打开项目,预览,页面点一点,正常
运行 yarn build 打包部署到测试环境,测试环境访问,点点页面功能,正常
优化
每次编译后,页面会自动刷新,而不是局部刷新,影响开发体验。
配置热更新,提升开发体验。
// webpack.dev.conf.js
devServer: {
    ...
+    liveReload: false, // 关闭文件更新刷新页面,开启热更新需要关闭这个选项
    ...
}
小结
webpack升级主要做一些以下内容
- 升级依赖:升级 webpack,vue-loader,html-webpack-plugin 等
- 代码分割修改:移除 CommonsChunkPlugin 配置 SplitChunksPlugin , 设置 mode ,配置优化 optimization
- 压缩css:移除extract-text-webpack-plugin;引入mini-css-extract-plugin 把css独立抽出单个文件。
- 代码热更新:升级 webpack-cli,webpack-dev-server,配置 mode ,配置 devServer
- 构建加速:使用 hard-source-webpack-plugin 插件缓存,加速构建。
升级webpack4后构建数据有明显的提升
测试数据暂时没时间弄,有需要了解可以百度看一下网友的评测。


 1569
1569

 被折叠的 条评论
为什么被折叠?
被折叠的 条评论
为什么被折叠?
 到【灌水乐园】发言


