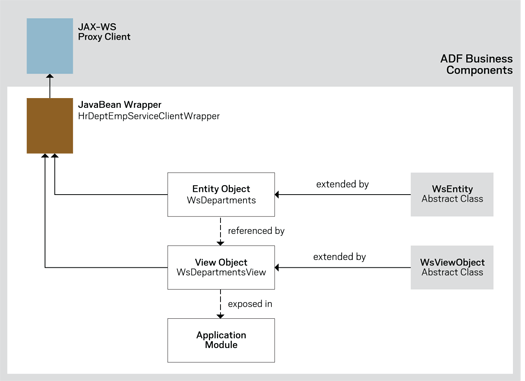
TECHNOLOGY: Oracle ADF Service, Please! By Frank Nimphius Integrate Web services with Oracle ADF and Business Components applications. Besides being used in SOA, Web services are a common access pattern in Web application development for remote data queries, application integration, and application departmentalization. Rather than enabling developers to directly access database tables owned by other lines of business, companies can expose the services interface to ensure data integrity and consistent application of business logic on the source data. In this column, you will learn about the Web services integration options available for Oracle Application Development Framework (Oracle ADF) applications. Stepping through a sample application, you’ll learn how to embed calls from Oracle ADF’s Business Components models into Web services for create, read, update, and delete (CRUD) operations. Web Services Integration in Oracle ADF SOAP-based Web services and Oracle ADF can be integrated in several different ways. Oracle ADF’s Web Service Data Control feature is easiest to configure at design time, but it does not provide much control of a service’s runtime behavior, nor of the exchanged data. Thus, using Web Service Data Control is best for simple interactions only. On the other hand, using the JavaBean Data Control feature or Business Components feature of Oracle ADF supports deeper, more complex integration scenarios. JavaBean Data Control can be used for integrations involving plain-old Java objects (POJOs). For applications that use Business Components as the business service layer, it makes sense to integrate the Web service application at the Business Components service integration layer and take full advantage of Business Components benefits such as participating in master-detail relationships and leveraging advanced framework features such as using model-driven lists of values. In the JavaBean Data Control or Business Components approach, the Web services are accessed through the standard Java API for XML Web Services (JAX-WS) proxy client, which gives you programmatic control for manipulating data in transit. Rather than using the JAX-WS proxy client alone, I recommend using it in conjunction with a JavaBean wrapper. The wrapper provides a stable API for your Business Components application integration, so that if the Web service changes, you’ll only need to regenerate your JAX-WS proxy client code and drop it into place. The example provided with this column shows you how to integrate a Web service and a Business Components application by using this recommended approach. Before delving into the step-by-step development process, let’s take a closer look at the integration architecture. Sample Application Integration Architecture The sample applications include a basic but complete Java Platform, Enterprise Edition Web service and a starter Business Components application that you’ll extend to support integration with the Web service. The Web service obtains data from the Departments table in the Oracle HR sample database schema. By default, Business Components queries data from database tables and views. For Business Components to work with other datasources, such as Web services, PL/SQL stored procedures, or Java Naming and Directory Interface (JNDI) services (LDAP, for example), developers create programmatic view objects and entities that override the Business Components framework default behavior. Figure 1 shows the class hierarchy and the integration architecture used in the sample. The JAX-WS proxy client is accessed from a JavaBean wrapper in the Business Components project. The JavaBean wrapper is accessed from methods of the WsDepartments entity object and theWsDepartmentsView view object.
Figure 1: Sample Oracle ADF Web service integration architecture The JAX-WS Proxy Client, JavaBean Wrapper, WsEntity, and WsViewObject classes are all provided in the sample workspaces. WsEntity and WsViewObject are code templates that assist in the development of programmatic view objects and entities for Web services CRUD access. In general, I recommend building templates such as these for recurring tasks in your application development projects. (Both templates are located in theoramag.sample.application.model.fmwExtensions package of the Business Components project. Examine the code to learn more.) In the sample integration this article covers, you’ll first create the programmatic entity objectWsDepartments (using a wizard in conjunction with the WsEntity class template) and then you’ll use that object as the basis for the programmatic view object WsDepartmentsView, which you’ll also create by using the wizard and the WsViewObject class template. You’ll then complete and test the integration by adding the programmatic view object on the application module, for use from the Oracle ADF Data Controls panel. Getting Started To begin, download the sample application and unzip the file. The file contains two folders:
- starter-app contains two workspaces: a completed Web services application and a Business Components application workspace with the JAX-WS proxy client contained in its own project. This article shows you how to complete the business components in the project to integrate with the Web services application.
- completed-app contains completed application workspaces for the Business Components application and the Web service. (As you’ll see, the completed app also includes some advanced capabilities.)
To follow the steps in this column, you’ll need the studio edition of Oracle JDeveloper 11g Release 2 (11.1.2.2) or later, available as a free download on Oracle Technology Network. You’ll also need an Oracle Database instance with an unlocked HR schema.
Preliminary setup tasks include changing the database connection to point to your HR database schema from both the Business Components application project and the Web services project, as follows:
- Launch Oracle JDeveloper 11g Release 2. Select File -> Open, and navigate to the directory containing the unpacked sample application.
- Open the starter-app folder and then the WebService folder, and select the WebService.jws file, followed by Open. The workspace will now open in Oracle Jdeveloper.
- Select View -> Database -> Database Navigator, and expand the WebService node to find thehrconn node.
- Right-click the hrconn node, and select Properties from the context menu. Edit the database connection information to work with your setup. Test the changes, and then click OK to close the connection properties.
With a working connection to your database, you can now deploy and run the Web service using Oracle WebLogic Server, which is integrated into Oracle JDeveloper. In the Application Navigator
- Expand the hrDeptEmpService project node and then the oramag.sample.jaxws.hr.sessionpackage structure.
- Continue expanding the package structure until you locate the class filehrDeptEmpServiceBean.java.
- Right-click hrDeptEmpServiceBean.java and choose Run from the context menu to deploy and run the service. (If a Create Default Domain dialog box appears, create a password for the default Oracle WebLogic Server domain associated with Oracle JDeveloper and click OK to continue.)
At this point, the Web service has been deployed and is running on the integrated Oracle WebLogic Server. You must also provide the correct database connection information for the Business Components application:
- Using File -> Open, navigate to the OraMag-AdfBcWsApp folder.
- Select the OraMag-AdfBcWsApp.jws file.
- Click Open to open the workspace.
- Select View -> Database -> Database Navigator. Expand the OraMag-AdfBcWsApp node, and right-click the hrconn node.
- Select Properties from the context menu to edit the database connection information to work with your database configuration. Test your changes, and then click OK to close the connection properties. You can now start integrating the Business Components application and the Web service.
Building a Web Service–Based Entity Object Web services are integrated into Business Components via programmatic view objects. To implement CRUD behavior, the view objects must be based on an entity object that overrides the built-in framework methods, doDML and doSelect, of the Business Components entity object. You provide information to Oracle JDeveloper about the properties and datatypes provided by the Web service. For the example integration, the Web service Departments entity has the following properties defined:
- BigDecimal departmentId;
- String departmentName;
- BigDecimal locationId;
- BigDecimal managerId;
You can obtain this information from the Departments.java class file or by examining the structure in the oramag.sample.proxy.client.types package, located in the JaxWs-ProxyClient project.
You’ll use this information as you step through the wizard. With the OraMag-AdfBcWsAppapplication still selected, open the Application Navigator.
- Expand the AdfBcModel -> Application Sources node and subsequent nodes until you can select the oramag.sample.application.model.entities package node.
- Right-click the oramag.sample.application.model.entities package node, and select New Entity Object from the context menu. The Create Entity Object wizard launches. In step 1 of 6 of the wizard
- In the Name field, type WsDepartments.
- Uncheck the Existing Object checkbox.
- Click Next and then Yes to accept WSDEPARTMENTS as the schemaobject name.
- In step 2 of 6, click the New button (repeatedly) to open a New Entity Attribute properties page and create the four entity attributes detailed in Table 1. When you have finished creating all four attributes, click Next.
| Name | Type | Other property to set | | DepartmentId | BigDecimal | Check Primary Key checkbox | | DepartmentName | String | Set Database Column Type to VARCHAR2(30) | | ManagerId | BigDecimal | None | | LocationId | BigDecimal | None |
Table 1: Attribute definitions for the custom entity object - Click Next to skip the wizard step 3 of 6. In the wizard step 4 of 6
- Check the Generate Entity Object Class checkbox.
- Click the Classes Extend button to launch the Override Base Classes dialog box.
- In the Override Base Classes dialog box, click the Browse button next to the Row field. The Find Superclass search dialog box appears.
- Type WsEntity in the Match Class or Package Name field. When the WsEntity (oramag.sample.application.model.fmwExtensions) package appears in the dialog box, click it and then click OK to save the change. Click OK again to dismiss the dialog box and redisplay the wizard step 4 of 6.
- Click Finish to conclude the wizard.
Oracle JDeveloper generates a custom entity class, WsDepartmentsImpl, based on the template, and places its metadata file on the XML edit pane. Now you override the abstract methods of theWsEntity template class in WsDepartmentsImpl to make Business Components write data updates to the Web service.
- In the WsDepartments.xml editor, select the Java menu option and the link next to the Entity Object Class label to open the entity implementation class, WsDepartmentsImpl, in the Java code editor.
- In the Java code editor, right-click anywhere in the file and choose Source -> Override Methodsfrom the context menu.
- In the Override Methods dialog box, check the Group By Class checkbox and then locate WsEntity(and its methods) in the list.
Select the doDML and doSelect methods under the WsEntity class. Also check the Copy Javadoccheckbox (at the bottom of the dialog box), so that the override instructions from the template populate the file.
- Click OK.
Oracle JDeveloper generates a Java class containing method signatures and comments instructing you how to access the JavaBean wrapper class in the AdfBcModel project from this class. To simplify your tasks for this example integration, I’ve provided the complete code for you.
- Open the entity-code-complete.txt file, located in the entities package, and copy and paste the file’s contents over WsDepartmentsImpl.java, replacing the entire generated content.
- Close all tabs in Oracle JDeveloper, and save all your work.
You now have a programmatic entity object that can be used as the basis for the view object that will access the Web service. The next step is to create the programmatic view object. Building the Programmatic View Object When using programmatic view objects, you must override the Business Components framework methods that query the database for data. The view object methods you will typically need to override include create, executeQueryForCollection, createRowFromResultSet, getQueryHitCount, and hasNextForCollection. (See “Key Framework Methods to Override for Programmatic View Objects” inOracle Application Development Framework Developer’s Guide For Forms/4GL Developers to learn more.) For this sample integration, the template provides much of the code, so you won’t be selecting all these methods. As with the programmatic entity object creation, a wizard guides you through the process. These steps begin in the OraMag-AdfBcWsApp application in the Application Navigator:
- Expand the AdfBcModel -> Application Sources node until theoramag.sample.application.model.views node appears.
- Right-click the oramag.sample.application.model.views package node and select New View Object from the context menu. The Create View Object wizard launches. On the Name page (Create View Object – Step 1 of 9)
- Enter WsDepartmentsView in the entity Name field.
- Keep the Data Source option set to Entity object.
- Click Next to continue. On the Entity Objects page (step 2 of 9)
- Expand the oramag.sample.application.model.entities package, and select theWsDepartments entity object.
- Click the right arrow to move WsDepartments to the Selected pane. Click Next.
- Click the double-arrow to move all Available attributes to the Selected pane.
- Click Next until the wizard step 7 of 9 appears. Set the Java properties for the view object as follows: check the Generate View Object Class checkbox (causes the wizard to create a custom view object implementation class whose default framework methods you can override). Under this checkbox
- Uncheck the Include bind variable accessor checkbox (the sample application does not use bind variables).
- Uncheck the Include custom data source methods checkbox. (In other applications, you might use this feature to generate signatures for the methods to be overridden, but this sample application provides you with a template class for this task).
- Click the Classes Extend button. In the Override Base Classes dialog box, click the Browsebutton (next to the Object field) to open the Search dialog box. In the Search dialog box, typeWsViewObject in the Match Class or Package Name field. When the package name appears in the Match Class or Package Name field, click the name to select it, and then click OK to exit the Search dialog box. Click OK again to redisplay step 7 of 9 of the wizard.
- Click Finish to close the view object creation wizard. In the WsDepartmentsView.xml editor, click theJava menu.
- Select the link next to the View Object Class label to open the class in the Java code editor.
- Move the cursor anywhere in the code within the Java editor, right-click, and choose Source ->Override Methods from the context menu.
- In the Override Methods dialog box, check the Group By Class checkbox to sort the methods by class. Locate WsViewObject in the list, and select its createRowFromResultSet, executeQuery-ForCollection, and getQueryHitCount methods. Be sure to check the Copy Javadoc checkbox.
- Click OK.
The generated file is now populated with methods for accessing the JavaBean wrapper class; the file includes comments (from the template’s javadoc) that include override instructions.
For your own integration projects, this is the approach you’ll take, overriding the methods as needed. For the purposes of this article, I’ve provided that code for you. - Open the viewObject-code-complete.txt file, located in the views package, and copy and paste its entire contents over the entire WsDepartmentsViewImpl class, replacing all the generated content.
- Save your work, and close all the open tabs.
Final Steps
At this point, you’ve created a programmatic entity object and a custom view object that uses the entity. To make these components available to integrate the Web service with the Business Components application, you must expose the custom view object by adding it to the application module. You can also then test the integration. Starting from the Application Navigator
- Expand the AdfBcModel -> Application Sourcesnode and theoramag.sample.application.model.servicespackage.
- Right-click the AppModule entry, and select Open AppModule from the context menu.
- In the AppModule.xml editor window, click the Data Model menu.
- In the Available View Objects field, expand the oramag.sample.application.model.views package and select WsDepartmentsView.
- Click the right arrow to move the selected view object to the Data Model list.
- Right-click the WsDepartmentsView1 instance, and choose Rename from the context menu.
- Rename the view object instance allWsDepartments and click OK before saving your work.
Assuming that the Web service you deployed during initial setup is still running, you can test the application by using the Oracle JDeveloper component tester.
Right-click the AppModule entry in the Application Navigator and choose Run from the context menu to launch the Business Component tester.
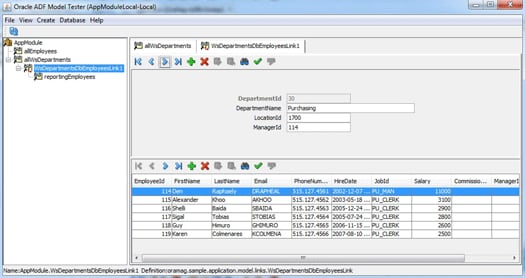
In the opened Oracle ADF Model Tester, double-click the allWsDepartments instance to read data from the Web service. Click the arrows to browse and modify the data, and see how the entity and view objects you created populate the UI and make changes to data on the Web service. The Business Components project also contains a pregenerated Employees entity and view object that query employee data directly from the database. As an advanced self-study exercise, create an entity association and view link between the WsDepartments entity and the Employees entity, using the DepartmentId attribute to define the parent-child relationship. The completed-app workspaces include this extra functionality as well as a model-driven list of values on the DepartmentId attribute of the EmployeesView object (see Figure 2). I encourage you to explore the code and learn about these powerful features.
Figure 2: Web services integration application with advanced functionality Summary Oracle ADF enables application developers to integrate Web services into their Business Components applications at the service layer, using a standard JAX-WS proxy client in conjunction with programmatic entity and view objects.
Frank Nimphius is a senior principal product manager for Oracle JDeveloper and Oracle Application Development Framework. He is a coauthor of Oracle Fusion Developer Guide: Building Rich Internet Applications with Oracle ADF Business Components and Oracle ADF Faces (McGraw-Hill, 2010).
Send us your comments |


 1461
1461

 被折叠的 条评论
为什么被折叠?
被折叠的 条评论
为什么被折叠?
 到【灌水乐园】发言


