


react 的语法规范
react 用的语法是
JSX语法 而JSX语法 是不被浏览器所识别的 这个时候我们就要用到babel去让浏览器能够正常识别我们的代码
babel解析的两个作用
- 把高版本的js版本转为浏览器能识别的es5代码
- 把JSX翻译成浏览器能识别的
JSX语法
JS和HTML 混用 然而浏览器怎么区别html``css呢?
<代表的HTML 开头- 其他的就是JS
- JSX以
<开头 中间的以/>为结束 所有的单标签 都要加/表示结束 比如 input hr img- 如果界面过于复杂 用()把布局包起来
- 和vue2一样,必须有唯一的根元素
- babel 把JSX 转移为 一个名为 React.createElement()函数调用
react 虚拟DOM 转为真实DOM的步骤
- 通过
JSX创建虚拟DOM- 通过render函数,渲染到界面上,称为真实的DOM
react 添加类class的方式
class=“app” 错误写法 正确写法 className=“app”
` 普通class添加类样式 `
<p className={isActive ? "bgC" : " "} >  选中态--三元  </p>
<p className={isActive && "bgC"} > 选中态--短路  </p>
  `style 样式`
 <p style={{ color: "white", backgroundColor: bol }}> style 绑定变量 </p>
 <p style={styleObj}> style 对象形式 里面要写成驼峰格式 </p>
react没有指令的说法
- 绑定属性用 直接通过 单括号来实现 / {表达式}
react循环机制
- react 没有
v-if指令 在需要条件判断进行渲染的时候 ,可以通过数组的API 比如map方法 ,forEach方法 对数组的每一项进行遍历 用三元运算或者短路进行条件渲染- JSX语法 里面
数组是可以直接展开的[...Array]- 在
react循环时key是必要的key唯一标识符,为了避免标签被重复渲染 diff算法 计算 虚拟DOM 和当前已经显示 的DOM 之间的差值 然后只渲染 不一样的地方
react事件传参
React JSX 的事件需要区分大小写
<button onClick={test} >JSX 点击事件-1</button>
function test(e) {
            console.log("点击事件React", e);
        }
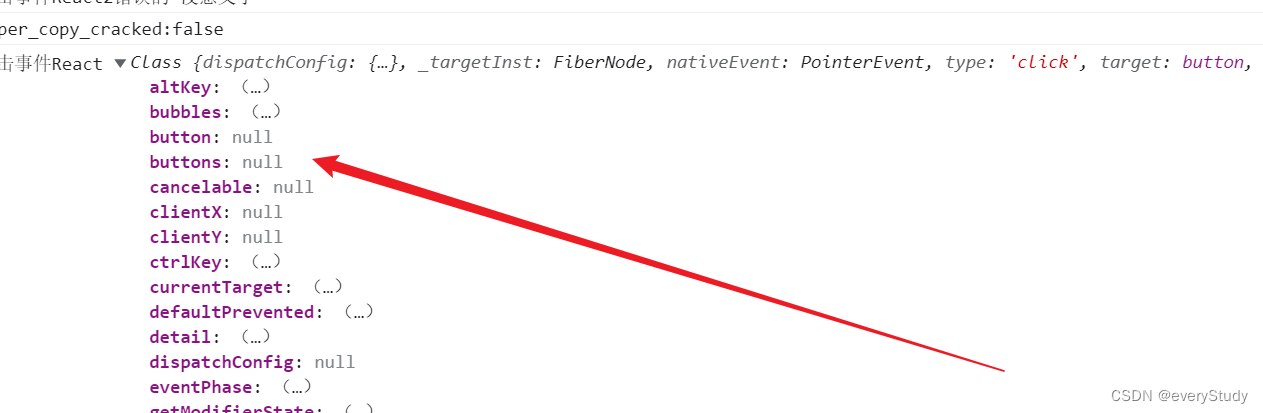
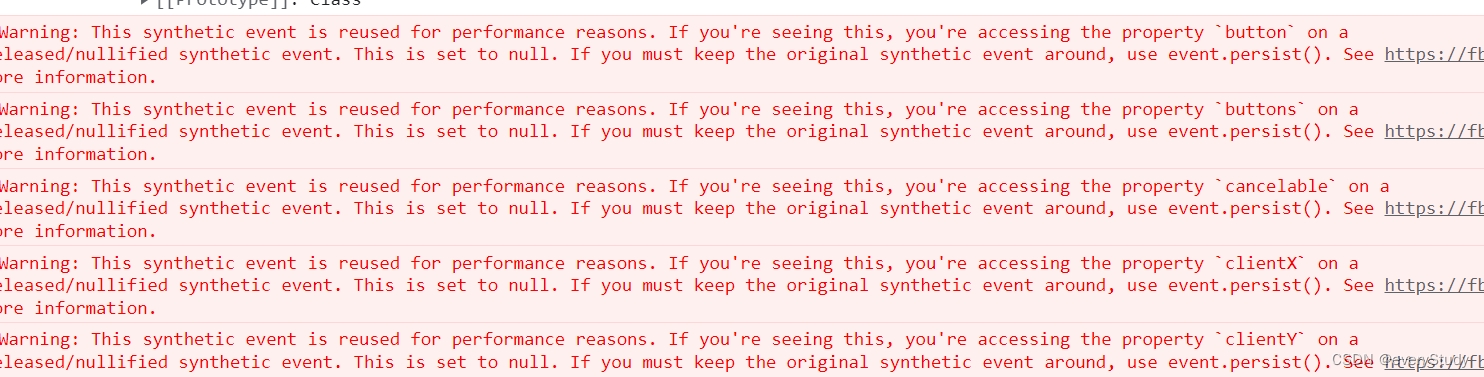
显示结果为空这是什么原因呢? 点击报错又是什么原因呢?
This synthetic event is reused for performance reasons原生事件
原来我们想要在react里面写原生事件,直接写react是不能识别的
事件的参数点击完就消失了 不进行保存
react 中用 的是合成事件 底层使用了 事件委托的方式对真实的DOM事件进行了封装
那应该怎么使用呢?
e.persist()对事件进行持久化存储
两种传参方式
1.自定义属性传参
<button onClick={test3} data-id="11111" data-name="张三" >JSX 点击事件传参-3</button>

 function test3(e) {
            // This synthetic event is reused for performance reasons原生事件
            // 而在 react 中用 的是合成事件 底层使用了 事件委托的方式对真实的DOM事件进行了封装
            // 优点:使用了合成式具有更好的浏览器兼容性能
            // 事件的参数性能点击完就消失了 不进行保存
            e.persist()
            console.log("点击事件React3传参", e);
            console.log("点击事件React3传参", e.target.dataset);
            //为什么e的时候报错呢?
            // react 合成事件
            // 持久化存储  电击后 事件参数信息还在
        }
- 直接传
<button onClick={(ev) => { test4(100, [100, 55, 333], ev) }}  data-name="张三"  > 点击事件-4 </button
  function test4(e, arr = [456, 123, 777], ev) {
           ev.persist()
           console.log("点击事件React4传参", e, ...arr, ev);
       }
react 组件 函数式组件 箭头函数和普通函数都可以
- 普通函数组件
 let FirstComponent = () => {
            return (
                <div>
                    <h1>  箭头函数组件 </h1>
                    <hr />
                </div>

            )
        }
        ReactDOM.render(FirstComponent(), app)
2.普通函数
let a = '传参'
 function SecondComponent(props) {
            let { name, age, a } = props
            return (
                <div>
                    <h1>  普通函数组件 </h1>
                    <h3> {a}---{name}---{age} </h3>
                    <hr />
                </div>
            )
        }
        ReactDOM.render(SecondComponent({ name: '对象的形式传参', age: '不知道传什么,传个石柏万', a }), app2)
  父组件向子组件传参 函数形参 一般起名 props
  子组件通过 props  接受父组件的参数
这里补充一个知识点 :
无状态组件:组件没有组件的数据/state
容器类组件: 只是负责展示数据的,基本上没有组件的自己的逻辑
函数式组件没有 this
函数式组件没有 生命周期钩子函数 life
函数式组件没有state
- 组件传值
ReactDOM.render(<ThirdComponent wyx-v="年薪百万" title="当前状态状态" name={obj} />, app3)
类组件
        // 解构
        let { Component } = React

        // 列表组件
        class List extends Component {
            render(props) {
                return (
                    <ul className="list" >
                        {
                            this.props.children
                        }
                    </ul>
                )
            }
        }

        // 根组件
        class App extends Component {


            render() {
                return (

                    <div>
                        <h1> 华为商城列表 </h1>
                        <hr />
                        <List>
                            {
                                dataList.map(goods => {
                                    let { name } = goods
                                    return (<li key={goods.skuId} >
                                        <img src={goods.image} alt={name} />
                                        <p>{goods.name}</p>
                                    </li>)
                                })
                            }
                        </List>
                    </div>

                )
            }

        }
        ReactDOM.render(<App list={dataList} />, app)
动态组件
1.利用了is属性去动态选择组件
let showComponent = ManPage //ManPage 每个组件的名字

        // 根组件
        let APP = (props) => {
            console.log("父传子", props);
            console.log(props.is);
            return (<div>

                <h1> 购物商城 </h1>
                <hr />
                {
                    //<GairPage/>=== <props.is />
                }
                <props.is />
            </div>)
        }
        ReactDOM.render(<APP is={showComponent} />, app)
组件数据State
    <div id="app"></div>
    <script src="../react.js"></script>
    <script src="../reactdom.js"></script>
    <script src="../babel.min.js"></script>
    <script type="text/babel">

        let { Component } = React
        class App extends Component {
            constructor(props) {
                super(props) //构造函数 是唯一可以给State 初始化的地方
                console.log("构造函数", this);
                this.state = {
                    msg: "类组件自己的数据",
                    name: "常用的方式,解构值",
                    time: new Date().toLocaleString()
                }
            }
            // 渲染
            render(props) {
                let { name, time } = this.state
                return (<div>
                    <h1 ref="titled" > {this.props.title}  </h1>
                    <hr />
                    <h4>  {this.state.msg} </h4>
                    <h4> {name} </h4>
                    <h1>  {time} </h1>
                </div>)
            }
            componentDidMount() {
                console.log("DidMount");
                console.log(this.state.time);
                this.setState({
                    name: "通过setState修改数据"
                })
                this.timer = setInterval(() => {
                    this.setState({
                        time: new Date().toLocaleString()
                    })
                }, 1000)
            }
            componentWillUnmount() {
                clearInterval(this.timer)
                console.log("组件将要卸载");
            }
        }
        ReactDOM.render(<App title="组件数据State" />, app)
组件顺序
let { Component } = React
        class App extends Component {


            /*
            执行顺序
            1. 构造函数
            2.render
            3.DidMount
            只要页面更新就会走 render
            */


            constructor(props) {
                super(props) //构造函数 是唯一可以给State 初始化的地方
                console.log("构造函数", this);
                this.state = {
                    msg: "类组件自己的数据",
                    name: "常用的方式,解构值",
                    time: new Date().toLocaleString()
                }
            }
            // 渲染
            render(props) {
                console.log("1111111");
                let { name, time } = this.state

                return (<div>

                    <h1 ref="titled" > {this.props.title}  </h1>
                    <hr />
                    <h4>  {this.state.msg} </h4>
                    <h4> {name} </h4>
                    <h1>  {time} </h1>
                </div>)
            }
            // 自定义函数
            autoTime() {
                this.timer = setInterval(() => {
                    this.setState({
                        time: new Date().toLocaleString()
                    })
                }, 1000)
            }
            // 页面加载钩子函数
            componentDidMount() {
                console.log("DidMount");
                console.log(this.state.time);
                this.setState({
                    name: "通过setState修改数据"
                })
                // 调用自定义函数
                this.autoTime()
            }
            //页面即将卸载
            componentWillUnmount() {
                clearInterval(this.timer)
                console.log("组件将要卸载");
            }
        }
        ReactDOM.render(<App title="组件数据State" />, app)
事件
  let { Component } = React
        class ToggleComponent extends Component {
            constructor(props) {
                super(props)
                // 初始化页面状态
                this.state = {
                    flag: false,//标识开关状态
                }
            }
            togglelerHader() {
                // react使用了严格模式
                this.setState({
                    flag: !this.state.flag
                })
            }
            // 渲染函数
            render(h) {
                let { flag } = this.state
                return (
                    <div>
                        <h1> 事件 </h1>
                        <button onClick={this.togglelerHader.bind(this)}  > 切换 </button><br />
                        <button onClick={() => {
                            this.togglelerHader()
                        }}  > 切换 </button><br />
                        <img src={flag ? "../image/6.jpg" : "../image/8.jpg"} alt="" />

                        {
                            //<img src={!flag && "../image/8.jpg"} alt="" />
                            //
                            /*   <img src={flag && "../image/6.jpg"} alt="" />
                          <img src={flag=!true && "../image/8.jpg"} alt="" /> */
                        }
                    </div>

                )
            }
        }
        class App extends Component {

        }


        ReactDOM.render(<ToggleComponent />, app)

        /*
        this undenfined
        修改this
        call apply 立即执行1次 调用一次
        bind(参数一修改的this指向)


        */
react使用了严格模式
事件–调用者
react 在调用事件函数的时候需要修改this指向,这里通过修改this的指向来修改
onClick={this.togglelerHader.bind(this)}改变this的指向
事件–调用者
创建出生的时候改变this指向
constructor(props) {
    super(props)
         // 初始化页面状态
       this.state = {
         flag: false,//标识开关状态
       }
                //创建出生的时候改变this指向
     this.togglelerHader2 = this.togglelerHader2.bind(this)
            }

 togglelerHader2(e) {
                e.persist()
                console.log(e);
                console.log("点击事件", this);
                this.setState({
                    flag: !this.state.flag
                })
            }
- 全用箭头函数
 onClick={this.togglelerHader2}
  togglelerHader = () => {
                console.log("点击事件", this);
                this.setState({
                    flag: !this.state.flag
                })
            }
nextTick()
因为事件函数式异步更新的
setState ()是异步更新的
所谓的nextTick 即是当前dom完成后,需要立即更新数据,就需要在当前函数处理内部完成后写一个回调函数把已经更新后的数据渲染到页面上,但这会影响到页面的重绘,
react的执行顺序/
- 初始化/初次加载 执行顺序
构造函数 > 渲染函数 > DidMount(生命周期钩子)
2.页面更新的时候钩子函数 执行顺序
should----Update > will---update > render---渲染函数 >did----update---已经更新首次渲染
绑定DOM的两种方式
- 事件绑定
  constructor() {
                super();
                this.state = {

                    msg: "这是双向数据绑定的信息"
                }
            }

          <input type="text" value={msg} onChange={(ev) => { this.changeInput(ev) } />
            // 修改函数
            changeInput = (ev) => {
                console.log("changeInput", ev.target.value);

                this.setState({
                    msg: ev.target.value
                })
            }
DOM ref 属性
<input type="text" ref={el => this.wyxRef= el} />
submitMsg = () => {
               console.log("是否是最新的数据", this.state.msg);
               console.log("是否是最新的数据-2", this.wyxRef.value);
           }
声明周期钩子函数
componentDidMount() 类比vue mounted 页面DOM挂载完成
//組件DOM已經加載
            componentDidMount() {
                // 网络请求数据
                console.log("componentDidMount---當前頁面已加載完成");
            }
componentWillUnmount()类比 vue beforeDestory 组件将要卸载
 componentWillUnmount() {
 /组件将要销毁  清理操作 例如 清除 timer 取消网络请求
                console.log("componentWillUnmount----组件将要卸载");
        }
不常用的 是否 应该更新
shouldComponentUpdate(nextProps, nextState)
 //不常用的  是否 应该更新
            shouldComponentUpdate(nextProps, nextState) {
                console.log("nextState111", this.state.count);
                console.log("should----Update---是否应该更新", nextProps);
                //nextState 将要更新的值
                console.log("should----Update---是否应该更新", nextState);

                console.log("nextState111", nextState);
                // 可以用来性能优化
                if (nextState.count % 5 == 0) {
                    alert('重复操作')
                }
                return true
            }
UNSAFE 是react 18x 版本的写法
componentWillUpdate(){} : 组件每次更新前调用此钩子函数。
UNSAFE_componentWillUpdate() {
                console.log("will---update", this.state);
            }
componentDidUpdate(){} : 组件每次更新完毕立即执行
componentDidUpdate() {
                console.log("did----update---已经更新首次渲染", this.state);
            }
react HOOK
Hook 是 React 16.8 的新增特性。它可以让你在不编写 class 的情况下使用 state 以及其他的 React 特性 你无需重写任何已有代码就可以在一些组件中尝试 Hook。但是如果你不想,你不必现在就去学习或使用 Hook。100% 向后兼容的。 Hook 不包含任何破坏性改动
const { useState, useEffect } = React
一般情况下 hook 都是 use开头的let [state,修改函数]=useState(初值) .例如let [num1, setNum1] = useState(6666)
const { useState } = React
  let [person, setPerson] = useState({ name: "法外狂徒", name1: "Hook" })
   <button onClick={() => {
                        setPerson({
                            name: "石栋梁",
                            age: 18,
                            name1: "富士康张庄一霸",
                        })
                    }} >  修改引用类型 </button>
useEffect
useEffect 影响副作用 didMount 页面dom挂载完毕时调用
  const App = () => {
            let [count, setCount] = useState(10086)
            let [person, setPerson] = useState({ name: "吴亦凡", address: "潮河派出所" })
            let wyx = null
            // 只有一个参数 didMount+Update
            useEffect(() => {
                console.log(123, "didMount-1---加载的时候调用"); wyx.style.color = "red";
                return () => {
                    console.log("willUnmount---清除的操作");
                }
            })
            //第二个参数是空数组的情况是 是didMount
            useEffect(() => { console.log(123, "didMount-2---加载的时候调用"); wyx.style.color = "yellow" }, [])
            //第二个参数是不为空的情况是 是didMount 类比vue watch 初始化走一次,就知道监听谁,监听的属性变化了,就走这个
            useEffect(() => { console.log(123, "didMount-3---加载的时候调用"); wyx.style.color = "blue" }, [count])
            return (
                <div>
                    <h1> 函数式组件---useEffect </h1>
                    <hr />
                    <h3 ref={el => wyx = el} >  ref属性 </h3>
                    <h1>  {count}  </h1>
                    <button onClick={() => { setCount(count += 66) }} > 点击更新数据 </button>
                    <hr />
                    <h1> {person.name}---{person.address}  </h1>
                    <button onClick={() => {
                        setPerson({
                            name: "我是修改后的数据",
                            address: "翻斗花园吧",
                        })
                    }} > 点击更新数据 </button>
                </div>

            )
        }

        ReactDOM.render(<App />, app)
父子组件传值
概念
1.子组件直接不能修改 父组件的数据,单项数据流,属性props 是只读的
2.父组件把修改函数的逻辑 通过props属性,一起传递给子组件,react 父子组件传值
通过自定义属性传值
传值的时候 使用横岗 在接收的时候不会转为 驼峰子组件修改父组件数据
把父组件的修改函数传递给子组件
子组件通过调用父组件的修改函数来 修改父组件的数据
 const { Component } = React

        class ChirdComponent extends Component {
            ChirenChangeParent = () => {
                //子组件不能修改 父组件的数据
                // 属性props 是 只读的
                this.props.parentNum = 1000
            }
            render() {
                let { parentNum, wyx } = this.props
                console.log(parentNum, wyx);
                return (
                    <div>

                        <hr />
                        <h1> 以下是子组件的内容 </h1>
                        <h3>  接受父组件的内容:{parentNum}  </h3>
                        <button onClick={() => {
                            this.props.wyx(2)
                        }}  > 通过 父组件  修改父组件的数据 </button>

                    </div>
                )
            }
        }


        class APP extends Component {
            constructor() {
                super()
                this.state = {
                    count: 10000,
                }
            }
            changeCount = (h) => {
                console.log("父组件修改", h);
                this.setState(oldState => {
                    return {
                        count: oldState.count + h
                    }
                })
            }

            render() {
                let { count } = this.state
                return (

                    <div>
                        <h1> 父子组件传值 </h1>
                        <hr />
                        <h2> 父组件的数据 {count} </h2>
                        <button onClick={() => {
                            this.changeCount(Math.floor(Math.random() * 2000 - 1) + 1)
                        }}  >  父组件修改自己的数据 </button>

                        <ChirdComponent parentNum={count} wyx={this.changeCount} ></ChirdComponent>
                    </div>

                )
            }
        }
受控组件 非受控组件
修改输入框数据—同一数据源都会改变 —数据的变化还是可控的,双向数据绑定的情况下
但是通过绑定ref属性只能获取到最后一次修改的数据,无法进行双向数据绑定
数据可控
谁的数据 谁修改
vuex 规则 通过 commit() 调用 mutations 修改函数来修改
获取DOM
ref 直接赋值 ref =“testRef”
访问 this.refs.testRef
ref={ el=>this.testRef=el}
访问 this.testRef
react nextTick
setState() 异步更新
 this.setState({},
 ()=>{
    //相当于 Vue的nextTick
    //事件末尾执行
 })
react脚手架
全局安装 npm i create-react-app -g
查看版本 create-react-app -V
常见的包管理工具
yarn npm pnpm homebrew
失败的可能性
- 位置不对
- node版本不支持
- 没获得管理员权限
以管理员身份安装 - window powerShell
- mac subo 指令后缀
脚手架创建项目
create-react-app
目录结构
mode_modelsels 依赖包 后端 marevn pom 文件
public 静态资源 不参与打包 所以存放在 SDK
.gitig nore 配置那些文件 不用上传到文段
package.json 依赖包
src
APP.css +APP.js =APP.vue
index.css
index.js main.js 入口文件
常用指令
window cls clear screen 清屏 mac clear
运行
- 进入到根目录下
- npm start /npm run statr
路由
npm i react-router-dom -S
默认安装版本是6x版本
5x版本和6版本区别大
页面存放目录
vue views
react pages src/pages
react 页面 一般 jsx/js 文件 +css 文件
样式污染
页面 之间样式互相影响了
基本是因为 类名重复了
解决方案
vue scoped 给样式加了唯一的标识符
react 模块化
react 使用模块化
文件名+ .moudle后缀
安装 sass
npm i sass -D 开发依赖 -S 生产依赖
路由传值+hook 使用
配置路由
// 路由6 的写法
//导入 react-router
import { BrowserRouter as Router, Route, Routes } from 'react-router-dom'
// BrowserRouter 浏览器的路由对象 as 别名 router
// 函数式组件
// vue 路由配置表    router路由对象  routes路由配置表 Route path components
// react   router 路由配置对象  Routes{路由配置表}  Route{单个路由}
//

import CityPage from '../pages/cities/'
import SearchPage from '../pages/search/index.jsx'
import Page404 from "../pages/404/index.jsx";
export default function index() {

    return (

        <div>

            <Router>

                <Routes>
                    {
                        /*
                        注释 默认路由/首页
                        params 传参 需要修改路由 修改逻辑
                        */
                    }

                    <Route path='/' element={<CityPage />}   ></Route>
                    <Route path='/search/:id/:name' element={<SearchPage />}  ></Route>

                    {
                        /*
                        404 是所有的页面都匹配不上的 才走的
                        */
                    }
                    <Route path="*" element={<Page404></Page404>} />
                </Routes>
            </Router>

        </div >
    )

}


 306
306

 被折叠的 条评论
为什么被折叠?
被折叠的 条评论
为什么被折叠?
 到【灌水乐园】发言


