


说实话现在AI发展的足够让我这只猴子不用去阅读复杂的threejs文档就实现这个功能( 英文太烂,没那个功夫, 懒狗一条),重要的是知道他怎么实现就可以了。
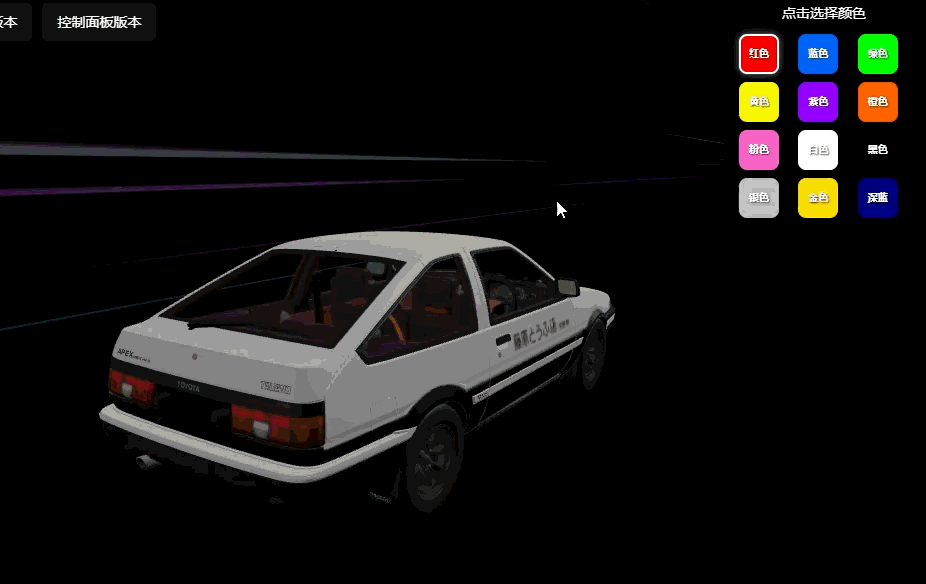
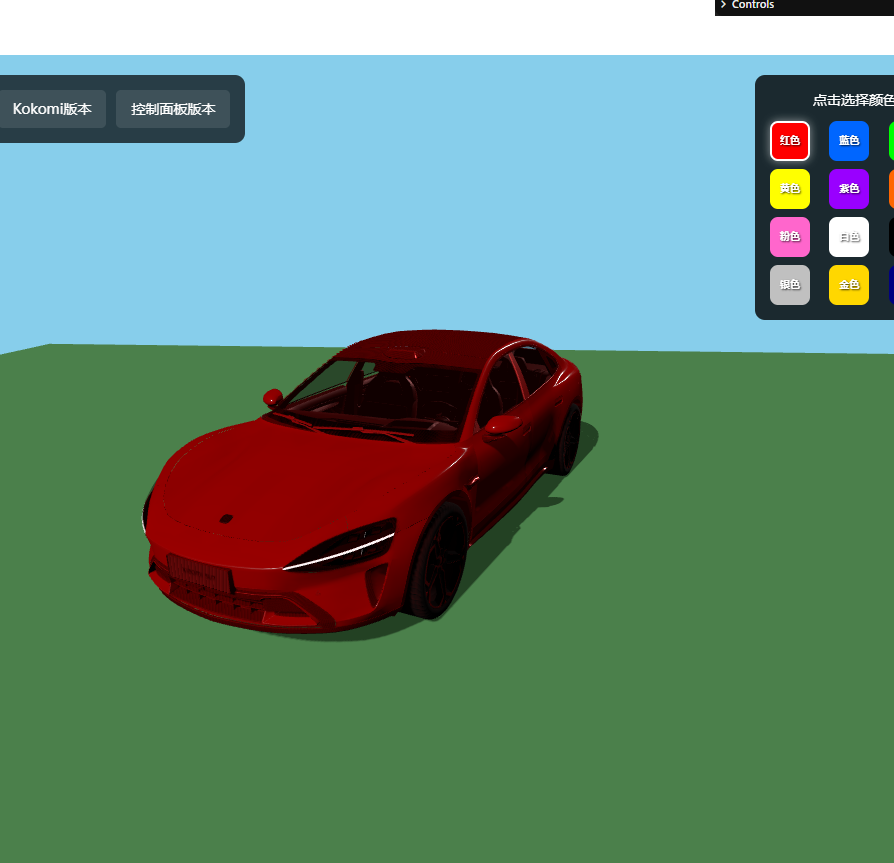
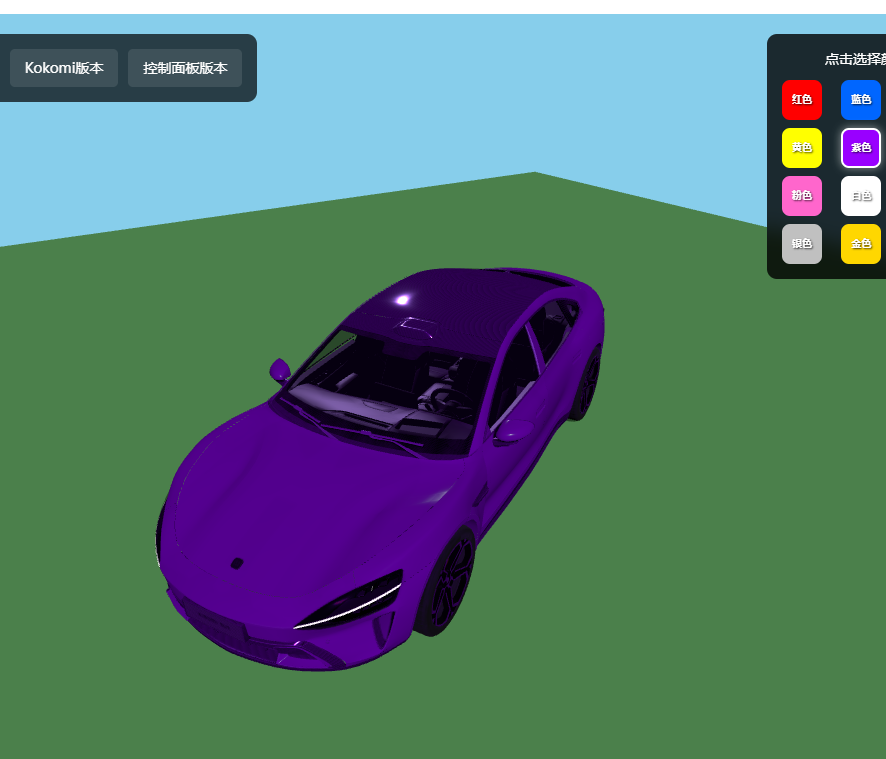
效果展示
前情提要
因为有这么个需求,所以调研了下相关技术。
1. three
作用:核心3D引擎,提供WebGL图形渲染、场景管理、摄像机和灯光等功能,是业界最流行、生态丰富的Web 3D开发基础库。

2. postprocessing
作用:高级3D渲染后处理库。在three.js中使用,可以非常方便地添加模糊、泛光(bloom)、景深、色彩校正等视觉特效,提升画面表现力。

依赖关系:基于three.js使用,并与其生态无缝集成。

3. lil-gui
作用:轻量级GUI面板库,类似 dat.gui。用于在网页端实时调整参数和调试变量,极大提升开发、调优与演示的效率。

依赖关系:可独立用于各种JS项目,常与three.js、postprocessing搭配,用于动态切换特效、灯光、材质等参数。

4. lygia
作用:丰富的GLSL着色器工具库。为自定义shader提供大量高性能、可组合的算法片段(如噪声、滤镜、数学函数)。专门用于提升WebGL/three.js中的视觉创意和自定义后处理能力。

依赖关系:常与three.js和postprocessing配合,实现复杂shader效果。

5. kokomi.js
作用:基于three.js的扩展性工具库,通常用于快速开发3D项目、场景管理或整合各种常用插件。可能封装了如场景切换、后处理、交互等高级功能,进一步简化three.js项目开发。

依赖关系:以three.js为基础,集成或规范化多种3D项目常用功能,加快开发速度。

6. howler
作用:流行的网页音频库,专注于高兼容性、性能最优的音效、音乐播放与管理。常用于需要有音效/背景音乐的3D或可视化交互项目。

依赖关系:独立于three.js,用于音频播放控制,增强多媒体体验。
上面都是AI给解释的奥,因为我们只是加载个模型 还用不着着色器一类的所以本文没有使用到postprocessing lygia
反正都是AI写无所谓了,知道有这么个东西就行,用的时候再去问AI。
正文
先让AI装了一下相关依赖,给他下达指令让他干活。
坑
奶奶滴,AI好像不认识kokomi 根本不知道咋用代码胡编乱造,跑都跑不起来。给👴气的脑溢血了。本身我想让他 只是用kokomi实现这个功能的这脑瘫AI似乎理解不了,加载模型还捣鼓他那破threejs,本身kokomi 已经封装了threejs,算了算了,我们只用kokomi初始化场景完事了,模型加载还是让脑瘫AI用threejs去加载吧。
代码展示【AI写的】
老演员占位div,这时候不太聪明的猴子就要问了为啥叫id="sketch" 不能自定义吗。
当然可以自定义,因为这代码是脑瘫AI写的他理解不了,而kokomi默认找的就是这个,所以我就这样写了。
<div ref="container" class="car-model-container" id="sketch">
初始化代码
onMounted(() => {
  initKokomiApp();
  loadCarModel();
});
// 继承 kokomi.Base 类
class CarSketch extends kokomi.Base {
  create() {
    // 设置场景背景
    this.scene.background = new THREE.Color(0x87ceeb);

    // 添加环境光 - 降低强度避免冲淡材质颜色
    const ambientLight = new THREE.AmbientLight(0xffffff, 0.3);
    this.scene.add(ambientLight);

    // 添加方向光 - 主要光源
    const directionalLight = new THREE.DirectionalLight(0xffffff, 1.0);
    directionalLight.position.set(10, 10, 5);
    directionalLight.castShadow = true;
    directionalLight.shadow.mapSize.width = 2048;
    directionalLight.shadow.mapSize.height = 2048;
    this.scene.add(directionalLight);

    // 添加补光 - 减少阴影过暗
    const fillLight = new THREE.DirectionalLight(0xffffff, 0.4);
    fillLight.position.set(-10, 5, -5);
    this.scene.add(fillLight);

    // 添加地面
    const groundGeometry = new THREE.PlaneGeometry(20, 20);
    const groundMaterial = new THREE.MeshLambertMaterial({ color: 0x90ee90 });
    const ground = new THREE.Mesh(groundGeometry, groundMaterial);
    ground.rotation.x = -Math.PI / 2;
    ground.receiveShadow = true;
    this.scene.add(ground);

    // 启用阴影
    this.renderer.shadowMap.enabled = true;
    this.renderer.shadowMap.type = THREE.PCFSoftShadowMap;
    this.renderer.outputColorSpace = THREE.SRGBColorSpace;

    // 设置相机位置
    this.camera.position.set(5, 3, 5);
    this.camera.lookAt(0, 0, 0);

    // 添加轨道控制器
    new kokomi.OrbitControls(this);

    // 添加自定义动画
    this.update((time) => {
      if (carModel) {
        carModel.rotation.y += 0.005;
      }
    });
  }
}

const initKokomiApp = () => {
  // 创建继承自 kokomi.Base 的实例
  sketch = new CarSketch();
  sketch.create();
};

const loadCarModel = () => {
  const loader = new GLTFLoader();

  // 设置 meshopt 解码器(如果需要的话)
  loader.setMeshoptDecoder(MeshoptDecoder);
  loadModel();

  function loadModel() {
    loader.load(
      "/sm_car.gltf",
      (gltf) => {
        carModel = gltf.scene;

        // 收集所有汽车网格并设置阴影
        carMeshes = [];
        carModel.traverse((child) => {
          if (child.isMesh) {
            child.castShadow = true;
            child.receiveShadow = true;
            carMeshes.push(child);
          }
        });

        // 调整模型大小和位置
        carModel.scale.set(1, 1, 1);
        carModel.position.set(0, 0, 0);

        sketch.scene.add(carModel);

        // 自动调整相机位置以适应模型
        const box = new THREE.Box3().setFromObject(carModel);
        const center = box.getCenter(new THREE.Vector3());
        const size = box.getSize(new THREE.Vector3());

        const maxDim = Math.max(size.x, size.y, size.z);
        const fov = sketch.camera.fov * (Math.PI / 180);
        let cameraZ = Math.abs(maxDim / 2 / Math.tan(fov / 2));

        sketch.camera.position.set(
          center.x + cameraZ,
          center.y + cameraZ * 0.5,
          center.z + cameraZ
        );
        sketch.camera.lookAt(center);

        // 模型加载完成
        isLoaded.value = true;
        loadingProgress.value = 100;

        // 延迟初始化GUI,确保模型已加载
        setTimeout(() => {
          initGUI();
        }, 500);

        console.log("汽车模型加载完成!");
      },
      (progress) => {
        if (progress.total > 0) {
          loadingProgress.value = (progress.loaded / progress.total) * 100;
        }
        console.log("加载进度:", loadingProgress.value + "%");
      },
      (error) => {
        console.error("加载模型时出错:", error);
        // 显示错误信息
        isLoaded.value = true;
        loadingProgress.value = 0;
      }
    );
  }
};
就这样汽车已经渲染出来了,是不是很简单,接下来实现换色,逻辑就是加载模型时把模型的网格存储起来。
然后遍历网格设置颜色就可以实现换色。
// 改变汽车颜色的函数
const changeCarColor = (color) => {
  currentColor.value = color;
  const threeColor = new THREE.Color(color);

  carMeshes.forEach((mesh) => {
    if (mesh.material) {
      // 如果是数组材质
      if (Array.isArray(mesh.material)) {
        mesh.material.forEach((mat) => {
          if (
            mat.isMeshStandardMaterial ||
            mat.isMeshLambertMaterial ||
            mat.isMeshPhongMaterial
          ) {
            mat.color = threeColor;
          }
        });
      } else {
        // 单个材质
        if (
          mesh.material.isMeshStandardMaterial ||
          mesh.material.isMeshLambertMaterial ||
          mesh.material.isMeshPhongMaterial
        ) {
          mesh.material.color = threeColor;
        }
      }
    }
  });

  console.log("汽车颜色已更改为:", color);
};
OK! 非常好的代码,使我的su7旋转
完整的答辩代码请直接复制粘贴
<template>
  <div ref="container" class="car-model-container" id="sketch">
    <!-- Loading 页面 -->
    <div v-if="!isLoaded" class="loading-overlay">
      <div class="loading-content">
        <div class="loading-spinner"></div>
        <div class="loading-text">正在加载汽车模型...</div>
        <div class="loading-progress" v-if="loadingProgress > 0">
          加载进度: {{ Math.round(loadingProgress) }}%
        </div>
      </div>
    </div>

    <!-- 颜色选择器 -->
    <div v-if="isLoaded" class="color-picker">
      <div class="color-picker-title">点击选择颜色</div>
      <div class="color-options">
        <div
          v-for="color in carColors"
          :key="color.name"
          class="color-option"
          :style="{ backgroundColor: color.value }"
          @click="changeCarColor(color.value)"
          :class="{ active: currentColor === color.value }"
        >
          <span class="color-name">{{ color.name }}</span>
        </div>
      </div>
    </div>
  </div>
</template>

<script setup>
import { ref, onMounted, onUnmounted } from "vue";
import * as kokomi from "kokomi.js";
import * as THREE from "three";
import { GLTFLoader } from "three/examples/jsm/loaders/GLTFLoader.js";
import { MeshoptDecoder } from "three/examples/jsm/libs/meshopt_decoder.module.js";
import GUI from "lil-gui";

const container = ref(null);
const isLoaded = ref(false);
const loadingProgress = ref(0);
const currentColor = ref("#ff0000");
let sketch,
  carModel,
  gui,
  carMeshes = [];

// 汽车颜色选项
const carColors = [
  { name: "红色", value: "#ff0000" },
  { name: "蓝色", value: "#0066ff" },
  { name: "绿色", value: "#00ff00" },
  { name: "黄色", value: "#ffff00" },
  { name: "紫色", value: "#9900ff" },
  { name: "橙色", value: "#ff6600" },
  { name: "粉色", value: "#ff66cc" },
  { name: "白色", value: "#ffffff" },
  { name: "黑色", value: "#000000" },
  { name: "银色", value: "#c0c0c0" },
  { name: "金色", value: "#ffd700" },
  { name: "深蓝", value: "#000080" },
];

onMounted(() => {
  initKokomiApp();
  loadCarModel();
});

onUnmounted(() => {
  if (sketch) {
    sketch.dispose();
  }
  if (gui) {
    gui.destroy();
  }
});

// 继承 kokomi.Base 类
class CarSketch extends kokomi.Base {
  create() {
    // 设置场景背景
    this.scene.background = new THREE.Color(0x87ceeb);

    // 添加环境光 - 降低强度避免冲淡材质颜色
    const ambientLight = new THREE.AmbientLight(0xffffff, 0.3);
    this.scene.add(ambientLight);

    // 添加方向光 - 主要光源
    const directionalLight = new THREE.DirectionalLight(0xffffff, 1.0);
    directionalLight.position.set(10, 10, 5);
    directionalLight.castShadow = true;
    directionalLight.shadow.mapSize.width = 2048;
    directionalLight.shadow.mapSize.height = 2048;
    this.scene.add(directionalLight);

    // 添加补光 - 减少阴影过暗
    const fillLight = new THREE.DirectionalLight(0xffffff, 0.4);
    fillLight.position.set(-10, 5, -5);
    this.scene.add(fillLight);

    // 添加地面
    const groundGeometry = new THREE.PlaneGeometry(20, 20);
    const groundMaterial = new THREE.MeshLambertMaterial({ color: 0x90ee90 });
    const ground = new THREE.Mesh(groundGeometry, groundMaterial);
    ground.rotation.x = -Math.PI / 2;
    ground.receiveShadow = true;
    this.scene.add(ground);

    // 启用阴影
    this.renderer.shadowMap.enabled = true;
    this.renderer.shadowMap.type = THREE.PCFSoftShadowMap;
    this.renderer.outputColorSpace = THREE.SRGBColorSpace;

    // 设置相机位置
    this.camera.position.set(5, 3, 5);
    this.camera.lookAt(0, 0, 0);

    // 添加轨道控制器
    new kokomi.OrbitControls(this);

    // 添加自定义动画
    this.update((time) => {
      if (carModel) {
        // carModel.rotation.y += 0.005;
      }
    });
  }
}

const initKokomiApp = () => {
  // 创建继承自 kokomi.Base 的实例
  sketch = new CarSketch();
  sketch.create();
};

const loadCarModel = () => {
  const loader = new GLTFLoader();

  // 设置 meshopt 解码器(如果需要的话)
  loader.setMeshoptDecoder(MeshoptDecoder);
  loadModel();

  function loadModel() {
    loader.load(
      "/sm_car.gltf",
      (gltf) => {
        carModel = gltf.scene;

        // 收集所有汽车网格并设置阴影
        carMeshes = [];
        carModel.traverse((child) => {
          if (child.isMesh) {
            child.castShadow = true;
            child.receiveShadow = true;
            carMeshes.push(child);
          }
        });

        // 调整模型大小和位置
        carModel.scale.set(1, 1, 1);
        carModel.position.set(0, 0, 0);

        sketch.scene.add(carModel);

        // 自动调整相机位置以适应模型
        const box = new THREE.Box3().setFromObject(carModel);
        const center = box.getCenter(new THREE.Vector3());
        const size = box.getSize(new THREE.Vector3());

        const maxDim = Math.max(size.x, size.y, size.z);
        const fov = sketch.camera.fov * (Math.PI / 180);
        let cameraZ = Math.abs(maxDim / 2 / Math.tan(fov / 2));

        sketch.camera.position.set(
          center.x + cameraZ,
          center.y + cameraZ * 0.5,
          center.z + cameraZ
        );
        sketch.camera.lookAt(center);

        // 模型加载完成
        isLoaded.value = true;
        loadingProgress.value = 100;

        // 延迟初始化GUI,确保模型已加载
        setTimeout(() => {
          initGUI();
        }, 500);

        console.log("汽车模型加载完成!");
      },
      (progress) => {
        if (progress.total > 0) {
          loadingProgress.value = (progress.loaded / progress.total) * 100;
        }
        console.log("加载进度:", loadingProgress.value + "%");
      },
      (error) => {
        console.error("加载模型时出错:", error);
        // 显示错误信息
        isLoaded.value = true;
        loadingProgress.value = 0;
      }
    );
  }
};

// 改变汽车颜色的函数
const changeCarColor = (color) => {
  currentColor.value = color;
  const threeColor = new THREE.Color(color);

  carMeshes.forEach((mesh) => {
    if (mesh.material) {
      // 如果是数组材质
      if (Array.isArray(mesh.material)) {
        mesh.material.forEach((mat) => {
          if (
            mat.isMeshStandardMaterial ||
            mat.isMeshLambertMaterial ||
            mat.isMeshPhongMaterial
          ) {
            mat.color = threeColor;
          }
        });
      } else {
        // 单个材质
        if (
          mesh.material.isMeshStandardMaterial ||
          mesh.material.isMeshLambertMaterial ||
          mesh.material.isMeshPhongMaterial
        ) {
          mesh.material.color = threeColor;
        }
      }
    }
  });

  console.log("汽车颜色已更改为:", color);
};

const initGUI = () => {
  gui = new GUI();

  // 确保 carModel 存在
  if (!carModel) {
    console.warn("Car model not loaded yet, skipping GUI initialization");
    return;
  }

  // 模型控制
  const modelFolder = gui.addFolder("模型控制");

  // 创建可控制的旋转对象
  const rotationControl = {
    x: carModel.rotation.x,
    y: carModel.rotation.y,
    z: carModel.rotation.z,
  };

  modelFolder
    .add(rotationControl, "x", -Math.PI, Math.PI)
    .name("旋转X")
    .onChange((value) => {
      carModel.rotation.x = value;
    });
  modelFolder
    .add(rotationControl, "y", -Math.PI, Math.PI)
    .name("旋转Y")
    .onChange((value) => {
      carModel.rotation.y = value;
    });
  modelFolder
    .add(rotationControl, "z", -Math.PI, Math.PI)
    .name("旋转Z")
    .onChange((value) => {
      carModel.rotation.z = value;
    });

  // 创建可控制的缩放对象
  const scaleControl = {
    scale: 1,
  };
  modelFolder
    .add(scaleControl, "scale", 0.1, 3)
    .name("缩放")
    .onChange((value) => {
      carModel.scale.set(value, value, value);
    });

  // 颜色控制
  const colorFolder = gui.addFolder("颜色控制");
  const colorParams = {
    color: currentColor.value,
  };
  colorFolder
    .addColor(colorParams, "color")
    .name("汽车颜色")
    .onChange((value) => {
      changeCarColor(value);
    });

  // 相机控制
  const cameraFolder = gui.addFolder("相机控制");
  cameraFolder.add(sketch.camera.position, "x", -20, 20).name("相机X");
  cameraFolder.add(sketch.camera.position, "y", -20, 20).name("相机Y");
  cameraFolder.add(sketch.camera.position, "z", -20, 20).name("相机Z");

  // 光照控制
  const lightFolder = gui.addFolder("光照控制");
  const ambientLight = sketch.scene.children.find(
    (child) => child.type === "AmbientLight"
  );
  if (ambientLight) {
    lightFolder.add(ambientLight, "intensity", 0, 1).name("环境光强度");
  }

  const directionalLight = sketch.scene.children.find(
    (child) => child.type === "DirectionalLight" && child.position.x > 0
  );
  if (directionalLight) {
    lightFolder.add(directionalLight, "intensity", 0, 2).name("主光源强度");
    lightFolder.add(directionalLight.position, "x", -20, 20).name("主光源X");
    lightFolder.add(directionalLight.position, "y", -20, 20).name("主光源Y");
    lightFolder.add(directionalLight.position, "z", -20, 20).name("主光源Z");
  }

  const fillLight = sketch.scene.children.find(
    (child) => child.type === "DirectionalLight" && child.position.x < 0
  );
  if (fillLight) {
    lightFolder.add(fillLight, "intensity", 0, 1).name("补光强度");
    lightFolder.add(fillLight.position, "x", -20, 20).name("补光X");
    lightFolder.add(fillLight.position, "y", -20, 20).name("补光Y");
    lightFolder.add(fillLight.position, "z", -20, 20).name("补光Z");
  }

  // 背景颜色控制
  const backgroundFolder = gui.addFolder("背景控制");
  const backgroundParams = {
    color: "#87ceeb",
  };
  backgroundFolder
    .addColor(backgroundParams, "color")
    .onChange((value) => {
      sketch.scene.background = new THREE.Color(value);
    })
    .name("背景颜色");

  // 地面颜色控制
  const groundFolder = gui.addFolder("地面控制");
  const ground = sketch.scene.children.find(
    (child) => child.geometry && child.geometry.type === "PlaneGeometry"
  );
  if (ground) {
    const groundParams = {
      color: "#90EE90",
    };
    groundFolder
      .addColor(groundParams, "color")
      .onChange((value) => {
        ground.material.color = new THREE.Color(value);
      })
      .name("地面颜色");
  }
};
</script>

<style scoped>
.car-model-container {
  width: 100%;
  height: 100vh;
  overflow: hidden;
  position: relative;
}

.loading-overlay {
  position: absolute;
  top: 0;
  left: 0;
  width: 100%;
  height: 100%;
  background: linear-gradient(135deg, #667eea 0%, #764ba2 100%);
  display: flex;
  justify-content: center;
  align-items: center;
  z-index: 1000;
  transition: opacity 0.5s ease-out;
}

.loading-content {
  text-align: center;
  color: white;
}

.loading-spinner {
  width: 60px;
  height: 60px;
  border: 4px solid rgba(255, 255, 255, 0.3);
  border-top: 4px solid white;
  border-radius: 50%;
  animation: spin 1s linear infinite;
  margin: 0 auto 20px;
}

.loading-text {
  font-size: 18px;
  font-weight: 500;
  margin-bottom: 10px;
  text-shadow: 0 2px 4px rgba(0, 0, 0, 0.3);
}

.loading-progress {
  font-size: 14px;
  opacity: 0.8;
  text-shadow: 0 1px 2px rgba(0, 0, 0, 0.3);
}

/* 颜色选择器样式 */
.color-picker {
  position: absolute;
  top: 20px;
  right: 20px;
  background: rgba(0, 0, 0, 0.8);
  padding: 15px;
  border-radius: 10px;
  backdrop-filter: blur(10px);
  z-index: 1001;
  min-width: 200px;
}

.color-picker-title {
  color: white;
  font-size: 14px;
  font-weight: 500;
  margin-bottom: 10px;
  text-align: center;
}

.color-options {
  display: grid;
  grid-template-columns: repeat(3, 1fr);
  gap: 8px;
}

.color-option {
  width: 40px;
  height: 40px;
  border-radius: 8px;
  cursor: pointer;
  display: flex;
  align-items: center;
  justify-content: center;
  border: 2px solid transparent;
  transition: all 0.3s ease;
  position: relative;
}

.color-option:hover {
  transform: scale(1.1);
  border-color: white;
}

.color-option.active {
  border-color: #fff;
  box-shadow: 0 0 10px rgba(255, 255, 255, 0.5);
}

.color-name {
  font-size: 10px;
  color: white;
  text-shadow: 1px 1px 2px rgba(0, 0, 0, 0.8);
  font-weight: bold;
  text-align: center;
  line-height: 1;
}

@keyframes spin {
  0% {
    transform: rotate(0deg);
  }
  100% {
    transform: rotate(360deg);
  }
}

/* 当加载完成时,淡出loading页面 */
.loading-overlay.fade-out {
  opacity: 0;
  pointer-events: none;
}
</style>

DLC 让车轮滚起来
      if (carModel) {
        // carModel.rotation.y += 0.005;
        if (wheelMeshes && wheelMeshes.length > 0) {
          wheelMeshes.forEach((wheel) => {
            // 轮子围绕其局部 Z 轴旋转以实现前进效果
            wheel.rotation.z += 0.1; // 调整旋转速度
          });
        }
      }
...
        carModel.traverse((child) => {
          if (child.isMesh) {
            child.castShadow = true;
            child.receiveShadow = true;
            carMeshes.push(child);
            // 识别轮子并添加到 sketch.wheelMeshes 数组
            if (child.name.toLowerCase().includes("wheel")) {
              // 假设轮子名称包含 'wheel'
              wheelMeshes.push(child);
            }
          }
        });
其他功能没有了,因为我的AI已经rate Limit 了,哭惹。


 1194
1194

 被折叠的 条评论
为什么被折叠?
被折叠的 条评论
为什么被折叠?
 到【灌水乐园】发言


