


1、Linux bash 命令行常用快捷键
| 快捷键 | 说明 |
|---|---|
| tab | 补全命令功能,连续2下 |
| ctrl+a | 光标移动到开头 |
| ctrl+e | 光标移动到结尾 |
| ctrl +方向键 | 向左右以单词为单位移动光标 |
| ctrl+u | 删除光标前内容 |
| ctrl+k | 删除光标后内容 |
| ctrl+w | 删除光标前的一个单词 |
| ctrl+y | 粘贴ctrl+u,ctrl+k,ctrl+w删除的文本 |
| ctrl+c | 终止当前程序 |
| ctrl+d | 退出当前会话(logout,也可退出终端如xshell) |
| ctrl+z | 暂停正在执行的程序 bg 将刚暂停的程序放到后台 |
| ctrl+l | 清屏(clear) |
| ctrl+s | 锁屏 |
| ctrl+q | 退出锁屏 |
| esc+. | 调用上一个命令最后一个空格后的内容 |
| ctrl+insert | 复制 |
| shift+insert | 粘贴 |
| ctrl+r | 搜索历史命令 |
| ctrl+g | 从ctrl+r中退出 |
2、帮助命令
man 命令

命令 --help

#bash内置命令只能使用以下方法查帮助
help 命令
#常用bash内置命令
alias, bg, break, cd, continue, declare, dirs, echo,
eval, exec, exit, export, fg, help, history, jobs,
kill, let, local, logout, printf, pwd, read, set,
source, suspend, test, times, trap, typeset,
ulimit, umask, unalias, unset3、历史命令
history 查看命令历史记录

history -d 序号  删除某个历史命令记录

history -c 序号  删除所有历史命令记录

!sys  执行最近一条以sys开头的历史命令

!!  执行上一条命令

!num  执行第num条命令
4、关机重启
shutdown
    -r  重启
    -r now  立刻重启
    -r +1  1分钟后重启

    -h  关机halt
    -h now  立刻关机
    -h +1  1分钟后关机
reboot 重启
init 0 关机
init 6 重启
halt 关机
poweroff 关机
logout 注销
exit 注销5、目录命令
pwd  #print working directory

[root@template ~]# pwd
/root
cd #change directory
. 当前目录
.. 上一级目录
~ 当前用户的家目录
- 上一次所在的目录
[root@template sysconfig]# cd /etc/sysconfig/network-scripts/
[root@template network-scripts]# cd .
[root@template network-scripts]# cd ..
[root@template sysconfig]# cd ~
[root@template ~]# cd -
/etc/sysconfigls #list directory contents
-l 长格式(long)查看内容属性
-a 显示所有文件,包含以.开头的隐藏文件
-d 只显示目录本身
-i 显示文件的inode号,相当于文件的身份id
[root@template ~]# ls -l
total 4
-rw-------. 1 root root 1703 Sep 25 12:12 anaconda-ks.cfg
[root@template ~]# ls -a
. anaconda-ks.cfg .bash_logout .bashrc .tcshrc
.. .bash_history .bash_profile .cshrc
[root@template ~]# ls -ld test1
drwxr-xr-x. 3 root root 15 Sep 26 22:37 test1
[root@test ~]# ls -li
total 4
33574980 -rw-------. 1 root root 1313 Sep 27 00:17 anaconda-ks.cfg
第一列 inode号,相当于文件的身份id
第二列 首字符代表文件类型
中间9个字符代表文件权限
.和selinux相关
第三列 硬链接数
mkdir  #make directory
    -p  递归创建目录

# 同时创建多个目录
[root@template ~]# mkdir test{1..10}
[root@template ~]# ls
anaconda-ks.cfg  test10  test3  test5  test7  test9
test1            test2   test4  test6  test8

[root@template ~]# mkdir -p test1/a/a/a/
[root@template ~]# ls -ltr test1/a/a/a/
total 0
tree #list contents of directories in a tree-like format
-L num 显示层级level
-d 只显示目录
[root@template ~]# tree -L 1 /root
/root
├── anaconda-ks.cfg
├── test1
├── test10
├── test2
├── test3
├── test4
├── test5
├── test6
├── test7
├── test8
└── test9
[root@template ~]# tree -d
.
├── test1
│ └── a
│ └── a
│ └── a
├── test10
├── test2
├── test3
├── test4
├── test5
├── test6
├── test7
├── test8
└── test9cp test.txt{,.bak}备份
cp -p 复制文件时保持源文件的所有者、权限信息以及时间属性
cp -d 如果复制的源文件是软连接,仅复制软连接本身,其保留软连接所指向的目标文件或目录
cp -r 递归复制目录
cp -a 等于-pdr
cp -t 目标 源
cp 源 目标mv 移动目录或文件
rm 删除目录或文件
rm -f 强制删除
rm -r 递归删除6、用户命令
whoami  #print effective(有效的) userid

[root@template ~]# whoami
root
7、文件命令
vi   相当于win记事本,默认已安装
vim  相当于notepad++,默认没有安装

rpm -qa vim-enhanced
vim-enhanced-7.4.629-8.el7_9.x86_64

yum install vim-enhanced -y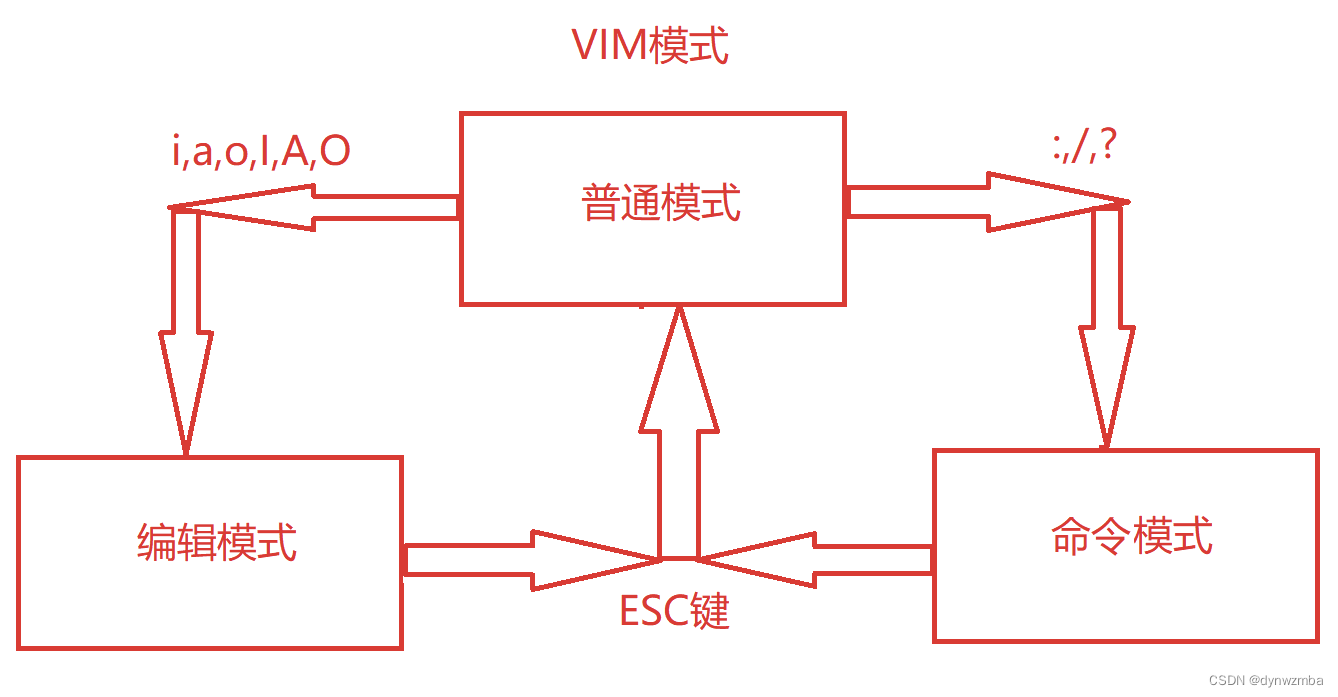
| 普通模式:光标移动 | |
| G | 光标移动到文件结尾 |
| gg | 光标移动到文件开头 |
| $ | 光标移动到行尾 |
| 0 | 光标移动到行头 |
| ngg | 光标移动到第n行 |
| n[回车] | 光标移动到n行 |
| 普通模式:搜索替换 | |
| /内容 | 向下搜索,此时按n继续搜索,N反向继续搜索 |
| ?内容 | 向上搜索,此时按n继续搜索,N反向继续搜索 |
| :%s/A/B/g | 把A替换成B,s为替换,g全局替换 “%” :表示整个文件,同“1,” |
| :n1,n2s/A/B/g | 在第n1行和n2行间寻找A,用B替换 |
| 普通模式:复制粘贴删除 | |
| yy | 复制当前行 |
| nyy | 复制从当前开始的n行 |
| p | 粘贴到光标的下一行 |
| P | 粘贴到光标的上一行 |
| dd | 删除当前行 |
| ndd | 删除从当前行开始的n行 |
| dG | 删除当前行至最后一行 |
| d0 | 删除当前光标文本至行首 |
| d$ | 删除当前光标文本至行尾 |
| x | 删除光标后字符 |
| X | 删除光标前字符 |
| u | 撤销上一步操作 |
| 编辑模式 | |
| i | 在当前光标所在处插入文字 |
| I | 在当前所在行的行首第一个非空格符处开始插入文字 |
| a | 在当前光标所在下一个字符处插入文字 |
| A | 在当前所在行的行尾最后一个字符处开始插入文字 |
| o | 在当前所在行的下一行处插入新的一行 |
| O | 在当前所在行的上一行处插入新的一行 |
| 命令模式 | |
| :w | 保存 |
| :q | 退出 |
| ! | 强制 |
| :set nu | 显示行号 |
| :set nonu | 关闭显示 |
| :set invlist | 显示不可见字符 |
| :set nolist | 关闭显示 |
cat  查看文件内容
    -n 显示行号

多行写入文本
cat >> /data/test.txt<<EOF
I
am
studying
linux
EOF    #EOF表示结束符
echo 打印内容输出内容
-n 不换行输出
-e 支持转义字符
[root@template ~]# echo -n "test"
test[root@template ~]# echo -e "test\ntest"
test
test
[root@template ~]# echo `date`
Thu Feb 10 22:49:04 CST 2022
[root@template ~]# echo $(date)
Thu Feb 10 22:49:19 CST 2022
[root@template ~]# echo '`date`'
`date`
[root@template ~]# echo '$(date)'
$(date)
[root@template ~]# a=tom
[root@template ~]# echo $a
tom
[root@template ~]# echo "$ais a man"
a man
[root@template ~]# echo "{$a}is a man"
{tom}is a man
[root@template ~]# echo "${a}is a man"
tomis a manless +n test.txt 从第n行开始显示文本内容
more 显示文本内容
head -n 显示文件前n行
tail -n 显示文件后n行
-f 动态跟踪文件尾部的变化,查看日志文件结尾grep 过滤筛选内容,按行输出
-n 显示行号的过滤
-w 按单词为单位过滤
-E == egrep 正则过滤
-c 返回匹配的个数
-o 只输出匹配的内容
常用正则匹配时过滤,只显示过滤的内容aaa
grep -o "aaa" test.txt
先找到10,再找到前后各5行
grep 10 -C 5 test.txt
同时过滤含有test和root的行
grep -E "test|root" oldboy.txt touch 创建文件
[root@template]# touch test{1..3}.txt
[root@template]# ls
test1.txt test2.txt test3.txtstat 查看文件或文件系统的状态
[root@template ~]# stat test1.txt
File: ‘test1.txt’
Size: 0 Blocks: 0 IO Block: 4096 regular empty file
Device: 803h/2051d Inode: 16998660 Links: 1
Access: (0644/-rw-r--r--) Uid: ( 0/ root) Gid: ( 0/ root)
Context: unconfined_u:object_r:admin_home_t:s0
Access: 2022-10-11 22:22:36.528994588 +0800
Modify: 2022-10-11 22:22:36.528994588 +0800
Change: 2022-10-11 22:22:36.528994588 +0800
Birth: -
[root@template ~]# stat /
File: ‘/’
Size: 224 Blocks: 0 IO Block: 4096 directory
Device: 803h/2051d Inode: 64 Links: 17
Access: (0555/dr-xr-xr-x) Uid: ( 0/ root) Gid: ( 0/ root)
Context: system_u:object_r:root_t:s0
Access: 2022-10-11 22:19:16.652999889 +0800
Modify: 2022-09-25 12:11:48.749498294 +0800
Change: 2022-09-25 12:11:48.749498294 +0800
Birth: -seq 输出数字序列
输出2-5
[root@template ~]#seq 2 5
2
3
4
5
步长2,从2到10
[root@template ~]# seq 2 2 10
2
4
6
8
10
-s 指定空格为分隔符
[root@template ~]# seq -s " " 5
1 2 3 4 5
-w 补齐位数
[root@template ~]# seq -w -s " " 10
01 02 03 04 05 06 07 08 09 10alias 查看和设置别名
查看已有别名
[root@template ~]# alias
alias cp='cp -i'
......
alias mv='mv -i'
alias rm='rm -i'
提高效率
[root@template ~]# alias net='cat /etc/sysconfig/network-scripts/ifcfg-eth0'
[root@template ~]# net
TYPE=Ethernet
PROXY_METHOD=none
......
GATEWAY=10.0.0.254
DNS1=10.0.0.254
IPV6_PRIVACY=no
防止误删数据,提醒用户
[root@template ~]# alias rm='echo "你好,请不要使用rm命令,用mv替代"'
[root@template ~]# rm test1
你好,请不要使用rm命令,用mv替代 test1
【别名】优先于【命令】
如何能不使用别名:
命令全路径执行 /bin/rm test1.txt
命令开头加反斜线 \rm test2.txt
取消别名 unalias rm
永久生效别名(alias只临时生效)
vi /etc/profile #全局环境变量
alias rm='echo "你好,请不要使用rm命令,用mv替代"'
source /etc/profile重定向:
标准输出重定向,用数字1表示
标准错误输出重定向,用数字2表示
标准输入重定向,用数字0表示
1、标准输出重定向:
>或1>,数据流向就是朝右
常用的清空文件命令:
>test.txt
cat /dev/null>test.txt
2、标准错误输出重定向
2> 接收执行命令的报错
lss 2>test.txt
lss 1>test1.txt 2>test2.txt
3、标准输入重定向
0<或< 数据流向朝左
4、>> << 文件末尾追加
5、一个文件同时收集错误和正确的信息
echo hello >> /data/test.txt 2>&1
echo hello &> /data/test.txt
echo hello &>> /data/test.txttr 按字符替换,从标准输入
只替换输出内容,不会修改原文件
[root@template ~]# tr "tt" "111" < test3.txt
11ss
ssee
ee11
[root@template ~]# cat test3.txt
ttss
ssee
eett
将test文件中的w替换成9
tr "w" "9" < test.txt
批量替换
tr "a-d" "0-3" < test.txt
a替换0,b替换1,c替换2,d替换3xargs 从标准输入建立和执行命令行
-n 分组
-i 标准输入通过 {} 调用,默认参数,且{}默认在最后
-t 先打印命令,然后再执行
[root@template ~]# xargs -n 4 <test.txt
1 2 3 4
5
-d 指定分隔符,不指定默认是空格
[root@template ~]# xargs -d"." -n 2 <test.txt
a b
c d
[root@template ~]# xargs -n 2 <test.txt
a.b.c.d
find /data -type f|xargs -i rm -f {}
find /data -type f|xargs rm -f #默认i参数
批量修改文件
ls | xargs -t -i mv {} {}.bak
批量改回文件名
ls |xargs -n1|sed -rn 's#(.*txt)(.bak)#mv \1\2 \1#gp'|bash
批量压缩
ls|xargs tar zcvf 1.tar.gz
下载文本里面的所有链接:
cat url-list.txt | xargs wget –cuniq 相邻的相同行去重(完全去重需要先sort)
-c 相邻的相同行去重并且计数
[root@template ~]# uniq test3.txt
10.0.0.1
10.0.0.11
10.0.0.2
10.0.0.8
10.0.0.16
10.0.0.20
10.0.0.16
10.0.0.17
10.0.0.35
10.0.0.16
10.0.0.35
[root@template ~]# uniq -c test3.txt
3 10.0.0.1
1 10.0.0.11
2 10.0.0.2
1 10.0.0.8
3 10.0.0.16
1 10.0.0.20
1 10.0.0.16
1 10.0.0.17
1 10.0.0.35
2 10.0.0.16
3 10.0.0.35sort 排序
-n 按数字排序
-t 指定分隔符
-k 指定列
-r 倒序
[root@template ~]# sort -nr -t. -k4 test3.txt|uniq
#-nr 数字,倒序排列
#-t. 以.为分隔符
#-k4 取第4列(需要排序的数字列)
10.0.0.35
10.0.0.20
10.0.0.17
10.0.0.16
10.0.0.11
10.0.0.8
10.0.0.2
10.0.0.1
统计下面test.txt中各网址出现的次数
[root@template ~]# sort -t/ -k3 test3.txt|uniq -c
2 http://bbs.etiantian.org
2 http://blog.etiantian.org
4 http://www.etiantian.orgfile 查看文件类型
纯文本文件
[root@template ~]# file test1.txt
test1.txt: ASCII text
数据文件
[root@template ~]# file /var/log/lastlog
/var/log/lastlog: data
二进制文件
[root@template ~]# file /bin/cat
/bin/cat: ELF 64-bit LSB executable......wc 显示一个文件的行数,字符数等
-l 显示一个文件的行数
-c 显示一个文件的字节数,包含换行和空格
-m 显示一个文件的字符数,包含换行和空格
[root@template ~]# wc -l test.txt
2 test.txt
[root@template ~]# wc -c test.txt
9 test.txt
[root@template ~]# wc -m test.txt
5 test.txt
[root@template ~]# cat test.txt
你好
atar 打包
z 压缩,gzip属性(.tar.gz)
j 压缩,bz2属性(.tar.bz2)
c 创建打包
t 在不解压包的情况下,查看包的内容
v 显示打包过程(工作中不用)
x 解压
f 指定打包的文件名,必须要有这个参数
-C 解压到指定路径下(不用本指令时,默认解压到当前目录下)
-p 保持文件原有属性
--exclude 排除打包
-X 通过文件指定批量排除
h 打包软链接文件只想的真实源文件
*.gz 用gzip -d或者gunzip解压
*.bz2 用bzip2 -d或者bunzip2解压
把/etc/目录打包到/opt下面
ls -d /etc #检查有没有要打包的目录
cd / #切换到打包目录的上一级
tar zcf /opt/etc.tar.gz ./etc
tar tf /tmp/local.tar.gz
默认解压到当前目录
tar xf etc.tar.gz
tar xf etc.tar.bz2
解压到指定目录
tar xf etc.tar.gz -C /home/
tar zcvf 1.tar.gz ./* --exclude={4,5}.txt
tar zcvf 1.tar.gz ./* --exclude={1..4}.txt
通过文件排除
[root@template ~]# cat paichu.txt
1.txt
2.txt
3.txt
[root@template ~]# tar zcvfX 1.tar.gz paichu.txt ./*
./1.tar.gz
./4.txt
./5.txt
./paichu.txt
date用作目录变量时,不能以空格分隔和冒号分隔
[root@]# tar zcvf $(date +"%F-%H-%M-%S").tar.gz ./*
/etc/rc.local是软链接文件,指向真实路径/etc/rc.d/rc.local
默认打包的时候,只打包了软链接文件
而加上-h打包,可以打包软链接对应的真实文件
tar zcvfh rc.local_1.tar.gz /etc/rc.local8、查找命令
which  查看二进制命令所在路径

[root@template ~]# which ls
alias ls='ls --color=auto'
	/usr/bin/ls
whereis 显示文件及文件的帮助等的路径
-b 等同which,只从PATH环境变量路径里查找,不会显示别名
[root@template ~]# whereis ls
ls: /usr/bin/ls /usr/share/man/man1/ls.1.gz
[root@template ~]# whereis -b ls
ls: /usr/bin/ls非常用指令
locate 查找文件及相关内容(内置数据库,通过updatedb)
需yum安装
yum install mlocate -y
初次安装后需更新locate查找内容对应的数据库
[root@template ~/test]# updatedb
locate搜索内容,默认从updatedb对应的数据库中查找
[root@template ~/test]# file /var/lib/mlocate/mlocate.db
/var/lib/mlocate/mlocate.db: datafind 查找(原理:磁盘遍历,速度慢)
-name 按名字查找
-type 按类型查找(f d l c b s)
-a and并且(默认)
-o or或者
! 取反
-szie 按文件大小查找
+1M 大于1M
1M 等于1M
-M 小于1M
-mtime 按文件修改时间查找
+3 3天前被修改的文件
3 之前第3天被修改的文件
-3 最近3天被修改的文件
-perm 按权限查找
-user 按用户查找
-exec 对找到的文件进行处理
find / -type f -name "ifcfg-eth0"
find / -type f -o -name "*txt"
模拟每天创建一个文件,连续30天(会临时修改服务器当前时间)
for n in `seq 30`;do date -s "2020/01/$n";touch ./file_$n;done
find / -tpye d -mtime +3 3天前
find / -tpye d -mtime 3 之前第3天
find / -tpye d -mtime -3 最近3天
find ./ -perm 644
find ./ -user root
find /data -type f|xargs rm -f # 效率更高
find /data -type f -exec rm -f {} \;9、其他命令
修改系统时间
date -s "20221012 11:11:11"
date -s "1hour"
date -s "-1hour"
clock -w  保存到BIOS中

[root@template ~]# date +%F -d "-1day"
2022-02-13
[root@template ~]# date +%F -d "+1day"
2022-02-15
[root@template ~]# date +%F -d "+1month"
2022-03-14
[root@template ~]# date +%F -d "+1year"
2023-02-14

[root@template ~]# date +"%Y-%m-%d %H:%M:%S"
2022-02-14 23:36:21
[root@template ~]# date +"%F %T"
2022-02-14 23:36:30


 1598
1598

 被折叠的 条评论
为什么被折叠?
被折叠的 条评论
为什么被折叠?
 到【灌水乐园】发言


