 深入理解Android Service机制


 本文详细解析了Android中Service的概念、分类及生命周期,对比了Service与Activity的异同,介绍了本地服务与远程服务的特性,以及如何使用StartService和BindService启动与管理服务。同时,探讨了Service在音乐播放、后台下载等场景的应用,提供了代码示例。
一、Service:
(一)、Service 简介:
1、何谓“Service”?
“Service” 意思即“服务”的意思, 像 Windows 上面的服务一样,服务是在后台上运行,承担着静悄悄的不为人所注意的工作。Service运行在后台,它是不可见的、无界面的程序。
Service可以在很多场合的应用中使用,比如播放多媒体的时候用户启动了其他Activity,这个时候程序要在后台继续播放;比如检测SD卡上文件的变化;再或者在后台记录用户的地理信息位置的改变;或者启动一个服务来运行并一直监听某种动作等等。
2、Service概念的总结:
- Service在后台运行,不可以与用户直接交互;
- 一个服务不是一个单独的进程。服务对象本身并不意味着它是在自己的进程中运行,除非另有规定,否则它与运行程序是同在一个进程中;
- 一个服务不是一个单独的线程。Service和其他组件一样,默认情况下,Service中的所有代码都是运行在主线程中;
- Service存在的价值虽然不如Activity那么清晰。但是一般都让Service执行耗时较长的操作。例如:播放音乐、下载文件、上传文件等等。但是因为Service默认运行在主线程中,因此不能直接用它来做耗时的请求或者动作,最好在Service中启动新线程来运行耗时的任务;
- 需要通过某一个Activity或其他Context对象来启动Service。context.startService() 或 context.bindService();
- Service很大程度上充当了应用程序后台线程管理器的角色。(如果Activity中新开启一个线程,当该Acitivyt关闭后,该线程依然在工作,但是与开启它的Activity失去联系。也就是说此时的这个线程处于失去管理的状态。但是使用Service,则可以对后台运行的线程有效地管理。)
3、为什么不使用后台线程而使用Service?
- 1、Service可以放在独立的进程中,所以更安全;
- 2、使用Service可以依赖现有的binder机制,不需要在应用层面上处理线程同步的繁杂工作;
- 3、系统可以重新启动异常死去的Service。
4、Service 与 Activity 的相同点与不同点:
- 不同点:Activity是与用户交互的组件,即可以看到UI界面,而Service是在后台运行、无需界面;
- 相同点:使用Activity 时我们需要在配置文件中声明<activity>标签,同样的使用Service 也需要在配置文件中声明<service>标签。都具有一定的生命周期。
(二)、服务的分类:
1、本地服务Local Service:
Local Service 用于应用程序内部。用于实现应用程序自己的一些耗时任务,比如查询升级信息,并不占用应用程序比如Activity所属线程,而是单开线程后台执行,这样用户体验比较好。
启动service有两种方法:
1)、 Context.startService()
调用者与服务之间没有关联,即使调用者退出,服务仍可运行
2)、 Context.bindService()
调用者与服务绑定在一起,调用者一旦退出,服务也就终止
A、根据启动方式将本地服务分为:启动服务Started Service和绑定服务Bound Service。【重点】
- Started Service:被启动的服务
- 被启动的服务是由其它组件调用startService()方法而启动的,该方法会导致被启动服务的生命周期方法onStartCommand()被回调。当服务是被启动状态后,其生命周期与启动它的组件无关,即使启动服务的组件(Activity,BroadcastReceiver)已经被销毁,该服务还可以在后台无限期运行。除非调用stopSelf()或stopService()来停止该服务。
- Bound Service:被绑定的服务
- 绑定服务是允许其它应用程序绑定并且与之交互的Service的实现类。为了提供绑定,必须实现onBind()回调方法。该方法返回IBinder对象,它定义了服务类与Activity交互的程序接口。
- Activity通过bindService()方法绑定到服务类,同时Activity必须提供ServiceConnection接口的实现类,它监视Activity与服务类之间的连接。在重写ServiceConnection接口的onServiceConnected()方法时,实现了将服务类顺利赋值到了Activity中,实现了在Activity中使用该服务类并执行其中的方法。
B、根据onStartCommand()回调方法的返回值,将Service分为粘性Service和非粘性Service:
onStartCommand()方法有三种返回值:
- START_STICKY(常量值:1):sticky的意思是“粘性的”。使用这个返回值时,我们启动的服务跟应用程序"粘"在一起,如果在执行完onStartCommand后,服务被异常kill掉,系统会自动重启该服务。当再次启动服务时,传入的第一个参数将为null;
- START_NOT_STICKY(常量值:2):“非粘性的”。使用这个返回值时,如果在执行完onStartCommand后,服务被异常kill掉,系统不会自动重启该服务。
- START_REDELIVER_INTENT(常量值:3):重传Intent。使用这个返回值时,如果在执行完onStartCommand后,服务被异常kill掉,系统会自动重启该服务,并将Intent的值传入。
【备注:】
以上三种情况,可以理解为发生车祸后的人:
- START_STICKY:(常量值:1)车祸后自己苏醒,但是失忆;
- START_NOT_STICKY:(常量值:2)车祸后再也没有苏醒;
- START_REDELIVER_INTENT:(常量值:3)车祸后自己苏醒,依然保持记忆。
2、远程服务Remote Service:
Remote Service 用于android系统内部的应用程序之间。可以定义接口并把接口暴露出来,以便其他应用进行操作。可被其他应用程序复用,比如天气预报服务,其他应用程序不需要再写这样的服务,调用已有的即可。
(三)、Service的生命周期:
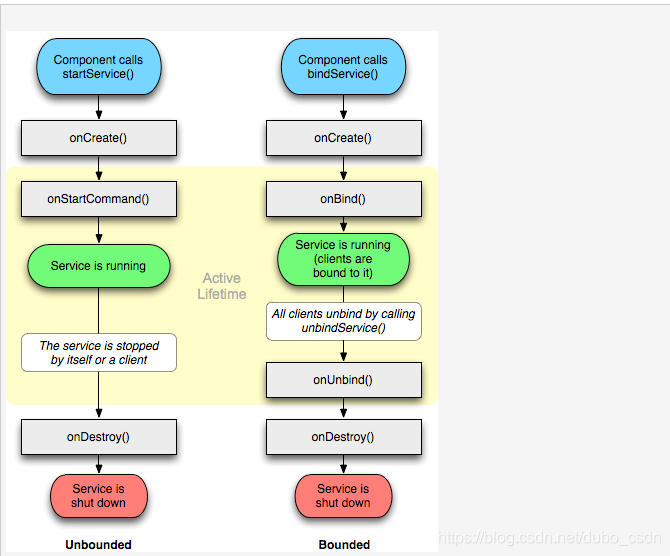
1、Started Service的生命周期:
- onCreate():创建服务
- onStartCommand():服务开始运行(在2.0以前版本中,使用onStart()回调方法)
- onDestroy() :服务被停止
【详细说明:】
- 在程序中调用:context.startService() 会触发执行Service生命周期中的onCreate()、onStartCommand()回调方法,此时服务就开始正式运行;
- 如果Service还没有运行,则android先调用onCreate()然后调用onStartCommand();如果Service已经运行,则只调用onStartCommand(),所以一个Service的onStartCommand方法可能会重复调用多次;
- 如果在程序中调用:context.stopService()会触发执行Service生命周期中的onDestroy()回调方法,会让服务停止;
- stopService()的时候直接onDestroy,如果是调用者自己直接退出而没有调用stopService()的话,Service会一直在后台运行。该Service的调用者再启动该Service后可以通过stopService关闭Service;stopSelf()
- 所以StartService的生命周期为:onCreate --> onStartCommand(可多次调用) --> onDestroy。
2、Bound Service的生命周期:
- onCreate():创建服务
- onBind():绑定服务,服务开始运行
- onUnbind():取消绑定
- onDestroy() :服务被停止
【详细说明:】
- 在程序中调用:context.bindService()会触发执行Service生命周期中的onCreate()、onBind()回调方法,此时服务开始运行;
- onBind将返回给客户端一个IBind接口实例,IBind允许客户端回调服务的方法,比如得到Service运行的状态或其他操作。此后调用者(Context,例如Activity)会和Service绑定在一起;
- 如果调用Service的调用者Context退出了,那么会依次调用Service生命周期中的onUnbind()、onDestroy()回调方法,会让服务停止;
- 所以BindService的生命周期为:onCreate --> onBind(只一次,不可多次绑定) --> onUnbind --> onDestory。
【备注:】
- Service是不能自己启动的,只有通过 Context 对象调用startService() 和bindService() 方法来启动。
- 在Service每一次的开启关闭过程中,只有onStartCommand()可被多次调用(通过多次startService调用),其他onCreate()、onBind()、onUnbind()、onDestory()在一个生命周期中只能被调用一次。
- Service可以在和多场合的应用中使用,比如播放多媒体的时候用户启动了其他Activity这个时候程序要在后台继续播放,比如检测SD卡上文件的变化,再或者在后台记录你地理信息位置的改变等等,总之服务总是藏在后头的。
二、本地Service:
(一)、Started Service启动MediaPlayer播放音乐:
1、操作步骤:
- 1、写xml布局文件;
- 2、写MainActivity文件,通过按钮点击事件启动Service;
- 3、写继承于Service的StartService类文件:重写onCreate()/onStartCommand()/onDestroy()回调方法。
2、XML布局文件核心代码:
<LinearLayoutxmlns:android="http://schemas.android.com/apk/res/android" android:layout_width="fill_parent" android:layout_height="fill_parent" android:orientation="vertical"> <Button android:id="@+id/button_main_play" android:layout_width="wrap_content" android:layout_height="wrap_content" android:onClick="clickButton" android:text="播放音乐"/> <Button android:id="@+id/button_main_pause" android:layout_width="wrap_content" android:layout_height="wrap_content" android:onClick="clickButton" android:text="暂停音乐"/> <Button android:id="@+id/button_main_stop" android:layout_width="wrap_content" android:layout_height="wrap_content" android:onClick="clickButton" android:text="停止音乐"/> <Button android:id="@+id/button_main_exit" android:layout_width="wrap_content" android:layout_height="wrap_content" android:onClick="clickButton" android:text="关闭当前窗体"/> <Button android:id="@+id/button_main_stopservice" android:layout_width="wrap_content" android:layout_height="wrap_content" android:onClick="clickButton" android:text="停止服务"/> </LinearLayout>
3、MainActivty核心代码:
publicclass MainActivity extends Activity { privatestaticfinal String TAG = "MainActivity"; private Intent intent = null; @Override protectedvoid onCreate(Bundle savedInstanceState) { Log.i(TAG, "==onCreate执行"); super.onCreate(savedInstanceState); setContentView(R.layout.activity_main); intent = new Intent(this, StartServicePlayMusic.class); } @Override protectedvoid onDestroy() { Log.i("MainActivty", "==onDestroy()"); super.onDestroy(); if (intent != null) { // 停止服务可以通过stopService(intent)来停止,也可以intent到Service程序中,通过stopSelf()来停止。 stopService(intent); } } publicvoid clickButton(View view) { int type = 0; switch (view.getId()) { case R.id.button_main_play: type = 1; break; case R.id.button_main_pause: type = 2; break; case R.id.button_main_stop: type = 3; break; case R.id.button_main_exit: finish(); break; case R.id.button_main_stopservice: // 停止服务可以通过stopService(intent)来停止,也可以intent到Service程序中,通过stopSelf()来停止 // stopService(intent); // finish(); type = 4; break; } Bundle bundle = new Bundle(); bundle.putInt("type", type); intent.putExtras(bundle); startService(intent); } }
4、StartServicePlayMusic核心代码:
publicclass StartServicePlayMusic extends Service { privatestaticfinal String TAG = "StartServicePlayMusic"; private MediaPlayer mediaPlayer; @Override public IBinder onBind(Intent intent) { Log.i(TAG, "==onBind执行"); returnnull; } @Override publicvoid onCreate() { Log.i(TAG, "==onCreate执行"); super.onCreate(); if (mediaPlayer == null) { mediaPlayer = MediaPlayer.create(this, R.raw.hitta); mediaPlayer.setLooping(false); } } @Override publicint onStartCommand(Intent intent, int flags, int startId) { Log.i(TAG, "==onStartCommand执行"); if (intent != null) { Bundle bundle = intent.getExtras(); int type = bundle.getInt("type"); switch (type) { case 1: play(); break; case 2: pause(); break; case 3: stop(); break; case 4: stopSelf(); break; } } returnSTART_STICKY; } @Override publicvoid onDestroy() { Log.i(TAG, "==onDestroy执行"); super.onDestroy(); if (mediaPlayer != null) { mediaPlayer.stop(); mediaPlayer.release(); } } publicvoid play() { if (!mediaPlayer.isPlaying()) { mediaPlayer.start(); } } publicvoid pause() { if (mediaPlayer.isPlaying()) { mediaPlayer.pause(); } } publicvoid stop() { if (mediaPlayer != null) { mediaPlayer.stop(); } } }
5、Manifest清单配置文件核心代码:
<service android:name=".StartServicePlayMusic"> <intent-filter> <actionandroid:name="com.steven.startservice.playmusic"/> </intent-filter> </service>
6、Started Service总结:
- Activity页面中需要startService(intent) 和 stopService(intent)两个方法来启动Service和停止Service;
- 继承于Service类的自定义子类——MyStartService类中,生命周期回调方法有:onCreate() 、onStartCommand() 、onDestroy();
- 如果停止服务,可以在Activity中调用stopService(intent),也可以intent到Service中执行stopSelf()方法;
- 执行停止服务方法,会回调Service生命周期中的onDestroy()方法;
- 如果希望关闭Activity窗体,服务也停止,那么在Activity的onDestroy()方法中执行stopService()方法。如果希望关闭窗体后,服务还继续,那么Activity的onDestroy()中不执行停止服务即可;
- 在StartService中不会回调onBind()方法;
- 在停止服务后,如果再次点击“播放”,可以重新启动StartService。
7、IntentService与Service:
不管是何种Service,它默认都是在应用程序的主线程(亦即UI线程)中运行的。所以,如果你的Service将要运行非常耗时或者可能被阻塞的操作时,你的应用程序将会被挂起,甚至会出现ANR错误。为了避免这一问题,你应该在Service中重新启动一个新的线程来进行这些操作。现有两种方法大家参考:
① 直接在Service的onStartCommand()方法中新建一个线程来执行;
② Android SDK 中为我们提供了一个现成的Service类来实现这个功能,它就是IntentService,它主要负责以下几个方面:
- Creates a default worker thread that executes all intents delivered to onStartCommand() separate from your application's main thread.
- 生成一个默认的且与主线程互相独立的工作者线程来执行所有传送至 onStartCommand() 方法的Intetnt
- Creates a work queue that passes one intent at a time to your onHandleIntent() implementation, so you never have to worry about multi-threading.
- 生成一个工作队列来传送Intent对象给你的onHandleIntent()方法,同一时刻只传送一个Intent对象,这样一来,你就不必担心多线程的问题。
- Stops the service after all start requests have been handled, so you never have to call stopSelf().
- 在所有的请求(Intent)都被执行完以后会自动停止服务,所以,你不需要自己去调用stopSelf()方法来停止该服务
- Provides default implementation of onBind() that returns null.
- 提供了一个onBind()方法的默认实现,它返回null
- Provides a default implementation of onStartCommand() that sends the intent to the work queue and then to your onHandleIntent() implementation
- 提供了一个onStartCommand()方法的默认实现,它将Intent先传送至工作队列,然后从工作队列中每次取出一个传送至onHandleIntent()方法,在该方法中对Intent对相应的处理
IntentService使用队列的方式将请求的Intent加入队列,然后开启一个worker thread(线程)来处理队列中的Intent,对于异步的startService请求,IntentService会处理完成一个之后再处理第二个,每一个请求都会在一个单独的worker thread中处理,不会阻塞应用程序的主线程。
这里就给我们提供了一个思路,如果有耗时的操作可以在Service里面开启新线程,也可以使用IntentService来处理耗时操作。 但你若是想在Service中让多个线程并发的话,就得使用第一种方法,在Service内部起多个线程,但是这样的话,你可要处理好线程的同步。
(1)、Service实现加载图片的核心代码:
publicclass DownloadService extends IntentService { privatestaticfinal String TAG = "DownloadService"; private String urlString = "https://www.google.com.hk/images/srpr/logo11w.png"; private NotificationCompat.Builder builder = null; private NotificationManager manager = null; public DownloadService() { super(""); } @Override protectedvoid onHandleIntent(Intent intent) { manager = (NotificationManager) getSystemService(NOTIFICATION_SERVICE); builder = new NotificationCompat.Builder(getApplicationContext()); builder.setSmallIcon(R.drawable.ic_launcher); builder.setContentTitle("提示:"); builder.setContentText("图片加载完成,请点击查看!"); builder.setTicker("图片加载完成"); builder.setAutoCancel(true); Intent intent2 = new Intent(getApplicationContext(), MainActivity.class); intent.setFlags(Intent.FLAG_ACTIVITY_CLEAR_TOP); PendingIntent pIntent = PendingIntent.getActivity( getApplicationContext(), 0, intent2, PendingIntent.FLAG_ONE_SHOT); builder.setContentIntent(pIntent); byte[] data = HttpClientHelper.loadByteFromURL(urlString); boolean flag = SDCardHelper.saveFileToSDCard(data, "Download", "logo11w.png"); if (flag) { manager.notify(1, builder.build()); } } }
(2)、IntentService实现加载图片的核心代码:
publicclass DownloadService extends Service { privatestaticfinal String TAG = "DownloadService"; private String urlString = "https://www.google.com.hk/images/srpr/logo11w.png"; private NotificationCompat.Builder builder = null; private NotificationManager manager = null; @Override public IBinder onBind(Intent intent) { returnnull; } @Override publicvoid onCreate() { super.onCreate(); manager = (NotificationManager) getSystemService(NOTIFICATION_SERVICE); builder = new NotificationCompat.Builder(getApplicationContext()); builder.setSmallIcon(R.drawable.ic_launcher); builder.setContentTitle("提示:"); builder.setContentText("图片加载完成,请点击查看!"); builder.setTicker("图片加载完成"); builder.setAutoCancel(true); Intent intent = new Intent(getApplicationContext(), MainActivity.class); intent.setFlags(Intent.FLAG_ACTIVITY_CLEAR_TOP); PendingIntent pIntent = PendingIntent .getActivity(getApplicationContext(), 0, intent, PendingIntent.FLAG_ONE_SHOT); builder.setContentIntent(pIntent); } @Override publicint onStartCommand(Intent intent, int flags, int startId) { new Thread(new Runnable() { @Override publicvoid run() { byte[] data = HttpClientHelper.loadByteFromURL(urlString); boolean flag = SDCardHelper.saveFileToSDCard(data, "Download", "logo11w.png"); if (flag) { manager.notify(1, builder.build()); stopSelf(); } } }).start(); returnSTART_STICKY; } @Override publicvoid onDestroy() { super.onDestroy(); } }
(二)、Bound Service启动MediaPlayer播放音乐:
1、操作步骤:
- 1、写xml布局文件;
- 2、写MainActivity文件,构建ServiceConnection对象,重写其中的抽象方法onServiceDisconnected()和onServiceConnected();
- 3、写继承于Service的BindService类文件,定义继承于Binder的内部类MyBinder,在其中定义方法getService();
- 4、BindService类中重写onCreate()方法、重写onBind()回调方法,onBind()方法返回MyBinder对象,重写onDestroy()方法;
2、XML布局文件:同上
3、MainActivty核心代码:
publicclass MainActivity extends Activity { privatestaticfinal String TAG = "MainActivity"; private Intent intent; private ServiceConnection conn = null; private BindServicePlayMusic musicService; @Override protectedvoid onCreate(Bundle savedInstanceState) { Log.i(TAG, "==onCreate执行"); super.onCreate(savedInstanceState); setContentView(R.layout.activity_main); // 启动服务有多种写法: // 可以通过new Intent(action字符串)来实现; // intent = new Intent("com.steven.bindservice.playmusic"); intent = new Intent(this, BindServicePlayMusic.class); conn = new ServiceConnection() { @Override publicvoid onServiceDisconnected(ComponentName name) { musicService = null; } @Override publicvoid onServiceConnected(ComponentName name, IBinder service) { musicService = ((BindServicePlayMusic.MyBinder) service) .getService(); if (musicService != null) { musicService.play(); } } }; } publicvoid clickButton(View view) { switch (view.getId()) { case R.id.button_main_play: if (musicService == null) { bindService(intent, conn, Context.BIND_AUTO_CREATE); } else { musicService.play(); } break; case R.id.button_main_pause: if (musicService != null) { musicService.pause(); } break; case R.id.button_main_stop: if (musicService != null) { musicService.stop(); } break; case R.id.button_main_exit: finish(); break; case R.id.button_main_stopservice: // BindService中stopService(intent)不起作用,要通过undbindService来停止服务 // stopService(intent); // musicService = null的目的是如果停止服务后,再次”播放“,可以正常执行。 // 如果不将musicService设置为null,再次播放时,将直接执行musicService.play(),而不执行bindService(),那么会导致异常 musicService = null; unbindService(conn); break; } } }
4、BindServicePlayMusic核心代码:
publicclass BindServicePlayMusic extends Service { privatestaticfinal String TAG = "BindServicePlayMusic"; private MediaPlayer mediaPlayer; private IBinder binder = null; @Override publicvoid onCreate() { Log.i(TAG, "==onCreate执行"); super.onCreate(); if (mediaPlayer == null) { mediaPlayer = MediaPlayer.create(this, R.raw.heavencity); mediaPlayer.setLooping(false); } binder = new MyBinder(); } class MyBinder extends Binder { public BindServicePlayMusic getService() { return BindServicePlayMusic.this; } }; @Override public IBinder onBind(Intent intent) { Log.i(TAG, "==onBind执行"); play(); returnbinder; } @Override publicboolean onUnbind(Intent intent) { Log.i(TAG, "==onUnbind执行"); returnsuper.onUnbind(intent); } @Override publicvoid onDestroy() { Log.i(TAG, "==onDestroy执行"); super.onDestroy(); if (mediaPlayer != null) { mediaPlayer.stop(); mediaPlayer.release(); } } publicvoid play() { if (!mediaPlayer.isPlaying()) { mediaPlayer.start(); } } publicvoid pause() { if (mediaPlayer.isPlaying()) { mediaPlayer.pause(); } } publicvoid stop() { if (mediaPlayer != null) { mediaPlayer.stop(); } } }
5、Manifest清单配置文件核心代码:
<service android:name=".BindServicePlayMusic"> <intent-filter> <actionandroid:name=“com.steven.bindservice.playmusic"/> </intent-filter> </service>
6、Bound Service总结:
三、Android系统服务:
getSystemService(String name)是Android很重要的一个方法,根据NAME来取得对应的Object,然后转换成相应的服务对象。以下介绍系统相应的服务。
===============================================================
name 返回的对象 说明
WINDOW_SERVICE WindowManager 管理打开的窗口程序
LAYOUT_INFLATER_SERVICE LayoutInflater 取得xml里定义的view
ACTIVITY_SERVICE ActivityManager 管理应用程序的系统状态
POWER_SERVICE PowerManger 电源的服务
ALARM_SERVICE AlarmManager 闹钟的服务
NOTIFICATION_SERVICE NotificationManager 状态栏的服务
KEYGUARD_SERVICE KeyguardManager 键盘锁的服务
LOCATION_SERVICE LocationManager 位置的服务,如GPS
SEARCH_SERVICE SearchManager 搜索的服务
VIBRATOR_SERVICE Vibrator 手机震动的服务
CONNECTIVITY_SERVICE Connectivity 网络连接的服务
WIFI_SERVICE WifiManager Wi-Fi服务
TELEPHONY_SERVICE TeleponyManager 电话服务
四、 拓展知识(进程和生命周期):
Android操作系统尝试尽可能长时间保持应用的进程,但当可用内存很低时要移走一部分进程。哪些程序可以运行,哪些要被销毁?答案是:重要级别低的进程可能被淘汰。
按照重要性排列,一共可以分成5级:
1、前台运行进程:
用户此时需要处理和显示的进程。符合下列条件任何一个,这个进程就被认为是前台运行进程。
- 与用户正发生交互;
- 它控制一个与用户交互的必须的基本的服务;
- 一个正在调用生命周期回调方法的ervice(如onCreate()、onStar()、onDestroy());
- 一个正在运行onReceive()方法的广播接收对象。
销毁前台运行进程是系统万不得已的、最后的选择——当内存不够系统继续运行下去时,杀掉一些前台进程来保证能够响应用户的需求。
2、可用进程:
一个可用进程没有任何前台组件,但它仍然可以影响到用户的界面。下面情况发生时,可以称该进程为可用进程。
它是一个非前台的activity,但对用户仍然可用(onPause()方法已经被调用)。例如:前台的activity是一个允许上一个activity可见的对话框。也就是说当前activity中是一个对话框,对话框之外的地方能看到前一个activity的界面。
3、服务进程:
服务进程是一个通过调用startService()方法启动的服务,并且不属于前两种情况。尽管服务进程没有直接被用户看到,但他们确实是用户所关心的,比如后台播放音乐或网络下载数据,所以系统保证他们的运行。
4、后台进程:
一个后台进程就是非当前正在运行的activity(activity的onStop()方法已经被调用),他们不会对用户体验造成直接的影响,当没有足够内存来运行前台可见程序时,他们将会被终止。
通常,后台进程会有很多个在运行,LRU最近使用程序列表来保证经常运行的activity能最后一个被终止。
5、空线程:
一个空线程没有运行任何可用应用程序,保留他们的唯一原因是为了设立一个缓存机制,来加快组件启动的时间。系统经常杀死这些内存来平衡系统的整个系统的资源,进程缓存和基本核心缓存之间的资源。
五、Service总结:
1.Service是Android四大组件中与Activity最相似的组件,它们都代表可执行的程序
2.Service与Activity的区别:
>Service一直在后台运行,它没有用户界面,所以绝不会到前台来
>Service被启动后,它就与Actiivty一样
>它完全具有自己的生命周期
3.应用场景:
>音乐播放器、后台下载等
4.Activity与Service的选择标准
>如果在运行时需要向用户呈现界面,或该程序需要与用户交互,就需要使用Activity
>否则就应该考虑使用Service
5.Service分类
>本地服务(在应用内)
>远程服务(在另一个应用内)
6.开发者开发Service的步骤与开发Activity的步骤很相似:
1.创建一个类,继承Service(它一个抽象类)
2.重写Service类中的相关生命周期方法(稍等一会再处理)
3.别忘记在清单文件中进行注册
>开发一个Service子类
>在AndroidManifest.xml文件配置该Service,可以通过<intent-filter../>元素指定它可被哪些Intent启动
7.Service与Activity的相似处:
>都是从Context派生出来,因此都可以调用Context里定义的如getResources()、getContentResolver()等方法
8.Service生命周期方法:
>IBinder onBind(Intent intent):Service子类必须实现的方法。该方法返回一个IBinder对象,应用程序可以通
该对象与Service组件通信
>void onCreate():当该Service被第一次创建时将立即回调该方法
>void onDestroy():当该Service被关闭之前将会回调该方法
>void onStartCommand(Intent intent,int flags,int startId):该方法的早期版本是
void onStart(Intent intent,int startId),每次客户调用startService(Intent)方法启动该Service时都
会回调该方法。
>boolean onUnbind(Intent intent):当该Service上绑定所有客户端都断开连接时将会回调该方法
9.服务的启动方式:
>服务不能自己运行,需要通过调用Context.startService()或Context.bindService()方法启动服务
>两启动方式的区别:
startService()启动服务,启动者与服务之间没有关联,即使访问者退出了,服务仍然运行
bindService()启动服务,启动者与服务之间绑定在了一起,启动者退出,则服务也就终止--"不求同生,但求同死"
10.服务的结束方式:
>采用Context.startService()启动的服务,只能调用Context.stopService()终止服务,
服务结束会调用onDestroy()方法启动服务
>采用bindService()启动的服务,随着访问者的退出而自动退出
11.startService()启动服务示例(音乐播放器)
12.int onStartCommand()方法参数与返回值的解释
onStartCommand(Intent intent,int flags,int startID)
参数说明:
>Intent: 就是startService(intent);中的intent对象
>flags:它的取值是0,START_FLAG_REDELIVERY(0x0001),START_FLAG_RETRY(0x0002)三种取值
利用这三种取值可以判断Service的如何启动的
>startID:是在哪个对象中启动了该服务,它是那个对象的id编号(唯一的)
返回值(常量--Service类中):
>START_STICKY(1):sticky的意思是"粘性的",如果使用这个返回值,我们启动的服务与应用本身"粘"在一起,如果在执行完
onStartCommand()方法后,服务被异常kill了,系统会重启服务,但需要注意,这时重启服务的intent是null
>START_NOT_STICKY(2):非粘性的,执行完onStartCommmand()方法后,如果服务被kill了,系统不会重启服务
>START_REDELIVERY_INTENT(3):重传Intent,使用这个返回值,服务执行完onStartCommand()方法后,被异常kill了,那么会重启
服务,同时把之前的Intent再次传入,这样可以保证之前的intent不会丢失
>START_STICKY_COMPATIBILITY(0):START_STICKY的兼容版本,但不保证服务被kill后一定重启
START_FLAG_REDELIVERY---->START_REDELIVERY_INTENT
START_FLAG_RETRY---->START_STICKY
13.绑定本地Service并与之通信
程序通过startService()和stopService()启动、关闭Service时,Service与访问者之间基本上不存在太多的关联,
因此Service和访问者之间与无法通信、数据交换(可以通过Intent传递参数实现)。
如果Service和访问者之间需要进行方法调用或数据交换,则应该使用bindService()和unbindService()方法启动、
关闭Service.
bindService()方法的完整签名为:bindService(Intent service,ServiceConnection conn,int flags)
参数说明:
service:该参数通过Intent指定要启动的Service
conn:该参数是一个ServiceConnection对象,该对象用于监听访问者与Service之间的连接情况。当访问者与Service
连接成功时将回调该ServiceConnection对象的onServiceConnected(ComponentName name,IBinder service)方法;
当Service所在的宿主进程由于异常中止或由于其他原因终止,导致该Service与访问者之间断开连接时回调
ServiceConnection对象的onServiceDisconnected(ComponentName name)方法.
flags:指定绑定时是否自动创建Service(如果Service还没有创建)。该参数可以指定为0(不自动创建)
或BIND_AUTO_CREATED(自动创建)
注意:当调用者主动通过unBindService()方法断开与Service连接时,ServiceConnection对象的onServiceDisconnected
(ComponentName name)方法并不会被调用
ServiceConnection对象的onServiceConnected方法中有一个IBinder对象,通过该对象即可实现与被绑定Service之间的通信
当开发Service类时,该Service类必须提供一个IBinder onBind(Intent intent)方法,在绑定本地Service情况下,onBind(
Intent intent)方法所返回的IBinder对象将会传给ServiceConnection对象里的onServiceConnected(ComponentName name,
IBinder service)方法的service参数,这样访问者就可通过该IBinder对象与Service进行通信。
注意:实际开发时通常会采用继承Binder(IBinder的实现类)的方式实现自己的IBinder对象。
示例:
14.Service的生命周期
应用程序启动Service方式的不同,Service的生命周期也略有差异
>通过startService()方法来启动
其生命周期为context.startService() ->onCreate()- >onStartCommand()->
Service running-->(如果调用context.stopService() )->onDestroy() ->Service shut down
如果Service还没有运行,则android先调用onCreate()然后调用onStart();
如果Service已经运行,则只调用onStart(),所以一个Service的onStartCommand()方法可能会重复调用多次。
>通过bindService()方法来启动
context.bindService()->onCreate()->onBind()->Service running-->onUnbind() -> onDestroy() ->Service stop
严重注意:
>startService()启动的服务,启动者退出时,服务不会停止,除非调用stopService()
>bindService()启动服务,启动者退出时,服务也会随之终止
>service虽然在后台运行,也不要在其中执行耗时的任务(如网络下载),请在相应的方法中开启一个线程来处理


 7779
7779

 被折叠的 条评论
为什么被折叠?
被折叠的 条评论
为什么被折叠?
 到【灌水乐园】发言


