


 本文介绍了如何使用SpringBoot和Mybatis构建商品秒杀项目的用户模块,涵盖了Metronic模板的简介,getotp页面的实现,otp验证码的获取以及页面美化。在实现过程中,针对跨域请求错误问题,通过@CrossOrigin注解解决了。
1.用户模型管理——Metronic模板简介
采用前后端分离的思想,建立一个html文件夹,引入static文件夹
前端文件保存在本地的哪个盘下都可以,因为是通过ajax来异步获取接口
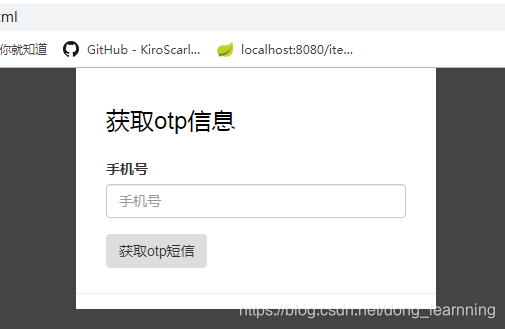
2.用户模型管理——getotp页面实现
1.getotp.html:
<html>
<head>
<meta charset="UTF-8">
<script src="static/assets/global/plugins/jquery-1.11.0.min.js" type="text/javascript"></script>
<title>Title</title>
</head>
<body>
<div>
<h3>获取otp信息</h3>
<div>
<label>手机号</label>
<div>
<input type="text" placeholder="手机号" name="telphone" id="telphone"/>
</div>
</div>
<div>
<button id="getotp" type="submit">
获取otp短信
</button>
</div>
</div>
</body>
<script>
jQuery(document).ready(function () {
//绑定otp的click事件用于向后端发送获取手机验证码的请求
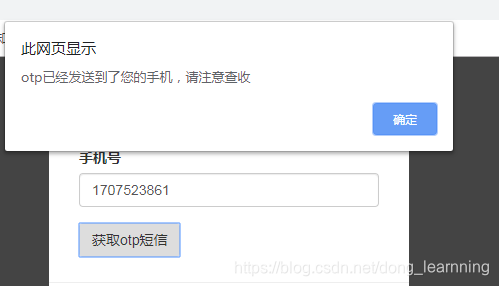
$("#getotp").on("click",function () {
var telphone=$("#telphone").val();
if (telphone==null || telphone=="") {
alert("手机号不能为空");
return false;
}
//映射到后端@RequestMapping(value = "/getotp", method = {RequestMethod.POST}, consumes = {CONTENT_TYPE_FORMED})
$.ajax({
type:"POST",
contentType:"application/x-www-form-urlencoded",
url:"http://localhost:8080/user/getotp",
data:{
"telphone":$("#telphone").val(),
},
success:function (data) {
if (data.status=="success") {
alert("otp已经发送到了您的手机,请注意查收");
}else {
alert("otp发送失败,原因为" + data.data.errMsg);
}
},
error:function (data) {
alert("otp发送失败,原因为"+data.responseText);
}
});
});
});
</script>
</html>
2.指定controller的method
@RequestMapping(value = "/getotp", method = {RequestMethod.POST}, consumes = {CONTENT_TYPE_FORMED})
3.用户模型管理——otp验证码获取
public class UserController extends BaseController{

    @Autowired
    private UserService userService;

    @Autowired
    private HttpServletRequest httpServletRequest;

    //用户获取otp短信接口
    @RequestMapping("/getotp")
    @ResponseBody
    public CommonReturnType getOtp(@RequestParam(name = "telphone") String telphone) {
        //需要按照一定的规则生成OTP验证码
        Random random = new Random();
        int randomInt = random.nextInt(99999);
        randomInt += 10000;
        String otpCode = String.valueOf(randomInt);

        //将OTP验证码同对应用户的手机号关联,使用httpsession的方式绑定手机号与OTPCDOE
        httpServletRequest.getSession().setAttribute(telphone, otpCode);

        //将OTP验证码通过短信通道发送给用户,省略
        System.out.println("telphone=" + telphone + "&otpCode=" + otpCode);

        return CommonReturnType.create(null);
    }
测试,在控制台打印数据 。。。。
3.提示发送失败,使用chrome调试,发现报错为
No 'Access-Control-Allow-Origin' header is present on the requested resource.
跨域请求错误,只需要在UserController类上加一个注解@CrossOrigin即可
@CrossOrigin(origins = {"*"}, allowCredentials = "true")
在.getotp.html中添加 xhrFields:{withCredentials:true},

4. 用户模型管理——getotp页面美化
1.引入样式表
<link href="static/assets/global/plugins/bootstrap/css/bootstrap.min.css" rel="stylesheet" type="text/css"/>
<link href="static/assets/global/plugins/css/component.css" rel="stylesheet" type="text/css"/>
<link href="static/assets/admin/pages/css/login.css" rel="stylesheet" type="text/css"/>
2.使用样式
<body class="login">
    <div class="content">
        <h3 class="form-title">获取otp信息</h3>
        <div class="form-group">
            <label class="control-label">手机号</label>
            <div>
                <input class="form-control" type="text" placeholder="手机号" name="telphone" id="telphone"/>
            </div>
        </div>
        <div class="form-actions">
            <button class="btn blue" id="getotp" type="submit">
                获取otp短信
            </button>
        </div>
    </div>

</body>
测试:


 454
454

 被折叠的 条评论
为什么被折叠?
被折叠的 条评论
为什么被折叠?
 到【灌水乐园】发言


