


大家好,今天我们聊聊Vue3的组合Composition API。
引言:为什么我们需要 Composition API?
在Vue2的Options API中,所有数据、方法及计算属性等都在一个抽屉里。当功能复杂时,相关的代码被分散在不同地方,改一个功能要在多个抽屉里翻找。
Composition API中,按功能把数据、方法、计算属性按功能打包在一起,改一个功能只需看一个地方(解决逻辑分散问题);写好的功能包可以直接在其他组件使用,更易复用(解决mixins 复用代码会带来命名冲突及来源不明问题);对TypeScript有更好的支持(解决类型支持差问题)。
文章目录
一、Composition API 核心概念详解
1.1 Options API vs Composition API
Options API(选项式 API)有固定的几个格子(data、methods、computed、watch),把代码按类型放进对应格子。
// Vue2 的 Options API - 逻辑分散
export default {
	data() {
		return {
			users: [],
			loading: false,
			searchQuery: ''
		}
	},
	computed: {
		filteredUsers() {
			return this.users.filter(user => user.name.includes(this.searchQuery))
		}
	},
	methods: {
		async fetchUsers() {
			this.loading = true
			// 获取用户逻辑
		},
		async addUser(user) {
			// 添加用户逻辑
		}
	},
	mounted() {
		this.fetchUsers()
	}
}
Composition API(组合式 API)按功能打包,一个功能的数据、方法、计算属性都在一起,把这些功能包组合成完整组件。
// Vue3 的 Composition API - 逻辑聚合
import { ref, computed, onMounted } from 'vue'
export default {
	setup() {
		// 用户管理相关逻辑
		const users = ref([])
		const loading = ref(false)
		const searchQuery = ref('')
		const filteredUsers = computed(() => {
			return users.value.filter(user => user.name.includes(searchQuery.value))
		})
		const fetchUsers = async () => {
			loading.value = true
			try {
				users.value = await userApi.getUsers()
			} finally {
				loading.value = false
			}
		}
		const addUser = async (user) => {
			const newUser = await userApi.addUser(user)
			users.value.push(newUser)
		}
		onMounted(fetchUsers)
		return {
			users,
			loading,
			searchQuery,
			filteredUsers,
			addUser
		}
	}
}
1.2 响应式系统的革命性升级
Options API的底层是基于“配置对象”的编译转换,在编译阶段将你的组件配置对象转换为渲染函数,将 data、methods、computed 等合并绑定到组件实例的 this 上。其响应式系统大致如下:
// vue2代码
data() {
	return { count: 0 }
},
methods: {
	increment() { this.count++ }
}
// 底层大致转换为
const instance = {
	data: reactive({ count: 0 }),  // 变为响应式
	increment: function() { this.data.count++ }.bind(this)
}
Composition API的底层是基于“函数调用”的直接响应式,在组件创建前执行,setup将返回的数据直接暴露给模板。响应式系统直接调用,不依赖于this。
setup() {
	// 直接调用响应式API,不依赖this
	const count = ref(0)
	const increment = () => { count.value++ }
	return { count, increment }
}
1.3 生命周期钩子的新写法
Vue3的生命周期如下图:
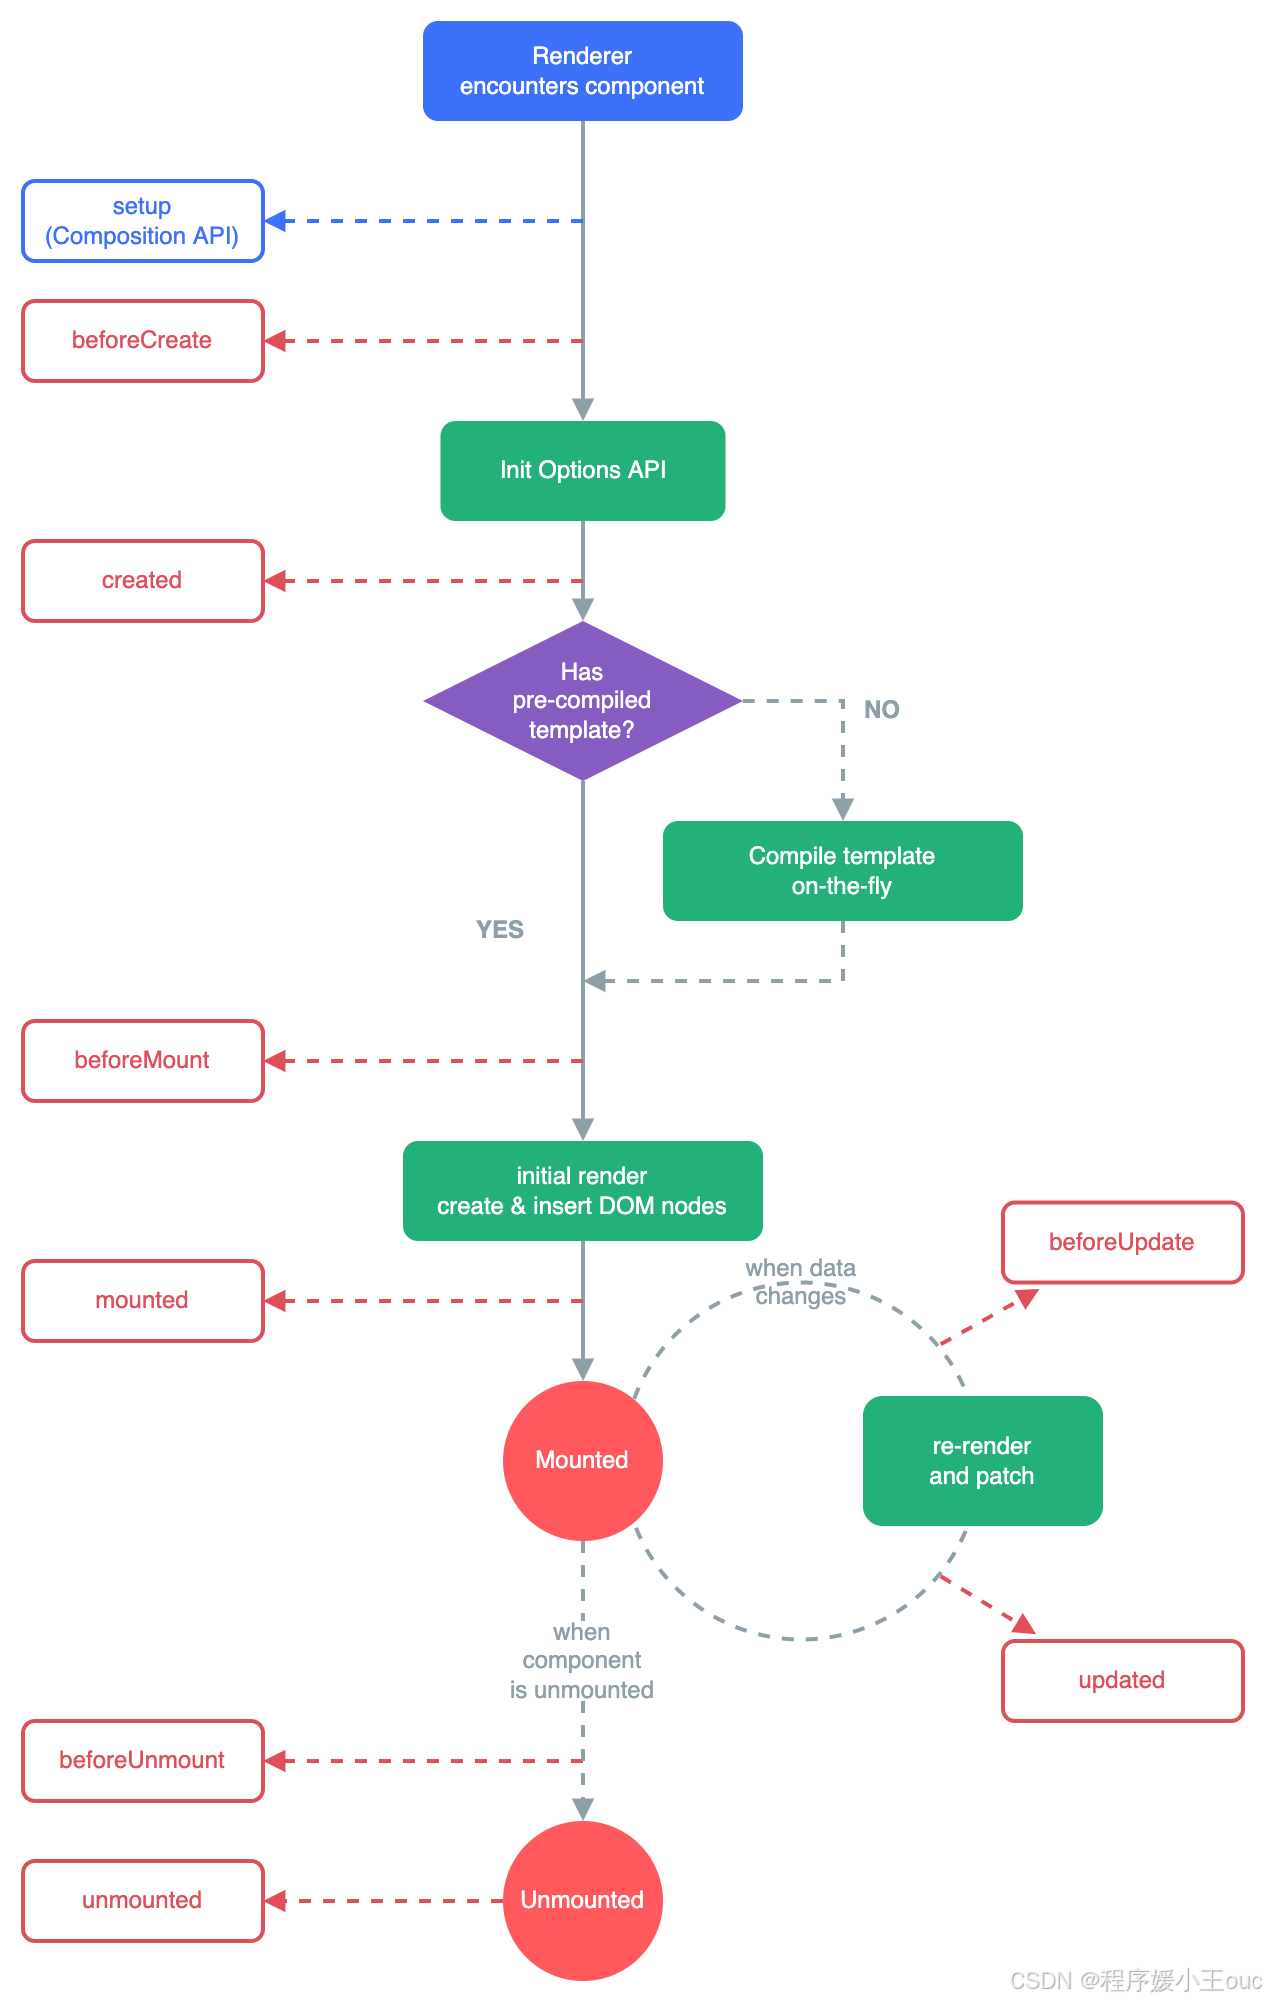
vue2 和 vue3 关于生命周期的对比
| Vue2 | Vue3 |
|---|---|
| beforeCreate created | setup,在 beforeCreate 和 created 前,因此一般在组合式 api 中使用它做一些前置处理。 |
| beforeMount | onBeforeMount |
| mounted | onMounted |
| updated | onUpdated |
| beforeDestroy | onBeforeUnmount |
| destroyed | onUnmounted |
1.4 计算属性与侦听器的威力
option API中所有计算属性挤在一起,与相关数据分离。
computed: {
	// 只能定义在固定区域
	fullName() {
		return this.firstName + ' ' + this.lastName
	},
	discountedPrice() {
		return this.price * this.discount
	}
}
Composition API中的计算可以与相关数据放在一起,可以在任何逻辑中创建,更易于封装复用。
import { computed } from 'vue'
setup() {
	const firstName = ref('张')
	const lastName = ref('三')
	// 威力1:与相关数据放在一起
	const fullName = computed(() => `${firstName.value} ${lastName.value}`)
	// 威力2:可以在任何逻辑中创建
	const price = ref(100)
	const discount = ref(0.8)
	const discountedPrice = computed(() => price.value * discount.value)
	// 威力3:易于封装复用
	const { filteredList, search } = useSearchComputed(list)
	return { fullName, discountedPrice }
}
Options API 的侦听器只能监听 this 上的属性且深度监听写法繁琐。
watch: {
	'user.id'(newVal, oldVal) {
		this.fetchUser(newVal)
	},
	// 深度监听
	someObject: {
		handler(newVal) { /* ... */ },
		deep: true,
		immediate: true
	}
}
Composition API 的侦听器可以直接监听响应式变量,自动追踪依赖变化,可精细控制(手动停止)。
import { watch, watchEffect } from 'vue'
setup() {
	const userId = ref(1)
	const user = reactive({ info: { name: '' } })
	// 威力1:直接监听响应式变量
	watch(userId, (newId) => {
		fetchUser(newId)
	})
	// 威力2:watchEffect - 自动追踪依赖
	watchEffect(() => {
		// 自动追踪 user.info.name 的变化
		console.log('用户名变更:', user.info.name)
	})
	// 威力3:灵活的监听选项
	watch(() => user.info.name,  // 可以监听嵌套属性
		(newName) => { /* ... */ },
		{ immediate: true, deep: true }
	)
	// 威力4:可以停止监听
	const stop = watch(userId, callback)
	stop() // 手动停止
}
二、构建可复用的组合式函数
组合式函数就是把一段相关逻辑打包成可复用的“工具箱“。
// useMouse.js - 创建一个“鼠标工具箱”
import { ref, onMounted, onUnmounted } from 'vue'
export function useMouse() {
	// 工具箱里的工具
	const x = ref(0)
	const y = ref(0)
	// 工具的功能
	function update(event) {
		x.value = event.pageX
		y.value = event.pageY
	}
	// 安装工具
	onMounted(() => window.addEventListener('mousemove', update))
	// 卸载工具
	onUnmounted(() => window.removeEventListener('mousemove', update))
	// 把工具暴露出去
	return { x, y }
}
在组件中使用:
<template>
	<div>鼠标位置:{{ x }}, {{ y }}</div>
</template>
<script setup>
// 导入并直接使用“鼠标工具箱”
import { useMouse } from './useMouse'
// 像调用函数一样使用,自动获得所有功能
const { x, y } = useMouse()
</script>
三、实际项目应用场景-数据请求与状态管理
useFetch - 数据请求封装
// composables/useFetch.ts
import { ref, computed, onUnmounted } from 'vue'
/**
 * 数据请求组合式函数
 * 特点:复用请求逻辑,统一错误处理,自动清理
 */
export function useFetch<T>(url: string, options?: RequestInit) {
	// 响应式状态
	const data = ref<T | null>(null)    // 数据
	const loading = ref(false)          // 加载状态
	const error = ref<Error | null>(null) // 错误信息
	// 取消请求的控制器
	const controller = new AbortController()
	/**
	 * 执行请求
	 */
	const execute = async () => {
	 	loading.value = true
	 	error.value = null
	 	try {
	 		const response = await fetch(url, {
	 			...options,
	 			signal: controller.signal // 支持取消请求
	 		})
	 		if (!response.ok) {
	 			throw new Error(`HTTP ${response.status}`)
	 		}
	 		data.value = await response.json()
	 	} catch (err) {
	 		// 如果是取消请求的错误,不设置 error
	 		if (err.name !== 'AbortError') {
	 			error.value = err as Error
	 		}
	 	} finally {
	 		loading.value = false
	 	}
	}
	/**
	 * 取消请求
	 */
	const cancel = () => {
	  controller.abort()
	}
	// 自动清理:组件卸载时取消请求
	onUnmounted(cancel)
	// 计算属性:是否成功获取数据
	const hasData = computed(() => !loading.value && data.value !== null)
	// 计算属性:是否出错
	const hasError = computed(() => !loading.value && error.value !== null)
	return {
 		// 响应式数据
 		data,
 		loading,
 		error,
 		// 计算属性
 		hasData,
 		hasError,
 		// 方法
 		execute,
 		cancel
 	}
}
在组件中使用
<!-- UserList.vue -->
<template>
	<div>
		<!-- 加载状态 -->
		<div v-if="loading">加载中...</div>
		<!-- 错误状态 -->
		<div v-else-if="error" class="error">
			错误: {{ error.message }}
			<button @click="retry">重试</button>
		</div>
		<!-- 数据展示 -->
		<div v-else-if="hasData">
			<ul>
				<li v-for="user in data" :key="user.id">
					{{ user.name }} - {{ user.email }}
				</li>
			</ul>
		</div>
		<!-- 初始状态 -->
		<div v-else>
			<button @click="fetchUsers">获取用户列表</button>
		</div>
	</div>
</template>
<script setup lang="ts">
import { useFetch } from './composables/useFetch'
// 使用组合式函数 - 逻辑集中,复用性强
interface User {
	id: number,
	name: string,
	email: string
}
const {
	data: users,
	loading,
	error,
	hasData,
	execute: fetchUsers,
	cancel
} = useFetch<User[]>('/api/users')
// 重试功能
const retry = () => {
	fetchUsers()
}
// 页面卸载时自动取消请求(已在 useFetch 中实现)
</script>
四、常用工具函数
4.1 inject/provide 依赖注入
provide/inject 是 Vue 3 中实现依赖注入的核心 API,用于在组件树中跨层级传递数据,避免了逐层传递 props 的繁琐。
<!--  ❌ Props 逐层传递(Props Drilling) -->
<GrandParent>
  <Parent :data="data" />  // 中间组件只是转发,不关心数据
    <Child :data="data" /> // 中间组件只是转发,不关心数据
      <GrandChild :data="data" /> // 实际使用者
</GrandParent>
<!--  ✅ Provide/Inject 直接注入 -->
<GrandParent>
  <Parent>                // 不需要传递 props
    <Child>              // 不需要传递 props
      <GrandChild />     // 直接注入使用
    </Child>
  </Parent>
</GrandParent>
inject/provide使用示例
<!-- Parent 祖先组件提供数据 -->
<script setup>
import { provide } from 'vue'
// 提供静态数据
provide('appName', 'My Awesome App')
provide('version', '1.0.0')
</script>

<!-- GrandChild 后代组件注入数据 -->
<script setup>
import { inject } from 'vue'
// 注入数据
const appName = inject('appName')
const version = inject('version')
console.log(appName) // 'My Awesome App'
console.log(version) // '1.0.0'
</script>
<template>
	<div>
		<h1>{{ appName }} v{{ version }}</h1>
	</div>
</template>
4.2 getCurrentInstance 获取当前组件
getCurrentInstance 是 Vue 3 的一个内部 API,用于获取当前组件的实例。
注意:它仅在 setup 函数或生命周期钩子中可用。不推荐使用,存在安全隐患。
<template>
	<div>
		<p>当前组件的 uid: {{ uid }}</p>
		<p>父组件是否存在: {{ hasParent }}</p>
		<p>根组件是否存在: {{ hasRoot }}</p>
	</div>
</template>
<script>
import { getCurrentInstance, onMounted } from 'vue'
export default {
	name: 'MyComponent',
	setup() {
		// 获取当前组件实例
		const instance = getCurrentInstance()
		// 从实例中获取一些属性
		const uid = instance.uid
		const hasParent = !!instance.parent
		const hasRoot = !!instance.root
		// 生命周期钩子中也可以使用
		onMounted(() => {
			console.log('组件已挂载')
		})
		return {
			uid,
			hasParent,
			hasRoot
		}
	}
}
</script>
4.3 useSlots/useAttrs 插槽和属性
Composition API中用于访问组件的插槽和属性的API。注意:它们只能在setup函数或<script setup>中使用。
useSlots访问插槽
<!-- SlotDemo.vue -->
<script setup>
import { useSlots, h } from 'vue'
// 获取插槽
const slots = useSlots()
// 检查插槽是否存在
console.log('默认插槽存在?', !!slots.default)
console.log('header插槽存在?', !!slots.header)
console.log('footer插槽存在?', !!slots.footer)
// 检查是否有作用域插槽
const hasScopedSlot = computed(() => {
	return !!slots.default && slots.default.length > 0
})
// 渲染插槽内容
const renderSlots = () => {
	// 如果没有默认插槽,返回提示
	if (!slots.default) {
		return h('div', '没有提供插槽内容')
	}
	// 渲染插槽
	return slots.default()
}
</script>

<template>
	<div class="slot-demo">
		<!-- 直接在模板中使用 -->
		<header v-if="slots.header">
			<slot name="header" />
		</header>
		<main>
			<slot>默认内容</slot>
		</main>
		<footer v-if="slots.footer">
			<slot name="footer" />
		</footer>
	</div>
</template>
useAttrs访问非Props属性
<!-- AttrsDemo.vue -->
<script setup>
import { useAttrs, computed } from 'vue'
// 定义 props(声明的 props 不会出现在 attrs 中)
const props = defineProps({
	title: String,
	disabled: Boolean
})
// 获取所有非 props 属性
const attrs = useAttrs()
// 监听 attrs 变化
watch(() => attrs, (newAttrs) => {
	console.log('属性变化:', newAttrs)
}, { deep: true })
// 分类处理 attrs
const classAttrs = computed(() => {
	const { class: className, style, ...rest } = attrs
	return { className, style, rest }
})
// 合并类名
const mergedClasses = computed(() => {
	const baseClass = 'base-component'
	const customClass = attrs.class || ''
	const disabledClass = props.disabled ? 'disabled' : ''
	return [baseClass, customClass, disabledClass].filter(Boolean).join(' ')
})
// 合并样式
const mergedStyles = computed(() => {
	const baseStyle = {
		padding: '16px',
		borderRadius: '4px'
	}
	const customStyle = typeof attrs.style === 'object' ? attrs.style : {}
	return { ...baseStyle, ...customStyle }
})
</script>
<template>
  <div :class="mergedClasses" :style="mergedStyles" v-bind="attrs">
  	<h3 v-if="title">{{ title }}</h3>
  	<slot />
  </div>
</template>
五、高频面试解析
问题:Composition API 与 Options API 的主要区别?
参考答案:
· 代码组织方式:Composition API 按逻辑关注点组织,Options API 按选项类型组织
· 逻辑复用:Composition API 通过组合式函数更好复用,Options API 主要通过 mixins(来源不清晰问题)
· TypeScript 支持:Composition API 有更好的类型推断
· 灵活性:Composition API 更灵活,适合复杂组件
六、总结
Compositon API优势
更好的逻辑复用:Composable 函数
更好的开发体验:组合式 API
核心思想转变:从思考"这个数据放哪里?这个方法放哪里?“到思考"这个功能需要哪些数据和方法?”
迁移建议
✅ 推荐做法:
新项目直接使用 Vue3 + Composition API
老项目逐步迁移,可以先在部分组件试用
充分利用 Composable 函数复用逻辑
使用 <script setup>语法糖简化代码
❌ 避免做法:
不要为了用新特性而过度设计
不要混合使用 Options API 和 Composition API 的编码风格
下一期预告
下一篇我们将深入探讨Vue的响应式原理Object.defineProperty VS Proxy, 理解底层原理能提升我们的开发效率、减少bug、写出更可靠的代码。
如果觉得有帮助,请关注+点赞+收藏,这是对我最大的鼓励! 如有问题,请评论区留言


 被折叠的 条评论
为什么被折叠?
被折叠的 条评论
为什么被折叠?
 到【灌水乐园】发言


