


本文是Microsoft的Web开发系列的一部分。 感谢您支持使SitePoint成为可能的合作伙伴。
本文讨论:
- 基本游戏开发理念
- 使用网络技术进行游戏开发
- 添加游戏控件和AI
讨论的技术:
- Visual Studio 2013专业版,Visual Studio 2013社区,ASP.NET
- 代码下载 (.zip)
您不需要全新的技能来开发游戏。 实际上,您当前在HTML,JavaScript,CSS等方面的Web开发技能对各种游戏都很好。 当您使用Web技术构建游戏时,它几乎可以在带有浏览器的任何设备上运行。
为了证明这一点,我将演示使用Web技术和仅有的两个外部库从头开始构建游戏,并且我将在不到一个小时的时间内完成它。 我将介绍各种游戏开发主题,从基本设计和布局,控件和精灵到简单对手的人工智能(AI)。 我什至将要开发该游戏,使其可以在PC,平板电脑和智能手机上使用。 如果您具有作为Web开发人员或其他开发领域进行编程的经验,但是没有编写游戏的经验,那么本文将帮助您入门。 如果您给我一个小时,我保证向您展示绳索。
起床并跑步
我将在Visual Studio中进行所有开发,这将允许我在进行更改时快速执行Web应用程序。 请确保拥有最新版本的Visual Studio,以便您可以继续学习。 我使用了Visual Studio 2013 Pro,但是使用Visual Studio 2013社区更新了代码。 另外,如果您使用的是Mac或Linux,则Visual Studio Code现在可以跨平台使用。
这个程序不需要服务器代码,因此我首先在Visual Studio中创建一个新的空Web页面项目。 在选择“文件” |“选项”之后,将选择“ Visual C#”选项,以将空的C#模板用于网站。 新品| ASP.NET空网站。
索引HTML文件仅需要三个资源:jQuery,一个主样式表和一个主JavaScript文件。 我将一个空CSS文件添加到名为style.css的项目中,并将一个空JavaScript文件称为ping.js以避免在加载页面时出错:
<!DOCTYPE html>
<html>
<head>
  <script src="http://ajax.aspnetcdn.com/ajax/jQuery/jquery-2.1.1.min.js"></script>
  <script src="ping.js"></script>
  <link rel="stylesheet" href="style.css"></script>
</head>
<body>
</body>
</html>
另外,请不要忘记在浏览器和设备上对此应用程序(或其他任何应用程序)进行测试。 尽管我编写的代码可与现代浏览器(例如Chrome,Firefox和Microsoft Edge )互操作,但这始终是反复检查的最佳实践。 现在,您可以使用免费的虚拟机和其他工具(例如http://www.browserstack.com)来做到这一点。
基本设计
我正在开发的游戏是Pong的一种变体,我称之为Ping。 Ping具有与Pong基本上相同的规则,不同之处在于,任一球员抓住球时都可以抓住球,然后可以直接或以一定角度向上或向下向后发射。 通常最好在构建游戏之前先绘制出游戏的外观。 对于此游戏,我要查看的总体布局如下所示。
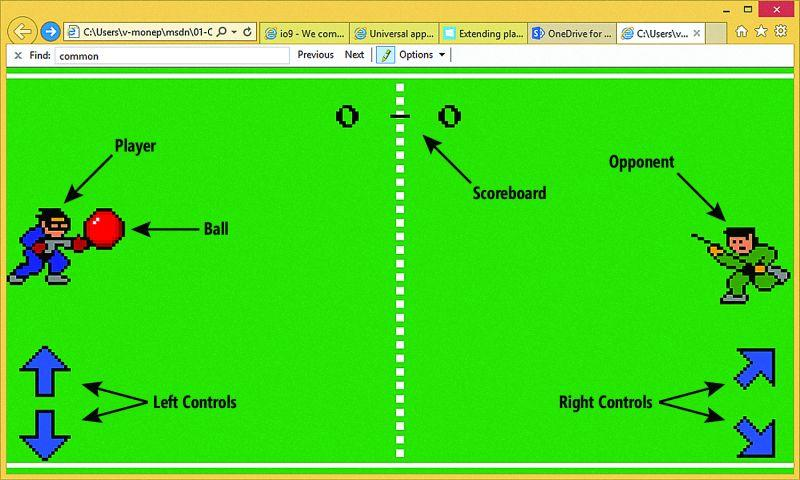
开发完游戏设计布局后,只需将每个元素添加到HTML中即可构建游戏。 不过要注意的一件事是,我将记分板和控件分组以确保它们放在一起。 因此,您可以一一看到,我已经添加了元素,如下所示:
<div id="arena">
  <div id="score">
    <h1>
      <span id="playerScore">0</span>
     <span id="opponentScore">0</span>
   </h1>
 </div>
 <div id="player"></div>
 <div id="opponent"></div>
 <div id="ball"></div>
 <div id="controls-left">
   <div id="up"></div>
   <div id="down"></div>
  </div>
  <div id="controls-right">
    <div id="left"></div>
    <div id="right"></div>
  </div>
</div>
玩风格
如果要加载此页面,则不会显示任何内容,因为未应用任何样式。 我已经在HTML中设置了一个main.css文件的链接,因此将所有CSS都放置在具有该名称的新文件中。 我要做的第一件事是将所有内容放置在屏幕上。 页面的主体需要占据整个屏幕,因此我将首先进行设置:
body {
  margin: 0px;
  height: 100%;
}
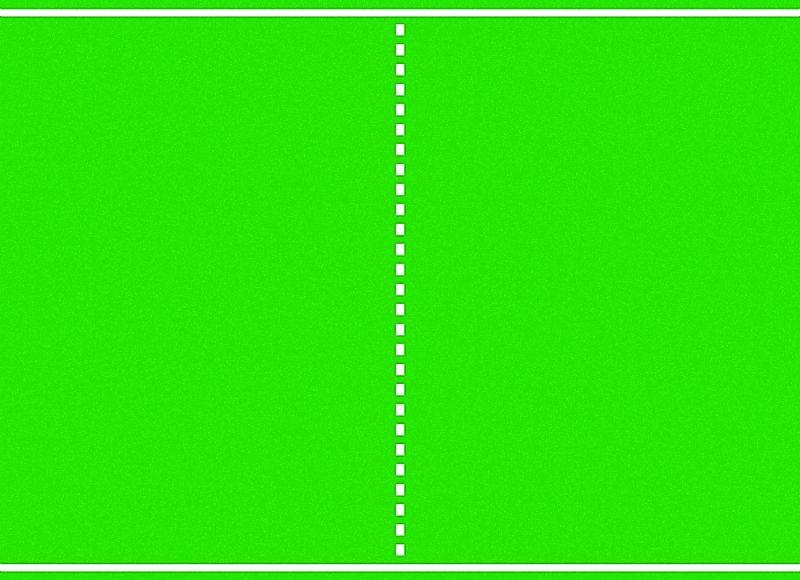
其次,我需要将舞台背景图像(请参见下图)应用到整个屏幕上:
#arena {
  background-image: url(arena.png);
  background-size: 100% 100%;
  margin: 0px;
  width: 100%;
  height: 100%;
  overflow: hidden;
}
接下来,我将放置计分板。 我希望它显示在其他元素的顶部和中心。 命令位置:absolute让我将其放置在所需的位置并向左移:50%将其放置在窗口顶部的中间,但从记分板元素的最左侧开始。 为了确保其居中完美,我使用了transform属性,而z-index属性则确保其始终位于顶部:
#score {
  position: absolute;
  z-index: 1000;
  left: 50%;
  top: 5%;
  transform: translate(-50%, 0%);
}
我还希望文本字体以复古为主题。 大多数现代浏览器都允许我包含自己的字体。 我从codeman38(zone38.net)找到了合适的Press Start 2P字体。 要将字体添加到记分板,我必须创建一个新的字体:
@font-face {
  font-family: 'PressStart2P';
  src: url('PressStart2P.woff');
}
现在,乐谱位于h1标签中,因此我可以为所有h1标签设置字体。 以防万一字体丢失,我将提供一些备份选项:
h1 {
  font-family: 'PressStart2P', 'Georgia', serif;
}
对于其他元素,我将使用图片的精灵表。 Sprite工作表将我需要的所有图像包含在一个文件中(请参见下面的图像)。
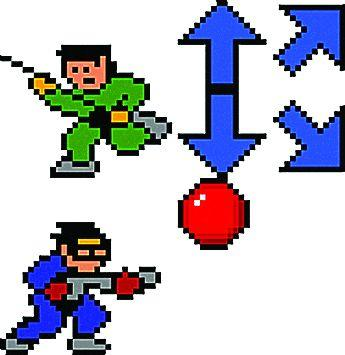
在此工作表上具有图像的任何元素都将分配一个sprite类。 然后,对于每个元素,我将使用background-position定义我要显示的Sprite工作表的哪一部分:
.sprite {
  background-image: url("sprites.png");
  width: 128px;
  height: 128px;
}
接下来,我将把sprite类添加到所有将使用sprite工作表的元素中。 我将不得不短暂地跳回HTML来执行此操作:
<div id="player" class="sprite"></div>
<div id="opponent" class="sprite"></div>
<div id="ball" class="sprite"></div>
<div id="controls-left">
  <div id="up" class="sprite"></div>
  <div id="down" class="sprite"></div>
</div>
<div id="controls-right">
  <div id="left" class="sprite"></div>
  <div id="right" class="sprite"></div>
</div>
现在,我需要为每个元素指示图纸上每个精灵的位置。 同样,我将使用背景位置进行此操作:
#player {
  position: absolute;
  background-position: 0px 128px;
}
#opponent {
  position: absolute;
  background-position: 0px 0px;
}
#ball {
  position: absolute;
  background-position: 128px 128px;
}
#right {
  background-position: 64px 192px;
}
#left {
  background-position: 64px 0px;
}
#down {
  background-position: 128px 192px;
}
#up {
  background-position: 128px 0px;
}
位置:玩家,对手和球的绝对属性将使我能够使用JavaScript进行移动。 如果您现在看此页面,将会看到控件和球上附着了不必要的部分。 这是因为精灵大小小于默认的128像素,因此我将其调整为正确的大小。 只有一个球,所以我直接设置它的大小:
#ball {
  position: absolute;
  width: 64px;
  height: 64px;
  background-position: 128px 128px;
}
有四个控制元素(用户可以按下按钮来移动播放器),所以我应该为它们设置一个特殊的类。 我还将添加一个边距,以便它们周围有一些空间:
.control {
  margin: 16px;
  width: 64px;
  height: 64px;
}
添加了此类之后,游戏的控件外观就会好得多:
<div id="controls-left">
  <div id="up" class="sprite control"></div>
  <div id="down" class="sprite control"></div>
</div>
<div id="controls-right">
  <div id="left" class="sprite control"></div>
  <div id="right" class="sprite control"></div>
</div>
我需要做的最后一件事是放置控件,以便当页面在移动设备上运行时,它们会被用户的拇指遮住。 我将它们固定在底角:
#controls-left {
  position: absolute;
  left: 0; bottom: 0;
}
#controls-right {
  position: absolute;
  right: 0; bottom: 0;
}
关于此设计的一件好事是,一切都设置为相对位置。 这意味着屏幕可以具有许多不同的尺寸,同时仍使游戏看起来不错。
跟随弹跳球
现在,我将球移动。 对于JavaScript代码,我引用了HTML中的一个名为ping.js的文件,就像处理CSS一样。 我将此代码添加到具有该名称的新文件中。 我将为球和每个球员制作对象,但是我将使用工厂模式作为对象。
这是一个简单的概念。 调用球功能时,它会创建一个新球。 无需使用new关键字。 通过阐明可用的对象属性,此模式减少了围绕此变量的一些混乱。 而且由于我只有一个小时来制作这款游戏,因此我需要尽量减少任何令人困惑的概念。
我制作简单的Ball类时,此模式的结构如下:
var Ball = function( {
  // List of variables only the object can see (private variables).
  var velocity = [0,0];
  var position = [0,0];
  var element = $('#ball');
  var paused = false;
  // Method that moves the ball based on its velocity. This method is only used
  // internally and will not be made accessible outside of the object.
  function move(t) {
  }
  // Update the state of the ball, which for now just checks
  // if the play is paused and moves the ball if it is not.
  // This function will be provided as a method on the object.
  function update(t) {
    // First the motion of the ball is handled
    if(!paused) {
      move(t);
    }
  }
  // Pause the ball motion.
  function pause() {
    paused = true;
  }
  // Start the ball motion.
  function start() {
    paused = false;
  }
  // Now explicitly set what consumers of the Ball object can use.
  // Right now this will just be the ability to update the state of the ball,
  // and start and stop the motion of the ball.
  return {
    update:       update,
    pause:        pause,
    start:        start
}
要创建一个新球,我只需调用定义的该函数:
var ball = Ball();
现在,我要使球移动并在屏幕周围反弹。 首先,我需要以一定间隔调用update函数来创建球的动画。 现代浏览器为此提供了一个称为requestAnimationFrame的函数。 这将一个函数作为参数,并在下一次运行动画周期时调用该传入的函数。 当浏览器准备进行更新时,这可以使球平稳地移动。 当它调用传递的函数时,它将以秒为单位给自页面加载以来的时间。 这对于确保动画随时间推移保持一致至关重要。 在游戏中, requestAnimationFrame的使用如下所示:
var lastUpdate = 0;
var ball = Ball();

function update(time) {
  var t = time - lastUpdate;
  lastUpdate = time;
  ball.update(t);
  requestAnimationFrame(update);
}

requestAnimationFrame(update);
注意,由于球已完成更新,因此在函数中再次调用requestAnimationFrame 。 这样可以确保连续的动画。
尽管此代码将起作用,但是可能存在一个问题,即在页面完全加载之前脚本开始运行。 为避免这种情况,我将在使用jQuery加载页面时启动代码:
var ball;
var lastUpdate;
$(document).ready(function() {
  lastUpdate = 0;
  ball = Ball();
  requestAnimationFrame(update);
});
因为我知道球的速度(速度)和自上次更新以来的时间,所以我可以做一些简单的物理操作来将球向前移动:
var position = [300, 300];
var velocity = [-1, -1];
var move = function(t) {
  position[0] += velocity[0] \* t;
  position[1] += velocity[1] \* t;
  element.css('left', position[0] + 'px');
  element.css('top', position[1] + 'px');
}
尝试运行代码,您将看到球以一定角度移动并离开屏幕。 这是一秒钟的乐趣,但是一旦球离开屏幕边缘,乐趣就会停止。 因此,下一步是使球从屏幕边缘弹起,如图7所示。添加此代码,运行应用程序将显示一个连续弹起的球。
可移动的球员
现在是时候制作Player对象了。 充实播放器类的第一步将是使移动功能更改播放器的位置。 side变量将指示玩家将驻留在球场的哪一侧,这将指示如何水平放置玩家。 传递给move函数的y值将是玩家将上下移动的数量:
var Player = function (elementName, side) {
  var position = [0,0];
  var element = $('#'+elementName);
  var move = function(y) {
  }
  return {
    move: move,
    getSide:      function()  { return side; },
    getPosition:  function()  { return position; }
  }
}
然后,我们可以安排玩家运动,如果玩家精灵到达窗口的顶部或底部,则停止运动。
var move = function(y) {
  // Adjust the player's position.
  position[1] += y;
  // If the player is off the edge of the screen, move it back.
  if (position[1] <= 0)  {
    position[1] = 0;
  }
  // The height of the player is 128 pixels, so stop it before any
  // part of the player extends off the screen.
  if (position[1] >= innerHeight - 128) {
    position[1] = innerHeight - 128;
  }
  // If the player is meant to stick to the right side, set the player position
  // to the right edge of the screen.
  if (side == 'right') {
    position[0] = innerWidth - 128;
  }
  // Finally, update the player's position on the page.
  element.css('left', position[0] + 'px');
  element.css('top', position[1] + 'px');
}
现在,我可以创建两个播放器,并将它们移到屏幕的相应一侧:
player = Player('player', 'left');
player.move(0);
opponent = Player('opponent', 'right');
opponent.move(0);
键盘输入
因此,从理论上讲,您可以移动播放器,但没有指令它就不会移动。 在播放器左侧添加一些控件。 您需要两种控制播放器的方法:使用键盘(在PC上)和点击控件(在平板电脑和手机上)。
为了确保各种平台上的触摸输入和鼠标输入之间的一致性,我将使用出色的统一框架Hand.js(handjs.codeplex.com)。 首先,我将在头部将脚本添加到HTML:
<script src="hand.minified-1.3.8.js"></script>
然后,当您按下键盘按键A和Z或点击控件时,我将使用Hand.js和jQuery来控制播放器。
var distance = 24;  // The amount to move the player each step.
$(document).ready(function() {
  lastUpdate = 0;
  player = Player('player', 'left');
  player.move(0);
  opponent = Player('opponent', 'right');
  opponent.move(0);
  ball = Ball();
  // pointerdown is the universal event for all types of pointers -- a finger,
  // a mouse, a stylus and so on.
  $('#up')    .bind("pointerdown", function() {player.move(-distance);});
  $('#down')  .bind("pointerdown", function() {player.move(distance);});
  requestAnimationFrame(update);
});
$(document).keydown(function(event) {
  var event = event || window.event;
  // This code converts the keyCode (a number) from the event to an uppercase
  // letter to make the switch statement easier to read.
  switch(String.fromCharCode(event.keyCode).toUpperCase()) {
    case 'A':
      player.move(-distance);
      break;
    case 'Z':
      player.move(distance);
      break;
  }
  return false;
});
接住球
随着球反弹,我想让球员接住球。 当球被抓住时,球将具有一个所有者,并且跟随该所有者的运动。 我将功能添加到球的move方法中,允许所有者,然后球将跟随:
var move = function(t) {
  // If there is an owner, move the ball to match the owner's position.
  if (owner !== undefined) {
    var ownerPosition = owner.getPosition();
    position[1] = ownerPosition[1] + 64;
    if (owner.getSide() == 'left') {
      position[0] = ownerPosition[0] + 64;
    } else {
      position[0] = ownerPosition[0];
    }
  // Otherwise, move the ball using physics. Note the horizontal bouncing
  // has been removed -- ball should pass by a player if it
  // isn't caught.
  } else {
    // If the ball hits the top or bottom, reverse the vertical speed.
    if (position[1] - 32 <= 0 || position[1] + 32 >= innerHeight) {
      velocity[1] = -velocity[1];
    }
    position[0] += velocity[0] \* t;
    position[1] += velocity[1] \* t;
  }
  element.css('left', (position[0] - 32) + 'px');
  element.css('top',  (position[1] - 32) + 'px');
}
当前,无法获取Player对象的位置,因此我将getPosition和getSide访问器添加到Player对象:
return {
  move: move,
  getSide:      function()  { return side; },
  getPosition:  function()  { return position; }
}
现在,如果球有一个所有者,它将跟随该所有者。 但是,如何确定所有者? 有人必须接住球。 让我们确定一名球员精灵何时触球。 发生这种情况时,我将球的所有者设置为该球员。
var update = function(t) {
// First the motion of the ball is handled.
if(!paused) {
    move(t);
}
// The ball is under control of a player, no need to update.
if (owner !== undefined) {
    return;
}
// First, check if the ball is about to be grabbed by the player.
var playerPosition = player.getPosition();
  if (position[0] <= 128 &&
      position[1] >= playerPosition[1] &&
      position[1] <= playerPosition[1] + 128) {
    console.log("Grabbed by player!");
    owner = player;
}
// Then the opponent...
var opponentPosition = opponent.getPosition();
  if (position[0] >= innerWidth - 128 &&
      position[1] >= opponentPosition[1] &&
      position[1] <= opponentPosition[1] + 128) {
    console.log("Grabbed by opponent!");
    owner = opponent;
}
如果您现在尝试玩游戏,您会发现球从屏幕顶部弹起,您可以移动玩家接住球。 现在,你怎么扔它? 这就是右手控制球的目的。 让我们向玩家添加一个“射击”功能以及一个瞄准属性。
var aim = 0;
var fire = function() {
  // Safety check: if the ball doesn't have an owner, don't not mess with it.
  if (ball.getOwner() !== this) {
    return;
  }
  var v = [0,0];
  // Depending on the side the player is on, different directions will be thrown.
  // The ball should move at the same speed, regardless of direction --
  // with some math you can determine that moving .707 pixels on the
  // x and y directions is the same speed as moving one pixel in just one direction.
  if (side == 'left') {
    switch(aim) {
    case -1:
      v = [.707, -.707];
      break;
    case 0:
      v = [1,0];
      break;
    case 1:
      v = [.707, .707];
    }
  } else {
    switch(aim) {
    case -1:
      v = [-.707, -.707];
      break;
    case 0:
      v = [-1,0];
      break;
    case 1:
      v = [-.707, .707];
    }
  }
  ball.setVelocity(v);
  // Release control of the ball.
  ball.setOwner(undefined);
}
// The rest of the Ball definition code goes here...
return {
  move: move,
  fire: fire,
  getSide:      function()  { return side; },
  setAim:       function(a) { aim = a; },
  getPosition:  function()  { return position; },
}
然后,我们可以扩展键盘功能来设置玩家的瞄准和射击功能。 瞄准将略有不同。 释放瞄准键后,瞄准将恢复为简单。
$(document).keydown(function(event) {
  var event = event || window.event;
  switch(String.fromCharCode(event.keyCode).toUpperCase()) {
    case 'A':
      player.move(-distance);
      break;
    case 'Z':
      player.move(distance);
      break;
    case 'K':
      player.setAim(-1);
      break;
    case 'M':
      player.setAim(1);
      break;
    case ' ':
      player.fire();
      break;
  }
  return false;
});
$(document).keyup(function(event) {
  var event = event || window.event;
  switch(String.fromCharCode(event.keyCode).toUpperCase()) {
    case 'K':
    case 'M':
      player.setAim(0);
      break;
  }
  return false;
});
最后的添加将是所有控件上的触摸支持。 我将使右边的控件更改播放器的目标。 我还将使其触摸屏幕上的任意位置以发射球:
$('#left')  .bind("pointerdown", function() {player.setAim(-1);});
$('#right') .bind("pointerdown", function() {player.setAim(1);});
$('#left')  .bind("pointerup",   function() {player.setAim(0);});
$('#right') .bind("pointerup",   function() {player.setAim(0);});
$('body')   .bind("pointerdown", function() {player.fire();});
保持得分
当球传给一名球员时,我想更改得分并将球交给该球员。 我将使用自定义事件,以便可以将评分与任何现有对象分开。 更新功能越来越长,因此我将添加一个名为checkScored的新私有功能:
function checkScored() {
  if (position[0] <= 0) {
    pause();
    $(document).trigger('ping:opponentScored');
  }
  if (position[0] >= innerWidth) {
    pause();
    $(document).trigger('ping:playerScored');
  }
}
以下代码对这些事件做出反应,以更新比分并移交球。 将此代码添加到JavaScript文档的底部。
$(document).on('ping:playerScored', function(e) {
  console.log('player scored!');
  score[0]++;
  $('#playerScore').text(score[0]);
  ball.setOwner(opponent);
  ball.start();
});
$(document).on('ping:opponentScored', function(e) {
  console.log('opponent scored!');
  score[1]++;
  $('#opponentScore').text(score[1]);
  ball.setOwner(player);
  ball.start();
});
现在,当球越过对手时(这并不困难,因为对手不会移动),您的得分将上升,球将移交给对手。 但是,对手只会抓住球。
聪明点
你几乎有一个游戏。 如果只有您和某人一起玩。 最后,我将展示如何使用简单的AI控制对手。 对手在球移动时将尝试与球保持平行。 如果对手接住球,它将随机移动并朝随机方向发射球。 为了使AI更具人性化,我将在完成的所有操作中增加延迟。 请注意,这不是高度智能的AI,但这将是与之对抗的东西。
在设计这种系统时,最好考虑一下状态。 对手AI具有三种可能的状态:跟随,瞄准/射击和等待。 我将处于以下操作之间的状态,以添加更人性化的元素。 首先从AI对象开始:
function AI(playerToControl) {
  var ctl = playerToControl;
  var State = {
    WAITING: 0,
    FOLLOWING: 1,
    AIMING: 2
  }
  var currentState = State.FOLLOWING;
}
根据AI的状态,我希望它执行其他操作。 就像球一样,我将创建一个更新函数,可以在requestAnimationFrame调用该函数,以使AI根据其状态进行操作:
function update() {
  switch (currentState) {
    case State.FOLLOWING:
      // Do something to follow the ball.
      break;
    case State.WAITING:
      // Do something to wait.
      break;
    case State.AIMING:
      // Do something to aim.
      break;
  }
}
FOLLOWING状态很简单。 对手沿球的垂直方向移动,并且AI转换为WAITING状态,以注入一些缓慢的反应时间。 下面的代码显示了这两种状态:
function moveTowardsBall() {
  // Move the same distance the player would move, to make it fair.
  if(ball.getPosition()[1] >= ctl.getPosition()[1] + 64) {
    ctl.move(distance);
  } else {
    ctl.move(-distance);
  }
}
function update() {
  switch (currentState) {
    case State.FOLLOWING:
      moveTowardsBall();
      currentState = State.WAITING;
    case State.WAITING:
      setTimeout(function() {
        currentState = State.FOLLOWING;
      }, 400);
      break;
    }
  }
}
AI在必须跟随球和等待一秒钟之间交替。 现在,将代码添加到游戏范围的更新功能中:
function update(time) {
  var t = time - lastUpdate;
  lastUpdate = time;
  ball.update(t);
  ai.update();
  requestAnimationFrame(update);
}
在运行游戏时,您会看到对手跟随球的动作-少于30行代码的AI就算不错。 当然,如果对手接住球,它什么也不会做。 因此,对于本小时的最后一个技巧,是时候为AIMING状态处理动作了。
我希望AI随机移动几次,然后向随机方向发射球。 让我们添加一个专用于此的私有函数。 将aimAndFire函数添加到AIMING case语句中,可以发挥功能齐全的AI。
function repeat(cb, cbFinal, interval, count) {
  var timeout = function() {
    repeat(cb, cbFinal, interval, count-1);
  }
  if (count <= 0) {
    cbFinal();
  } else {
    cb();
    setTimeout(function() {
      repeat(cb, cbFinal, interval, count-1);
    }, interval);
  }
}

function aimAndFire() {

  // Repeat the motion action 5 to 10 times.

  var numRepeats = Math.floor(5 + Math.random() \* 5);
  function randomMove() {
    if (Math.random() > .5) {
      ctl.move(-distance);
    } else {
      ctl.move(distance);
    }
  }

  function randomAimAndFire() {

    var d = Math.floor( Math.random() \* 3 - 1 );
    opponent.setAim(d);
    opponent.fire();

    // Finally, set the state to FOLLOWING.

    currentState = State.FOLLOWING;
  }

  repeat(randomMove, randomAimAndFire, 250, numRepeats);

}
包起来
到现在为止,您已经拥有可以在PC,智能手机和平板电脑上运行的完整网络游戏。 此游戏有许多可能的改进。 例如,在智能手机上的纵向模式下,它看起来会有些尴尬,因此您需要确保将手机横向放置才能正常工作。 这只是Web和其他平台游戏开发可能性的小展示。
感谢技术专家Mohamed Ameen Ibrahim审阅本文。
使用JavaScript进行更多操作
本文是Microsoft技术传播者开发的Web开发系列文章的一部分,内容涉及实用的JavaScript学习,开源项目以及互操作性最佳实践,包括Microsoft Edge浏览器和新的EdgeHTML呈现引擎 。
我们鼓励您使用dev.modern.IE上的免费工具跨浏览器和设备进行测试,包括Microsoft Edge(Windows 10的默认浏览器):
- 扫描您的站点以查找过期的库,布局问题和可访问性
- 在Mac,Linux和Windows上使用虚拟机
- 在您自己的设备上远程测试Microsoft Edge
- GitHub上的编码实验室:跨浏览器测试和最佳实践
我们的工程师和宣传人员在Microsoft Edge和Web平台上进行了深入的技术学习:
- Microsoft Edge Web Summit 2015 (新浏览器,受支持的新网络平台标准以及来自JavaScript社区的嘉宾演讲者会期待什么)
- 哇,我可以在Mac和Linux上测试Edge和IE! (来自Rey Bango)
- 在不中断网络的情况下推进JavaScript (摘自Christian Heilmann)
- 使Web正常工作的Edge渲染引擎 (来自Jacob Rossi)
- 使用WebGL释放3D渲染 (来自David Catuhe,包括vorlon.JS和babylonJS项目)
- 托管的Web应用程序和Web平台创新 (来自Kevin Hill和Kiril Seksenov,包括歧管 .JS项目)
Web平台的更多免费跨平台工具和资源:
From: https://www.sitepoint.com/build-a-web-game-in-an-hour-with-visual-studio-and-asp-net/


 被折叠的 条评论
为什么被折叠?
被折叠的 条评论
为什么被折叠?
 到【灌水乐园】发言


