


 本文深入解析JSR107规范及Spring缓存抽象,演示如何利用注解如@Cacheable、@CachePut和@CacheEvict等简化缓存管理,涵盖Maven依赖配置、自定义keyGenerator及使用Redis缓存的完整流程。
目录
概念介绍
JSR107
java Caching的五个核心接口:
- CachingProvider 定义、配置、获取、管理和控制多个CacheManager.一个应用可以在运行期间访问多个CachingProvider
- CaheManager:定义、配置、获取、管理和控制多个唯一命名的Cache,这些Cache存在CaheManager上下文中。一个Cachemanager仅被一个CachingProvider所拥有。
- Cache:一个类似map的数据结构并临时存储以key为索引的值。一个cache仅被一个cachemanager所拥有。
- Entry:一个存储在cache中的key-value对
- Expiry:每一个存储在cache中的条目有一个定义的有效期。一旦超过这个时间,条目为过期状态。一旦过期,条目将不可访问、更新和删除。缓存有效期可以通过ExpiryPolicy设置。
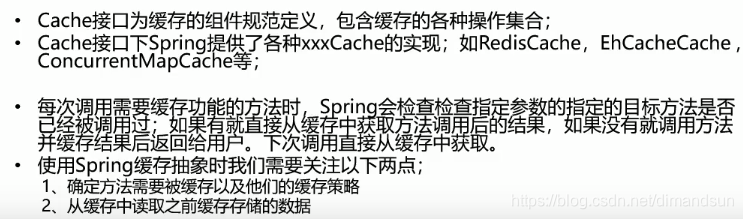
spring缓存抽象
保留jsr107的Cache和CacheManager,支持JCache(JSR-107)注解简化开发

快速入门
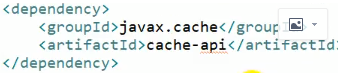
maven依赖:
<!--        缓存          begin-->
<dependency>
    <groupId>org.springframework.boot</groupId>
    <artifactId>spring-boot-starter-cache</artifactId>
</dependency>
<!--- mybatis和mysql-->
<dependency>
    <groupId>org.mybatis.spring.boot</groupId>
    <artifactId>mybatis-spring-boot-starter</artifactId>
    <version>2.1.1</version>
</dependency>
<dependency>
    <groupId>mysql</groupId>
    <artifactId>mysql-connector-java</artifactId>
    <scope>runtime</scope>
</dependency>
<!--- redis-->
<dependency>
    <groupId>org.springframework.boot</groupId>
    <artifactId>spring-boot-starter-data-redis</artifactId>
</dependency>
开启基于注解的缓存
@EnableCaching
@MapperScan("com.czy.spring_cash_test.mvc.dao")
@SpringBootApplication
@EnableCaching
public class SpringCashTestApplication {
    public static void main(String[] args) {
        SpringApplication.run(SpringCashTestApplication.class, args);
    }
}
注解:
@Cacheable
@Cacheable(cacheNames = "emp",key = "#root.methodName+'['+#id+']'")
public Employee getEmp(Integer id){
    System.out.println("查询"+id+"号员工");
    Employee emp=employeeDao.getEmpById(id);
    return emp;
}
运行流程:
@Cacheable:
- 方法运行之前,先去查询Cache(缓存组件),按照cacheNames指定的名字获取;(CacheManager先获取相应的缓存),第一次获取缓存如果没有Cache组件会自动创建。
- 去Cache中查找缓存的内容,使用一个key,默认就是方法的参数;
key是按照某种策略生成的;默认是使用keyGenerator生成的,默认使用SimpleKeyGenerator生成key;
SimpleKeyGenerator生成key的默认策略;
如果没有参数;key=new SimpleKey();
如果有一个参数:key=参数的值
如果有多个参数:key=new SimpleKey(params); - 没有查到缓存就调用目标方法;
- 将目标方法返回的结果,放进缓存中
@Cacheable标注的方法执行之前先来检查缓存中有没有这个数据,默认按照参数的值作为key去查询缓存,
如果没有就运行方法并将结果放入缓存;以后再来调用就可以直接使用缓存中的数据;
重点:
- 使用CacheManager【ConcurrentMapCacheManager】按照名字得到Cache【ConcurrentMapCache】组件。
- key使用keyGenerator生成的,默认是SimpleKeyGenerator
几个属性:
- cacheNames/value:指定缓存组件的名字;将方法的返回结果放在哪个缓存中,是数组的方式,可以指定多个缓存;
- key:缓存数据使用的key;可以用它来指定。默认是使用方法参数的值 1-方法的返回值
编写SpEL; #i d;参数id的值 #a0 #p0 #root.args[0] - keyGenerator:key的生成器;可以自己指定key的生成器的组件id。key/keyGenerator:二选一使用;
- cacheManager 指定缓存管理器;或者cacheResolver指定获取解析器
- condition:指定符合条件的情况下才缓存;condition = “#a0>1”:第一个参数的值》1的时候才进行缓存
- unless:否定缓存;当unless指定的条件为true,方法的返回值就不会被缓存;可以获取到结果进行判断;unless = “#result == null”;unless = “#a0==2”:如果第一个参数的值是2,结果不缓存;
- sync:是否使用异步模式不支持unless
自定义keyGenerator
@Bean("myKeyGenerator")
public KeyGenerator keyGenerator(){
    return new KeyGenerator(){
        @Override
        public Object generate(Object target, Method method, Object... params) {
            return method.getName()+"["+ Arrays.asList(params).toString()+"]";
        }
    };
}
@CachePut
既调用方法,又更新缓存数据;同步更新缓存
1、先调用目标方法
2、将目标方法的结果缓存起来
@CachePut(value = "emp",key = "#result.id")
public Employee updateEmp(Employee employee){
    System.out.println("updateEmp:"+employee);
    employeeDao.updateEmp(employee);
    return employee;
}
@CacheEvict、
缓存清除
属性:
- key:指定要清除的数据
- allEntries = true:指定清除这个缓存中所有的数据
- beforeInvocation = false:缓存的清除是否在方法之前执行。默认代表缓存清除操作是在方法执行之后执行;如果出现异常缓存就不会清除
@Caching
定义复杂的缓存规则
@Caching(
     cacheable = {
         @Cacheable(/*value="emp",*/key = "#lastName")
     },
     put = {
         @CachePut(/*value="emp",*/key = "#result.id"),
         @CachePut(/*value="emp",*/key = "#result.email")
     }
)
public Employee getEmpByLastName(String lastName){
//return employeeMapper.getEmpByLastName(lastName);
    return null;
}
使用redis缓存
下载安装
docker pull redis
docker run -d -p 6379:6379 --name myredis redis
yml文件配置redis主机
spring:
  redis:
    host: 192.168.31.137
配置缓存管理器
缓存对象默认使用jdk序列化机制,自定义CacheManager 使用json序列化
@Bean
public CacheManager cacheManager(RedisConnectionFactory redisConnectionFactory) {
    //初始化一个RedisCacheWriter
    RedisCacheWriter redisCacheWriter = RedisCacheWriter.nonLockingRedisCacheWriter(redisConnectionFactory);
    //设置CacheManager的值序列化方式为json序列化
    RedisSerializer<Object> jsonSerializer = new GenericJackson2JsonRedisSerializer();
    RedisSerializationContext.SerializationPair<Object> pair = RedisSerializationContext.SerializationPair
            .fromSerializer(jsonSerializer);
    RedisCacheConfiguration defaultCacheConfig=RedisCacheConfiguration.defaultCacheConfig()
            .serializeValuesWith(pair);
    //设置默认超过期时间是30秒
    defaultCacheConfig.entryTtl(Duration.ofSeconds(30));
    //初始化RedisCacheManager
    return new RedisCacheManager(redisCacheWriter, defaultCacheConfig);
}


 708
708

 被折叠的 条评论
为什么被折叠?
被折叠的 条评论
为什么被折叠?
 到【灌水乐园】发言


