


 本文详细介绍如何在本地工作站上以SolrCloud模式搭建Apache Solr 7.5集群,包括环境配置、启动两个Solr节点、创建集合、索引示例数据及基本检索技巧。
本文基于 Apache Solr 7.5 编写。开始之前,需要确认运行环境是否满足需求(安装 JDK ),并下载 Apache Solr。
下载并解压 Solr
下载(示例使用了镜像网站)并解压 Solr,更改工作目录到 Solr 的子目录:
~$ wget wget https://mirrors.tuna.tsinghua.edu.cn/apache/lucene/solr/7.5.0/solr-7.5.0.zip

~$ ls solr*
solr-7.5.0.zip

~$ unzip -q solr-7.5.0.zip

~$ cd solr-7.5.0/
关于 Solr 的目录结构,可以参考官方文档。
以 SolrCloud 模式启动 Solr
启动一个交互式会话,然后在这台机器上启动两个 Solr“服务”节点(通过 -noprompt 命令可以跳过提示输入,这里不再演示):
solr-7.5.0:$ ./bin/solr start -e cloud

Welcome to the SolrCloud example!

This interactive session will help you launch a SolrCloud cluster on your local workstation.
To begin, how many Solr nodes would you like to run in your local cluster? (specify 1-4 nodes) [2]:
直接输入回车,采用默认值 [2] ,运行 2 个 Solr 节点:
Ok, let's start up 2 Solr nodes for your example SolrCloud cluster.
Please enter the port for node1 [8983]:
第一个节点默认运行在 [8983] 端口,直接输入回车键进入下一步。如果该端口被占用,需要选择另一个端口输入:
Please enter the port for node2 [7574]:第二个节点默认和运行在 [7574] 端口。
完成以上操作后,Solr 会初始化启动两个节点,并打印出可供参考的命令,需要仔细阅读 limit 等相关的提示。
Creating Solr home directory /home/dc2-user/solr-7.5.0/example/cloud/node1/solr
Cloning /home/dc2-user/solr-7.5.0/example/cloud/node1 into
   /home/dc2-user/solr-7.5.0/example/cloud/node2

Starting up Solr on port 8983 using command:
"bin/solr" start -cloud -p 8983 -s "example/cloud/node1/solr"

*** [WARN] *** Your open file limit is currently 4096.
 It should be set to 65000 to avoid operational disruption.
 If you no longer wish to see this warning, set SOLR_ULIMIT_CHECKS to false in your profile or solr.in.sh
*** [WARN] ***  Your Max Processes Limit is currently 3789.
 It should be set to 65000 to avoid operational disruption.
 If you no longer wish to see this warning, set SOLR_ULIMIT_CHECKS to false in your profile or solr.in.sh
Waiting up to 180 seconds to see Solr running on port 8983 [-]
Started Solr server on port 8983 (pid=13089). Happy searching!
...
INFO  - 2018-12-10 00:41:13.447; org.apache.solr.common.cloud.ConnectionManager; zkClient has connected
INFO  - 2018-12-10 00:41:13.471; org.apache.solr.common.cloud.ZkStateReader; Updated live nodes from ZooKeeper... (0) -> (2)
INFO  - 2018-12-10 00:41:13.492; org.apache.solr.client.solrj.impl.ZkClientClusterStateProvider; Cluster at localhost:9983 ready
我们以 SolrCloud 模式启动了两个 Solr 实例,但并没有指定额外的 ZooKeeper 集群,Solr 运行了内置的 ZooKeeper 并成功连接了两个节点。
启动完成后,系统将提示需要创建用于索引数据的集合:
Now let's create a new collection for indexing documents in your 2-node cluster.
Please provide a name for your new collection: [gettingstarted]这里直接输入techproducts ,也可以输入其他名称以示区分。
How many shards would you like to split techproducts into? [2]直接输入回车键,采用默认的分片 ,在两个节点之间相对均匀的拆分索引。
How many replicas per shard would you like to create? [2]replica(副本)是用于故障转移的索引的拷贝(参考 Solr Glossary definition),暂且采用默认值“2”。
Please choose a configuration for the techproducts collection, available options are:
_default or sample_techproducts_configs [_default]
集合必须有一个配置集(configSet),它至少包括 Solr 的两个主要配置文件:schema 文件(命名为 managed-schema 或 schema.xml)和 solrconfig.xml。 Solr 有两个默认的配置文件样本集(称为 configSet),_default 是一个简单的选项, sample_techproducts_configs 专门用于支持我们要使用的示例数据,在这里输入包含“techproducts”的 configSet,进入下一步:
Uploading /solr-7.5.0/server/solr/configsets/_default/conf for config techproducts to ZooKeeper at localhost:9983

Connecting to ZooKeeper at localhost:9983 ...
INFO  - 2017-07-27 12:48:59.289; org.apache.solr.client.solrj.impl.ZkClientClusterStateProvider; Cluster at localhost:9983 ready
Uploading /solr-7.5.0/server/solr/configsets/sample_techproducts_configs/conf for config techproducts to ZooKeeper at localhost:9983

Creating new collection 'techproducts' using command:
http://localhost:8983/solr/admin/collections?action=CREATE&name=techproducts&numShards=2&replicationFactor=2&maxShardsPerNode=2&collection.configName=techproducts

{
  "responseHeader":{
    "status":0,
    "QTime":5460},
  "success":{
    "192.168.0.110:7574_solr":{
      "responseHeader":{
        "status":0,
        "QTime":4056},
      "core":"techproducts_shard1_replica_n1"},
    "192.168.0.110:8983_solr":{
      "responseHeader":{
        "status":0,
        "QTime":4056},
      "core":"techproducts_shard2_replica_n2"}}}

Enabling auto soft-commits with maxTime 3 secs using the Config API

POSTing request to Config API: http://localhost:8983/solr/techproducts/config
{"set-property":{"updateHandler.autoSoftCommit.maxTime":"3000"}}
Successfully set-property updateHandler.autoSoftCommit.maxTime to 3000

SolrCloud example running, please visit: http://localhost:8983/solr恭喜!你现在可以通过 http://localhost:8983/solr 访问 Solr 了。Solr 启动了两个节点,端口分别是 7574 和 8983。techproducts 是自动创建的的集合,拥有两个 shard,每个 shard 拥有两个 replica。如果你正在使用云主机,需要确保在安全组中增加 8983 端口,才能在本地计算机中通过 http://{replace by your eip}:8983/solr 访问。
在管理控制台中,可以从 Cloud -> Graph 中找到:

索引 Techproducts 数据
Solr 服务器已经启动并正常运行,但还未包含任务数据。可以通过 Solr 的 bin/post 工具索引示例数据。目前 bin/post 工具没有合适的 Windows 脚本 ,以下通过 Shell 脚本索引 example/exampledocs 目录,包含 JSON,CSV 等格式的文档:
solr-7.5.0:$ bin/post -c techproducts example/exampledocs/*运行后输出以下内容:
SimplePostTool version 5.0.0
Posting files to [base] url http://localhost:8983/solr/techproducts/update...
Entering auto mode. File endings considered are xml,json,jsonl,csv,pdf,doc,docx,ppt,pptx,xls,xlsx,odt,odp,ods,ott,otp,ots,rtf,htm,html,txt,log
POSTing file books.csv (text/csv) to [base]
POSTing file books.json (application/json) to [base]/json/docs
POSTing file gb18030-example.xml (application/xml) to [base]
POSTing file hd.xml (application/xml) to [base]
...
COMMITting Solr index changes to http://localhost:8983/solr/techproducts/update...
Time spent: 0:00:00.822
Solr 已经包含了数据,可以开始检索了。
基本检索
Solr 支持通过 REST 客户端、curl、wget、Chrome POSTMAN 等进行检索。Solr 管理控制台包含了一个 query builder 界面,可以通过 Collection Selector 选择 techproducts,进入 Query 页面,使用默认选项直接点击 Execute Query 按钮进行检索。
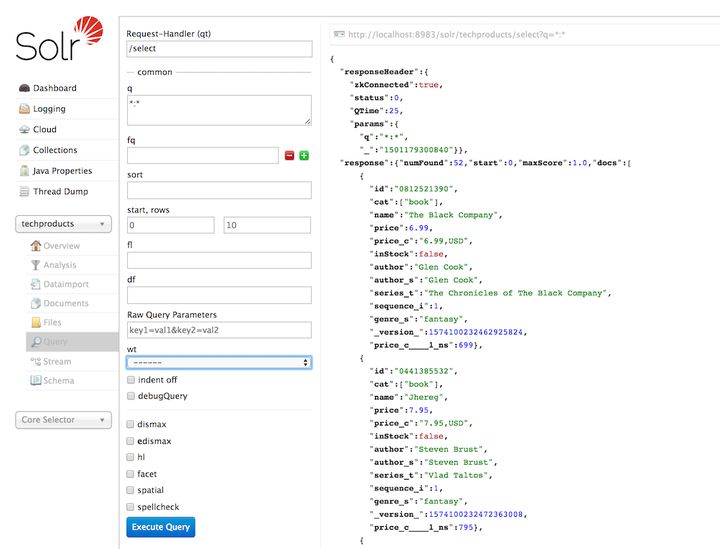
Solr 管理控制台发送的 URL 以及响应内容可以通过点击右上方的灰色链接获取,复制浏览器中的链接,可以通过 curl 命令执行:
curl "http://localhost:8983/solr/techproducts/select?indent=on&q=*:*"这里我们使用查询参数 q 来请求在索引 *:* 下的所有的 documents,由于默认参数 rows 被设置为 10,以上语句并不会返回所有结果。
Solr 有强大的搜索选项,本文仅包含了常用的几种类型供参考。
单词语检索,输入 foundation,同时检索多个字段:
curl "http://localhost:8983/solr/techproducts/select?q=foundation"{
"responseHeader":{
"zkConnected":true,
"status":0,
"QTime":8,
"params":{
"q":"foundation"}},
"response":{"numFound":4,"start":0,"maxScore":2.7879646,"docs":[
{
"id":"0553293354",
"cat":["book"],
"name":"Foundation",
"price":7.99,
"price_c":"7.99,USD",
"inStock":true,
"author":"Isaac Asimov",
"author_s":"Isaac Asimov",
"series_t":"Foundation Novels",
"sequence_i":1,
"genre_s":"scifi",
"_version_":1574100232473411586,
"price_c____l_ns":799}]
}}
该查询命中了 4 个 document ("numFound":4)。返回的 document 中包含了所有的索引的字段,你可以通过指定fl参数来限制返回哪些字段,例如仅返回id字段:
curl "http://localhost:8983/solr/techproducts/select?q=foundation&fl=id"有时,我们需要限定检索的字段来提高检索结果的有效性。例如,我们想获取到“electronics”相关的产品,指定 cat 字段 (“category”的缩写)更为精确:
curl "http://localhost:8983/solr/techproducts/select?q=cat:electronics"多词语的短语检索需要使用双引号 q="multiple terms here",例如,检索“CAS latency”(使用 curl 时需要需要把空格替换为“+”号):
curl "http://localhost:8983/solr/techproducts/select?q=\"CAS+latency\""通常,在单个查询中检索多个词语或短语时,Solr 会返回匹配任意一个词语或短语的 document,同时匹配多个的 document 排序更高一些。如果某个词语或短语是必须在 document 中存在,则在它前面添加 +,如果不允许某个词语或短语出现,在它前面添加 -。检索同时包含 “electronics” 和“music”的 document,输入 +electronics +music(+ 编码后为%2B):
curl "http://localhost:8983/solr/techproducts/select?q=%2Belectronics%20%2Bmusic"如果检索包含“electronics”但不包含“music”的 document,输入以下内容:
curl "http://localhost:8983/solr/techproducts/select?q=%2Belectronics+-music"更多的检索项,参考检索文档。
到目前为止,我们已经了解了 Solr 的索引数据以及如何进行基本的检索。如果需要删除默认集合重新开始配置,运行以下命令(如果需要继续查看文档,请跳过该步骤):
bin/solr delete -c techproducts创建一个新的集合:
bin/solr create -c <yourCollection> -s 2 -rf 2停止我们刚才启动的节点:
bin/solr stop -all更多关于 start 或 stop,以及 bin/solr 相关的集合参数, 参考 Solr 控制脚本。
重启 Solr
如果你刚刚停止了 Solr,需要重新启动 Solr:
./bin/solr start -c -p 8983 -s example/cloud/node1/solr第一个节点启动完成后,启动第二个节点,并指定 ZooKeeper:
./bin/solr start -c -p 7574 -s example/cloud/node2/solr -z localhost:9983如果你已经在 solr.in.sh/solr.in.cmd 中定义了 ZK_HOST (参考文档)可以忽略 -z <zk host string> 参数。
创建集合
以下我们将用一个全新的数据集,这需要创建一个新的集合。
什么是 schema?Solr 的 schema 是一个单独的 XML 文件,存储了字段的详细信息,包括字段类型以及索引字段时需要的必要变更等。例如,通过“abc”和“ABC”都能查询到 document,需要在 schema 中指定对应的规则,以小写方式存储。Schema 中也可以定义 Copy Field,一种特殊的字段,数据来源于其他字段。Dynamic Field 是另一种特殊的字段,可以使用通配符(例如 *_t 或 *_s)动态创建一个特定类型的字段。
假定我们要索引电影相关的数据,创建一个“films”集合(使用默认的 _default 配置集):
bin/solr create -c films -s 2 -rf 2-s 和 -rf 分别代表 shard 数量以及 replica 数量。
完成后可以通过管理控制台进行访问 http://localhost:8983/solr/#/films/collection-overview 。
我们正在使用的是“managed schema”,建议通过 API 进行编辑,而不是手工编辑的方式。“field guessing” 配置在 solrconfig.xml 文件中,由于“schemaless”可能会出现失误,不建议在生产环境中应用,除非这些字段不重要且你确信能正确处理。
通过以下命令创建 name 字段。“text_general”指的是文本字段,它允许有多个值,并会被存储(stored,即查询时会被返回)。除了 API 外,也可以通过管理控制台进行创建字段,只是它提供配置项较少:
curl -X POST -H 'Content-type:application/json' --data-binary '{"add-field": {"name":"name", "type":"text_general", "multiValued":false, "stored":true}}' http://localhost:8983/solr/films/schema以上内容并不完善,更多信息请参考官方文档,或从 Solr 资源页。了解更多内容。
本文作者:王世超
想了解更多技术知识,欢迎关注滴滴云知乎机构号,大量教程在线等你~


 1839
1839

 被折叠的 条评论
为什么被折叠?
被折叠的 条评论
为什么被折叠?
 到【灌水乐园】发言


