


 本文详细介绍Spring MVC框架的搭建步骤及应用场景,包括项目结构、依赖配置、控制器编写等内容,并探讨了请求处理、异常处理、文件上传下载等功能实现。
本篇项目框架所涉及的源码全部放在我的资源中,可自行下载
第一步:先搭建一个基于maven的web项目

2在main下添加两个目录

如果不是默认的话,右键Java会有一个source 目录

3添加依赖包
<dependency>
      <groupId>javax.servlet</groupId>
      <artifactId>javax.servlet-api</artifactId>
      <version>3.1.0</version>
      <scope>provided</scope>
    </dependency>
    <dependency>
    <groupId>org.springframework</groupId>
    <artifactId>spring-webmvc</artifactId>
      <version>5.0.8.RELEASE</version>
    </dependency>
    <dependency>
      <groupId>org.springframework</groupId>
      <artifactId>spring-context</artifactId>
      <version>5.0.8.RELEASE</version>
    </dependency>
    <dependency>
      <groupId>org.springframework</groupId>
      <artifactId>spring-context-support</artifactId>
      <version>5.0.8.RELEASE</version>
    </dependency>
    <dependency>
      <groupId>org.springframework</groupId>
      <artifactId>spring-web</artifactId>
      <version>5.0.8.RELEASE</version>
    </dependency>
    <dependency>
      <groupId>javax.servlet</groupId>
      <artifactId>jstl</artifactId>
      <version>1.2</version>
    </dependency>
4修改web.xml文件
<web-app>
  <display-name>Archetype Created Web Application</display-name>
  <servlet>
  <servlet-name>ss</servlet-name>
  <servlet-class>
    org.springframework.web.servlet.DispatcherServlet
  </servlet-class>
</servlet>
<servlet-mapping>
<servlet-name>ss</servlet-name>
<url-pattern>/</url-pattern>
</servlet-mapping>
</web-app>
5修改Spring配置文件,加入如下配置信息
<!--扫描注解包-->
    <context:component-scan base-package="com"></context:component-scan>
    <!-- 视图解析器 -->
    <bean class="org.springframework.web.servlet.view.InternalResourceViewResolver">
    <!-- jsp所在的位置-->
   <property name="prefix" value="/" ></property> <!--  用来指定结果页面的前缀和后缀-->
    <!-- jsp文件的后缀名-->
    <property name="suffix" value=".jsp"></property>
  </bean>
6配置index.jsp

7 创建一个controller类

期间的这个过程是 这样的
首先index页面里,点击test根据超链接去匹配请求,进入到web.xml文件,根据匹配地址,走DispacherServlet,在跳转的同时走Springmvc,springmvc又在扫描注解包,匹配前缀后缀信息
8新建一个success.jsp页面

9配置Tomcat,然后启动项目就会发现成功搭建了框架

点击test正常跳转

接收参数
常用的有如下三种方式


第一二种

第三种
方法的参数名和传的不一样,用这种方法解决

解决日期类型的问题时


默认是这种 “/”方式提交
提交完成后控制台显示成功

如果是yyyy-MM-DD 这种方式会报下面这种错误,用这种方案解决

首先导入一个依赖包
<dependency>
<groupId>joda-time</groupId>
<artifactId>joda-time</artifactId>
<version>2.9.9</version>
</dependency>
然后再配置文件中添加
配置文件:<mvc:annotation-driven/>
接着在主函数中这样设计格式
public String test1(@DateTimeFormat(pattern = "yyyy-MM-dd")Date birthday){}
但是注意这样设置出来的格式智能以这种方式提交,不能用原来的
后台存值方式 前台反参
首先修改web.xml文件,用来支持jsp操作EL表达式
<web-app xmlns:xsi="http://www.w3.org/2001/XMLSchema-instance"
xmlns="http://java.sun.com/xml/ns/javaee"
xsi:schemaLocation="http://java.sun.com/xml/ns/javaee
http://java.sun.com/xml/ns/javaee/web-app_2_5.xsd" version="2.5">
主要有四种方式
(1)HttpServletRequest
(2)ModelMap map ,默认作用域request
(3)ModelAndView 对象需要new,同时作为返回值类型
(4)Model类保存数据
接下来是前三种方式
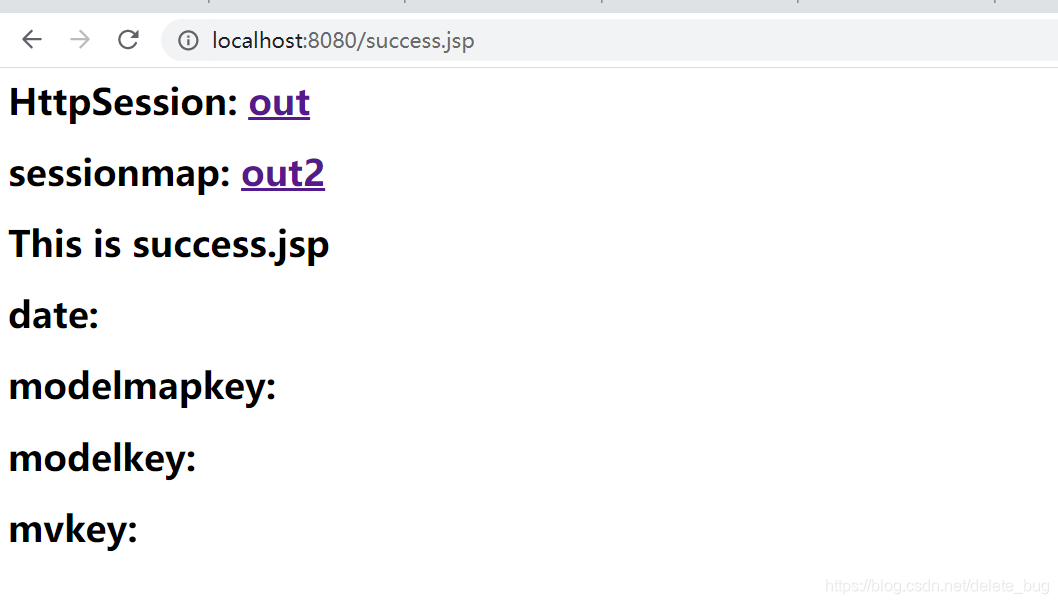
<h1>This is success.jsp</h1>
<h1>date:${birth}</h1>
<h1>modelmapkey:${modelmapkey}</h1>
<h1>modelkey:${modelkey}</h1>
<h1>mvkey:${mvkey}</h1>
 @RequestMapping(value = "/Test2")
    public String test2(Date birthdat, HttpServletRequest request, ModelMap map, Model model){
        System.out.println("test2=>date"+birthdat);
        request.setAttribute("birth",birthdat);//request 存值转发是显示,重定向时丢失
        map.addAttribute("modelmapkey",birthdat);
        model.addAttribute("modelkey",birthdat);
        return "success";
    }

第四种
 @RequestMapping(value = "/Test2")
    public ModelAndView test2(Date birthdat){
        System.out.println("test2=>date"+birthdat);
        ModelAndView modelAndView =new ModelAndView();
        modelAndView.setViewName("success");
        modelAndView.addObject("mvkey",birthdat);
        return modelAndView;
    }
session存值
(1)使用HttpSession :request.getSession();
@RequestMapping(value = "/Test")
    public String Test1(@RequestParam(name="username") String name,@RequestParam(name="age") int age, HttpSession session) {
       session.setAttribute("usession",name);
        return "success";//返回结果页面的名称 /success.jsp
    }
    @RequestMapping("/out")
    public String out(HttpSession session){
        session.invalidate();
        return  "loginout";
    }

(2)使用@sessionAttributes(“key值”)//写的是ModelMap中定义的key值
要定义一个注解的方法,这里使用注解的话out方法里的清除数据不会清除注解定义的session,只会清除Http定义的session,但是用SessionStatus 里的conplete方法可以
package com.controller;

import com.bean.User;
import org.springframework.stereotype.Controller;
import org.springframework.ui.ModelMap;
import org.springframework.web.bind.annotation.RequestMapping;
import org.springframework.web.bind.annotation.RequestParam;
import org.springframework.web.bind.annotation.SessionAttributes;
import org.springframework.web.bind.support.SessionStatus;
import org.springframework.web.servlet.ModelAndView;

import javax.servlet.http.HttpSession;
import java.util.Date;

@Controller
@SessionAttributes("sessionmap") //将sessionmap的值放到session作用域
public class myController {

    @RequestMapping(value = "/Test")
    public String Test1(@RequestParam(name="username") String name,@RequestParam(name="age") int age, HttpSession session
      ,ModelMap map) {
       session.setAttribute("usession",name);
       map.addAttribute("sessionmap",age);
        return "success";//返回结果页面的名称 /success.jsp
    }
    @RequestMapping("/out")//基于Httpsession清除数据
    public String out(HttpSession session){
        session.invalidate();
        return  "loginout";
    }
    @RequestMapping("/out2")//基于sessionAttribute注解清除
    public String out2(SessionStatus status){
        status.setComplete();
        return  "loginout";
    }
   /* @RequestMapping(value = "/Test2")
    public String test2(Date birthdat, HttpServletRequest request, ModelMap map, Model model){
        System.out.println("test2=>date"+birthdat);
        request.setAttribute("birth",birthdat);//request 存值转发是显示,重定向时丢失
        map.addAttribute("modelmapkey",birthdat);
        model.addAttribute("modelkey",birthdat);
        return "success";
    }*/
    @RequestMapping(value = "/Test2")
    public ModelAndView test2(Date birthdat){
        System.out.println("test2=>date"+birthdat);
        ModelAndView modelAndView =new ModelAndView();
        modelAndView.setViewName("success");
        modelAndView.addObject("mvkey",birthdat);
        return modelAndView;
    }

}


被清除后的success页面
响应流的使用
//弹窗方式响应结果
    @RequestMapping("/out2")//基于sessionAttribute注解清除
    public void out2(SessionStatus status, HttpServletResponse response){
        status.setComplete();//清除session
        //响应流
        response.setContentType("text/html;charset=utf-8");
        try {
            PrintWriter writer=response.getWriter();
            writer.print("<script>alert('退出成功');location.href='loginout.jsp'</script>");
        } catch (IOException e) {
            e.printStackTrace();
        }
    }
乱码处理

如果是浏览器里请求乱码,那么修改所有配置文件里的这一行改为
<%@ page contentType="text/html;charset=UTF-8" language="java" pageEncoding="utf-8" %>
转发和重定向
如何区分转发和重定向,看地址栏是不是新的地址,如果是则证明是重定向
异常处理
用三种方法来处理异常
1 方法1:在web.xml响应状态码配置一个对应页面
<error-page>
<error>404</error>
<location>/404.html</location>
</error-page>
2
@RequestMapping("/login9")
public String login9(){
String a=null;
System.out.println(a.charAt(0));
return "login9.jsp";
}
//配置异常结果界面
@ExceptionHandler(NullPointerException.class)
public String execeptionResult(){
return "exception";
}
3 配置全局处理异常


请求头,cookie值的获取


RestFul请求方式
当页面发生请求,进入web.xml文件,然后进入web.xml里找filter
<filter>
    <filter-name>hid</filter-name>
    <filter-class>
      org.springframework.web.filter.HiddenHttpMethodFilter
    </filter-class>
  </filter>
  <filter-mapping>
    <filter-name>hid</filter-name>
    <url-pattern>/*</url-pattern>
  </filter-mapping>
filter匹配完成后找对应的controller
package com.controller;

import org.springframework.stereotype.Controller;
import org.springframework.web.bind.annotation.RequestMapping;
import org.springframework.web.bind.annotation.RequestMethod;

@Controller
public class RestController {
@RequestMapping(value = "/testrest",method = RequestMethod.GET)
    public String get(){
    System.out.println("get 请求");
    return "getsuccess";
}
    @RequestMapping(value = "/testrest",method = RequestMethod.POST)
    public String post(){
        System.out.println("post 请求");
        return "getsuccess";
    }
    @RequestMapping(value = "/testrest",method = RequestMethod.PUT)
    public String put(){
        System.out.println("put 请求");
        return "getsuccess";
    }
    @RequestMapping(value = "/testrest",method = RequestMethod.DELETE)
    public String delete(){
        System.out.println("delete 请求");
        return "getsuccess";
    }
}
restful.jsp页面
<%@ taglib prefix="form" uri="http://www.springframework.org/tags/form" %>
<%--
  Created by IntelliJ IDEA.
  User: ly
  Date: 2021/3/11
  Time: 22:02
  To change this template use File | Settings | File Templates.
--%>
<%@ page contentType="text/html;charset=UTF-8" language="java" %>
<html>
<head>
    <title>Title</title>
</head>
<body>
 <form action="/testrest" method="get">
     <input type="submit" value="get"> </input>
 </form>
 <form action="/testrest" method="post">
     <input type="submit" value="post"> </input>
 </form>
 <form action="/testrest" method="post">
     <input type="hidden" name ="_method" value="put"> </input>
     <input type="submit" value="put"> </input>
 </form>
 <form action="/testrest" method="post">
     <input type="hidden" name ="_method" value="delete"> </input>
     <input type="submit" value="delete "> </input>
 </form>
</body>
</html>
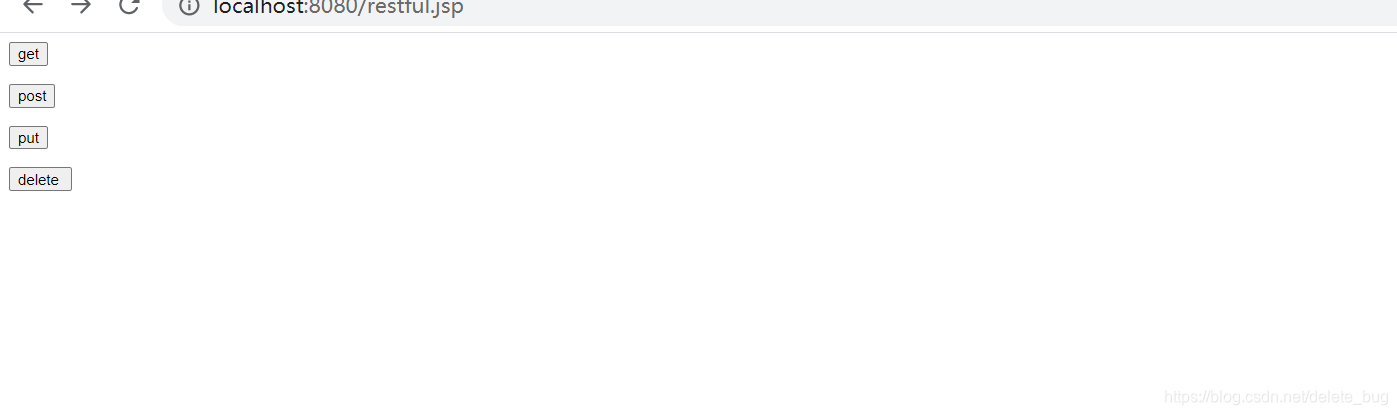
点击按钮后,后台返回对应请求的方法


restful的传值问题
package com.controller;

import org.springframework.stereotype.Controller;
import org.springframework.web.bind.annotation.PathVariable;
import org.springframework.web.bind.annotation.RequestMapping;
import org.springframework.web.bind.annotation.RequestMethod;

@Controller
public class RestController {
@RequestMapping(value = "/testrest/{myname}/{uage}",method = RequestMethod.GET)
    public String get(@PathVariable("myname") String name ,@PathVariable ("uage") int age){
    System.out.println("get 请求"+"name"+name+ age);
    return "getsuccess";
}
    @RequestMapping(value = "/testrest/{myname}/{uage}",method = RequestMethod.POST)
    public String post(@PathVariable("myname") String name ,@PathVariable ("uage") int age){
        System.out.println("post 请求"+"name"+name+ age);
        return "getsuccess";
    }
    @RequestMapping(value = "/testrest/{myname}/{uage}",method = RequestMethod.PUT)
    public String put(@PathVariable("myname") String name ,@PathVariable ("uage") int age){
        System.out.println("put 请求"+"name"+name+ age);
        return "getsuccess";
    }
    @RequestMapping(value = "/testrest/{myname}/{uage}",method = RequestMethod.DELETE)
    public String delete(@PathVariable("myname") String name ,@PathVariable ("uage") int age){
        System.out.println("delete 请求"+"name"+name+ age);
        return "getsuccess";
    }
}
<%@ taglib prefix="form" uri="http://www.springframework.org/tags/form" %>
<%--
  Created by IntelliJ IDEA.
  User: ly
  Date: 2021/3/11
  Time: 22:02
  To change this template use File | Settings | File Templates.
--%>
<%@ page contentType="text/html;charset=UTF-8" language="java" %>
<html>
<head>
    <title>Title</title>
</head>
<body>
 <form action="/testrest/张三/12" method="get">

     <input type="submit" value="get"> </input>
 </form>
 <form action="/testrest/张三/13" method="post">
     <input type="submit" value="post"> </input>
 </form>
 <form action="/testrest/张三/14" method="post">
     <input type="hidden" name ="_method" value="put"> </input>
     <input type="submit" value="put"> </input>
 </form>
 <form action="/testrest/张三/15" method="post">
     <input type="hidden" name ="_method" value="delete"> </input>
     <input type="submit" value="delete "> </input>
 </form>
</body>
</html>

注意:如果访问put和delete请求的时候,报405:method not allowed。处理方式是将过滤器的请求地址改成/,而
不是/*
静态资源访问
需要注意一种,DispatcherServlet拦截资源设置成了 / 避免了死循环,但是 / 不拦截jsp资源,但是它会拦截其他静态资
源,例如 html , js , css,image等等, 那么我们在使用jsp内部添加 静态资源就无法成功,所以,我们需要单独处理下静态
资源!
处理方案: 在springmvc的配置文件中添加mvc命名空间下的标签!
1. 修改Spring MVC对应配置文件,添加mvc命名空间和约束
<?xml version="1.0" encoding="UTF-8"?>
<beans xmlns="http://www.springframework.org/schema/beans"
xmlns:xsi="http://www.w3.org/2001/XMLSchema-instance"
xmlns:context="http://www.springframework.org/schema/context"
xmlns:mvc="http://www.springframework.org/schema/mvc"
xsi:schemaLocation="http://www.springframework.org/schema/beans
http://www.springframework.org/schema/beans/spring-beans.xsd
http://www.springframework.org/schema/context
http://www.springframework.org/schema/context/spring-context.xsd
http://www.springframework.org/schema/mvc
http://www.springframework.org/schema/mvc/spring-mvc.xsd
">
2. 添加处理标签
<mvc:annotation-driven /> <!--注解驱动-->
<mvc:resources mapping="/img/**" location="/images/" ></mvc:resources>
方式2:
<mvc:default-servlet-handler></mvc:default-servlet-handler>

访问成功
JSON数据处理
1首先在pom.xml中添加相应的包依赖
<dependency>
<groupId>com.fasterxml.jackson.core</groupId>
<artifactId>jackson-databind</artifactId>
<version>2.9.5</version>
</dependency>
(2)实现代码:@ResponseBody
注意:需要在springmvc.xml配置文件添加 mvc:annotation-driven/
新建一个类,项目启动的时候访问getuser地址,
package com.controller;

import com.bean.User;
import org.springframework.stereotype.Controller;
import org.springframework.web.bind.annotation.RequestMapping;
import org.springframework.web.bind.annotation.ResponseBody;

@Controller
public class JSONController {
    @RequestMapping("/getuser")
    public @ResponseBody User getuser(){ //ResponseBody 标记当前返回对象类型为json格式,不仅可以返回对象,还能返回集合
        User user=new User();
        user.setUsername("xiaoming");
        user.setAge(20);
        user.getAge();
        user.getUsername();
        System.out.println("打印成功");
        return user;
    }
}
如果出现如下错误,是因为项目中lib下的json包重复了,删掉不一样的版本就行,

如果出现如下错误,则说明是依赖包出现了问题,查明了网上说的没有添加setget方法,我试过了不行,然后找了添加这个依赖包解决了问题

          <dependency>
            <groupId>com.fasterxml.jackson.core</groupId>
            <artifactId>jackson-core</artifactId>
            <version>2.9.6</version>
         </dependency>
         <dependency>
            <groupId>com.fasterxml.jackson.core</groupId>
            <artifactId>jackson-annotations</artifactId>
            <version>2.9.6</version>
        </dependency>
        <dependency>
            <groupId>com.fasterxml.jackson.core</groupId>
            <artifactId>jackson-databind</artifactId>
            <version>2.9.6</version>
        </dependency>

JSONController代码
package com.controller;

import com.bean.User;
import org.springframework.context.annotation.Bean;
import org.springframework.stereotype.Controller;
import org.springframework.web.bind.annotation.RequestMapping;
import org.springframework.web.bind.annotation.ResponseBody;

@Controller
public class JSONController {
    @RequestMapping("/getuser")
    public @ResponseBody User getuser(){ //ResponseBody 标记当前返回对象类型为json格式,不仅可以返回对象,还能返回集合
        return new User("小米",18);
    }
}
SpringMVC拦截器
(1)创建拦截器类:实现HandlerInterceptor接口
preHandle() 拦截器开始
postHandle() 拦截器结束
afterCompletion 最后执行
(2)配置拦截器
拦截所有请求
<mvc:interceptors>
<bean id="my" class="util.MyInterceptor"/>
</mvc:interceptors
拦截指定请求
<mvc:interceptors>
<mvc:interceptor >
<mvc:mapping path="/请求名" />
<mvc:mapping path="/请求名" />
<bean id="my" class="util.MyInterceptor"/>
</mvc:interceptor>
</mvc:interceptors>
springMVC拦截器使用场景
1、日志记录 :记录请求信息的日志
2、权限检查,如登录检查
3、性能检测:检测方法的执行时间
SpringMVC的拦截器(Interceptor)和过滤器(Filter)的区别与联系
一 简介
com.fasterxml.jackson.core
jackson-databind
2.9.5
mvc:interceptors
</mvc:interceptors
mvc:interceptors
<mvc:interceptor >
<mvc:mapping path="/请求名" />
<mvc:mapping path="/请求名" />
</mvc:interceptor>
</mvc:interceptors>
(1)过滤器:
依赖于servlet容器。在实现上基于函数回调,可以对几乎所有请求进行过滤,但是缺点是一个过滤器实例只能在容
器初始化时调用一次。使用过滤器的目的是用来做一些过滤操作,获取我们想要获取的数据,比如:在过滤器中修
改字符编码;在过滤器中修改HttpServletRequest的一些参数,包括:过滤低俗文字、危险字符等
(2)拦截器:
依赖于web框架,在SpringMVC中就是依赖于SpringMVC框架。在实现上基于Java的反射机制,属于面向切面编程
(AOP)的一种运用。由于拦截器是基于web框架的调用,因此可以使用Spring的依赖注入(DI)进行一些业务操
作,同时一个拦截器实例在一个controller生命周期之内可以多次调用。但是缺点是只能对controller请求进行拦
截,对其他的一些比如直接访问静态资源的请求则没办法进行拦截处理
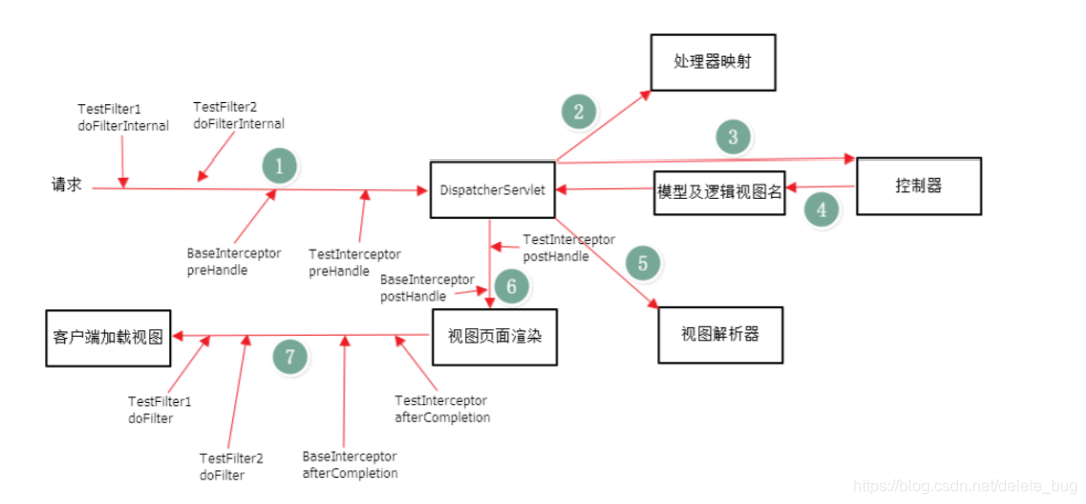
二 多个过滤器与拦截器的代码执行顺序
(1)过滤器的运行是依赖于servlet容器的,跟springmvc等框架并没有关系。并且,多个过滤器的执行顺序跟xml文
件中定义的先后关系有关
(2)对于多个拦截器它们之间的执行顺序跟在SpringMVC的配置文件中定义的先后顺序有关
拦截器和过滤器的应用场景
文件上传
1添加对应的依赖包
<dependency>
<groupId>commons-fileupload</groupId>
<artifactId>commons-fileupload</artifactId>
<version>1.3.1</version>
</dependency>
<dependency>
<groupId>commons-io</groupId>
<artifactId>commons-io</artifactId>
<version>2.4</version>
</dependency>
2修改配置文件
<!--文件上传对象-->
    <bean id="multipartResolver"
          class="org.springframework.web.multipart.commons.CommonsMultipartResolver">
        <property name="maxUploadSize" value="10000000"> </property>
        <property name="defaultEncoding" value="UTF-8"> </property>
    </bean>
```这里的配置文件的参数大小一定设置的大一些,要不然就会
报错```
3)页面表单,提交方式必须是post
enctype=“multipart/form-data”,因为get请求有最大长度限制
upload.jsp
<%--
  Created by IntelliJ IDEA.
  User: ly
  Date: 2021/3/12
  Time: 9:39
  To change this template use File | Settings | File Templates.
--%>
<%@ page contentType="text/html;charset=UTF-8" language="java" %>
<html>
<head>
    <title>Title</title>
</head>
<body>
<h1>上传</h1>
<form action="/upload" method="post" enctype="multipart/form-data">
    文件:<input type="file" name="myfile">
    <input type="submit" value="上传">
</form>
</body>
</html>
uploadController
package com.controller;

import org.springframework.stereotype.Controller;
import org.springframework.web.bind.annotation.RequestMapping;
import org.springframework.web.multipart.MultipartFile;

import javax.servlet.http.HttpServletRequest;
import java.io.File;
import java.io.IOException;

@Controller
public class UploadController {
@RequestMapping("/upload")
    public String upload(MultipartFile myfile ,HttpServletRequest request){
    //处理上传的文件内容
    //1将上传的文件夹转换成服务器路径
    String realPath=request.getRealPath("/uploadimg");
    System.out.println("realPath="+realPath);
    //2得到上传的文件名
    String filename=myfile.getOriginalFilename();
    //3上传
    try {
        myfile.transferTo((new File(realPath+"/"+filename)));//刚刚路径转换完没有/ ,所以在这里补上
    } catch (IOException e) {
        e.printStackTrace();
    }

    request.setAttribute("filename",filename);
    return  "uploadsuccess";
}
}
uploadsuccess.jsp
<%--
  Created by IntelliJ IDEA.
  User: ly
  Date: 2021/3/12
  Time: 9:55
  To change this template use File | Settings | File Templates.
--%>
<%@ page contentType="text/html;charset=UTF-8" language="java" %>
<html>
<head>
    <title>Title</title>
</head>
<body>
<h1>上传数据展示</h1>
<img src="uploadimg/${filename}">
</body>
</html>

注意,在web下新建的uplandimg文件夹里先存一个文件(a.txt随意),不然maven不会编译,导致报错,
最终访问成功


文件下载
(1)添加jar包,因为前边已经添加过,所以可以不重复添加了
<dependency>
<groupId>commons-io</groupId>
<artifactId>commons-io</artifactId>
<version>2.4</version>
</dependency>
updatesuccess.jsp 页面
<%--
  Created by IntelliJ IDEA.
  User: ly
  Date: 2021/3/12
  Time: 9:55
  To change this template use File | Settings | File Templates.
--%>
<%@ page contentType="text/html;charset=UTF-8" language="java" %>
<html>
<head>
    <title>Title</title>
</head>
<body>
<h1>上传数据展示</h1>
<img src="uploadimg/${filename}">
<a href="/download?filename=${filename}">下载</a><br>
</body>
</html>
新建一个downloadController类
package com.controller;

import org.apache.commons.io.FileUtils;
import org.springframework.http.HttpHeaders;
import org.springframework.http.HttpStatus;
import org.springframework.http.MediaType;
import org.springframework.http.ResponseEntity;
import org.springframework.stereotype.Controller;
import org.springframework.web.bind.annotation.PathVariable;
import org.springframework.web.bind.annotation.RequestMapping;

import javax.servlet.http.HttpServletRequest;
import java.io.File;
import java.io.IOException;
import java.io.UnsupportedEncodingException;
import java.net.URLEncoder;

@Controller
public class DownloadController {
@RequestMapping("/download")
    public ResponseEntity<byte[]>down(String filename, HttpServletRequest request) throws UnsupportedEncodingException, IOException {
    //1转换服务器地址
    String realPath =request.getRealPath("/uploadimg");
    //2 得到要下载的文件路径
    String filePath =realPath+"/"+filename;
    //3设置响应的头信息
    HttpHeaders httpHeaders=new HttpHeaders();
    httpHeaders.setContentType(MediaType.APPLICATION_OCTET_STREAM);
    //给用户弹窗的方式进行下载
    //attachment 用来表示以附件的形式响应给客户端
    httpHeaders.setContentDispositionFormData("attachment", URLEncoder.encode(filename,"UTF-8"));
    //4 创建文件
    File file =new File(filePath);
    //5将文件进行返回
    ResponseEntity<byte []> responseEntity =new ResponseEntity<byte[]>(FileUtils.readFileToByteArray(file),httpHeaders, HttpStatus.CREATED);
    return responseEntity;
}
}


下载成功


 138
138

 被折叠的 条评论
为什么被折叠?
被折叠的 条评论
为什么被折叠?
 到【灌水乐园】发言


