


目录
一、maxscale概述
MaxScale核心介绍
MaxScale是由MariaDB公司开发的一款高性能、模块化数据库代理和负载均衡工具,专门为MySQL/MariaDB数据库设计。它作为数据库集群的中间层,提供智能路由、负载均衡和故障转移功能。
主要功能特性
-
高级负载均衡:
-
支持读写分离
-
基于连接数/查询数的负载分配
-
自定义路由规则
-
-
高可用性保障:
-
自动故障检测和切换
-
支持主从复制和Galera集群
-
零停机维护能力
-
-
安全增强:
-
连接加密(TLS/SSL)
-
数据库防火墙
-
审计日志记录
-
-
性能优化:
-
查询缓存
-
连接池管理
-
结果集压缩
-
MaxScale是maridb开发的一个mysql数据中间件,其配置简单,能够实现读写分离,并且可以根据主从状态实现写库的自动切换。(MyCat) 官网:https://mariadb.com/kb/en/mariadb-enterprise/mariadb-maxscale-20/
下载地址:https://dlm.mariadb.com/3927179/MaxScale/24.02.3/rhel/9/x86_64/maxscale-24.02.3-1.rhel.9.x86_64.rpm
https://dlm.mariadb.com/3993858/MaxScale/24.02.4/rhel/8/x86_64/maxscale-24.02.4-1.rhel.8.x86_64.rpm
二、读写分离
1、环境说明
| 数据库角色 | IP | 应用与系统版本 |
|---|---|---|
| master | 192.168.166.25 | rocky linux9.4 mysql-8.0.36 |
| slave | 192.168.166.26 | rocky linux9.4 mysql-8.0.36 |
| slave2 | 192.168.166.27 | rocky linux9.4 mysql-8.0.36 |
| maxscale | 192.168.166.9 | rocky linux9.4 maxscale24.02.3-GA |
2、mysql主从复制配置
分别在主从三台服务器上安装mysql8,并配置主从复制。
##由于认证插件问题,需要在master服务器使用下述命令进行更改密码的验证插件。 ALTER USER'slave'@'%' IDENTIFIED WITH mysql_native_password BY 'password'; FLUSH PRIVILEGES; ###修改认证插件 ##my.cnf default-authentication-plugin=mysql_native_password
3、maxscale安装
#下载yum源 [root@maxscale ~]# curl -LsS https://r.mariadb.com/downloads/mariadb_repo_setup | sudo bash # [info] Checking for script prerequisites. # [info] MariaDB Server version 11.2 is valid # [info] Repository file successfully written to /etc/yum.repos.d/mariadb.repo # [info] Adding trusted package signing keys... /etc/pki/rpm-gpg ~ ~ # [info] Successfully added trusted package signing keys # [info] Cleaning package cache... 25 files removed [root@maxscale ~]# ls /etc/yum.repos.d/ mariadb.repo rocky-addons.repo rocky-devel.repo rocky-extras.repo rocky.repo #安装maxscale [root@maxscale ~]# yum -y install maxscale
4、配置maxscale
登录到主库
[root@master ~]# mysql -uroot mysql: [Warning] Using a password on the command line interface can be insecure. Welcome to the MySQL monitor. Commands end with ; or \g. Your MySQL connection id is 14 Server version: 8.0.36 MySQL Community Server - GPL Copyright (c) 2000, 2023, Oracle and/or its affiliates. Oracle is a registered trademark of Oracle Corporation and/or its affiliates. Other names may be trademarks of their respective owners. Type 'help;' or '\h' for help. Type '\c' to clear the current input statement. #创建maxscale用户密码是maxscale mysql> CREATE USER 'maxscale'@'%' IDENTIFIED BY 'maxscale'; Query OK, 0 rows affected (0.00 sec) #授权maxscale可以查询所有数据库 mysql> GRANT SELECT ON mysql.* TO 'maxscale'@'%'; Query OK, 0 rows affected (0.01 sec) #授权可以看所有数据库 mysql> GRANT SHOW DATABASES ON *.* TO 'maxscale'@'%'; Query OK, 0 rows affected (0.00 sec) #创建admin用户可以在maxscale上登录 mysql> CREATE USER 'admin'@'192.168.166.%' IDENTIFIED BY 'admin'; Query OK, 0 rows affected (0.01 sec)
在maxscale上安装mysql
[root@maxscale ~]# yum -y install mysql [root@maxscale ~]# which mysql /usr/bin/mysql #登录到master [root@maxscale ~]# mysql -uadmin -padmin -h192.168.166.25 mysql: [Warning] Using a password on the command line interface can be insecure. Welcome to the MySQL monitor. Commands end with ; or \g. Your MySQL connection id is 15 Server version: 8.0.36 MySQL Community Server - GPL Copyright (c) 2000, 2023, Oracle and/or its affiliates. Oracle is a registered trademark of Oracle Corporation and/or its affiliates. Other names may be trademarks of their respective owners. Type 'help;' or '\h' for help. Type '\c' to clear the current input statement. ####因为没有权限所以只能看到两个数据库 mysql> show databases; +--------------------+ | Database | +--------------------+ | information_schema | | performance_schema | +--------------------+ 2 rows in set (0.00 sec) mysql> exit Bye
回到master主库设置增删改查权限
mysql> GRANT CREATE, SELECT, INSERT, UPDATE, DELETE ON *.* TO 'admin'@'192.168.166.%';
Query OK, 0 rows affected (0.00 sec)
在maxscale上修改配置文件
[root@maxscale ~]# vim /etc/maxscale.cnf #先看有无这个 [maxscale] threads=auto #修改后端服务器地址 [server1] type=server address=192.168.166.25 port=3306 protocol=MySQLBackend [server2] type=server address=192.168.166.26 port=3306 protocol=MySQLBackend [server3] type=server address=192.168.166.27 port=3306 protocol=MySQLBackend #配置监控 [MySQL-Monitor] type=monitor module=mariadbmon servers=server1,server2,server3 user=monitor password=monitor monitor_interval=2s #注释掉只读配置 #[Read-Only-Service] #type=service #router=readconnroute #servers=server2 #user=maxscale #password=maxscale #router_options=slave #修改读写分离服务 [Read-Write-Service] type=service router=readwritesplit servers=server1,server2,server3 user=maxscale password=maxscale version_string = 8.0 #配置listener #注释掉只读 #[Read-Only-Listener] #type=listener #service=Read-Only-Service #protocol=mariadbprotocol #port=4008 #修改读写分离 [Read-Write-Listener] type=listener service=Read-Write-Service protocol=mariadbprotocol port=3306 #(伪装成数据库端口3306)
切换到主库创建monitor用户
mysql> CREATE USER 'monitor'@'%' IDENTIFIED BY 'monitor'; Query OK, 0 rows affected (0.01 sec) #再添加授权 mysql> GRANT REPLICATION CLIENT on *.* to 'monitor'@'%'; Query OK, 0 rows affected (0.00 sec) mysql> GRANT REPLICATION SLAVE on *.* to 'monitor'@'%'; Query OK, 0 rows affected (0.01 sec) mysql> GRANT SUPER,RELOAD on *.* to 'monitor'@'%'; Query OK, 0 rows affected, 1 warning (0.01 sec)
启动服务
[root@maxscale ~]# systemctl start maxscale
查看端口
[root@maxscale ~]# ss -antl
State     Recv-Q    Send-Q       Local Address:Port       Peer Address:Port   Process
LISTEN    0         4096             127.0.0.1:8989            0.0.0.0:*
LISTEN    0         128                0.0.0.0:22              0.0.0.0:*
LISTEN    0         4096                     *:3306                  *:*
LISTEN    0         128                   [::]:22                 [::]:*
[root@maxscale ~]# ss -antlp
State      Recv-Q     Send-Q          Local Address:Port           Peer Address:Port     Process
LISTEN     0          4096                127.0.0.1:8989                0.0.0.0:*         users:(("maxscale",pid=15450,fd=19))
LISTEN     0          128                   0.0.0.0:22                  0.0.0.0:*         users:(("sshd",pid=792,fd=3))
LISTEN     0          4096                        *:3306                      *:*         users:(("maxscale",pid=15450,fd=27))
LISTEN     0          128                      [::]:22                     [::]:*         users:(("sshd",pid=792,fd=4))
查看有哪些服务
[root@maxscale ~]# maxctrl list services
┌────────────────────┬────────────────┬─────────────┬───────────────────┬───────────────────────────┐
│ Service            │ Router         │ Connections │ Total Connections │ Targets                   │
├────────────────────┼────────────────┼─────────────┼───────────────────┼───────────────────────────┤
│ Read-Write-Service │ readwritesplit │ 0           │ 0                 │ server1, server2, server3 │
└────────────────────┴────────────────┴─────────────┴───────────────────┴───────────────────────────┘
查看后台服务器有哪些
[root@maxscale ~]# maxctrl list servers
┌─────────┬─────────────────┬──────┬─────────────┬─────────────────┬──────┬───────────────┐
│ Server  │ Address         │ Port │ Connections │ State           │ GTID │ Monitor       │
├─────────┼─────────────────┼──────┼─────────────┼─────────────────┼──────┼───────────────┤
│ server1 │ 192.168.166.25 │ 3306 │ 0           │ Master, Running │      │ MySQL-Monitor │
├─────────┼─────────────────┼──────┼─────────────┼─────────────────┼──────┼───────────────┤
│ server2 │ 192.168.166.27 │ 3306 │ 0           │ Slave, Running  │      │ MySQL-Monitor │
├─────────┼─────────────────┼──────┼─────────────┼─────────────────┼──────┼───────────────┤
│ server3 │ 192.168.166.26 │ 3306 │ 0           │ Slave, Running  │      │ MySQL-Monitor │
└─────────┴─────────────────┴──────┴─────────────┴─────────────────┴──────┴───────────────┘
测试
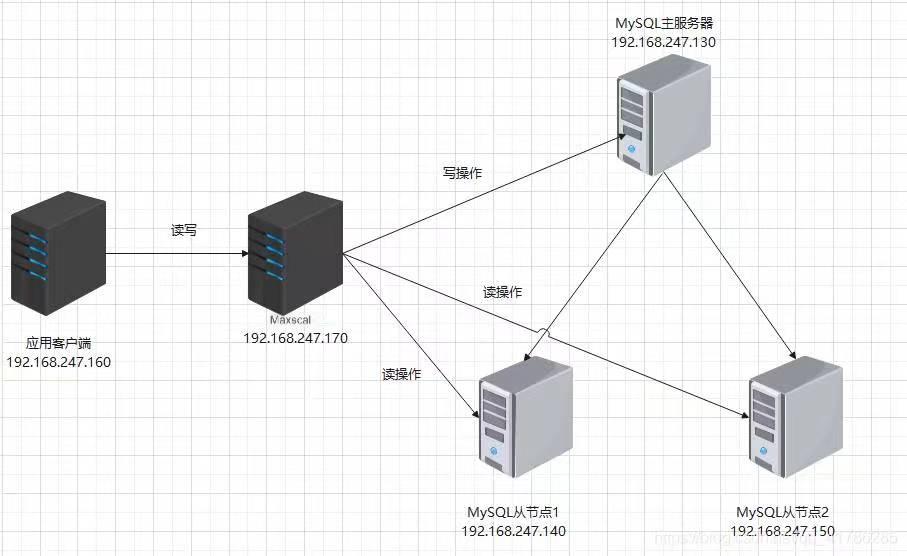
用客户机连接maxscale
username:admin
password:admin
会发现进行读操作时,是在slave的从数据库上执行;在进行写操作时,是在master主数据库上执行
实战案例
1、配置mysql数据库主从复制
两台设备(ip分别为192.168.58.160和192.168.58.161)都安装mysql服务
[root@mysql-slave ~]# yum install -y mysql-server
[root@mysql-slave ~]# systemctl start mysqld
主服务配置
对时
#192.168.58.160 [root@localhost ~]# timedatectl set-timezone Asia/Shanghai [root@mysql ~]# vim /etc/chrony.conf # Use public servers from the pool.ntp.org project. # Please consider joining the pool (http://www.pool.ntp.org/join.html). pool 2.rocky.pool.ntp.org iburst # Record the rate at which the system clock gains/losses time. driftfile /var/lib/chrony/drift
##添加修改此字段 # Use public servers from the pool.ntp.org project. # Please consider joining the pool (http://www.pool.ntp.org/join.html). #pool 2.rocky.pool.ntp.org iburst server ntp.aliyun.com iburst # Record the rate at which the system clock gains/losses time. driftfile /var/lib/chrony/drift [root@mysql ~]# systemctl restart chronyd.service [root@mysql ~]# hostnamectl set-hostname mysql-master [root@mysql ~]# bash
[root@mysql-master ~]# mysql Welcome to the MySQL monitor. Commands end with ; or \g. Your MySQL connection id is 76 Server version: 8.0.41 Source distribution Copyright (c) 2000, 2025, Oracle and/or its affiliates. Oracle is a registered trademark of Oracle Corporation and/or its affiliates. Other names may be trademarks of their respective owners. Type 'help;' or '\h' for help. Type '\c' to clear the current input statement. mysql> create user slave@'192.168.58.%' identified by '123.com'; #创建从主机可以进行访问的用户slave Query OK, 0 rows affected (0.02 sec) mysql> grant all on *.* to slave@'192.168.58.%'; #给slave用户赋权 Query OK, 0 rows affected (0.02 sec) mysql> exit Bye [root@mysql-master ~]# vim /etc/my.cnf.d/mysql-server.cnf [mysqld] datadir=/var/lib/mysql socket=/var/lib/mysql/mysql.sock log-error=/var/log/mysql/mysqld.log pid-file=/run/mysqld/mysqld.pid
#添加命令,启用二进制日志记录功能
[mysqld]
datadir=/var/lib/mysql
socket=/var/lib/mysql/mysql.sock
log-error=/var/log/mysql/mysqld.log
pid-file=/run/mysqld/mysqld.pid
log-bin=mysql-bin
binlog_format="statement"
[root@mysql-master ~]# systemctl restart mysqld #关闭防火墙和SELinux [root@mysql-master ~]# systemctl stop firewalld [root@mysql-master ~]# setenforce 0 [root@mysql-master ~]# cd /var/lib/mysql #验证配置 [root@mysql-master mysql]# ls auto.cnf db1 mysql-bin.000001 private_key.pem binlog.000001 '#ib_16384_0.dblwr' mysql-bin.index public_key.pem binlog.000002 '#ib_16384_1.dblwr' mysql.ibd server-cert.pem binlog.000003 ib_buffer_pool mysql.sock server-key.pem binlog.index ibdata1 mysql.sock.lock sys ca-key.pem ibtmp1 mysql_upgrade_info test ca.pem '#innodb_redo' mysqlx.sock test2 client-cert.pem '#innodb_temp' mysqlx.sock.lock undo_001 client-key.pem mysql performance_schema undo_002 [root@mysql-master mysql]# mysql Welcome to the MySQL monitor. Commands end with ; or \g. Your MySQL connection id is 9 Server version: 8.0.41 Source distribution Copyright (c) 2000, 2025, Oracle and/or its affiliates. Oracle is a registered trademark of Oracle Corporation and/or its affiliates. Other names may be trademarks of their respective owners. Type 'help;' or '\h' for help. Type '\c' to clear the current input statement. #查看master正在使用的日志文件及日志书写位置 mysql> show master status; +------------------+----------+--------------+------------------+-------------------+ | File | Position | Binlog_Do_DB | Binlog_Ignore_DB | Executed_Gtid_Set | +------------------+----------+--------------+------------------+-------------------+ | mysql-bin.000001 | 157 | | | | +------------------+----------+--------------+------------------+-------------------+ 1 row in set (0.00 sec) #注意:查看位置完毕后,不要对master做任何操作,等配置完从服务再进行其余操作
从服务器配置
对时
#192.168.58.161 [root@localhost ~]# timedatectl set-timezone Asia/Shanghai [root@mysql ~]# vim /etc/chrony.conf # Use public servers from the pool.ntp.org project. # Please consider joining the pool (http://www.pool.ntp.org/join.html). pool 2.rocky.pool.ntp.org iburst # Record the rate at which the system clock gains/losses time. driftfile /var/lib/chrony/drift
##添加修改此字段 # Use public servers from the pool.ntp.org project. # Please consider joining the pool (http://www.pool.ntp.org/join.html). #pool 2.rocky.pool.ntp.org iburst server ntp.aliyun.com iburst # Record the rate at which the system clock gains/losses time. driftfile /var/lib/chrony/drift [root@mysql ~]# systemctl restart chronyd.service [root@localhost ~]# hostnamectl set-hostname mysql-slave [root@localhost ~]# bash [root@mysql-slave ~]# vim /etc/my.cnf.d/mysql-server.cnf [mysqld] datadir=/var/lib/mysql socket=/var/lib/mysql/mysql.sock log-error=/var/log/mysql/mysqld.log pid-file=/run/mysqld/mysqld.pid
#添加命令,启用二进制日志中继日志 [mysqld] datadir=/var/lib/mysql socket=/var/lib/mysql/mysql.sock log-error=/var/log/mysql/mysqld.log pid-file=/run/mysqld/mysqld.pid binlog_format="statement" relay-log-index=slave-bin.index server-id=22 [root@mysql-slave ~]# systemctl restart mysqld #关闭防火墙和SELinux [root@mysql-slave ~]# systemctl stop firewalld [root@mysql-slave ~]# setenforce 0 [root@mysql-slave ~]# cd /var/lib/mysql #配置验证,此时没有与主服务器进行连接,所以没有产生对应的relay log [root@mysql-slave mysql]# ls auto.cnf '#ib_16384_0.dblwr' mysql.ibd public_key.pem binlog.000001 '#ib_16384_1.dblwr' mysql.sock server-cert.pem binlog.000002 ib_buffer_pool mysql.sock.lock server-key.pem binlog.index ibdata1 mysql_upgrade_info sys ca-key.pem ibtmp1 mysqlx.sock undo_001 ca.pem '#innodb_redo' mysqlx.sock.lock undo_002 client-cert.pem '#innodb_temp' performance_schema client-key.pem mysql private_key.pem [root@mysql-slave mysql]# mysql Welcome to the MySQL monitor. Commands end with ; or \g. Your MySQL connection id is 8 Server version: 8.0.41 Source distribution Copyright (c) 2000, 2025, Oracle and/or its affiliates. Oracle is a registered trademark of Oracle Corporation and/or its affiliates. Other names may be trademarks of their respective owners. Type 'help;' or '\h' for help. Type '\c' to clear the current input statement. ##配置从服务器的所属主服务器 mysql> change master to master_host='192.168.58.160',master_user='slave',master_password='123.com',master_log_file='mysql-bin.000001',master_log_pos=157; Query OK, 0 rows affected, 8 warnings (0.02 sec) ##启动slave角色,默认没有配置主从时,所有的mysql节点都是master mysql> start slave; Query OK, 0 rows affected, 2 warnings (0.01 sec) mysql> show databases; +--------------------+ | Database | +--------------------+ | information_schema | | mysql | | performance_schema | | sys | +--------------------+ 4 rows in set (0.01 sec)
验证结果
#192.168.58.160 #创建新库c2505 mysql> create database c2505; Query OK, 1 row affected (0.00 sec) mysql> show databases; +--------------------+ | Database | +--------------------+ | c2505 | | information_schema | | mysql | | performance_schema | | sys | +--------------------+ 8 rows in set (0.01 sec)
#192.168.58.161
#验证,查看到这里也创建了一个新库c2505
mysql> show databases;
+--------------------+
| Database           |
+--------------------+
| c2505              |
| information_schema |
| mysql              |
| performance_schema |
| sys                |
+--------------------+
5 rows in set (0.00 sec)
2、配置maxscale
#192.168.58.170
[root@bogon ~]# hostnamectl set-hostname maxscale
[root@bogon ~]# bash
#安装maxscale
[root@maxscale ~]# yum -y install maxscale
[root@maxscale ~]# yum -y install mariadb
修改主从服务器数据库配置文件
#192.168.58.160
#登录到主库
root@mysql-master mysql]# vim /etc/my.cnf.d/mysql-server.cnf
[mysqld]
datadir=/var/lib/mysql
socket=/var/lib/mysql/mysql.sock
log-error=/var/log/mysql/mysqld.log
pid-file=/run/mysqld/mysqld.pid
log-bin=mysql-bin
binlog_format="statement"
[mysqld] datadir=/var/lib/mysql socket=/var/lib/mysql/mysql.sock log-error=/var/log/mysql/mysqld.log pid-file=/run/mysqld/mysqld.pid log-bin=mysql-bin binlog_format="statement" server-id=11 #添加此id,注意此id不能与其他服务器id相同 default-authentication-plugin=mysql_native_password #修改认证插件 [root@mysql-master mysql]# systemctl restart mysqld [root@mysql-master mysql]# mysql Welcome to the MySQL monitor. Commands end with ; or \g. Your MySQL connection id is 10 Server version: 8.0.41 Source distribution Copyright (c) 2000, 2025, Oracle and/or its affiliates. Oracle is a registered trademark of Oracle Corporation and/or its affiliates. Other names may be trademarks of their respective owners. Type 'help;' or '\h' for help. Type '\c' to clear the current input statement. #创建maxscale用户密码是maxscale mysql> create user maxscale@'%' identified by 'maxscale'; Query OK, 0 rows affected (0.02 sec) #授权maxscale用户 mysql> grant all on *.* to maxscale@'%'; Query OK, 0 rows affected (0.01 sec) #创建admin用户可以在maxscale上登录 mysql> create user 'admin'@'192.168.58.%' identified by 'admin'; Query OK, 0 rows affected (0.01 sec) mysql> grant create,select,insert,update,delete on *.* to 'admin'@'192.168.58.%'; Query OK, 0 rows affected (0.00 sec) 创建monitor用户 mysql> create user 'monitor'@'%' identified by 'monitor'; Query OK, 0 rows affected (0.01 sec) mysql> grant replication client on *.* to 'monitor'@'%'; Query OK, 0 rows affected (0.00 sec) mysql> grant replication slave on *.* to 'monitor'@'%'; Query OK, 0 rows affected (0.01 sec) mysql> grant super,reload on *.* to 'monitor'@'%'; Query OK, 0 rows affected, 1 warning (0.00 sec)
#192.168.58.161
[root@mysql-slave mysql]# vim /etc/my.cnf.d/mysql-server.cnf
mysqld]
datadir=/var/lib/mysql
socket=/var/lib/mysql/mysql.sock
log-error=/var/log/mysql/mysqld.log
pid-file=/run/mysqld/mysqld.pid
binlog_format="statement"
relay-log-index=slave-bin.index
[mysqld] datadir=/var/lib/mysql socket=/var/lib/mysql/mysql.sock log-error=/var/log/mysql/mysqld.log pid-file=/run/mysqld/mysqld.pid binlog_format="statement" relay-log-index=slave-bin.index server-id=22 #添加此id,注意此id不能与其他服务器id相同 default-authentication-plugin=mysql_native_password #修改认证插件 [root@mysql-slave mysql]# systemctl restart mysqld
更改maxscale的配置文件
#192.168.58.170 [root@maxscale ~]# mysql -uadmin -padmin -h192.168.58.160 Welcome to the MariaDB monitor. Commands end with ; or \g. Your MySQL connection id is 12 Server version: 8.0.41 Source distribution Copyright (c) 2000, 2018, Oracle, MariaDB Corporation Ab and others. Type 'help;' or '\h' for help. Type '\c' to clear the current input statement. MySQL [(none)]> show databases; +--------------------+ | Database | +--------------------+ | c2505 | | db1 | | information_schema | | mysql | | performance_schema | | sys | | test | | test2 | +--------------------+ 8 rows in set (0.009 sec) MySQL [(none)]> exit Bye [root@maxscale ~]# vim /etc/maxscale.cnf
[maxscale] threads=auto [server1] type=server address=192.168.58.160 port=3306 protocol=MySQLBackend [server2] type=server address=192.168.58.161 port=3306 protocol=MySQLBackend [MySQL-Monitor] type=monitor module=mariadbmon servers=server1,server2 user=monitor password=monitor monitor_interval=2s #注释掉只读配置 #[Read-Only-Service] #type=service #router=readconnroute #servers=server2 #user=maxscale #password=maxscale #router_options=slave #修改读写分离服务 [Read-Write-Service] type=service router=readwritesplit servers=server1,server2 user=maxscale password=maxscale version_string = 8.0 #配置listener #注释掉只读 #[Read-Only-Listener] #type=listener #service=Read-Only-Service #protocol=mariadbprotocol #port=4008 #修改读写分离 [Read-Write-Listener] type=listener service=Read-Write-Service protocol=mariadbprotocol port=3306 [root@maxscale ~]# setenforce 0 [root@maxscale ~]# systemctl stop firewalld
启动服务
#192.168.58.170
[root@maxscale ~]# systemctl start maxscale
验证结果


 1088
1088

 被折叠的 条评论
为什么被折叠?
被折叠的 条评论
为什么被折叠?
 到【灌水乐园】发言


