


 本文详细剖析了Gradle的配置阶段,包括项目初始化、buildSrc构建、buildFile的编译与加载。重点讨论了NotifyingBuildLoader、ProjectPropertySettingBuildLoader和InstantiatingBuildLoader在项目创建过程中的作用,以及如何应用和编译构建脚本,特别是对gradle.properties的处理。此外,提到了configure阶段的流程,如加载默认工程和插件配置。
gradle-configure篇
gradle-3-(configure篇)
1. 入口
DefaultGradleLauncher.java
private void doClassicBuildStages(Stage upTo) {
        if (stage == null) {
            configurationCache.prepareForConfiguration();
        }
        prepareSettings();
        if (upTo == Stage.LoadSettings) {
            return;
        }
        prepareProjects();
        if (upTo == Stage.Configure) {
            return;
        }
        prepareTaskExecution();
        if (upTo == Stage.TaskGraph) {
            return;
        }
        configurationCache.save();
        runWork();
    }

// 配置操作
private void prepareProjects() {
        if (stage == Stage.LoadSettings) {
            projectsPreparer.prepareProjects(gradle);
            stage = Stage.Configure;
        }
    }
上述方法prepareProjects就是我们传说中的gradle配置阶段
Configure阶段到底做了什么呢?我看先来看下调用链路
2. 调用链路
上面的projectsPreparer对象其实是来自BuildScropServices类中的createBuildConfigurer方法返回值,也就是BuildOperationFiringProjectsPreparer
BuildScropServices.java

从上图可以看出,其实是个链式调用(反射调的,不明白可以看篇一),整体结构还是比较清晰的;
因为configure篇东西有点多,先总结下主要流程,后面在详细展开
3. 总结
configure阶段其实大体可以分为三个部分
- project的初始化
- 创建工程中的各个project对象(反射及递归实现,后面会说)
- 给各工程做些配置(eg,加载gradle.properties属性给每个工程)
- buildSrc工程的编译及构建
- project的构建脚本(通常是build.gradle)的编译与加载
BuildOperationFiringProjectsPreparer其实没做啥事情主要就是代理转发任务,只要看BuildTreePreparingProjectsPreparer即可,它其实就本篇的主要流程,可以看到就是我们上面总结的三大流程
// BuildTreePreparingProjectsPreparer.java
@Override
public void prepareProjects(GradleInternal gradle) {
  // Setup classloader for root project, all other projects will be derived from this.
  SettingsInternal settings = gradle.getSettings();

  ClassLoaderScope settingsClassLoaderScope = settings.getClassLoaderScope();
  ClassLoaderScope buildSrcClassLoaderScope = settingsClassLoaderScope.createChild("buildSrc[" + gradle.getIdentityPath() + "]");
  gradle.setBaseProjectClassLoaderScope(buildSrcClassLoaderScope);
  // 1. attaches root project
  buildLoader.load(gradle.getSettings(), gradle);
  // Makes included build substitutions available
  if (gradle.isRootBuild()) {
    buildStateRegistry.beforeConfigureRootBuild();
  }
  // 2. Build buildSrc and export classpath to root project
  buildBuildSrcAndLockClassloader(gradle, buildSrcClassLoaderScope);

  // 3. buildFile的编译与加载
  delegate.prepareProjects(gradle);

  // Make root build substitutions available
  if (gradle.isRootBuild()) {
    buildStateRegistry.afterConfigureRootBuild();
  }
}
4. 流程1-init-project
流程1就是代码
buildLoader.load(gradle.getSettings(), gradle);
的内部实现;buildLoader对象的创建其实也是通过调用BuildScopeServices.createBuildLoader方法来实现的
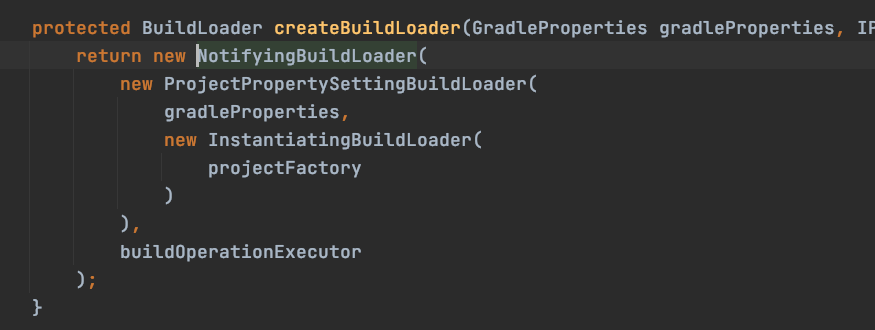
调用链路非常清晰(装饰器模式)
先看NotifyingBuildLoader
4.1 NotifyingBuildLoader.load干啥了?
先看代码吧
 @Override
    public void load(final SettingsInternal settings, final GradleInternal gradle) {
        final String buildPath = gradle.getIdentityPath().toString();
        buildOperationExecutor.call(new CallableBuildOperation<Void>() {
            @Override
            public BuildOperationDescriptor.Builder description() {
                return BuildOperationDescriptor.displayName("Load projects").
                    progressDisplayName("Loading projects").details(new LoadProjectsBuildOperationType.Details() {
                    @Override
                    public String getBuildPath() {
                        return buildPath;
                    }
                });
            }

            @Override
            public Void call(BuildOperationContext context) {
              	// 1. load projects (ProjectPropertySettingBuildLoader)
                buildLoader.load(settings, gradle);
              	// 2. 存储加载后各project相关信息
                context.setResult(createOperationResult(gradle, buildPath));
                return null;
            }
        });
        buildOperationExecutor.run(new RunnableBuildOperation() {
            @Override
            public void run(BuildOperationContext context) {
              	// 3. 相关回调通知
                gradle.getBuildListenerBroadcaster().projectsLoaded(gradle);
                context.setResult(PROJECTS_LOADED_OP_RESULT);
            }

            @Override
            public BuildOperationDescriptor.Builder description() {
                return BuildOperationDescriptor.displayName(gradle.contextualize("Notify projectsLoaded listeners"))
                    .details(new NotifyProjectsLoadedBuildOperationType.Details() {
                        @Override
                        public String getBuildPath() {
                            return buildPath;
                        }
                    });
            }
        });
    }
代码可以清晰看到
- 先是在当前线程同步调用了buildLoader.load(settings, gradle);这部其实就是我们通常理解的创建project以及加载各个project(这个操作交给ProjectPropertySettingBuildLoader实现,见4.2)
- 读取第一步加载后的project相关信息,存储到result中
- gradle的projectsLoaded生命周期回调
4.2 ProjectPropertySettingBuildLoader.load
先看内部实现
@Override
public void load(SettingsInternal settings, GradleInternal gradle) {
  // InstantiatingBuildLoader.load
  buildLoader.load(settings, gradle);
  setProjectProperties(gradle.getRootProject(), new CachingPropertyApplicator());
}
从名字可以看出这个类只负责gradle.properties属性的解析加载,真正工程的创建其实交给了InstantiatingBuildLoader
小结:
- 委托InstantiatingBuildLoader去创建project
- 给project设置相关属性(gradle.properties)
1的实现只要看4.3即可,现在关注步骤2setProjectProperties坐了什么,其实总结归纳可以简单理解为三小步
- 寻找并解析每个工程对应的gradle.properties文件配置
- 通过反射机制(setKey)将配置动态更新到对应工程中,并同步到扩展属性中
- 增加了缓存机制,提高性能
来看下代码实现吧
// ProjectPropertySettingBuildLoader.java

@Override
public void load(SettingsInternal settings, GradleInternal gradle) {
  buildLoader.load(settings, gradle);
  setProjectProperties(gradle.getRootProject(), new CachingPropertyApplicator());
}

private void setProjectProperties(Project project, CachingPropertyApplicator applicator) {
  		// 1. 第一步当然是解析rootProject的gradle.properties文件,并合并
        addPropertiesToProject(project, applicator);
        for (Project childProject : project.getChildProjects().values()) {
            setProjectProperties(childProject, applicator);
        }
    }

    private void addPropertiesToProject(Project project, CachingPropertyApplicator applicator) {
      	// 1. 寻找并解析配置文件
        Properties projectProperties = new Properties();
        File projectPropertiesFile = new File(project.getProjectDir(), Project.GRADLE_PROPERTIES);
        LOGGER.debug("Looking for project properties from: {}", projectPropertiesFile);
        if (projectPropertiesFile.isFile()) {
            projectProperties = GUtil.loadProperties(projectPropertiesFile);
            LOGGER.debug("Adding project properties (if not overwritten by user properties): {}",
                projectProperties.keySet());
        } else {
            LOGGER.debug("project property file does not exists. We continue!");
        }

        // this should really be <String, Object>, however properties loader signature expects a <String, String>
        // even if in practice it was never enforced (one can pass other property types, such as boolean) an
        // fixing the method signature would be a binary breaking change in a public API.
      	// 2. 合并属性
        Map<String, String> mergedProperties = gradleProperties.mergeProperties(uncheckedCast(projectProperties));

      	// 3. 执行configureProperty(将key-value的数据通过放射动态注入到对应的project属性中;同时设置到project.ext扩展属性中)
        for (Map.Entry<String, String> entry : mergedProperties.entrySet()) {
            applicator.configureProperty(project, entry.getKey(), entry.getValue());
        }
    }
先是解析根工程的gradle.properties,接找寻找自己工程中的gradle.properties,如果有就解析加载,最后就是将这些熟悉合并,并同步到project.ext扩展属性中;
缓存实现如下,就不在废话了
CachingPropertyApplicator
/**
     * Applies the given properties to the project and its subprojects, caching property mutators whenever possible
     * to avoid too many searches.
     */
    private static class CachingPropertyApplicator {
        private final Map<Pair<String, ? extends Class<?>>, PropertyMutator> mutators = Maps.newHashMap();
        private Class<? extends Project> projectClazz;

        void configureProperty(Project project, String name, Object value) {
            if (isPossibleProperty(name)) {
                Class<? extends Project> clazz = project.getClass();
                if (clazz != projectClazz) {
                    mutators.clear();
                    projectClazz = clazz;
                }
                Class<?> valueType = value == null ? null : value.getClass();
                Pair<String, ? extends Class<?>> key = Pair.of(name, valueType);
                PropertyMutator propertyMutator = mutators.get(key);
                if (propertyMutator != null) {
                    propertyMutator.setValue(project, value);
                } else {
                    if (!mutators.containsKey(key)) {
                      	// 1. 反射调用
                        propertyMutator = JavaPropertyReflectionUtil.writeablePropertyIfExists(clazz, name, valueType);
                        mutators.put(key, propertyMutator);
                        if (propertyMutator != null) {
                            propertyMutator.setValue(project, value);
                            return;
                        }
                    }
                  	// 2. 扩展属性更新
                    ExtraPropertiesExtension extraProperties = project.getExtensions().getExtraProperties();
                    extraProperties.set(name, value);
                }
            }
        }
        /**
         * In a properties file, entries like '=' or ':' on a single line define a property with an empty string name and value.
         * We know that no property will have an empty property name.
         *
         * @see java.util.Properties#load(java.io.Reader)
         */
        private boolean isPossibleProperty(String name) {
            return !name.isEmpty();
        }
    }
4.3 InstantiatingBuildLoader.load
public class InstantiatingBuildLoader implements BuildLoader {
    private final IProjectFactory projectFactory;

    public InstantiatingBuildLoader(IProjectFactory projectFactory) {
        this.projectFactory = projectFactory;
    }

    @Override
    public void load(SettingsInternal settings, GradleInternal gradle) {
        createProjects(gradle, settings.getRootProject());
        attachDefaultProject(gradle, settings.getDefaultProject());
    }
}
load方法,功能非常清晰
- 创建工程
创建各个project,包括根工程,子工程(递归)(settings.gradle文件中include的所有工程) - 关联默认工程
先看工程是如何被创建的
private void createProjects(GradleInternal gradle, ProjectDescriptor rootProjectDescriptor) {
        ClassLoaderScope baseProjectClassLoaderScope = gradle.baseProjectClassLoaderScope();
        ClassLoaderScope rootProjectClassLoaderScope = baseProjectClassLoaderScope.createChild("root-project[" + gradle.getIdentityPath() + "]");

  			// 1. 创建根工程
        ProjectInternal rootProject = projectFactory.createProject(gradle, rootProjectDescriptor, null, rootProjectClassLoaderScope, baseProjectClassLoaderScope);
        gradle.setRootProject(rootProject);

  			// 2. 创建子工程
        createChildProjectsRecursively(gradle, rootProject, rootProjectDescriptor, rootProjectClassLoaderScope, baseProjectClassLoaderScope);
    }

    private void createChildProjectsRecursively(GradleInternal gradle, ProjectInternal parentProject, ProjectDescriptor parentProjectDescriptor, ClassLoaderScope parentProjectClassLoaderScope, ClassLoaderScope baseProjectClassLoaderScope) {
        for (ProjectDescriptor childProjectDescriptor : parentProjectDescriptor.getChildren()) {
            ClassLoaderScope childProjectClassLoaderScope = parentProjectClassLoaderScope.createChild("project-" + childProjectDescriptor.getName());
            ProjectInternal childProject = projectFactory.createProject(gradle, childProjectDescriptor, parentProject, childProjectClassLoaderScope, baseProjectClassLoaderScope);

          	// 创建子工程时,其内部有时递归创建子工程下的子工程(如果存在)
            createChildProjectsRecursively(gradle, childProject, childProjectDescriptor, childProjectClassLoaderScope, baseProjectClassLoaderScope);
        }
    }
子工程的创建其实是通过递归方式开实现的,所以gradle其实内部是支持嵌套的;创建工程的创建是需要工程名称,desc,路径,buildFile等相关属性,只有告诉gradle这些,gradle才知道这个工程依赖了哪些库,需要哪些插件,需要下载哪些等等;project的创建实现在ProjectFactory类中,先看下ProjectDescriptor属性

上图显示的是根工程创建demo,path为: 每个工程都有对应的childern,parent属性;有点像节点;工程的创建其实通过依赖注入方式来实现
@Override
    public ProjectInternal createProject(GradleInternal gradle, ProjectDescriptor projectDescriptor, @Nullable ProjectInternal parent, ClassLoaderScope selfClassLoaderScope, ClassLoaderScope baseClassLoaderScope) {
    	// 1. 工程路径
        Path projectPath = ((DefaultProjectDescriptor) projectDescriptor).path();
        ProjectState projectContainer = projectStateRegistry.stateFor(owner.getBuildIdentifier(), projectPath);

		// 2. buildFile脚步的加载及解析
        File buildFile = projectDescriptor.getBuildFile();
        TextResource resource = textFileResourceLoader.loadFile("build file", buildFile);
        ScriptSource source = new TextResourceScriptSource(resource);

      	// 3. 反射创建project对象
      	// DependencyInjectingInstantiator.newInstance;还是用来反射
        DefaultProject project = instantiator.newInstance(DefaultProject.class,
            projectDescriptor.getName(),
            parent,
            projectDescriptor.getProjectDir(),
            buildFile,
            source,
            gradle,
            projectContainer,
            gradle.getServiceRegistryFactory(),
            selfClassLoaderScope,
            baseClassLoaderScope
        );
        project.beforeEvaluate(p -> {
        	// 4. 注册监听器;在evaludate之前将会对project做一些校验处理,校验失败会报错
            NameValidator.validate(project.getName(), "project name", DefaultProjectDescriptor.INVALID_NAME_IN_INCLUDE_HINT);
            gradle.getServices().get(DependencyResolutionManagementInternal.class).configureProject(project);
        });

		// 5. 后续的一些存储操作
        if (parent != null) {
            parent.addChildProject(project);
        }
        projectRegistry.addProject(project);
        projectContainer.attachMutableModel(project);
        return project;
    }
在看看关联默认工程
private void attachDefaultProject(GradleInternal gradle, ProjectDescriptor defaultProjectDescriptor) {
        ProjectInternal rootProject = gradle.getRootProject();
        ProjectRegistry<ProjectInternal> projectRegistry = rootProject.getProjectRegistry();

        String defaultProjectPath = defaultProjectDescriptor.getPath();
        ProjectInternal defaultProject = projectRegistry.getProject(defaultProjectPath);
        if (defaultProject == null) {
            throw new IllegalStateException("Did not find project with path " + defaultProjectPath);
        }

        gradle.setDefaultProject(defaultProject);
    }
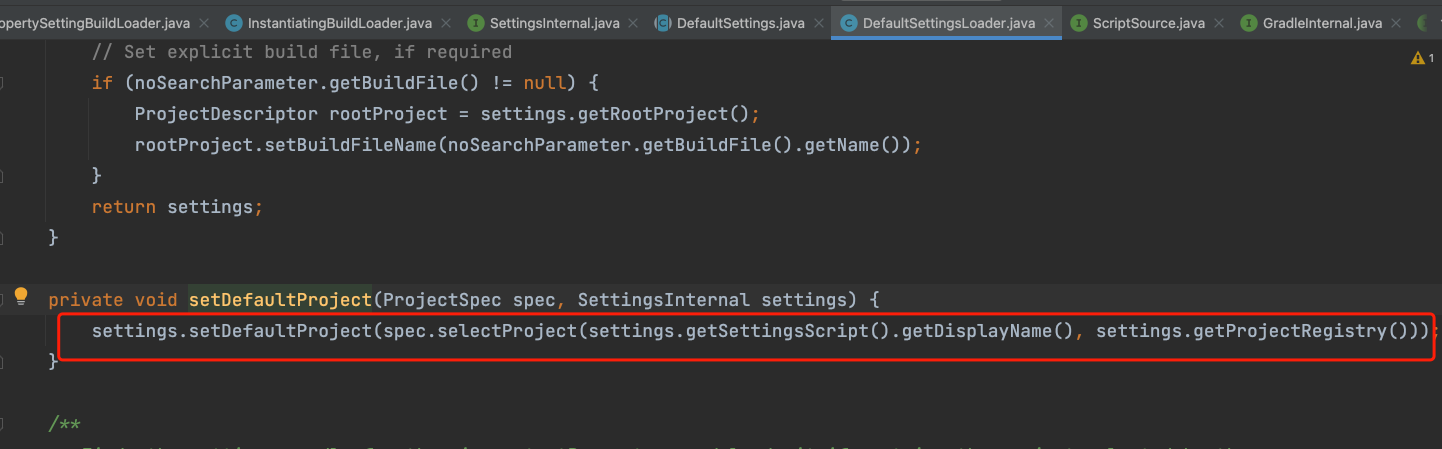
为gradle设置默认工程,defaultProjectPath的值取决于setting.gradle脚本中配置,参见gradle-2-setting篇中DefaultSettingsLoader中说明
5. 流程2- buildSrc的构建

buildSrc的工程这块就不做过多介绍了,通常使用的场景就是gradle自定义插件的调试,在新版本gradle中不在建议使用了
6. 流程3- buildFile的编译与加载
我们回过头来再看看BuildTreePreparingProjectsPreparer.prepareProjects方法,直接看第三步实现

从调用链路上可以知道此处代的delegate即为DefaultProjectsPreparer
  // DefaultProjectsPreparer.prepareProjects
  @Override
  public void prepareProjects(GradleInternal gradle) {
    if (gradle.getStartParameter().isConfigureOnDemand()) {
      IncubationLogger.incubatingFeatureUsed("Configuration on demand");
      projectConfigurer.configure(gradle.getRootProject());
    } else {
      //TaskPathProjectEvaluator
      // 1. configure root project and all subproject
      projectConfigurer.configureHierarchy(gradle.getRootProject());

	  // 2. call gradle.projectsEvaluated listener
      new ProjectsEvaluatedNotifier(buildOperationExecutor).notify(gradle);
    }

    modelConfigurationListener.onConfigure(gradle);
  }
方法中会读取启动参数org.gradle.configureondemand属性,如果设置为true则只config根工程,否则configure所有工程(默认值为false),这个属性需要注意慎用

关于详细说明参见官方文档
总结:
- configure rootProject以及所有subProject
- gradle生命周期projectsEvaluated回调
本例中因为存在buildSrc及子工程,所以会先config buildSrc根工程及子工程;再config 根工程及子工程

	// TaskPathProjectEvaluator.java
  @Override
  public void configureHierarchy(ProjectInternal project) {
    configure(project);
    for (Project sub : project.getSubprojects()) {
      configure((ProjectInternal) sub);
    }
  }

	@Override
    public void configure(ProjectInternal project) {
        if (cancellationToken.isCancellationRequested()) {
            throw new BuildCancelledException();
        }
        // Need to configure intermediate parent projects for configure-on-demand
        ProjectInternal parentProject = project.getParent();
        if (parentProject != null) {
            configure(parentProject);
        }
      	// 评估工程(重点)
        project.evaluate();
    }
从上面可以知道每次对project进行evaluate之前会对其父工程做evaluate;那么evaluate到底干啥了呀?
evaluate
这个阶段就是编译相关build.gradlei或build.gradle.kts相关脚步文件了
调用链路
调试跟踪发现其调用链路如下:
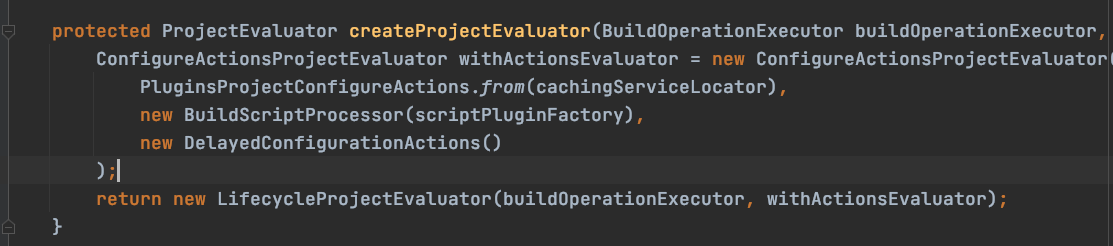
看下图可得ConfigureActionsProjectEvaluator.evaludate方法内部会循环三次分别调用
-
PluginsProjectConfigureActions
这里说白了就是应用常用插件到project中去,你经常用的任务eg:
./gradlew task
./gradlew javaToolchains
都来源于此
// DefaultProject.java public ProjectEvaluator getProjectEvaluator() { if (projectEvaluator == null) { // services.get内部调用最终会通过反射去创建PluginsProjectConfigureActions对象 projectEvaluator = services.get(ProjectEvaluator.class); } return projectEvaluator; } -
BuildScriptProcessor
-
DelayedConfigurationActions

1. PluginsProjectConfigureActions
该类的内部有五个action,这个阶段其实就是声明或应用gradle常用的插件而已

分别为
- 应用org.gradle.help-tasks插件
- 定义javaToolchains任务
- 应用org.gradle.build-init插件
- 应用org.gradle.wrapper插件
//This one should go away once we complete the auto-apply plugins
public class HelpTasksAutoApplyAction implements ProjectConfigureAction {
    @Override
    public void execute(ProjectInternal project) {
        project.getPluginManager().apply("org.gradle.help-tasks");
    }
}

public class ShowToolchainsTaskConfigurator implements ProjectConfigureAction {

    @Override
    public void execute(ProjectInternal project) {
        project.getTasks().register("javaToolchains", ShowToolchainsTask.class, task -> {
            task.setDescription("Displays the detected java toolchains. [incubating]");
            task.setGroup(HelpTasksPlugin.HELP_GROUP);
            task.setImpliesSubProjects(true);
        });
    }

}

// 感觉是用与编译kotlin脚本语言的工具插件
class KotlinScriptingModelBuildersRegistrationAction : ProjectConfigureAction {

    override fun execute(project: ProjectInternal) {

        val builders = project.serviceOf<ToolingModelBuilderRegistry>()
        builders.register(KotlinBuildScriptModelBuilder)
        builders.register(KotlinBuildScriptTemplateModelBuilder)

        if (project.parent == null) {
            builders.register(KotlinDslScriptsModelBuilder)
            project.tasks.register(KotlinDslModelsParameters.PREPARATION_TASK_NAME)
        }
    }
}
HelpTasksAutoApplyAction内部应用了HelpTasksPlugin插件,其内部支持了一些常用的命令eg:
help、projects、tasks、等等(参见下图)具体不在细述

至于ShowToolchainsTaskConfigurator、KotlinScriptingModelBuildersRegistrationAction 等其他基本类似
2. buildFile脚本编译及加载
编译脚步处理器,用来编译相关脚步文件用的;
对于.gradle脚步调用链路如下:
BuildScriptProcessor ==>
DefaultScriptPluginFactory.create => ScriptPluginImpl.apply =>
BuildScopeInMemoryCachingScriptClassCompiler.compile ==>
CrossBuildInMemoryCachingScriptClassCache ==> getOrCompile
FileCacheBackedScriptClassCompiler.compile
// ScriptPluginImpl.java
public void apply(final Object target) {
            DefaultServiceRegistry services = new DefaultServiceRegistry(scriptServices);
            services.add(ScriptPluginFactory.class, scriptPluginFactory);
            services.add(ClassLoaderScope.class, baseScope);
            services.add(LoggingManagerInternal.class, loggingFactoryManager.create());
            services.add(ScriptHandler.class, scriptHandler);

            final ScriptTarget initialPassScriptTarget = initialPassTarget(target);

            ScriptCompiler compiler = scriptCompilerFactory.createCompiler(scriptSource);

            // Pass 1, extract plugin requests and plugin repositories and execute buildscript {}, ignoring (i.e. not even compiling) anything else
            CompileOperation<?> initialOperation = compileOperationFactory.getPluginsBlockCompileOperation(initialPassScriptTarget);
            Class<? extends BasicScript> scriptType = initialPassScriptTarget.getScriptClass();

  			// 1.1 编译脚本buildscript{}代码块, plugins{xxx}脚本
            ScriptRunner<? extends BasicScript, ?> initialRunner = compiler.compile(scriptType, initialOperation, baseScope, Actions.doNothing());

  			// 1.2 加载编译脚本的jar产物,运行jar中run方法
            initialRunner.run(target, services);

  			// 1.3 读取应用插件代码块;eg:plugins{xxx}
            PluginRequests initialPluginRequests = getInitialPluginRequests(initialRunner);
            PluginRequests mergedPluginRequests = autoAppliedPluginHandler.mergeWithAutoAppliedPlugins(initialPluginRequests, target);

            PluginManagerInternal pluginManager = topLevelScript ? initialPassScriptTarget.getPluginManager() : null;
  			// 1.4 应用插件(调用plugin.apply方法)
            pluginRequestApplicator.applyPlugins(mergedPluginRequests, scriptHandler, pluginManager, targetScope);

            // Pass 2, compile everything except buildscript {}, pluginManagement{}, and plugin requests, then run
            final ScriptTarget scriptTarget = secondPassTarget(target);
            scriptType = scriptTarget.getScriptClass();

            CompileOperation<BuildScriptData> operation = compileOperationFactory.getScriptCompileOperation(scriptSource, scriptTarget);

  			// 2.1 编译脚本
            final ScriptRunner<? extends BasicScript, BuildScriptData> runner = compiler.compile(scriptType, operation, targetScope, ClosureCreationInterceptingVerifier.INSTANCE);
            if (scriptTarget.getSupportsMethodInheritance() && runner.getHasMethods()) {
                scriptTarget.attachScript(runner.getScript());
            }
            if (!runner.getRunDoesSomething()) {
                return;
            }

  			// 2.2 执行编译后class文件中run方法;run 脚本 DefaultScriptRunnerFactory.ScriptRunnerImpl.run
            Runnable buildScriptRunner = () -> runner.run(target, services);

            boolean hasImperativeStatements = runner.getData().getHasImperativeStatements();
            scriptTarget.addConfiguration(buildScriptRunner, !hasImperativeStatements);
        }
小结:
- 编译根工程build.gradle文件中的buildScript代码块、调用其run方法
- 解析plugins{xxx}代码块,应用其插件
- 编译除buildscript {}, pluginManagement{}, and plugin requests其他代码块
- 加载运行
编译
先看类BuildScopeInMemoryCachingScriptClassCompiler
这个类是一个编译脚步的缓存(非全局缓存),如果在这个缓存中没找到会去全局缓存寻找,如果还没有则,TODO执行编译落?
/**
 * This in-memory cache is responsible for caching compiled build scripts during a build.
 * If the compiled script is not found in this cache, it will try to find it in the global cache,
 * which will use the delegate script class compiler in case of a miss. The lookup in this cache is
 * more efficient than looking in the global cache, as we do not check the script's hash code here,
 * assuming that it did not change during the build.
 */

从类可以看到,去缓存是根据key,而key是根据className classLoader 以及dslId三个因子来判断的
public class ScriptCacheKey {
    ...
    @Override
    public boolean equals(Object o) {
        if (this == o) {
            return true;
        }
        if (o == null || getClass() != o.getClass()) {
            return false;
        }

        ScriptCacheKey key = (ScriptCacheKey) o;

        return classLoader.get() != null && key.classLoader.get() != null
            && classLoader.get().equals(key.classLoader.get())
            && className.equals(key.className)
            && dslId.equals(key.dslId);
    }
    ...
}
CrossBuildInMemoryCachingScriptClassCache 用来负责脚本缓存了;主要是将编译后的class缓存到cachedCompiledScripts全局缓存中,以提高性能
// CrossBuildInMemoryCachingScriptClassCache.java
public <T extends Script, M> CompiledScript<T, M> getOrCompile(ScriptSource source,
                                                                   ClassLoaderScope targetScope,
                                                                   CompileOperation<M> operation,
                                                                   Class<T> scriptBaseClass,
                                                                   Action<? super ClassNode> verifier,
                                                                   ScriptClassCompiler delegate) {
        ScriptCacheKey key = new ScriptCacheKey(source.getClassName(), targetScope.getExportClassLoader(), operation.getId());
        CachedCompiledScript cached = cachedCompiledScripts.getIfPresent(key);
        HashCode hash = source.getResource().getContentHash();
        if (cached != null) {
            if (hash.equals(cached.hash)) {
                cached.compiledScript.onReuse();
                return Cast.uncheckedCast(cached.compiledScript);
            }
        }
        CompiledScript<T, M> compiledScript = delegate.compile(source, targetScope, operation, scriptBaseClass, verifier);
        cachedCompiledScripts.put(key, new CachedCompiledScript(hash, compiledScript));
        return compiledScript;
    }
先查看cachedCompiledScripts中是否有缓存,如果有缓存存在且脚步内容hash一致可以直接服用,否则编译脚步,加载到缓存中
FileCacheBackedScriptClassCompiler这个类用来编译脚步并缓存到指定目录以及从缓存目录加载class的功能
A ScriptClassCompiler which compiles scripts to a cache directory, and loads them from there.
public class FileCacheBackedScriptClassCompiler implements ScriptClassCompiler, Closeable {
    private static final Object[] EMPTY_OBJECT_ARRAY = new Object[0];
    private final ScriptCompilationHandler scriptCompilationHandler;
    private final ProgressLoggerFactory progressLoggerFactory;
    private final CacheRepository cacheRepository;
    private final ClassLoaderHierarchyHasher classLoaderHierarchyHasher;
    private final CachedClasspathTransformer classpathTransformer;

    public FileCacheBackedScriptClassCompiler(CacheRepository cacheRepository, ScriptCompilationHandler scriptCompilationHandler,
                                              ProgressLoggerFactory progressLoggerFactory, ClassLoaderHierarchyHasher classLoaderHierarchyHasher,
                                              CachedClasspathTransformer classpathTransformer) {
        this.cacheRepository = cacheRepository;
        this.scriptCompilationHandler = scriptCompilationHandler;
        this.progressLoggerFactory = progressLoggerFactory;
        this.classLoaderHierarchyHasher = classLoaderHierarchyHasher;
        this.classpathTransformer = classpathTransformer;
    }

    @Override
    public <T extends Script, M> CompiledScript<T, M> compile(final ScriptSource source,
                                                              final ClassLoaderScope targetScope,
                                                              final CompileOperation<M> operation,
                                                              final Class<T> scriptBaseClass,
                                                              final Action<? super ClassNode> verifier) {
        assert source.getResource().isContentCached();
        if (source.getResource().getHasEmptyContent()) {
            return emptyCompiledScript(operation);
        }

        ClassLoader classLoader = targetScope.getExportClassLoader();
        HashCode sourceHashCode = source.getResource().getContentHash();
        final String dslId = operation.getId();
        HashCode classLoaderHash = classLoaderHierarchyHasher.getClassLoaderHash(classLoader);
        if (classLoaderHash == null) {
            throw new IllegalArgumentException("Unknown classloader: " + classLoader);
        }
        final RemappingScriptSource remapped = new RemappingScriptSource(source);

        PrimitiveHasher hasher = Hashing.newPrimitiveHasher();
        hasher.putString(dslId);
        hasher.putHash(sourceHashCode);
        hasher.putHash(classLoaderHash);
        String key = HashUtil.compactStringFor(hasher.hash().toByteArray());

        // Caching involves 2 distinct caches, so that 2 scripts with the same (hash, classpath) do not get compiled twice
        // 1. First, we look for a cache script which (path, hash) matches. This cache is invalidated when the compile classpath of the script changes
        // 2. Then we look into the 2d cache for a "generic script" with the same hash, that will be remapped to the script class name
        // Both caches can be closed directly after use because:
        // For 1, if the script changes or its compile classpath changes, a different directory will be used
        // For 2, if the script changes, a different cache is used. If the classpath changes, the cache is invalidated, but classes are remapped to 1. anyway so never directly used
        final PersistentCache cache = cacheRepository.cache("scripts/" + key)
            .withDisplayName(dslId + " generic class cache for " + source.getDisplayName())
            .withInitializer(new ProgressReportingInitializer(
                progressLoggerFactory,
                new CompileToCrossBuildCacheAction(remapped, classLoader, operation, verifier, scriptBaseClass),
                "Compiling " + source.getShortDisplayName()))
            .open();
        try {
            File genericClassesDir = classesDir(cache, operation);
            File metadataDir = metadataDir(cache);
            ClassPath remappedClasses = remapClasses(genericClassesDir, remapped);

          	// 加载class文件
            return scriptCompilationHandler.loadFromDir(source, sourceHashCode, targetScope, remappedClasses, metadataDir, operation, scriptBaseClass);
        } finally {
            cache.close();
        }
    }

    private <T extends Script, M> CompiledScript<T, M> emptyCompiledScript(CompileOperation<M> operation) {
        return new EmptyCompiledScript<>(operation);
    }
}
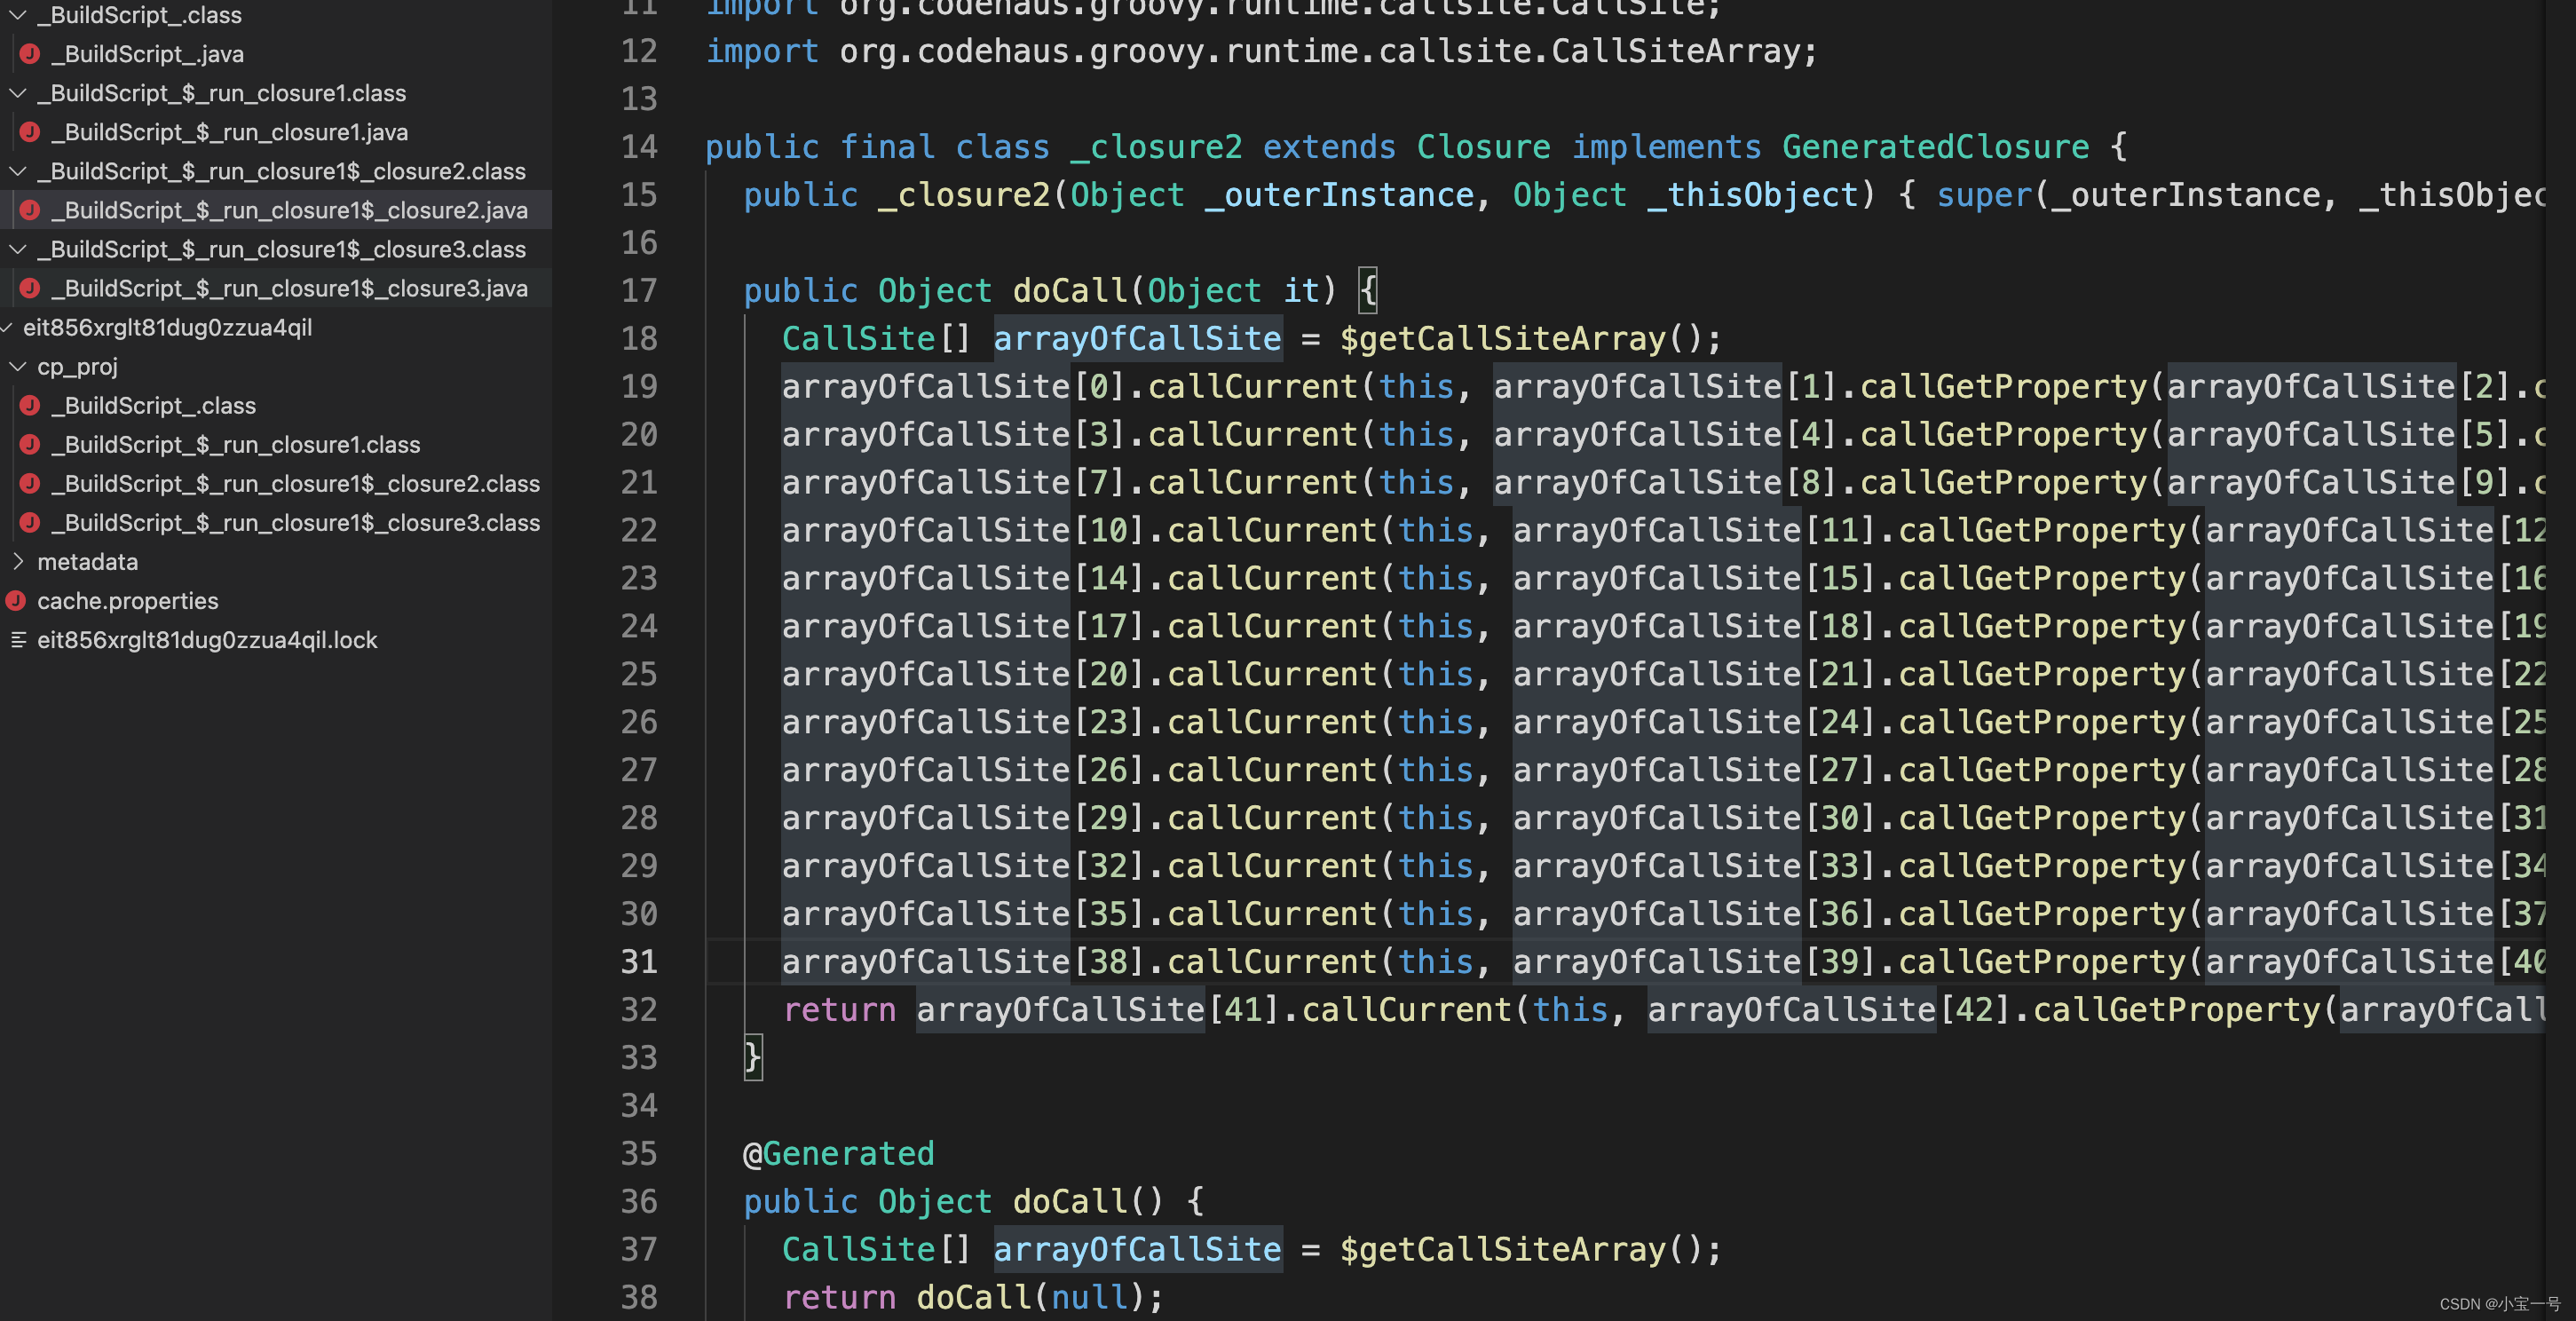
每一个闭包会被编译生成一个run_closurex.class文件
以根工程build.gradle中buildscript代码块为例子
buildscript {
    // 代码块1
    apply from: "config.gradle"
    addRepos(repositories)

    // 代码块2
    dependencies {
        classpath deps.gradle
        classpath deps.kotlin.kotlin_gradle_plugin

        classpath greendaos.greendao_plugin

        classpath deps.vasdolly.plugin

        classpath mkplugins.plugin_mkaop
        classpath mkplugins.plugin_flavor_environment
        classpath mkplugins.plugin_flavor_seller_platform
        classpath mkplugins.plugin_pins
        classpath mkplugins.plugin_arouter
        classpath mkplugins.plugin_imageoptimize
        classpath mkplugins.plugin_serializable_check

        classpath mkplugins.plugin_check_duplicate_layout
        classpath alibaba.arouter_register
        classpath mkplugins.plugin_screen

        // NOTE: Do not place your application dependencies here; they belong
        // in the individual module build.gradle files
    }

	// 代码块3
    configurations.all {
        //gradle 本地缓存策略 秒seconds 分钟minutes 小时hours
        resolutionStrategy.cacheChangingModulesFor 0, 'seconds'
    }
}
....
我们看下编译产物,以及反编译出来的字节码


对应闭包内代码块1

对应dependencies闭包代码块2
对应第三个闭包代码块

上面可以看到build.gradle中声明的插件管理,仓库管理,依赖管理等所以等东东,最终都是被编译成class,通过运行jar方式来达到想要的结果
加载class
BuildOperationBackedScriptCompilationHandler.loadFromDir ==>
DefaultScriptCompilationHandler.loadFromDir
ClassesDirCompiledScript.loadClass
// DefaultScriptCompilationHandler.java
@Override
    public <T extends Script, M> CompiledScript<T, M> loadFromDir(ScriptSource source, HashCode sourceHashCode, ClassLoaderScope targetScope, ClassPath scriptClassPath,
                                                                  File metadataCacheDir, CompileOperation<M> transformer, Class<T> scriptBaseClass) {
        File metadataFile = new File(metadataCacheDir, METADATA_FILE_NAME);
        try (KryoBackedDecoder decoder = new KryoBackedDecoder(new FileInputStream(metadataFile))) {
            byte flags = decoder.readByte();
            boolean isEmpty = (flags & EMPTY_FLAG) != 0;
            boolean hasMethods = (flags & HAS_METHODS_FLAG) != 0;
            M data;
            if (transformer != null && transformer.getDataSerializer() != null) {
                data = transformer.getDataSerializer().read(decoder);
            } else {
                data = null;
            }
            return new ClassesDirCompiledScript<>(isEmpty, hasMethods, scriptBaseClass, scriptClassPath, targetScope, source, sourceHashCode, data);
        } catch (Exception e) {
            throw new IllegalStateException(String.format("Failed to deserialize script metadata extracted for %s", source.getDisplayName()), e);
        }
    }
加载脚步DefaultScriptCompilationHandler.ClassesDirCompiledScript.loadClass


以下流程是针对.gradle.kts脚步的
调试发现最终是调用BuildOperationScriptPlugin.apply方法
==》KotlinScriptPlugin.apply ==> KotlinScriptPluginFactory => StandardKotlinScriptEvaluator.evaluate
==> org.gradle.kotlin.dsl.execution.Interpreter.eval
==> org.gradle.kotlin.dsl.execution.Interpreter$ProgramHost.eval
//
编译脚步类
KotlinScriptEvaluator.ScopeBackedCompiledScript

ProgramHost.eval
fun eval(
target: Any,
scriptSource: ScriptSource,
sourceHash: HashCode,
scriptHandler: ScriptHandler,
targetScope: ClassLoaderScope,
baseScope: ClassLoaderScope,
topLevelScript: Boolean,
options: EvalOptions = defaultEvalOptions
) {
。。。
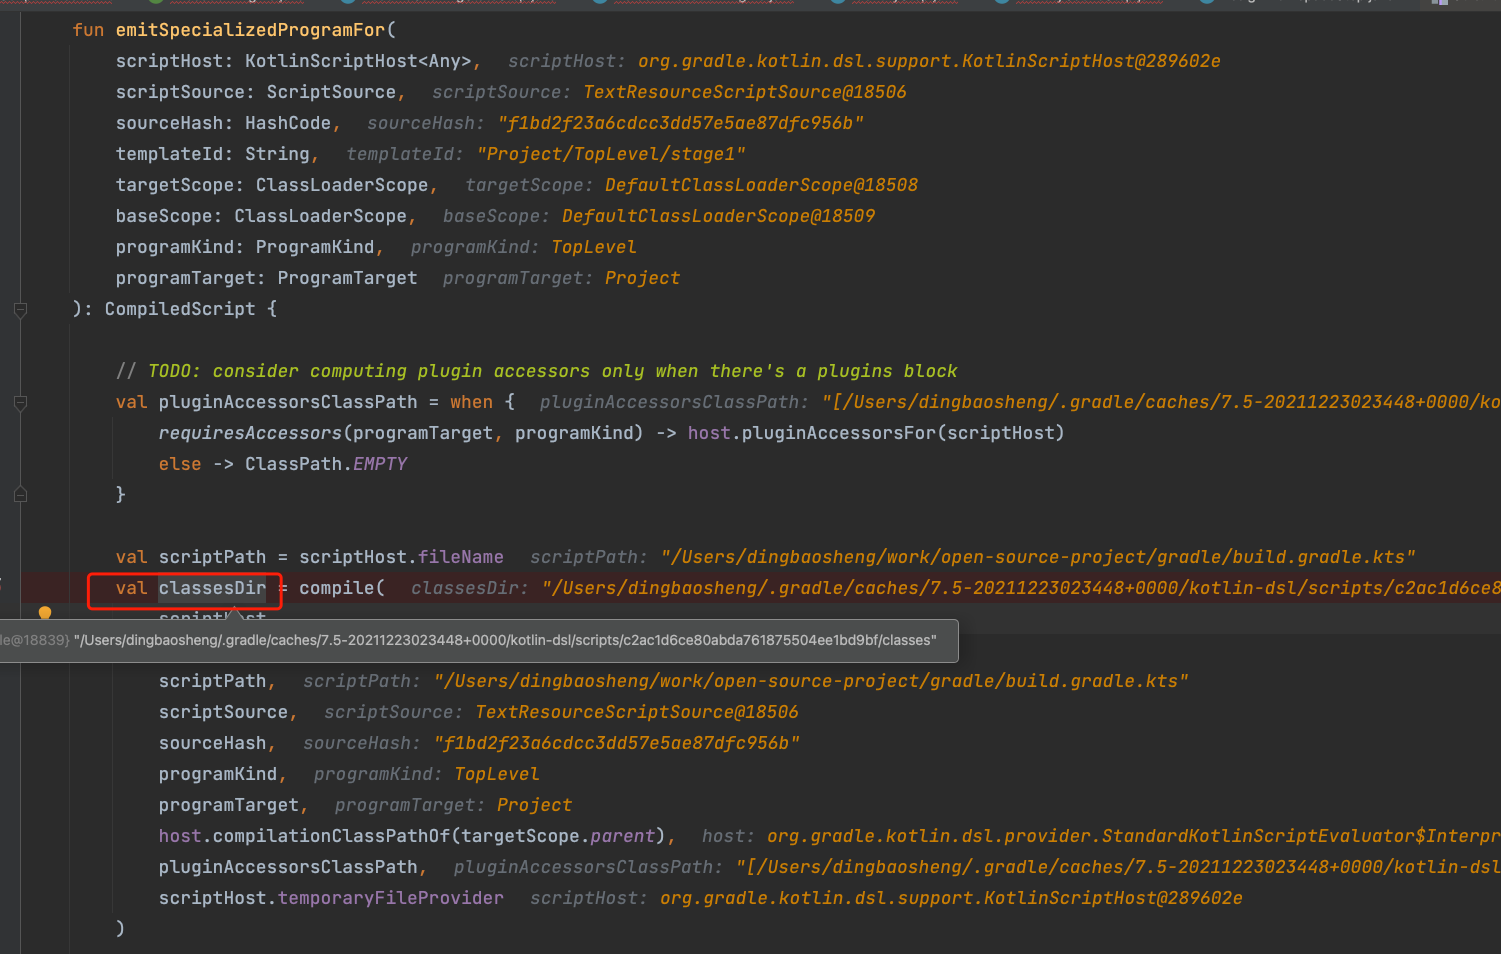
// 1. 编译脚步
val specializedProgram =
emitSpecializedProgramFor(
scriptHost,
scriptSource,
sourceHash,
templateId,
targetScope,
baseScope,
programKind,
programTarget
)
host.cache(
specializedProgram,
programId
)
// 2. 加载class 并运行
programHost.eval(specializedProgram, scriptHost)
}
- 编译脚步,看rootProject.build.gradle.kts编译产物
使用jadx看下有2个class类


// 加载脚步
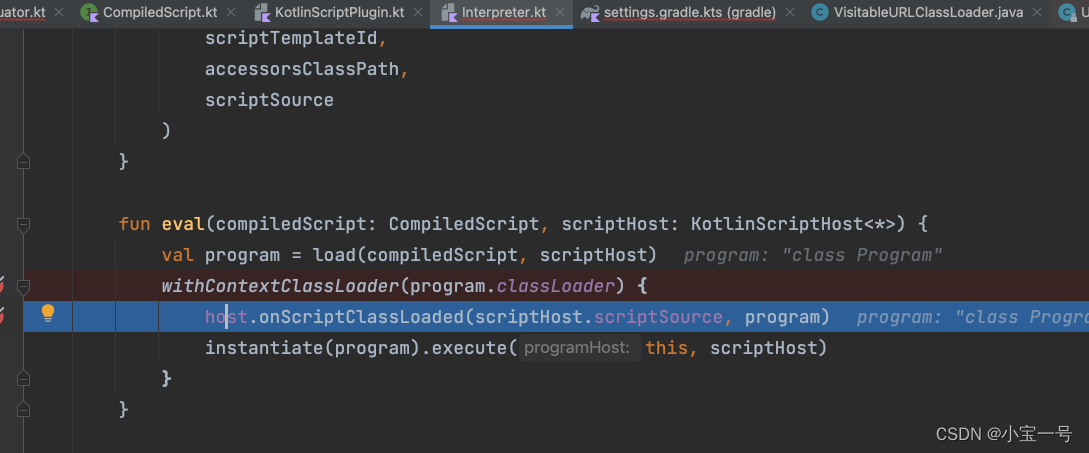
fun eval(compiledScript: CompiledScript, scriptHost: KotlinScriptHost<*>) {
  					// 加载Program 类
            val program = load(compiledScript, scriptHost)
            withContextClassLoader(program.classLoader) {
                host.onScriptClassLoaded(scriptHost.scriptSource, program)

              	// 2. 反射创建Program对象,执行execute方法
                instantiate(program).execute(this, scriptHost)
            }
        }
后面没跟进去了
3. DelayedConfigurationActions
这里最终也会调用BasePlugin.apply方法

里面包含一些添加一些基础任务
比如LIfecycleBasePlugin中的
clean
assemble
check
build
有兴趣可以自行深入分析


 738
738

 被折叠的 条评论
为什么被折叠?
被折叠的 条评论
为什么被折叠?
 到【灌水乐园】发言


