Hadoop on Windows with Eclipse -03- Set Environment Variables

本文详细介绍了如何设置环境变量以便Eclipse IDE能够访问Cygwin命令。通过修改系统变量Path,将Cygwin的bin和usr/sbin目录添加到路径中,确保在Windows环境下无缝使用Cygwin工具。

摘要生成于 C知道 ,由 DeepSeek-R1 满血版支持, 前往体验 >

Set Environment Variables

The next step is to set up the PATH environment variable so that Eclipse IDE can access Cygwin commands

To set environment variables follow these steps:

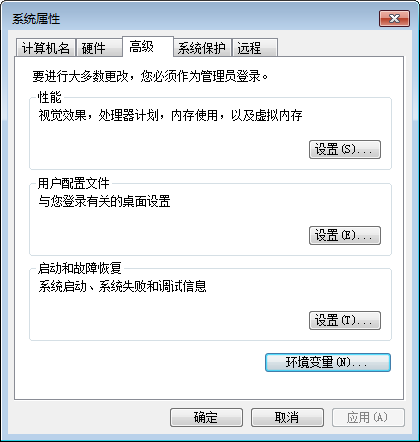
    1. Find "My Computer" icon either on the desktop or in the start menu, right-click on it and select Properties item from the menu.
    2. When you see the Properties dialog box, click on the Environment Variablesbutton as shown below


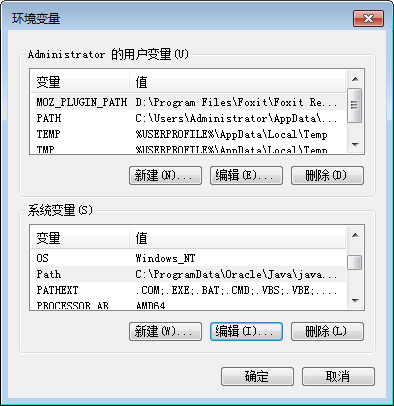
    3. When Environment Variables dialog shows up, click on the Path variable located in the System Variables box and then click the Edit button.

    4. When Edit dialog appears append the following text to the end of the Variable value field:

      ;c:\cygwin64\bin;c:\cygwin64\usr\sbin

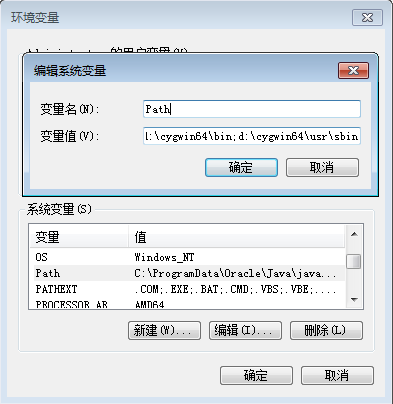
      Note: If you installed cygwin in the non-standard location, correct the above value accordingly.
    5. Close all three dialog boxes by pressing OK button of each dialog box.

转载于:https://www.cnblogs.com/summersoft/p/7643625.html

### 下载适用于 VMware 的 Hive 工具或虚拟机镜像 为了获取与 VMware 相关的 Hive 工具或虚拟机镜像,可以按照以下方法操作: #### 1. 官方 Apache Hive 镜像下载 Hive 是一个建立在 Hadoop 上的数据仓库工具。虽然官方并没有提供专门针对 VMware 的预配置虚拟机镜像,但可以通过安装 Cloudera 或 Hortonworks 提供的虚拟环境来间接获得支持 Hive 的 VMware 虚拟机。 Cloudera 和 Hortonworks 均提供了基于 VMware 的虚拟机镜像,这些镜像已经集成了 Hadoop 生态系统的组件,包括 Hive。以下是具体步骤: - 访问 **Cloudera QuickStart VM** 页面[^4] 并选择适合的操作系统版本以及 VMware 格式的虚拟机镜像。 - 对于 Hortonworks Sandbox,在其官网页面找到对应 VMware 版本的下载链接[^5]。 #### 2. 使用第三方资源库 如果希望寻找更轻量级或者特定用途的 Hive 虚拟机镜像,也可以尝试访问一些社区驱动的资源网站,比如: - **Vagrant Boxes**: 这些盒子通常由开发者贡献并经过测试,可能包含已预先配置好的 Hive 环境。通过搜索引擎查找关键词 `vagrant box hive vmware` 可能会发现合适的选项。 - **GitHub Releases**: 很多开源项目会在 GitHub 发布带有 Hive 功能的虚拟化解决方案。例如某些教育性质的 Big Data 学习套件可能会附带这样的文件。 #### 3. 手动构建自定义VM 当现成可用的选择无法满足需求时,则需考虑自行搭建具备所需特性的虚拟服务器实例。此过程大致分为以下几个方面: - 准备基础操作系统ISO文件; - 利用 VMware Workstation/Player 创建新的客户端机器; - 安装 Java JDK、Hadoop集群及相关依赖项之后再部署最新版Hive软件包; 下面给出一段简单的脚本来展示如何自动化部分设置流程(假设目标平台为Ubuntu Linux): ```bash #!/bin/bash # Update system packages sudo apt-get update && sudo apt-get upgrade -y # Install necessary components sudo apt-get install openjdk-8-jdk hadoop-common libhdfs0 hbase thrift mysql-server python-dev git-core curl zlib1g-dev build-essential libssl-dev libreadline-dev libyaml-dev libsqlite3-dev sqlite3 libxml2-dev libxslt1-dev libcurl4-openssl-dev software-properties-common libffi-dev nodejs npm yarnpkg redis-tools redis-server mongodb-org rabbitmq-server elasticsearch kibana logstash filebeat metricbeat packetbeat heartbeat-elastic zookeeperd kafka_2.x.y scala sbt maven ant cmake swig autoconf automake pkg-config unzip wget tar gzip bzip2 xz-utils lsof iotop iftop htop sysstat strace tcpdump valgrind gdb netcat-openbsd telnet openssh-client openssh-server rsync screen tmux vim emacs-nox nano less man-db info tree locate dnsutils whois nmap traceroute iproute2 ethtool bridge-utils iptables ufw apparmor-profiles apparmor-utils auditd rsyslog syslog-ng chrony tzdata locales language-pack-en fonts-liberation ttf-dejavu-core fontconfig ghostscript imagemagick graphicsmagick ffmpeg sox flac oggenc vorbisgain lame mp3gain faad aften faac normalize-audio speex ecasound jackd timidity audacity vlc gstreamer1.0-plugins-base gstreamer1.0-plugins-good gstreamer1.0-plugins-bad gstreamer1.0-plugins-ugly gstreamer1.0-libav gstreamer1.0-pulseaudio pulseaudio pavucontrol alsa-utils osspd mpg123 xmms2 moc cmus exaile quodlibet clementine spotify-client rhythmbox banshee amarok deadbeef smplayer vlc browser-plugin-vlc gecko-mediaplayer chromium-browser firefox thunderbird evolution mutt pine claws-mail roundcube phpmyadmin wordpress drupal joomla mediawiki owncloud nextcloud seafile kolab groupoffice zimbra collabora libreoffice writerperfect abiword wps-office calligra suite scribus lyx dia drawio inkscape blender freecad sketchup viewer solidworks eview pdfsam basic pdftk qpdf ghostscript gsfonts-x11 texlive-full latexmk biblatex biber doxygen graphviz dot2tex dia-gnome plantuml yed umlet visio-viewer microsoft-visio wine winetricks mono-complete visual-studio-code codeblocks qtcreator eclipse sublime-text atom brackets notepad-plus-plus vscode-insiders rider pycharm community edition intellij idea ultimate edition spyder anaconda miniconda jupyter-notebook rstudio desktop datagrip goland webstorm rubymine phpstorm clion appcode goLand Rider PyCharm IntelliJ IDEA Ultimate Edition PhpStorm WebStorm RubyMine DataGrip GoLand CLion AppCode Goland -y --no-install-recommends # Configure MySQL Database For Metastore Usage By Hive mysql_secure_installation <<EOF password yes password password yes yes yes yes EOF echo "[client]" | tee ~/.my.cnf > /dev/null ; echo user=root >>~/.my.cnf; echo password=password>>~/.my.cnf; chmod 600 ~/.my.cnf; CREATE DATABASE metastore DEFAULT CHARACTER SET utf8mb4 COLLATE utf8mb4_general_ci ; USE metastore ; source $HOME/hive/scripts/metastore/upgrade/mysql/hive-schema-*.sql ; FLUSH PRIVILEGES ; exit ; # Setup Environment Variables And Start Services Automatically On Boot Time export JAVA_HOME=/usr/lib/jvm/java-8-oracle/ export PATH=$PATH:$JAVA_HOME/bin:/opt/mongodb/bin/:/etc/hadoop/conf/:/var/lib/kafka/bin/:$HOME/spark/sbin/:$HOME/flink/bin/ update-rc.d ssh defaults service ssh start chkconfig mysqld on service mysqld restart for service_name in $(ls /etc/init.d/*);do case "$service_name" in */hadoop-*|*/hive*|*/spark*|*/flink*) chkconfig ${service_name#/etc/init.d/} on ;; esac done reboot now ``` 请注意以上仅为示范代码片段,并未完全适配所有场景下的实际应用情况,请根据具体情况调整参数值等内容后再执行。 ---
评论
添加红包

请填写红包祝福语或标题

红包个数最小为10个

红包金额最低5元

当前余额3.43前往充值 >
需支付:10.00
成就一亿技术人!
领取后你会自动成为博主和红包主的粉丝 规则
hope_wisdom
发出的红包
实付
使用余额支付
点击重新获取
扫码支付
钱包余额 0

抵扣说明:

1.余额是钱包充值的虚拟货币,按照1:1的比例进行支付金额的抵扣。
2.余额无法直接购买下载,可以购买VIP、付费专栏及课程。

余额充值