


1. IOC && DI
Spring的核心就是DI和AOP
AOP后面再讲
DI 就是依赖注入 ,DI是怎么实现的?看下面的小demo分析
假如有这样的一个类
package day01;

public class AnimalPrint {

    private  Cat cat;


    public void initCat(){
        cat = new Cat();
    }

    public void printAnimalTalk(){
        cat.printHelloWorld();
    }


}
要是这样写的话,测试的时候就是问题,并且这个程序也不好扩展,它只能打印dog说的话,之后要是想打印cat说话,那就不行,而且在编写单元测试的时候,更难了, 想要调用printAnimalTalk()必须保障initCat()在它之前调用
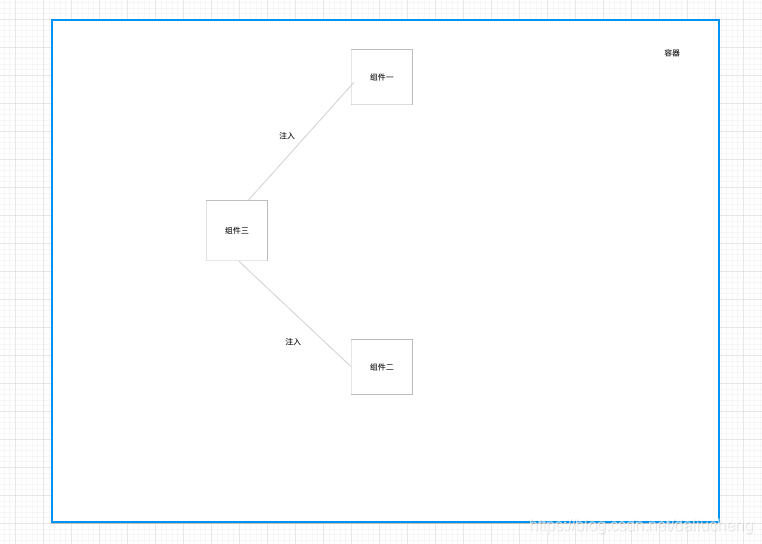
所以说我们需要一个容器来管理所有的bean,各个组件之间的依赖关系,让容器来管理,不需要我们来管理。
所以应该是这样的关系
现在的代码应该变为这样
package day01;
public class AnimalPrint {
     private  Talk animal;
    public AnimalPrint(Talk animal) {
        this.animal = animal;
    }
    public void printAnimalTalk(){
       animal.printHelloWorld();
    }
}
现在传进来一个实现Talk的接口的类,这个就可以运行,就可以完全避免
上面的问题,上面测试所产生的问题,耦合度降低了很多。
现在的问题 ,怎么给AnimalPrint传递一个继承了Talk的类呢?
2. Bean的装配方式
第一种,基于XML
    <bean id="dog" class="first.Dog">
    </bean>

    <bean id="bird" class="first.Bird">
    </bean>

    <bean id="cat" class="first.Cat"></bean>

    <bean  id="animalPrint" class="first.AnimalPrint">
		<!---说明
		<property>标签的name表示 animal属性,ref表示这个属性的值引用的是一个bean(已经申明过的bean)bird表示bean的名字
		--->
        <property name="animal" ref="bird"/>
    </bean>
测试类
package first;

public class AnimalPrint {
	/*
	注意
		要是重写了构造方法,就要必须显示的重写无参的构造方法,
		一般来说 get 和set也要写,但是之后可以不写,之后会有说明的
	*/
    private Talk animal;

    AnimalPrint(){}
    public AnimalPrint(Talk animal) {
        this.animal = animal;
    }

    public Talk getAnimal() {
        return animal;
    }

    public void setAnimal(Talk animal) {
        this.animal = animal;
    }

    public void printAnimalTalk(){
       animal.printHelloWorld();
    }
}


package first;

public interface Talk {
    public void printHelloWorld();
}


package first;

public class Bird implements Talk {
    public void printHelloWorld() {
        System.out.println("Bird.printHelloWorld");
    }
}

package first;

public class Cat  implements Talk {
    public void printHelloWorld() {
        System.out.println("Cat.printHelloWorld");
    }
}


package first;

import org.springframework.context.ApplicationContext;
import org.springframework.context.support.ClassPathXmlApplicationContext;

public class Demo {

    public static void main(String[] args) {
        ClassPathXmlApplicationContext context = new ClassPathXmlApplicationContext("applicationContext.xml");

        AnimalPrint animal = (AnimalPrint) context.getBean("AnimalPrint");

        animal.printHelloWorld();

    }

}
有没有觉得上面的这一种很烦,就上面的那一点点的东西,配置文件就写了这么多,下面的能解决这个问题
第二种 基于自动配置 这种装配模式是不需要xml配置文件的
package first;

import org.springframework.beans.factory.annotation.Autowired;
import org.springframework.beans.factory.annotation.Qualifier;
import org.springframework.stereotype.Component;

@Component //这个注解表示这个类要被spring管理,默认bean的名字是类名第一个字母小写,可以在@Component("名字")指定名字
public class AnimalPrint {
    @Qualifier("cat") 		//指明 装配的bean的名字叫cat
    @Autowired			//自动装配 默认按类型装配 ,多个类型就按照@Qualifier()指明 装配的bean装配
    private Talk animal;

    AnimalPrint(){}
    public AnimalPrint(Talk animal) {
        this.animal = animal;
    }

    public Talk getAnimal() {
        return animal;
    }

    public void setAnimal(Talk animal) {
        this.animal = animal;
    }

    public void printAnimalTalk(){
       animal.printHelloWorld();
    }
}


package first;

import org.springframework.stereotype.Component;
@Component
public class Cat  implements Talk {
    public void printHelloWorld() {
        System.out.println("Cat.printHelloWorld");
    }
}


package first;

import org.springframework.stereotype.Component;
@Component
public class Bird implements Talk {
    public void printHelloWorld() {
        System.out.println("Bird.printHelloWorld");
    }
}


package first;

import com.sun.xml.internal.xsom.parser.AnnotationContext;
import org.springframework.context.ApplicationContext;
import org.springframework.context.annotation.AnnotationConfigApplicationContext;
import org.springframework.context.support.ClassPathXmlApplicationContext;

public class Demo {

    public static void main(String[] args) {
        AnnotationConfigApplicationContext annotationContext = new AnnotationConfigApplicationContext(MyConf.class);
        AnimalPrint bean = annotationContext.getBean(AnimalPrint.class);
        bean.printAnimalTalk();

    }


}

/*
声明这是一个配置类,
*/
package first;

import org.springframework.context.annotation.ComponentScan;
import org.springframework.context.annotation.Configuration;
@ComponentScan(value = {"first"})   //组件扫描,说明要扫描那些包
@Configuration										//声明这是一个配置类
public class MyConf {
/*
	在这里也可以声明组件,用@bean标签标示
*/
}
在xml文件中能做的事情,在配置类中也是可以做的
当然上面的两种情况只是大体上的两种,这两种方式中还会有分类,但是主要搞清楚基于xml方式的装配方式,基于注解的就是很简单的,下面是对基于xml方式的简单介绍
大体有三种
- 设值注入 具体的可以参考这个文章
- 构造注入 具体的可以参考这个文章
- 自动装配 具体的可以参考这个文章
1. byName。
通过byName方式自动装配属性时,定义Bean的时候,在property标签中设置autowire属性为byName,Spring会自动寻找一个与该属性名称相同或id相同的Bean,注入进来。
2. byType。
通过byType方式自动注入属性时,定义Bean的时候,在property标签中设置autowire属性为byType,Spring会自动寻找一个与该属性类型相同的Bean,注入进来。
3. constructor。
通过构造器自动注入。定义Bean时,在bean标签中,设置autowire属性为constructor,那么,Spring会寻找与该Bean的构造函数各个参数类型相匹配的Bean,通过构造函数注入进来。
4. autodetect。
自动装配。如果想进行自动装配,但不知道使用哪种类型的自动装配,那么就可以使用autodetect,让容器自己决定。这是通过在定义Bean时,设置bean标签的autowire属性为autodetect来实现的。设置为autodetect时,Spring容器会首先尝试构造器注入,然后尝试按类型注入。
5. 默认情况下,Spring是不进行自动装配的。
关于注解的自动装配看这个文章
之后的demo里面会对用到的注解做解释,并且之后的demo可能是基于注解和xml混编的
请参考写一篇
spring3


 被折叠的 条评论
为什么被折叠?
被折叠的 条评论
为什么被折叠?
 到【灌水乐园】发言


