


 本教程介绍如何在AngularJS与Firebase构建的应用中实现博客文章的编辑和删除功能,涵盖按钮添加、编辑弹出窗口显示、文章详情填充及更新、删除确认弹出窗口与文章删除等步骤。
在本系列的前一部分中,我们了解了如何创建博客文章并在欢迎页面中显示所有博客文章。 在这一部分中,我们将实现编辑和删除帖子功能。
入门
首先,从GitHub克隆本教程的上一部分。
git clone https://github.com/jay3dec/AngularJS_Firebase_Part5.git克隆源代码后,导航到项目目录并安装所需的依赖项。
cd AngularJS_Firebase_Part5
npm install
安装依赖项后,启动服务器。
npm start将浏览器指向http:// localhost:8000 / app /#/ home ,您应该运行该应用程序。
编辑博客文章
步骤1:添加“编辑”和“删除”按钮
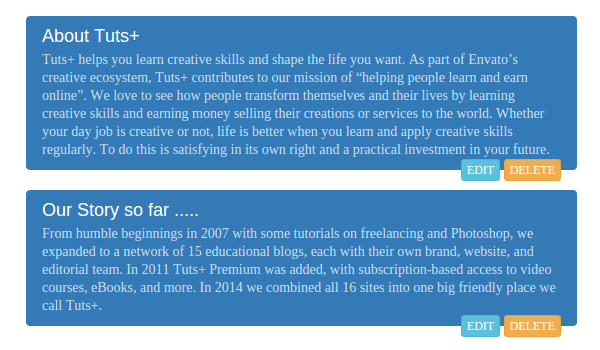
我们将从在博客文章中添加编辑和删除按钮开始。 在上一个教程中,我们在欢迎页面上显示了博客文章。 让我们在博客文章中添加“ Edit和“ Delete按钮。
导航至app/welcome/并打开welcome.html 。 我们使用了引导列表组组件来显示博客文章。 将以下HTML代码添加到list-group组件以显示“ Edit和“ Delete按钮。
<div class="list-group" ng-repeat="article in articles">
    <a href="#" class="list-group-item active">
        <h4 class="list-group-item-heading">{{article.title}}</h4>
        <p class="list-group-item-text">{{article.post}}</p>

        <span class="pull-right">
      <button class="btn btn-xs btn-info">EDIT</button>
      <button class="btn btn-xs btn-warning">DELETE</button>
    </span>
    </a>
</div>
保存更改并重新启动服务器。 使用有效的电子邮件地址和密码登录,您应该能够看到以下屏幕:
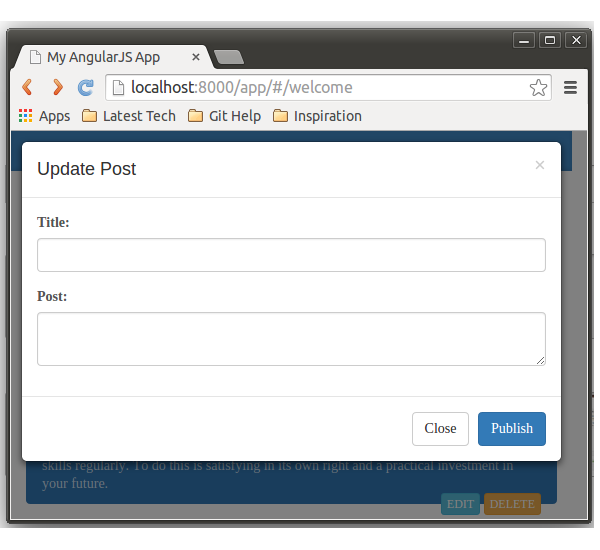
步骤2:点击显示编辑弹出窗口
我们将使用一个称为Modal popup的Bootstrap JavaScript组件。 为了使用Bootstrap JavaScript组件,请在index.html包括jQuery和Bootstrap脚本。
<script src="https://code.jquery.com/jquery-2.0.1.min.js"></script>

<script src="https://maxcdn.bootstrapcdn.com/bootstrap/3.3.1/js/bootstrap.min.js"></script> 包含脚本引用后,将以下弹出HTML代码添加到app/welcome/welcome.html 。
<div class="modal fade" id="editModal" tabindex="-1" role="dialog" aria-labelledby="editModalLabel" aria-hidden="true">
<div class="modal-dialog">
<div class="modal-content">
<div class="modal-header">
<button type="button" class="close" data-dismiss="modal"><span aria-hidden="true">×</span><span class="sr-only">Close</span>
</button>
<h4 class="modal-title" id="editModalLabel">Update Post</h4>
</div>
<div class="modal-body">
<form role="form">
<div class="form-group">
<label for="recipient-name" class="control-label">Title:</label>
<input type="text" class="form-control" id="recipient-name">
</div>
<div class="form-group">
<label for="message-text" class="control-label">Post:</label>
<textarea class="form-control" id="message-text"></textarea>
</div>
</form>
</div>
<div class="modal-footer">
<button type="button" class="btn btn-default" data-dismiss="modal">Close</button>
<button type="button" class="btn btn-primary">Publish</button>
</div>
</div>
</div>
</div> 接下来,修改“ Edit按钮HTML代码以包括data-toggle和data-target以使弹出窗口在单击时显示。
<button class="btn btn-xs btn-info" data-toggle="modal" data-target="#editModal">EDIT</button> data-target属性指向HTML元素的ID,该ID需要在模式弹出窗口中显示。
onclick事件添加到“ Edit按钮的父锚标记中,如下所示:
<a href="#" onclick="return false;" class="list-group-item active"> 保存更改,重新启动服务器,然后尝试登录。当您在欢迎页面上时,单击“ Edit按钮,您应该会显示弹出窗口。
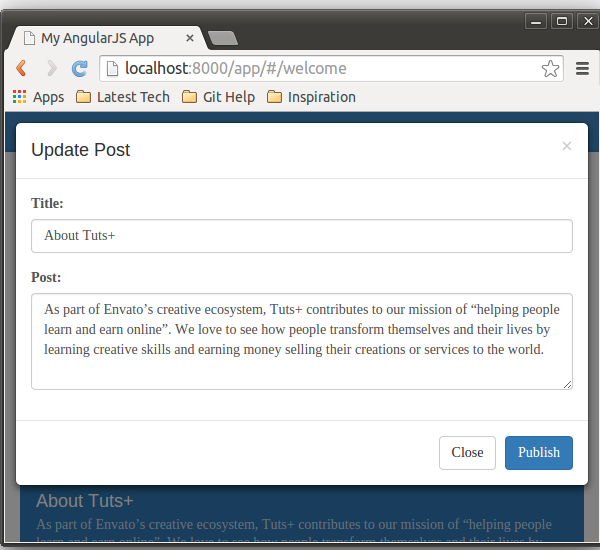
步骤3:填充“编辑”弹出窗口
Firebase中的每个条目都有一个唯一的ID,我们将使用该ID从Firebase中获取特定的记录详细信息。 为了使用唯一ID查询Firebase,我们需要具有该ID。 在上一教程中,我们查询了Firebase,并在欢迎页面中呈现了返回的结果。 这是我们渲染结果的方式:
<div class="list-group" ng-repeat="article in articles">
    <a href="#" onclick="return false;" class="list-group-item active">
        <h4 class="list-group-item-heading">{{article.title}}</h4>
        <p class="list-group-item-text">{{article.post}}</p>

        <span class="pull-right">
      <button class="btn btn-xs btn-info" data-toggle="modal" data-target="#editModal">EDIT</button>
      <button class="btn btn-xs btn-warning" >DELETE</button>
    </span>
    </a>
</div>
现在,从“ Edit按钮中删除data-toggle="modal" 。 我们将从控制器触发模式弹出窗口。
在app/welcome/welcome.js ,添加一个editPost函数,我们将在单击Edit按钮时调用它。 之前,我们使用Firebase URL https://blistering-heat-2473.firebaseio.com/Articles从Firebase获取所有文章。 为了从Firebase获取特定记录,我们需要附加文章的唯一ID,例如https://blistering-heat-2473.firebaseio.com/Articles/-JdMk7taYJCLZg9DfMJg 。
因此,我们将使用唯一ID特定的URL创建Firebase对象,然后对其进行引用以获取作为对象的文章详细信息。 这是editPost函数的外观:
$scope.editPost = function(id) {

    var firebaseObj = new Firebase("https://blistering-heat-2473.firebaseio.com/Articles/" + id);

    var syn = $firebase(firebaseObj);

    $scope.postToUpdate = syn.$asObject();

    $('#editModal').modal();      // triggers the modal pop up
} 打开welcome.html并将ngClick指令添加到“ Edit按钮。 将ngClick函数调用添加到editPost ,传递文章的唯一ID,如下所示:
<button class="btn btn-xs btn-info" ng-click="editPost(article.$id)" data-target="#editModal">EDIT</button> 接下来,我们需要在模式弹出窗口中填充获取的文章的详细信息。 由于详细信息位于$scope.postToUpdate ,因此我们将使用ngModel指令将其绑定到模式。 将ngModel指令添加到post和title文本区域,如下所示:
<input type="text" class="form-control" ng-model="postToUpdate.title" id="recipient-name">

<textarea class="form-control" id="message-text" ng-model="postToUpdate.post"></textarea>
保存所有更改,然后重新启动服务器。 尝试使用有效的电子邮件地址和密码登录。 登录后,单击“ Edit按钮,然后应该在模式弹出窗口中填充文章详细信息。
步骤4:实施更新功能
接下来,我们将实现更新功能。 在编辑模式弹出窗口中填充了文章之后,用户可以修改标题或帖子,然后单击“ Publish 。 单击“发布”后,我们需要更新Firebase中的详细信息。
首先,将ngClick指令添加到“ Publish按钮。
<button type="button" class="btn btn-primary" ng-click="update()">Publish</button> 打开app/welcome/welcome.js并添加一个update功能调用,该调用在“ Publish按钮单击时被调用。 在更新功能内部,我们需要使用附加唯一文章ID的Firebase URL创建一个Firebase对象。
var fb = new Firebase("https://blistering-heat-2473.firebaseio.com/Articles/"+$scope.postToUpdate.$id); 使用fb对象创建一个$firebase对象。
var article = $firebase(fb);使用article对象,我们将调用update API来更新对Firebase的更改。
article.$update({
    title: $scope.postToUpdate.title,
    post: $scope.postToUpdate.post,
    emailId: $scope.postToUpdate.emailId
}).then(function(ref) {
    // Update successful
}, function(error) {
    console.log("Error:", error);
});
更新成功后,请关闭模式弹出窗口。 添加以下代码以更新成功回调。
$('#editModal').modal('hide'); 这是完整的update功能:
$scope.update = function() {
    var fb = new Firebase("https://blistering-heat-2473.firebaseio.com/Articles/" + $scope.postToUpdate.$id);
    var article = $firebase(fb);
    article.$update({
        title: $scope.postToUpdate.title,
        post: $scope.postToUpdate.post,
        emailId: $scope.postToUpdate.emailId
    }).then(function(ref) {
        $('#editModal').modal('hide');
    }, function(error) {
        console.log("Error:", error);
    });
}
保存所有更改,然后重新启动服务器。 尝试使用有效的电子邮件地址和密码登录。 登录后,尝试编辑和更新帖子。
删除博客文章
接下来,让我们实现删除帖子功能。 在删除帖子之前,很容易显示确认弹出窗口,因此让我们开始吧。
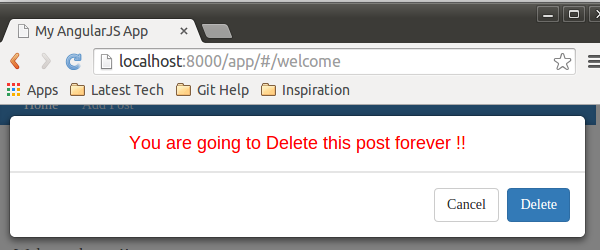
步骤1:显示“删除确认”弹出窗口
在这里,我们还将使用Bootstrap模式来显示确认弹出窗口。 将以下HTML代码添加到welcome.html :
<div class="modal fade" id="deleteModal" tabindex="-1" role="dialog" aria-labelledby="deleteModalLabel" aria-hidden="true">
    <div class="modal-dialog">
        <div class="modal-content">
            <div class="modal-header" style="text-align:center;">
                <h4 class="modal-title" style="color:red;" id="deleteModalLabel">You are going to Delete this post forever !!</h4>
            </div>

            <div class="modal-footer">
                <button type="button" class="btn btn-default" data-dismiss="modal">Cancel</button>
                <button type="button" class="btn btn-primary" ng-click="update()">Delete</button>
            </div>
        </div>
    </div>
</div>
现在,修改“ Delete按钮以添加data-toggle和data-target属性,如下所示:
<button class="btn btn-xs btn-warning" data-toggle="modal" data-target="#deleteModal" >DELETE</button> data-toggle属性触发模式弹出窗口,而data-target属性标识将哪个HTML块显示为模式弹出窗口。
保存更改并重新启动服务器。 登录并单击“ Delete按钮,您应该会看到删除确认弹出窗口。
第2步:删除帖子
现在,为了删除博客文章,我们需要从Firebase检索文章。 获得ID后,如果用户从模式弹出窗口中单击Delete,我们将从Firebase中删除该文章。
因此,首先从Delete按钮中删除data-toggle属性,因为一旦获取了文章,我们将从控制器触发模式弹出窗口。 另外,将ngClick指令添加到Delete按钮。
<button class="btn btn-xs btn-warning" ng-click="confirmDelete(article.$id)" data-target="#deleteModal" >DELETE</button> 在app/welcome/welcome.js内部,创建一个名为confirmDelete的新函数,该函数将触发模式弹出窗口并从Firebase中获取文章。 这是confirmDelete函数的样子:
$scope.confirmDelete = function(id) {
        var fb = new Firebase("https://blistering-heat-2473.firebaseio.com/Articles/" + id);
        var article = $firebase(fb);
        $scope.postToDelete = article.$asObject();
        $('#deleteModal').modal();
} 如上面的代码所示,我们已经使用商品ID创建了Firebase对象。 使用$firebase我们检索了article对象。 使用此文章对象,我们将能够从Firebase中删除该文章。
接下来,添加另一个名为deletePost函数,一旦用户确认删除文章,我们将调用该函数。 在confirmDelete函数中,我们已经将商品对象分配给$scope.postToDelete 。 在deletePost函数中,我们将使用$scope.postToDelete对象引用该文章并将其从Firebase中删除。 这是deletePost函数的外观:
$scope.deletePost = function() {
        var fb = new Firebase("https://blistering-heat-2473.firebaseio.com/Articles/" + $scope.postToDelete.$id);
        var article = $firebase(fb);
        article.$remove().then(function(ref) {
            $('#deleteModal').modal('hide');
        }, function(error) {
            console.log("Error:", error);
        });
}我们已使用$ remove API方法将文章从Firebase中删除。 成功删除后,我们还切换了删除确认弹出窗口的可见性。
在删除模式弹出窗口中的“ Delete按钮上添加ngClick指令。
<button type="button" class="btn btn-primary" ng-click="deletePost()">Delete</button>保存所有更改,然后重新启动服务器。 使用有效的电子邮件地址和密码登录。 登录后,尝试删除文章。
包起来
在本教程中,我们看到了如何使用API方法编辑和删除Firebase中添加的博客文章。 在本教程的下一部分中,我们将尝试将Ladda加载指示器集成到我们的应用程序中。 我们还将修复应用程序中存在的一些小问题。
请在下面的评论中告诉我们您的想法!
该教程的源代码可在GitHub上获得 。


 171
171

 被折叠的 条评论
为什么被折叠?
被折叠的 条评论
为什么被折叠?
 到【灌水乐园】发言


