Nginx 安装配置

nginx安装及简要配置 介绍nginx安装及简要配置。 阅读详情

首先进入root下

安装编译工具及库文件

yum -y install make zlib zlib-devel gcc-c++ libtool  openssl openssl-devel

接着

要安装 PCRE

PCRE 作用是让 Nginx 支持 Rewrite 功能。

打开src目录

cd /usr/local/src/

下载PCRE压缩包

wget http://downloads.sourceforge.net/project/pcre/pcre/8.35/pcre-8.35.tar.gz

解压安装包:

tar zxvf pcre-8.35.tar.gz

进入安装包目录

cd pcre-8.35

编译安装 

./configure
make && make install

查看pcre版本

pcre-config --version

安装 Nginx

打开src目录

cd /usr/local/src/

下载

wget http://nginx.org/download/nginx-1.6.2.tar.gz

解压

tar zxvf nginx-1.6.2.tar.gz

进入安装目录

 cd nginx-1.6.2

编译安装

./configure --prefix=/usr/local/webserver/nginx --with-http_stub_status_module --with-http_ssl_module --with-pcre=/usr/local/src/pcre-8.35

make

make install

查看nginx版本

/usr/local/webserver/nginx/sbin/nginx -v

Nginx 配置

创建 Nginx 运行使用的用户

创建 Nginx 运行使用的用户 www

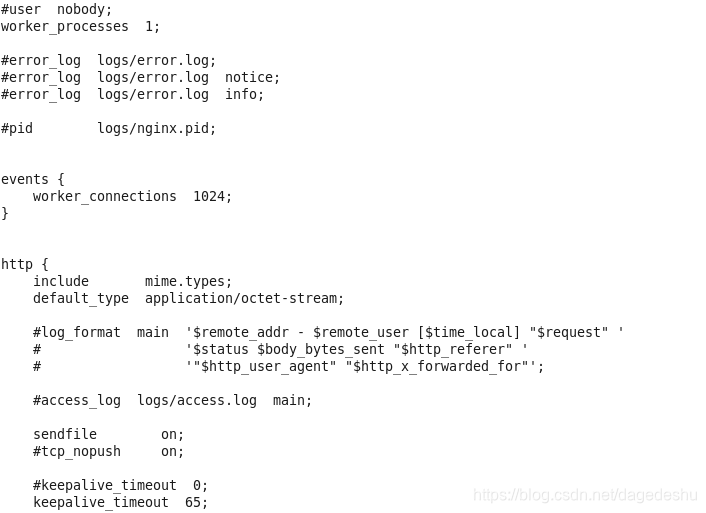
配置nginx.conf ,将/usr/local/webserver/nginx/conf/nginx.conf替换为以下内容

原来是这样:

修改为:

user www www;
worker_processes 2; #设置值和CPU核心数一致
error_log /usr/local/webserver/nginx/logs/nginx_error.log crit; #日志位置和日志级别
pid /usr/local/webserver/nginx/nginx.pid;
#Specifies the value for maximum file descriptors that can be opened by this process.
worker_rlimit_nofile 65535;
events
{
  use epoll;
  worker_connections 65535;
}
http
{
  include mime.types;
  default_type application/octet-stream;
  log_format main  '$remote_addr - $remote_user [$time_local] "$request" '
               '$status $body_bytes_sent "$http_referer" '
               '"$http_user_agent" $http_x_forwarded_for';
  
#charset gb2312;
     
  server_names_hash_bucket_size 128;
  client_header_buffer_size 32k;
  large_client_header_buffers 4 32k;
  client_max_body_size 8m;
     
  sendfile on;
  tcp_nopush on;
  keepalive_timeout 60;
  tcp_nodelay on;
  fastcgi_connect_timeout 300;
  fastcgi_send_timeout 300;
  fastcgi_read_timeout 300;
  fastcgi_buffer_size 64k;
  fastcgi_buffers 4 64k;
  fastcgi_busy_buffers_size 128k;
  fastcgi_temp_file_write_size 128k;
  gzip on; 
  gzip_min_length 1k;
  gzip_buffers 4 16k;
  gzip_http_version 1.0;
  gzip_comp_level 2;
  gzip_types text/plain application/x-javascript text/css application/xml;
  gzip_vary on;
 
  #limit_zone crawler $binary_remote_addr 10m;
 #下面是server虚拟主机的配置
 server
  {
    listen 80;#监听端口
    server_name localhost;#域名
    index index.html index.htm index.php;
    root /usr/local/webserver/nginx/html;#站点目录
      location ~ .*\.(php|php5)?$
    {
      #fastcgi_pass unix:/tmp/php-cgi.sock;
      fastcgi_pass 127.0.0.1:9000;
      fastcgi_index index.php;
      include fastcgi.conf;
    }
    location ~ .*\.(gif|jpg|jpeg|png|bmp|swf|ico)$
    {
      expires 30d;
  # access_log off;
    }
    location ~ .*\.(js|css)?$
    {
      expires 15d;
   # access_log off;
    }
    access_log off;
  }

}
# 查看物理CPU个数
cat /proc/cpuinfo| grep "physical id"| sort| uniq| wc -l

# 查看每个物理CPU中core的个数(即核数)
cat /proc/cpuinfo| grep "cpu cores"| uniq

# 查看逻辑CPU的个数
cat /proc/cpuinfo| grep "processor"| wc -l

查看本地ip

ifconfig

检查配置文件nginx.conf的正确性命令

/usr/local/webserver/nginx/sbin/nginx -t

启动 Nginx

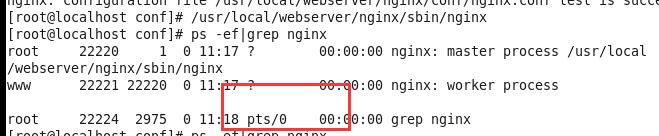
/usr/local/webserver/nginx/sbin/nginx

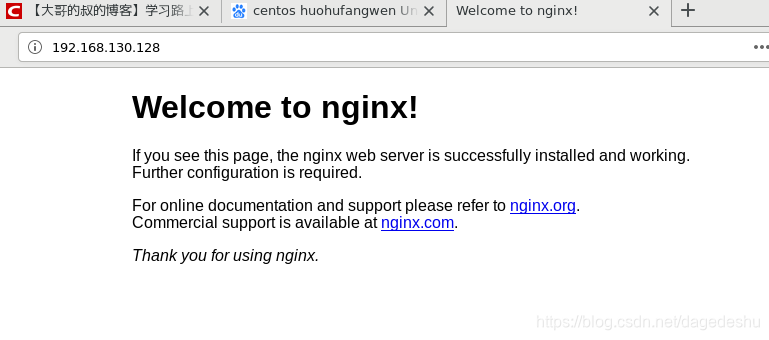
就是使用自己的IP访问或者输入localhost也可以

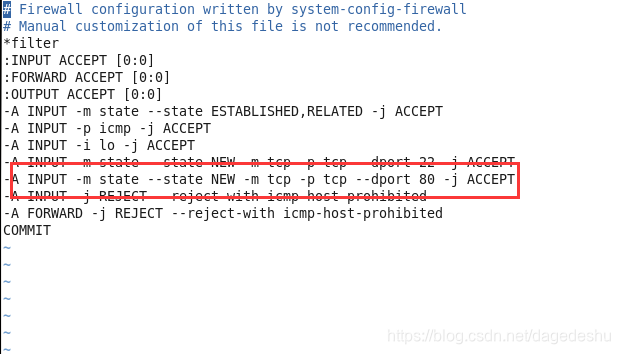
如果访问不了有可能是防火墙开启关闭:service iptables stop  

或者修改

打开 

修改后重启

基本就解决问题了

Altium AD20差分对走线设置方法 AD20的PCB差分对走线设置 1、原理图添加差分对 先在原理图中,讲要设置差分对的网络对添加网络标签。 名称前面的内容要相同,后缀用 _P 和 _N 加以区分。 最后使用 放置差分对,将两个网络标记。 2、编译,更改到PCB 编译,更新到PCB,确认差分对网络的出现。 验证更改,执行更改。将改动更新到PCB中。 PCB中,可通过 右下角 Panels - 调出 PCB 显示。来对已添加的差分对进行查看。 这时原本的走线有一点点小问题,需要删掉原来走线,设置差分对规则,并重新布线。 阅读详情

相关推荐

保姆级教程:用MATLAB复现格拉斯哥大学FMCW雷达数据集多普勒谱(附完整代码与避坑指南)

本文提供了一份详细的MATLAB教程,指导如何复现格拉斯哥大学FMCW雷达数据集的多普勒谱分析。从环境准备、数据获取到距离压缩、MTI滤波、时频分析(STFT)以及结果后处理,涵盖了完整流程,并附有优化代码和避坑指南,特别适合雷达信号处理研究者和工程师。

weixin_28720767的博客 114

Nginx 安装 SSL 配置 HTTPS

Nginx 安装 SSL 配置 HTTPS 文章目录Nginx 安装 SSL 配置 HTTPS一、Nginx 的 SSL 模块安装二、SSL 证书部署三、Nginx.conf 配置四、重启 nginx 一、Nginx 的 SSL 模块安装 查看 nginx 是否安装 http_ssl_module 模块。 $ /usr/local/nginx/sbin/nginx -V 如果出现 configure arguments: –with-http_ssl_module, 则已安装(下面的步骤可以跳过,进

weixin_44745741的博客 1280

基于STM32与SimpleFOC实现直流无刷电机开环控制的实战指南

本文提供了一份基于STM32微控制器与SimpleFOC开源库实现直流无刷电机开环控制的详细实战指南。内容涵盖硬件连接、PlatformIO环境搭建、核心代码解析及上电测试,旨在帮助开发者快速验证硬件并理解开环控制的基本原理,为后续实现高性能的闭环FOC控制奠定基础。

xxx12的博客 959

Nginx基础篇-Nginx的编译参数

Nginx基础篇-Nginx的编译参数

yyf0430的博客 1384

TCGA之GDC-client工具下载安装与使用

文章主要是对GDC-client工具下载TCGA数据库数据整个过程的一个记录 1.下载GDC-client工具 GDC-client工具网址:GDC Data Transfer Tool | NCI Genomic Data Commons (cancer.gov) 我这里下的是上图中红圈中的版本, 2.解压安装 从网上了解的是不能解压到带中文的路径里,解压后是一个.exe文件,为了能直接在cmd命令行下使用,将其加入系统环境: 点击新建之后,输入将文件解压到的路径,然后...

better_strong的博客 1万+

PX4实战指南:通过遥控器通道映射实现多舵机PWM精准控制

本文详细介绍了通过PX4飞控的AUX PWM接口实现遥控器通道映射控制多舵机的实战指南。内容包括硬件选型与连接、软件参数配置、通道映射方法以及常见问题排查,帮助开发者精准实现无人机舵机PWM控制,适用于云台、机械臂等扩展功能开发。

ee345的博客 304

Centos6.5下安装Nginx+Tomcat(安装Nginx)

1.安装make yum -y install gcc automake autoconf libtool make 2.安装g++ yum install gcc gcc-c++ 3.安装pcre 下载地址:ftp://ftp.csx.cam.ac.uk/pub/software/programming/pcre/ ...

ANANHAO12345的博客 241

飞常准小程序接口逆向分析:如何破解航班查询的签名机制

本文深度解析了飞常准小程序航班查询接口的安全机制,重点剖析了其基于MD5和参数排序的签名算法。通过逆向分析核心代码,详细阐述了签名生成流程,并提供了Python实现的签名生成器与调试技巧,为开发者理解与模拟此类接口调用提供了实战指南。

zz67890的博客 531

Nginx安装

一. 下载nginx 进入 http://nginx.org/en/download.html 网址 分别有 Mainline version(主线版、开发版)、Stable version(稳定版)、Legacy versions(历史版本) 在这里选择稳定版进行下载 可以复制链接,使用wget工具直接下载到 linux 中的目录,也可以先下载下来,然后放入到 linux 中 wget http://nginx.org/download/nginx-1.16.1.tar.gz 二. 安装nginx 2

qq_39430927的博客 349

智能车图像处理22-进阶篇14--小s的判断

这篇文章中主要讲述智能车图像处理中 : 小s的判断方法。

taiyuezyh的博客 2565

HTML音乐爱心3D旋转相册完整源码

HTML音乐爱心3D旋转相册完整源码

LilyCoder的博客 1379

Nginx configure 参数

配置 说明 默认值 --prefix=PATH 设置安装文件夹 /usr/local/nginx --sbin-path=PATH 执行程序文件(nginx) /usr/local/nginx/sbin/nginx --modules-path=PATH 设置模块文件夹 ...

733

【系统分析师】2009年真题:综合知识-答案及详解

在某银行业务的用例模型中,“取款”用例需要等到“存款”用例执行之后才能执行,两个用例之间的关系属于(1);“取款”和“存款”两个用例中都需 要执行查询余额的功能,将查询余额提取成独立的用例,那么“取款”和“存款” 用例与“查询余额”用例之间的关系属于(2)。(1)A. 关联关系 B. 扩展关系 C. 使用关系 D. 依赖关系 (2)A. 扩展关系 B. 使用关系 C. 依赖关系 D. 继承关系【参考答案】D、A雇员类含有计算报酬的行为,利用面向对象的(3),可以使得其派生类专职 雇员类和兼职雇员类计算报酬的

数据知道的博客 1万+

centOS7安装nginx及nginx配置

安装所需插件 1、安装gcc gcc是linux下的编译器在此不多做解释,感兴趣的小伙伴可以去查一下相关资料,它可以编译C,C++,Ada,Object C和Java等语言 命令:查看gcc版本 gcc -v 一般阿里云的centOS7里面是都有的,没有安装的话会提示命令找不到, 安装命令: yum -y install gcc 2、pcre、pcre-...

Snow、杨 30万+

深度学习工具包 DeepLearningToolbox

深度学习工具包Deprecation notice.-----This toolbox is outdated and no longer maintained.There are much better tools available for deep learning than this toolbox, e.g. [Theano](http://deeplearning.net/software/theano/), [torch](http://torch.ch/) or [tensorflow](http://www.tensorflow.org/)I would suggest you use one of the tools mentioned above rather than use this toolbox.Best, Rasmus.DeepLearnToolbox================A Matlab toolbox for Deep Learning.Deep Learning is a new subfield of machine learning that focuses on learning deep hierarchical models of data.It is inspired by the human brain's apparent deep (layered, hierarchical) architecture.A good overview of the theory of Deep Learning theory is[Learning Deep Architectures for AI](http://www.iro.umontreal.ca/~bengioy/papers/ftml_book.pdf)For a more informal introduction, see the following videos by Geoffrey Hinton and Andrew Ng.* [The Next Generation of Neural Networks](http://www.youtube.com/watch?v=AyzOUbkUf3M) (Hinton, 2007)* [Recent Developments in Deep Learning](http://www.youtube.com/watch?v=VdIURAu1-aU) (Hinton, 2010)* [Unsupervised Feature Learning and Deep Learning](http://www.youtube.com/watch?v=ZmNOAtZIgIk) (Ng, 2011)If you use this toolbox in your research please cite [Prediction as a candidate for learning deep hierarchical models of data](http://www2.imm.dtu.dk/pubdb/views/publication_details.php?id=6284)```@MASTERSTHESIS\{IMM2012-06284, author = "R. B. Palm", title = "Prediction as a candidate for learning deep hierarchical models of data", year = "2012",}```Contact: rasmusbergpalm at gmail dot comDirectories included in the toolbox-----------------------------------`NN/` - A library for Feedforward Backpropagation Neural Networks`CNN/` - A library for Convolutional Neural Networks`DBN/` - A library for Deep Belief Networks`SAE/` - A library for Stacked Auto-Encoders`CAE/` - A library for Convolutional Auto-Encoders`util/` - Utility functions used by the libraries`data/` - Data used by the examples`tests/` - unit tests to verify toolbox is workingFor references on each library check REFS.mdSetup-----1. Download.2. addpath(genpath('DeepLearnToolbox'));Example: Deep Belief Network---------------------```matlabfunction test_example_DBNload mnist_uint8;train_x = double(train_x) / 255;test_x = double(test_x) / 255;train_y = double(train_y);test_y = double(test_y);%% ex1 train a 100 hidden unit RBM and visualize its weightsrand('state',0)dbn.sizes = [100];opts.numepochs = 1;opts.batchsize = 100;opts.momentum = 0;opts.alpha = 1;dbn = dbnsetup(dbn, train_x, opts);dbn = dbntrain(dbn, train_x, opts);figure; visualize(dbn.rbm{1}.W'); % Visualize the RBM weights%% ex2 train a 100-100 hidden unit DBN and use its weights to initialize a NNrand('state',0)%train dbndbn.sizes = [100 100];opts.numepochs = 1;opts.batchsize = 100;opts.momentum = 0;opts.alpha = 1;dbn = dbnsetup(dbn, train_x, opts);dbn = dbntrain(dbn, train_x, opts);%unfold dbn to nnnn = dbnunfoldtonn(dbn, 10);nn.activation_function = 'sigm';%train nnopts.numepochs = 1;opts.batchsize = 100;nn = nntrain(nn, train_x, train_y, opts);[er, bad] = nntest(nn, test_x, test_y);assert(er < 0.10, 'Too big error');```Example: Stacked Auto-Encoders---------------------```matlabfunction test_example_SAEload mnist_uint8;train_x = double(train_x)/255;test_x = double(test_x)/255;train_y = double(train_y);test_y = double(test_y);%% ex1 train a 100 hidden unit SDAE and use it to initialize a FFNN% Setup and train a stacked denoising autoencoder (SDAE)rand('state',0)sae = saesetup([784 100]);sae.ae{1}.activation_function = 'sigm';sae.ae{1}.learningRate = 1;sae.ae{1}.inputZeroMaskedFraction = 0.5;opts.numepochs = 1;opts.batchsize = 100;sae = saetrain(sae, train_x, opts);visualize(sae.ae{1}.W{1}(:,2:end)')% Use the SDAE to initialize a FFNNnn = nnsetup([784 100 10]);nn.activation_function = 'sigm';nn.learningRate = 1;nn.W{1} = sae.ae{1}.W{1};% Train the FFNNopts.numepochs = 1;opts.batchsize = 100;nn = nntrain(nn, train_x, train_y, opts);[er, bad] = nntest(nn, test_x, test_y);assert(er < 0.16, 'Too big error');```Example: Convolutional Neural Nets---------------------```matlabfunction test_example_CNNload mnist_uint8;train_x = double(reshape(train_x',28,28,60000))/255;test_x = double(reshape(test_x',28,28,10000))/255;train_y = double(train_y');test_y = double(test_y');%% ex1 Train a 6c-2s-12c-2s Convolutional neural network %will run 1 epoch in about 200 second and get around 11% error. %With 100 epochs you'll get around 1.2% errorrand('state',0)cnn.layers = { struct('type', 'i') %input layer struct('type', 'c', 'outputmaps', 6, 'kernelsize', 5) %convolution layer struct('type', 's', 'scale', 2) %sub sampling layer struct('type', 'c', 'outputmaps', 12, 'kernelsize', 5) %convolution layer struct('type', 's', 'scale', 2) %subsampling layer};cnn = cnnsetup(cnn, train_x, train_y);opts.alpha = 1;opts.batchsize = 50;opts.numepochs = 1;cnn = cnntrain(cnn, train_x, train_y, opts);[er, bad] = cnntest(cnn, test_x, test_y);%plot mean squared errorfigure; plot(cnn.rL);assert(er<0.12, 'Too big error');```Example: Neural Networks---------------------```matlabfunction test_example_NNload mnist_uint8;train_x = double(train_x) / 255;test_x = double(test_x) / 255;train_y = double(train_y);test_y = double(test_y);% normalize[train_x, mu, sigma] = zscore(train_x);test_x = normalize(test_x, mu, sigma);%% ex1 vanilla neural netrand('state',0)nn = nnsetup([784 100 10]);opts.numepochs = 1; % Number of full sweeps through dataopts.batchsize = 100; % Take a mean gradient step over this many samples[nn, L] = nntrain(nn, train_x, train_y, opts);[er, bad] = nntest(nn, test_x, test_y);assert(er < 0.08, 'Too big error');%% ex2 neural net with L2 weight decayrand('state',0)nn = nnsetup([784 100 10]);nn.weightPenaltyL2 = 1e-4; % L2 weight decayopts.numepochs = 1; % Number of full sweeps through dataopts.batchsize = 100; % Take a mean gradient step over this many samplesnn = nntrain(nn, train_x, train_y, opts);[er, bad] = nntest(nn, test_x, test_y);assert(er < 0.1, 'Too big error');%% ex3 neural net with dropoutrand('state',0)nn = nnsetup([784 100 10]);nn.dropoutFraction = 0.5; % Dropout fraction opts.numepochs = 1; % Number of full sweeps through dataopts.batchsize = 100; % Take a mean gradient step over this many samplesnn = nntrain(nn, train_x, train_y, opts);[er, bad] = nntest(nn, test_x, test_y);assert(er < 0.1, 'Too big error');%% ex4 neural net with sigmoid activation functionrand('state',0)nn = nnsetup([784 100 10]);nn.activation_function = 'sigm'; % Sigmoid activation functionnn.learningRate = 1; % Sigm require a lower learning rateopts.numepochs = 1; % Number of full sweeps through dataopts.batchsize = 100; % Take a mean gradient step over this many samplesnn = nntrain(nn, train_x, train_y, opts);[er, bad] = nntest(nn, test_x, test_y);assert(er < 0.1, 'Too big error');%% ex5 plotting functionalityrand('state',0)nn = nnsetup([784 20 10]);opts.numepochs = 5; % Number of full sweeps through datann.output = 'softmax'; % use softmax outputopts.batchsize = 1000; % Take a mean gradient step over this many samplesopts.plot = 1; % enable plottingnn = nntrain(nn, train_x, train_y, opts);[er, bad] = nntest(nn, test_x, test_y);assert(er < 0.1, 'Too big error');%% ex6 neural net with sigmoid activation and plotting of validation and training error% split training data into training and validation datavx = train_x(1:10000,:);tx = train_x(10001:end,:);vy = train_y(1:10000,:);ty = train_y(10001:end,:);rand('state',0)nn = nnsetup([784 20 10]); nn.output = 'softmax'; % use softmax outputopts.numepochs = 5; % Number of full sweeps through dataopts.batchsize = 1000; % Take a mean gradient step over this many samplesopts.plot = 1; % enable plottingnn = nntrain(nn, tx, ty, opts, vx, vy); % nntrain takes validation set as last two arguments (optionally)[er, bad] = nntest(nn, test_x, test_y);assert(er < 0.1, 'Too big error');```[![Bitdeli Badge](https://d2weczhvl823v0.cloudfront.net/rasmusbergpalm/deeplearntoolbox/trend.png)](https://bitdeli.com/free "Bitdeli Badge")

jre9下载 jdk9

(Java SE Runtime Environment 9.0) 9.0u175 官方最新版 【x86|x64】

Nginx的安装配置教程

Nginx是一款轻量级的Web服务器/反向代理服务器及电子邮件(IMAP/POP3)代理服务器。其特点是占有内存少,并发能力强,事实上nginx的并发能力在同类型的网页服务器中表现较好

BraveZhouzhou的博客 2万+

Probability and Statistics - 4th edition

Probability and Statistics - 4th edition

Nginx安装配置

在新机器上首次安装nginx之前,需要设置nginx软件包存储库。之后,您可以从存储库安装和更新nginx。默认情况下,使用稳定的nginx软件包的存储库。Nginx 编译安装与配置使用。Nginx 部署-Yum方式

o1234567ii的博客 1454

IEM模型,地表粗糙度模拟

利用微波反演土壤水分时候,利用IEM模型可以实现对随机地表的模拟

Ubuntu安装配置nginx

系Ubuntu安装配置nginx 提示:这里可以添加系列文章的所有文章的目录,目录需要自己手动添加 例如:第一章 Python 机器学习入门之pandas的使用 提示:写完文章后,目录可以自动生成,如何生成可参考右边的帮助文档 文章目录系Ubuntu安装配置nginx前言一、pandas是什么?二、使用步骤1.引入库2.读入数据总结 前言 提示:这里可以添加本文要记录的大概内容: 例如:随着人工智能的不断发展,机器学习这门技术也越来越重要,很多人都开启了学习机器学习,本文就介绍了机器学习的基础内容。

zyf_smile的博客 1万+

Nginx安装、配置

Nginx安装、配置

一恍过去 1万+

NGINX安装和全局配置

首先,确认当前运行的Nginx版本和配置。Nginx的配置文件主要位于(在大多数Linux发行版中),但也可以包括其他文件,这些文件通过include指令被引入。全局块:主要设置影响nginx服务器整体运行的配置指令,如user(运行nginx进程的用户)、(工作进程数量)、error_log(错误日志路径)等。events块:主要影响nginx服务器与用户的网络连接,如(单个工作进程的最大并发连接数)。http块:可以包含多个server块,用于定义虚拟主机。http块还可以包含一些影响所有。

yz3004653的博客 1395

Ubuntu安装配置Nginx

安装NginxNginx下载网站:http://nginx.org/ ,根据需要下载版本,一般提供两种版本stable版本和mainline 版本,在实际生产环境中建议使用stable版本,此次下载安装的版本为:nginx-1.10.3.tar.gz。配置环境为ubuntu-16.10-server-amd64系统。 文件目录在Ubuntu目录下自己新建的/myapp/soft/目录下(此目录也可

shmilychan的博客 1万+

nginx的安装以及配置

一、安装 官网 https://nginx.org/en/download.html 命令 # 下载 wget https://nginx.org/download/nginx-1.14.2.tar.gz # 解压 tar -zxvf nginx-1.14.2.tar.gz # 检测当前系统环境,以确保能成功安装nginx ./configure # 安装 make&make instal...

lazyRabbit的博客 1221

Linux之安装配置Nginx

使用wget命令或直接在浏览器中下载Nginx的安装包(如nginx-xx.xx.xx.tar.gz)。通过编辑这个文件,可以修改Nginx的监听端口、服务器名称、日志文件路径等配置。:确保Linux系统已安装,并且具有网络连接(以便在线安装依赖或下载Nginx)。: 进入Nginx的安装目录下的sbin目录,执行nginx启动脚本。选项指定Nginx的安装路径,以及其他一些可选的配置选项。命令访问Nginx服务的默认页面(通常监听在80端口)。: 进入解压后的Nginx目录,执行配置脚本。

ldwtxwh的专栏 899

nginx安装及配置

经常遇到的nginx问题及命令---------至主动之人!这边对nginx配置http请求做的一些通用配置,记录方便查找。

weixin_40026022的博客 1514

Linux下安装配置nginx

首先到ngnix官网(http://nginx.org/en/download.html)下载ngnix的安装包。当然你也可以通过wget命令wgethttps://nginx.org/download/nginx-1.19.1.tar.gz 把下载好的安装包上传到linux上 解压 tar -zxvfnginx-1.19.1.tar.gz 然后把解压后的文件移到到 /usr/local目录下(也可以在解压的时候指定,通过-C指定, tar -zxvf nginx-1.19.1.tar.gz ..

chunguang.yao的博客 1268
上一篇: 大数据的浅显分析与假想
下一篇: 创建github仓库(入门级)
大哥的叔
博客等级 码龄8年 72粉丝 295原创
评论
成就一亿技术人!
拼手气红包6.0元
还能输入1000个字符
 
 条评论被折叠 查看
添加红包

请填写红包祝福语或标题

个

红包个数最小为10个

元

红包金额最低5元

当前余额3.43元 前往充值 >
需支付:10.00元
成就一亿技术人!
领取后你会自动成为博主和红包主的粉丝 规则
hope_wisdom
发出的红包
实付元
使用余额支付
点击重新获取
扫码支付
钱包余额 0

抵扣说明:

1.余额是钱包充值的虚拟货币,按照1:1的比例进行支付金额的抵扣。
2.余额无法直接购买下载,可以购买VIP、付费专栏及课程。

余额充值