


 本文详细介绍了Vue组件间的通讯方式,包括:父组件通过props和方法传递数据给子组件,子组件通过$emit和$parent回传数据给父组件,兄弟组件间通过共同父组件或EventBus实现通讯,以及非父子组件间使用Vuex进行状态管理。文章涵盖了Vuex的state、getters、mutations、actions和模块化使用。
Vue组件之间的通讯方式(父传子、子传父、兄弟组件间传值)
*引子
- 首先,我们初步建立一个以vue/cli4为基础的项目;
- 在components的文件夹下新建Parent.vue和ChildOne的父组件和子组件;
- 在App.vue和Parent.vue中映射成组件标签。
基本结构如下:
Parent.vue
<template>
    <div>
    	<h1>Parent</h1>
        <child-one></child-one>
    </div>
</template>

<script>
import ChildOne from '@/components/ChildOne'
export default {
    data () {
        return {

        }
    },
    components:{
        ChildOne
    }
}
</script>
ChildOne.vue
<template>
    <div>
        <h1>ChildOne</h1>
    </div>
</template>

<script>
export default {
};
</script>
一、父传子
- Props属性传递
父组件通过自定义属性给子组件传值,子组件用props接收
代码如下
Parent.vue
//template
<div>
	<h1>Parent</h1>
	<child-one :msgToChild="msg"></child-one>
</div>

//script
data () {
	return {
		msg:'i am you father'
    }
},
ChildOne.vue
//template
<div>
	<h1>ChildOne</h1>
	<div>接收到父亲传来的消息:{{msgToChild}}</div>
</div>

//script
export default {
    //第一种写法
    // props:['msgToChild']
    //第二种写法
     props: {
            msgToChild: {
                type: String,
            }
     }
};
- 方法传递
通过组件标签进行方法的传递,子组件$emit触发方法
Parent.vue
//template
<!--进行方法的传递-->
<child-one @methodToChild="showMsg"></child-one>

//script
methods:{
	/*定义方法*/
	showMsg () {
		alert('i am your father')
	}
},
ChildOne.vue
//tempalte
    <div>接收到父亲传来的消息:{{msgToChild}}</div>
    <!--定义一个按钮用来触发方法-->
    <button @click="needFatherMethod">place click me</button>

//script
 props:{
        /*接收方法*/
        methodToChild:{
            type:Function
        }
    },
 methods:{
        /*触发方法*/
        needFatherMethod () {
            this.$emit('methodToChild')
        }
    }
- 通过parent获取方法和属性
通过$parent来获取父组件的实例,从而获取父组件的属性和方法
子组件:ChildOne.vue
//template
 <!--新建一个按钮来触发方法-->
    <button @click="$parentMethod">place $parent</button>
    /*定义后去父组件实例的方法*/
    $parentMethod (){
       // console.log(this.$parent._data.msg)//i am you father
        console.log(this.$parent.msg)//i am you father
        this.$parent.showMsg()//调用方法
    }
二、子传父
1、 属性传递
通过触发父组件的方法进行传递数据(这等同于父 --> 子 传递方法,方法的参数就是子组件的数据,emit的第二个参数就是父组件想要的数据)
缺点
- 需要一定的触发条件
- 不是响应式数据
- 一般触发条件只能在子组件,因为要得到的是子组件的数据(比如说在父函数定义一个方法通过这种方式来的到子组件数据,似乎比较困难。但是可以通过生命周期函数在子组件触发来传递数据)
父组件:Parent.vue
//template
<div>接收到子组件传来的消息: {{childMsg}}</div>
<!--进行方法的传递-->
<child-one @getChildMsg="getChildMsg"></child-one>
  //script
  data () {
        return {
            childMsg:''
        }
    },
    /*1.定义得到子组件数据的方法,触发条件只能在子组件
    * 2.在data中定义一个属性来保存子组件传递过来的数据
    * */
    getChildMsg (childMsg){
        this.childMsg = childMsg
    },
子组件:ChildOne.vue
//template
<!--定义向父组件信息的触发的条件-->
 <button @click="setParentMsg">place send parent msg</button>
//script
 data (){
        return {
            /*子组件数据*/
            msg:'i am your child'
        }
    },
   /*触发父组件的方法,并传递参数*/
   setParentMsg (){
       this.$emit('getChildMsg',this.msg)
   },
- 通过$refs主动获取子组件方法和属性
通过ref得到子组件的实例,进而得到子组件的方法和属性
父组件:Parent.vue
//template
<button @click="getMyChildMsgAndMethod">作为父亲,我要主动拿到孩子的信息</button>
<div>这是孩子的信息: {{childMsg}}</div>
 <!--通过ref得到子组件的实例-->
 <child-one ref="myChild"></child-one>
//script
   data () {
        return {
            childMsg:''
        }
    },
    /*得到子组件的方法和属性*/
    getMyChildMsgAndMethod (){
        this.childMsg = this.$refs.myChild.msg
        this.$refs.myChild.methodToParent()
    },
子组件:ChildOne.vue
//script
/*父亲调用的方法*/
   methodToParent (){
     alert('i am you child')
   },
- 通过children主动获取子组件方法和属性
通过this.$ children得到的是一个子组件实例的数组,除此之外,他的用法几乎和$refs相同
父组件:Parent.vue
//template
  <button @click="$childrenMsg">$children得到孩子信息</button>
   <div>这是孩子的信息: {{childMsg}}</div>
//script
    $childrenMsg (){
        /*this.$children得到是一个数组*/
        const child = this.$children[0]
        this.childMsg = child.msg
        child.methodToParent()
    },
三、兄弟间的通讯
- 通过共同的父亲进行传递信息
父组件只充当邮递员的角色,他所利用的就是,父子和子父之间的通讯,两者的结合
在components文件夹下,新建ChildTwo.vue文件,代码如下
子组件two:ChildTwo.vue
//template
<template>
    <div>
        <h1>ChildTwo</h1>
        <div>{{commonMsg}}</div>
    </div>
</template>
//script
 export default {
        props:['common-msg'],
        name: "ChildTwo",
    }
子组件one:ChildOne.vue
//template
 <!--向兄弟组件传递数据-->
  <button @click="setBrotherMsg">One send brother Two a msg</button>
//script
  data (){
        return {
            /*定义数据*/
            commonMsg:'I miss you ,my brother!'
        }
    },
    props:{
    //接收父亲传来的方法,主要用于拿到此组件的数据
	  poster:{
	      type:Function
	  },
    },
     /*调用方法传递数据*/
    setBrotherMsg (){
    	//把数据传给父组件
        this.$emit('poster',this.commonMsg)
    },
父组件:Parent.vue
//template
 <!--进行方法的传递-->
   <child-one @poster="poster">从One拿数据存储到commonMsg</child-one>
   <!--数据传递-->
   <child-two :common-msg="commonMsg">把commonMsg的数据给Two</child-two>
//script
 data () {
        return {
        	//定义保存数据的变量
            commonMsg:''
        }
    },
    methods:{
        /*定义拿到数据的方法*/
        poster (commonMsg){
            this.commonMsg = commonMsg
        },
    }
- 全局事件总线—EventBus
EventBus相当于全局的 $ emit、$ on,我们需要把它放到一个所有组件都能看得到的地方,
eventBus原理就是利用和 emit 并实例化一个全局 vue 实现数据共享
//main.js
    Vue.prototype.$bus=new Vue()
//传值组件
    this.$bus.$emit('eventTarget','值')
//接收组件
    this.$bus.$on('eventTarget',value=> console.log(value))
- 过PubSub通讯
PubSub是一个包,专门用于组件之间的通讯
- 使用PubSub.subsribe()订阅(注册)事件
- 使用PubSub.publish()触发事件
- 他与event-bus的使用差不多,只是参数略有不同,绑定事件的第一个参数必须传(请看下面的例题) 一般在React中用的较多
使用方法
1.下载
npm install pubsub-js --save
2.在ChildOne.vue引入
兄弟组件:ChildOne.vue
//template
<button @click="pubsubBrotherMsg">send brother msg by pubsub</button>
//script
import PubSub from 'pubsub-js'
	methods: {
	   pubsubBrotherMsg (){
	       PubSub.subscribe('pubsubMsg',this.commonMsg)
	   },
	}
2.在ChildTwo.vue引入
兄弟组件:ChildTwo.vue
import PubSub from 'pubsub-js'
   data(){
       return {
           pubsubMsg:''
       }
   },
 mounted() {
 	/*msg:回调函数第一个参数,必须传*/
	  PubSub.subscribe('pubsubMsg',(msg,data) => {
	      this.pubsubMsg = data
	  } )
  }
- 通过Vuex通讯
Vuex 是一个专为 Vue.js 应用程序开发的状态管理模式。vuex使用手册
四、非父子组件间传值
- 通过Vuex通讯
vuex 是通过将 state 作为数据中心、各个组件共享 state 实现跨组件通信的。
vuex 就是一个仓库,仓库里放了很多对象。其中state就是数据源存放地,对应于一般 vue 对象里面的data里面存放的数据是响应式的,vue 组件从store读取数据,若是store中的数据发生改变,依赖这相数据的组件也会发生更新它通过mapState把全局的state和getters映射到当前组件的computed计算属性。vuex 更多地用于解决跨组件通信以及作为数据中心集中式存储数据。
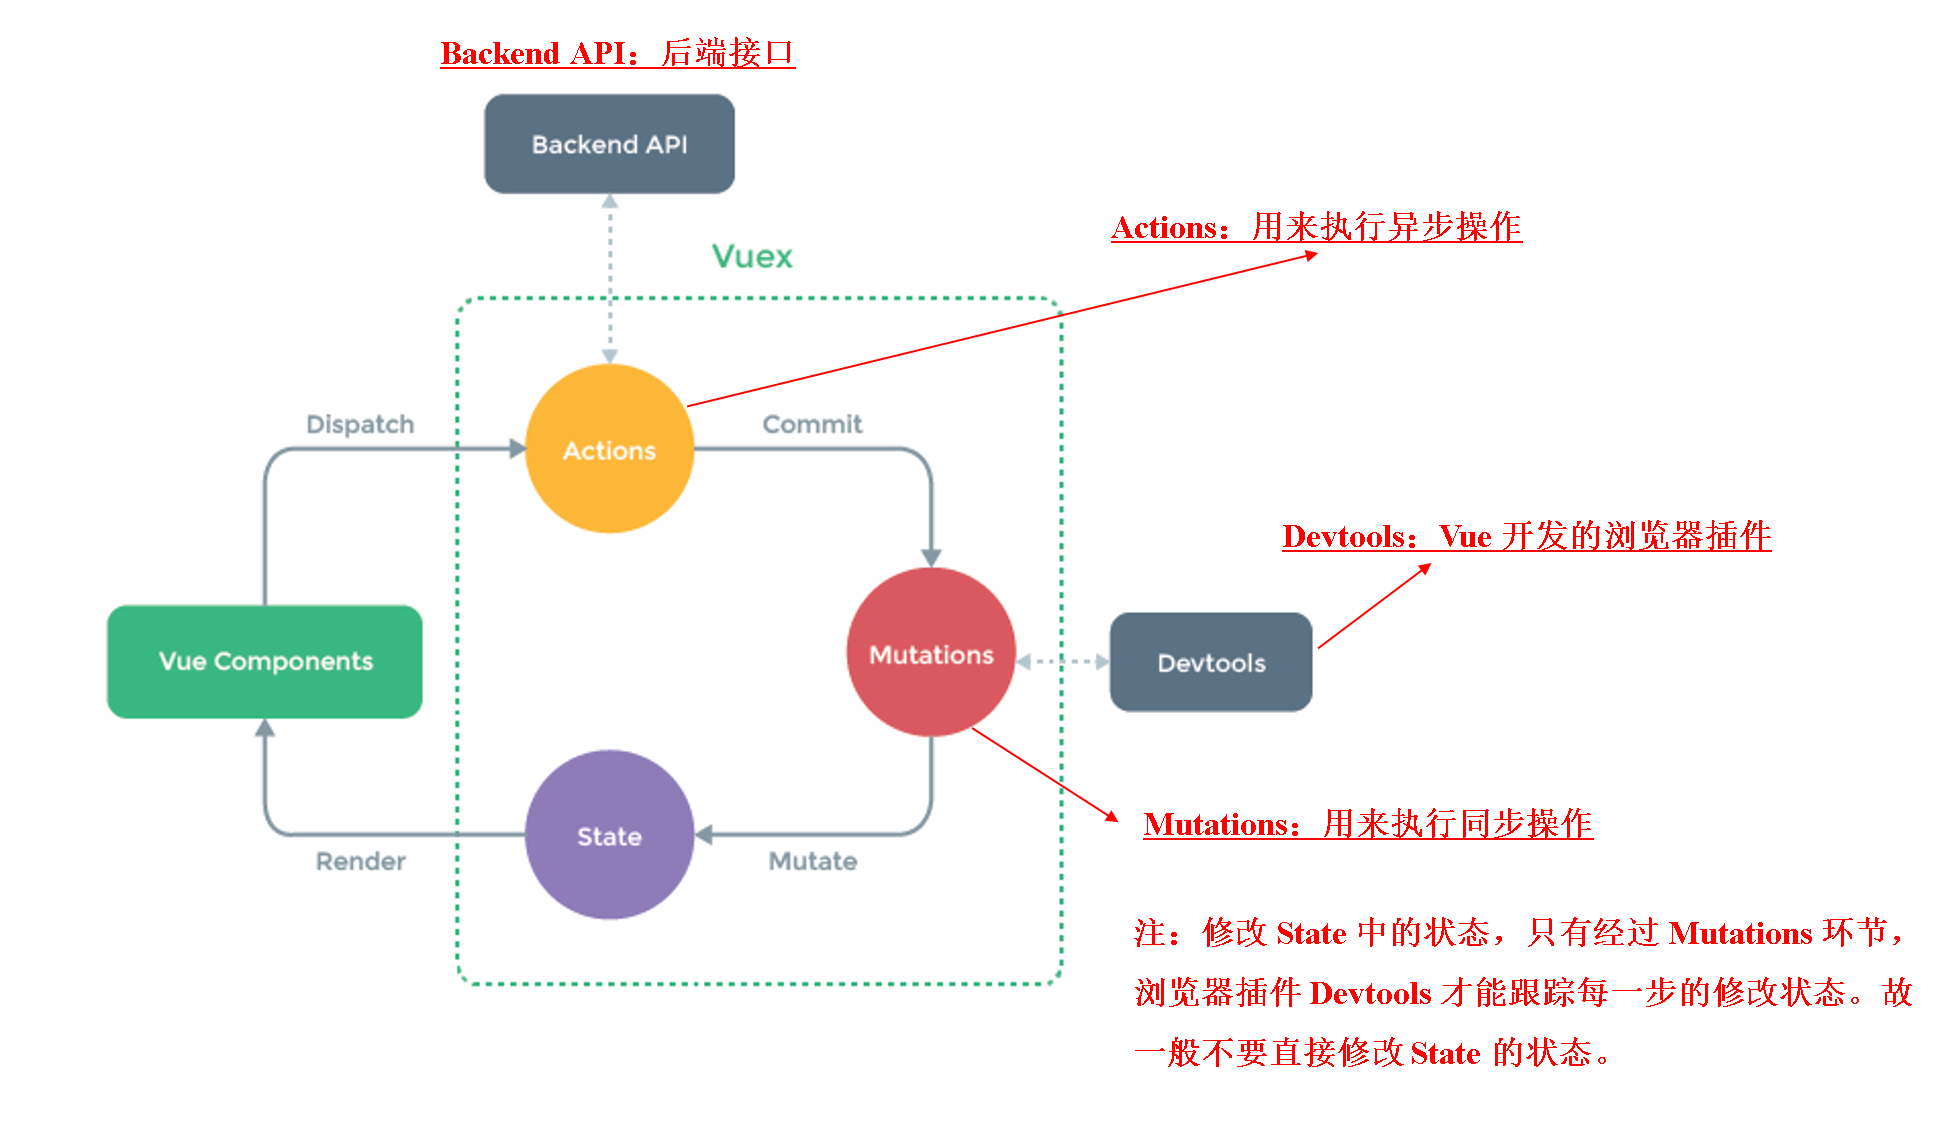
*五个核心概念简单介绍:
- state
Vuex里的state相当于一个全局的state,你可以在component的任何地方获取和修改它。
//获取state
this.$store.state.count

//vuex的辅助方法
import { mapState } from 'vuex'
computed:mapState([
  'count'
])
- getters
Vuex里的getters类似于computed,就像计算属性一样,getter 的返回值会根据它的依赖被缓存起来,且只有当它的依赖值发生了改变才会被重新计算。
//直接使用
this.$store.getters.doneTodosCount

//使用辅助方法
import { mapGetters } from 'vuex'
computed:mapGetters({
  doneCount: 'doneTodosCount'
})
- mutations
更改 Vuex 的 store 中的状态的唯一方法是提交 mutation。一条重要的原则就是要记住 mutation 必须是同步函数。
//触发mutations
this.$store.commit('xxx')

//辅助函数
import { mapMutations } from 'vuex'
methods:mapMutations(['increment' ])
在increment函数中调用setTimeout()方法在2s后更新count,这就是一个异步调用。例如:
const store = new Vuex.Store({
  state: {
    count: 0
  },
  mutations: {
    increment (state) {
      setTimeout( () => {
        state.count++
      }, 2000)
    }
  }
})
Vuex 的 store 中的状态是响应式的,那么当我们变更状态时,监视状态的 Vue 组件也会自动更新。这也意味着 Vuex 中的 mutation 也需要与使用 Vue 一样遵守一些注意事项:
1.最好提前在你的 store 中初始化好所有所需属性。
2.当需要在对象上添加新属性时,你应该:
(1)使用 Vue.set(obj, 'newProp', 123), 或者
(2)以新对象替换老对象。例如,利用对象展开运算符 (opens new window)我们可以这样写:
state.obj = { ...state.obj, newProp: 123 }
- actions
类似于 mutation,不同在于:
Action 提交的是 mutation,而不是直接变更状态,Action 可以包含任意异步操作。
//触发action
store.dispatch('increment')

//辅助函数
import { mapActions } from 'vuex'
methods:mapActions(['increment' ])
- Module
由于使用单一状态树,应用的所有状态会集中到一个比较大的对象。Vuex 允许我们将 store 分割成模块(module)。每个模块拥有自己的 state、mutation、action、getter、甚至是嵌套子模块——从上至下进行同样方式的分割。
const moduleA = {
  state: { ... },
  mutations: { ... },
  actions: { ... },
  getters: { ... }
}

const moduleB = {
  state: { ... },
  mutations: { ... },
  actions: { ... }
}

const store = new Vuex.Store({
  modules: {
    a: moduleA,
    b: moduleB
  }
})

store.state.a // -> moduleA 的状态
store.state.b // -> moduleB 的状态
详情理解:vuex五个核心概念https://juejin.cn/post/7196924295309213752
对于大型应用,我们会希望把 Vuex 相关代码分割到模块中。下面是项目结构示例:
highlighter- Bash
└── store
    ├── index.js          # 我们组装模块并导出 store 的地方
    ├── actions.js        # 根级别的 action
    ├── mutations.js      # 根级别的 mutation
    └── modules
        ├── cart.js       # 购物车模块
        └── products.js   # 产品模块


 1002
1002

 被折叠的 条评论
为什么被折叠?
被折叠的 条评论
为什么被折叠?
 到【灌水乐园】发言


