


 本文介绍了一种自定义Windows表单控件的创建方法,该控件可移动、可调整大小,具有标题栏和调整大小的句柄。通过重写绘图事件和处理鼠标事件,实现了控件的交互性。
在我的最后见识中,
http://bytes.com/topic/c-sharp/insig...ng-resolutions ,我谈到了将对象缩放到窗体的大小,以便它始终以正确的比例绘制。 这样,我用来创建和存储可以在表单上绘制的对象的方法是一种手动方法。 也就是说,我创建并存储了对象列表,然后手动绘制它们。尽管这确实可行,但是如果我想使它们具有交互性,则意味着有很多代码需要编写。 说,如果我想使它们可移动,则必须扫描列表中的每个对象,并检查鼠标指针是否在控件的范围内。 我还必须实现排序顺序,以确保仅获得最高的项目。 这肯定是可能的(有时甚至很有趣!),但是您可能会想自己:“哇,啊,啊,分钟,不是有人为我这样做了吗?”
好吧,如果是的话,那绝对是对的! 微软为我们提供了
我们可以继承并获得默认情况下很多功能的Control类 ,我们只需要实现我们想要的东西即可。 然后,我们可以创建一个对象并将其放入任何包含一个对象的“控件”列表中。我将在此通过的示例创建一个名为NamedContainer的自定义控件,该控件将绘制看起来像窗口的窗口,并允许用户移动窗口并调整其大小。 您将能够指定标题文本和标题栏的颜色。
好的,让我们开始吧。 首先,创建一个新的VS Windows Forms项目并在您的表单上放置一个面板。 我还喜欢将背景色设置为粉红色,以便可以更轻松地将其与表单区分开。 使您的窗体相当大,并确保将面板的锚定设置为可以随窗体调整大小。
现在让我们来谈谈事物的实质。 让我们创建命名的容器类。
public class NamedContainer : Control
{
}protected override void OnPaint(PaintEventArgs e)
{
Graphics g = e.Graphics;
// Draw Background
g.FillRectangle(new SolidBrush(this.BackColor), this.ClientRectangle);
base.OnPaint(e);
// Draw Border
g.DrawRectangle(Pens.Black, this.ClientRectangle.X, this.ClientRectangle.Y, this.ClientRectangle.Width - 1, this.ClientRectangle.Height - 1);
}现在,您可以将以下代码添加到表单的构造函数中...
NamedContainer c = new NamedContainer();
c.Location = new Point(50, 50);
c.Size = new Size(300, 150);
panel1.Controls.Add(c);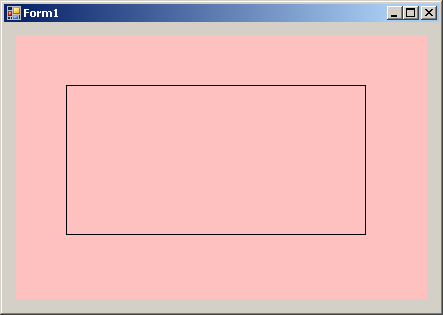
太好了,我们有一个矩形! 让我们做一些更令人兴奋的事情吧? 我提到过要绘制标题栏并使它看起来像一个窗口。 让我们继续做下去,但是首先让我们做一些属性,以便我们可以轻松获得标题栏的大小和颜色。
[Browsable(false)]
public Rectangle TitleBarRectangle
{
    get { return new Rectangle(this.ClientRectangle.X, this.ClientRectangle.Y, this.ClientRectangle.Width, (int)(this.Font.Height * 1.25)); }
}
[Category("Appearance")]
public Color TitleBarColor { get; set; }现在,我们可以通过在TitleBarRectangle上绘制一个填充的矩形并在TitleBarRectangle内居中绘制文本来向OnPaint添加代码以绘制标题栏。 绘制背景后直接将其放置。
// Draw Titlebar
g.FillRectangle(new SolidBrush(this.TitleBarColor), this.TitleBarRectangle);
g.DrawString(this.Text, this.Font, new SolidBrush(this.ForeColor), new Point(this.ClientRectangle.X + (int)(this.ClientRectangle.Width / 2 - g.MeasureString(this.Text, this.Font).Width / 2), this.ClientRectangle.Y + this.TitleBarRectangle.Height / 2 - this.Font.Height / 2));g.DrawLine(Pens.Black, new Point(this.ClientRectangle.X, this.TitleBarRectangle.Bottom), new Point(this.TitleBarRectangle.Right, this.TitleBarRectangle.Bottom));public NamedContainer()
:base()
{
this.DoubleBuffered = true;
this.Size = new Size(300, 150);
this.TitleBarColor = SystemColors.ActiveCaption;
this.ForeColor = SystemColors.ActiveCaptionText;
}让我们还更新代码以创建我们的对象...
NamedContainer c = new NamedContainer();
c.Location = new Point(50, 50);
c.Size = new Size(300, 150);
c.Text = "Our Named Container!";
c.BackColor = Color.White;
panel1.Controls.Add(c);
哦,嘿,我们正在重新创建Windows 3.1!
到现在为止,我们已经完成的所有工作实际上都可以使用对象缩放示例中使用的相同方法完成,因此让我们开始做一些更令人兴奋的事情。 我提到了移动和调整大小,所以让我们从移动开始。 首先,让我们进行枚举,以告诉我们如何移动表格。
private enum MoveMode
{
    NotMoving,
    Form,
    ResizeBoth
}private Point? m_clickLoc = null;
private MoveMode m_moveMode = MoveMode.NotMoving;[Category("Behavior"), DefaultValue(true)]
public bool Movable { get; set; }this.Movable = true;- 检查是否允许控件移动。
- 检查是否按下了鼠标左键(正如我决定说的是控制这些东西的左键)。
- 如果我们上次单击的位置不存在,请检查鼠标光标是否在可以移动物体的位置。
- 如果是这样,请设置移动模式(并更新最后单击的位置)。
- 现在检查我们是否要移动。
- 检查我们的行动方式,并采取适当的措施。
- 如果鼠标按钮没有按下,请更新控件的光标以反映其悬停的内容。
因此,为此编写代码...
protected override void OnMouseMove(MouseEventArgs e)
{
// We only want stuff to happen if we say it can.
if (this.Movable)
{
if (e.Button == MouseButtons.Left)
{
// Figure out what we're doing... if it's something, we want to store the last click location.
if (m_clickLoc == null)
{
if (this.TitleBarRectangle.Contains(e.Location))
m_moveMode = MoveMode.Form;
else
m_moveMode = MoveMode.NotMoving;
if (m_moveMode != MoveMode.NotMoving)
m_clickLoc = new Point(e.X, e.Y);
}
// If we're not, not moving, figure out what we should be doing! (oooh poetry)
if (m_moveMode != MoveMode.NotMoving)
{
switch (m_moveMode)
{
case MoveMode.Form:
// Just moving, update the form's location
this.Location = new Point(this.Location.X + e.X - m_clickLoc.Value.X, this.Location.Y + e.Y - m_clickLoc.Value.Y);
break;
}
}
}
else
{
// No desired button pressed lets clear all our states
m_moveMode = MoveMode.NotMoving;
m_clickLoc = null;
// Update the cursor based on what it moved over
if (this.TitleBarRectangle.Contains(e.Location))
this.Cursor = Cursors.SizeAll;
else
this.Cursor = Cursors.Default;
}
}
base.OnMouseMove(e);
}完成此操作后,我们可以添加调整大小的支持。 首先,我们将不得不在论坛上绘制一个调整大小的控件,因此让我们添加一个属性来定义该控件的位置。 我已经决定将其放置在控件的右下角,大约为15x15像素。
[Browsable(false)]
public Rectangle ResizeHandleRectangle
{
get { return new Rectangle(this.ClientRectangle.Width - 15, this.ClientRectangle.Height - 15, 15, 15); }
}// Draw Resize Anchor if it can be used
if (this.Movable)
{
g.DrawLine(Pens.Black, this.ResizeHandleRectangle.Right - 3, this.ResizeHandleRectangle.Top + 3, this.ResizeHandleRectangle.Left + 3, this.ResizeHandleRectangle.Bottom - 3);
g.DrawLine(Pens.Black, this.ResizeHandleRectangle.Right - 3, this.ResizeHandleRectangle.Top + 6, this.ResizeHandleRectangle.Left + 6, this.ResizeHandleRectangle.Bottom - 3);
g.DrawLine(Pens.Black, this.ResizeHandleRectangle.Right - 3, this.ResizeHandleRectangle.Top + 9, this.ResizeHandleRectangle.Left + 9, this.ResizeHandleRectangle.Bottom - 3);
}运行代码会产生...

看看那个光滑的小尺寸手柄! 好吧,老实说,我从盯着我的Visual Studio的那个人那里大胆地偷了它。 诚然,他们的照片也更酷……您可以绘制任何喜欢的图像,或者根据需要甚至使用图像。
现在我们需要修改代码,以便支持调整大小。 我们已经有了枚举代码ResizeBoth(均表示水平和垂直),因此我们只需要使用它即可。 我们还需要一种让表单知道最小尺寸的方法。 这是因为我们不想让控件缩小到一个斑点的大小。 合理的最小尺寸可能是我们绘制的文本的宽度和标题栏的高度的两倍。 这样,我们仍然可以根据需要再次将其调整为更大的尺寸。 让我们创建一个私有方法,该方法将基于字符串和字体为我们提供最小大小。
private Size GetMinimumSize(string text, Font font)
{
Graphics g = this.CreateGraphics();
return new Size((int)g.MeasureString(text, font).Width, this.TitleBarRectangle.Height * 2);
}private Size m_minimumSize;public override string Text
{
get
{
return base.Text;
}
set
{
base.Text = value;
// The minimium size is based on the area the text takes up so we need to recalculate when the text changes.
m_minimumSize = this.GetMinimumSize(this.Text, this.Font);
}
}
public override Font Font
{
get
{
return base.Font;
}
set
{
base.Font = value;
// The minimium size is based on the area the text takes up so we need to recalculate when the font changes.
m_minimumSize = this.GetMinimumSize(this.Text, this.Font);
}
}if (m_clickLoc == null)
{
if (this.TitleBarRectangle.Contains(e.Location))
m_moveMode = MoveMode.Form; else if (this.ResizeHandleRectangle.Contains(e.Location))
m_moveMode = MoveMode.ResizeBoth;
else
m_moveMode = MoveMode.NotMoving;
if (m_moveMode != MoveMode.NotMoving)
m_clickLoc = new Point(e.X, e.Y);
}case MoveMode.ResizeBoth:
Size newSize = new Size(this.Size.Width + e.X - m_clickLoc.Value.X, this.Size.Height + e.Y - m_clickLoc.Value.Y);
bool needsRedraw = false;
// Handle width and heigh resizing separately so that when we hit the minimum size for one, we can still resize the other.
// Also, only allow sizing if the particular dimension of the new size is greater than the corresponding minimum.
// Finally, if we do a resize, we need to force a redraw and update the click location so we always resize based on a delta movement.
if (newSize.Width > m_minimumSize.Width)
{
this.Size = new Size(newSize.Width, this.Size.Height);
m_clickLoc = new Point(e.X, m_clickLoc.Value.Y);
needsRedraw = true;
}
if (newSize.Height > m_minimumSize.Height)
{
this.Size = new Size(this.Size.Width, newSize.Height);
m_clickLoc = new Point(m_clickLoc.Value.X, e.Y);
needsRedraw = true;
}
if (needsRedraw)
this.Invalidate();
break;if (this.TitleBarRectangle.Contains(e.Location))
this.Cursor = Cursors.SizeAll; else if (this.ResizeHandleRectangle.Contains(e.Location))
this.Cursor = Cursors.SizeNWSE;
else
this.Cursor = Cursors.Default;在这一点上,我们还可以演示Control对象的一个漂亮功能,即它可以包含其他控件。 由于我们的容器是从控件继承的,因此我们可以在其中添加一个按钮,只是为了好玩。 让我们将主表单构造函数代码更新为以下内容...
NamedContainer c = new NamedContainer();
c.Location = new Point(50, 50);
c.Size = new Size(300, 150);
c.Text = "Our Named Container!";
c.BackColor = Color.White;
panel1.Controls.Add(c);
Button b = new Button();
b.ForeColor = Color.Black;
b.BackColor = SystemColors.Control;
b.Font = this.Font;
b.Text = "Click!";
b.Location = new Point(12, c.TitleBarRectangle.Bottom + 12);
c.Controls.Add(b);
请注意,您可以拖动控件,它也会更新按钮的位置。 这是因为控件的所有客户端控件都相对于其父控件绘制自己。 !
至此,我们基本完成了。 但是,为了好玩和测试,并演示从控件继承的另一个优点,让我们增强主类。 我们要做到这一点,以便在面板上单击鼠标右键将添加一个控件,单击鼠标中键将删除一个控件,而单击鼠标左键将其放在最前面。
首先,让我们向NamedContainer类添加一个构造函数重载,以更轻松地实现此过程。
public NamedContainer(string text, int x, int y, int width, int height)
: this()
{
this.Text = text;
this.Location = new Point(x, y);
this.Size = new Size(width, height);
}private void panel1_MouseClick(object sender, MouseEventArgs e)
{
switch (e.Button)
{
case MouseButtons.Right:
NamedContainer c = new NamedContainer("Container " + (panel1.Controls.Count + 1).ToString(), e.X, e.Y, 450, 200);
c.MouseDown += new MouseEventHandler(c_MouseDown);
c.Font = new Font(c.Font.Name, 12f, FontStyle.Bold);
c.BackColor = Color.White;
panel1.Controls.Add(c);
c.BringToFront();
break;
}
}void c_MouseDown(object sender, MouseEventArgs e)
{
if (sender is NamedContainer)
{
((NamedContainer)sender).BringToFront();
if (e.Button == MouseButtons.Middle)
{
panel1.Controls.Remove((NamedContainer)sender);
}
}
}现在运行项目。 右键单击面板将创建容器,单击鼠标中键将删除它们。 您还可以根据需要移动面板并调整其大小。 一个更加完整和有趣的测试。

在这一点上,我将由您自己进行尝试和/或添加新功能。 要添加的一项功能可能是通过单击并拖动控件边缘来调整大小的功能,类似于使用Windows窗体的方法。
请享用!
----------------------------------------------
以下是Visual Studio项目中Form1.cs的完整代码。 这只是部分类的代码部分,因为我认为没有必要包含整个工作项目。 通常还需要将控件放入另一个源文件(可能是另一个类库)中。 为了简单起见,我只是将其放在Form1.cs中Form类的底部。
using System;
using System.Collections.Generic;
using System.ComponentModel;
using System.Data;
using System.Drawing;
using System.Linq;
using System.Text;
using System.Windows.Forms;
namespace WindowsFormsApplication1
{
public partial class Form1 : Form
{
public Form1()
{
InitializeComponent();
//NamedContainer c = new NamedContainer();
//c.Location = new Point(50, 50);
//c.Size = new Size(300, 150);
//c.Text = "Our Named Container!";
//c.BackColor = Color.White;
//panel1.Controls.Add(c);
//Button b = new Button();
//b.ForeColor = Color.Black;
//b.BackColor = SystemColors.Control;
//b.Font = this.Font;
//b.Text = "Click!";
//b.Location = new Point(12, c.TitleBarRectangle.Bottom + 12);
//c.Controls.Add(b);
}
private void panel1_MouseClick(object sender, MouseEventArgs e)
{
switch (e.Button)
{
case MouseButtons.Right:
NamedContainer c = new NamedContainer("Container " + (panel1.Controls.Count + 1).ToString(), e.X, e.Y, 450, 200);
c.MouseDown += new MouseEventHandler(c_MouseDown);
c.Font = new Font(c.Font.Name, 12f, FontStyle.Bold);
c.BackColor = Color.White;
panel1.Controls.Add(c);
c.BringToFront();
break;
}
}
void c_MouseDown(object sender, MouseEventArgs e)
{
if (sender is NamedContainer)
{
((NamedContainer)sender).BringToFront();
if (e.Button == MouseButtons.Middle)
{
panel1.Controls.Remove((NamedContainer)sender);
}
}
}
}
public class NamedContainer : Control
{
#region Enumerations
/// <summary>
/// How is this object currently moving?
/// </summary>
private enum MoveMode
{
NotMoving,
Form,
ResizeBoth,
ResizeVert,
ResizeHoriz
}
#endregion
#region Private Members
private Point? m_clickLoc = null;
private MoveMode m_moveMode = MoveMode.NotMoving;
private Size m_minimumSize;
#endregion
#region Constructors
/// <summary>
/// Base constructor
/// </summary>
public NamedContainer()
:base()
{
this.DoubleBuffered = true;
this.Movable = true;
this.Size = new Size(300, 150);
this.TitleBarColor = SystemColors.ActiveCaption;
this.ForeColor = SystemColors.ActiveCaptionText;
}
/// <summary>
/// Constructor
/// </summary>
/// <param name="text">The text for this control.</param>
/// <param name="x">The x coordinate of this control's position.</param>
/// <param name="y">The y coordinate of this control's position.</param>
/// <param name="width">This control's width.</param>
/// <param name="height">This control's height.</param>
public NamedContainer(string text, int x, int y, int width, int height)
: this()
{
this.Text = text;
this.Location = new Point(x, y);
this.Size = new Size(width, height);
}
#endregion
#region Properties
/// <summary>
/// Whether or not this control can be moved via the mouse.
/// </summary>
[Category("Behavior"), DefaultValue(true)]
public bool Movable { get; set; }
/// <summary>
/// The text for this control.
/// </summary>
public override string Text
{
get
{
return base.Text;
}
set
{
base.Text = value;
// The minimium size is based on the area the text takes up so we need to recalculate when the text changes.
m_minimumSize = this.GetMinimumSize(this.Text, this.Font);
}
}
/// <summary>
/// The font for this control.
/// </summary>
public override Font Font
{
get
{
return base.Font;
}
set
{
base.Font = value;
// The minimium size is based on the area the text takes up so we need to recalculate when the font changes.
m_minimumSize = this.GetMinimumSize(this.Text, this.Font);
}
}
/// <summary>
/// The color of the title bar.
/// </summary>
[Category("Appearance")]
public Color TitleBarColor { get; set; }
/// <summary>
/// The rectangle area the titlebar encompasses.
/// </summary>
[Browsable(false)]
public Rectangle TitleBarRectangle
{
get { return new Rectangle(this.ClientRectangle.X, this.ClientRectangle.Y, this.ClientRectangle.Width, (int)(this.Font.Height * 1.25)); }
}
/// <summary>
/// The rectangle area the resize handle encompasses.
/// </summary>
[Browsable(false)]
public Rectangle ResizeHandleRectangle
{
    get { return new Rectangle(this.ClientRectangle.Width - 15, this.ClientRectangle.Height - 15, 15, 15); }
}
#endregion
#region Private Methods
/// <summary>
/// Calculate the minimum size for this form based on a string and a font.
/// </summary>
/// <param name="text">The text.</param>
/// <param name="font">The font.</param>
/// <returns>The minimum size this form can be to still display the form properly.</returns>
private Size GetMinimumSize(string text, Font font)
{
Graphics g = this.CreateGraphics();
return new Size((int)g.MeasureString(text, font).Width, this.TitleBarRectangle.Height * 2);
}
#endregion
#region Overrides
protected override void OnPaint(PaintEventArgs e)
{
Graphics g = e.Graphics;
// Draw Background
g.FillRectangle(new SolidBrush(this.BackColor), this.ClientRectangle);
// Draw Titlebar
g.FillRectangle(new SolidBrush(this.TitleBarColor), this.TitleBarRectangle);
g.DrawString(this.Text, this.Font, new SolidBrush(this.ForeColor), new Point(this.ClientRectangle.X + (int)(this.ClientRectangle.Width / 2 - g.MeasureString(this.Text, this.Font).Width / 2), this.ClientRectangle.Y + this.TitleBarRectangle.Height / 2 - this.Font.Height / 2));
base.OnPaint(e);
// Draw Resize Anchor if it can be used
if (this.Movable)
{
    g.DrawLine(Pens.Black, this.ResizeHandleRectangle.Right - 3, this.ResizeHandleRectangle.Top + 3, this.ResizeHandleRectangle.Left + 3, this.ResizeHandleRectangle.Bottom - 3);
    g.DrawLine(Pens.Black, this.ResizeHandleRectangle.Right - 3, this.ResizeHandleRectangle.Top + 6, this.ResizeHandleRectangle.Left + 6, this.ResizeHandleRectangle.Bottom - 3);
    g.DrawLine(Pens.Black, this.ResizeHandleRectangle.Right - 3, this.ResizeHandleRectangle.Top + 9, this.ResizeHandleRectangle.Left + 9, this.ResizeHandleRectangle.Bottom - 3);
}
// Draw Border
g.DrawRectangle(Pens.Black, this.ClientRectangle.X, this.ClientRectangle.Y, this.ClientRectangle.Width - 1, this.ClientRectangle.Height - 1);
g.DrawLine(Pens.Black, new Point(this.ClientRectangle.X, this.TitleBarRectangle.Bottom), new Point(this.TitleBarRectangle.Right, this.TitleBarRectangle.Bottom));
}
protected override void OnMouseMove(MouseEventArgs e)
{
// We only want stuff to happen if we say it can.
if (this.Movable)
{
if (e.Button == MouseButtons.Left)
{
// Figure out what we're doing... if it's something, we want to store the last click location.
if (m_clickLoc == null)
{
    if (this.TitleBarRectangle.Contains(e.Location))
        m_moveMode = MoveMode.Form;     else if (this.ResizeHandleRectangle.Contains(e.Location))
        m_moveMode = MoveMode.ResizeBoth;
    else
        m_moveMode = MoveMode.NotMoving;
    if (m_moveMode != MoveMode.NotMoving)
        m_clickLoc = new Point(e.X, e.Y);
}
// If we're not, not moving, figure out what we should be doing! (oooh poetry)
if (m_moveMode != MoveMode.NotMoving)
{
switch (m_moveMode)
{
case MoveMode.Form:
// Just moving, update the form's location
this.Location = new Point(this.Location.X + e.X - m_clickLoc.Value.X, this.Location.Y + e.Y - m_clickLoc.Value.Y);
break;
case MoveMode.ResizeBoth:
    Size newSize = new Size(this.Size.Width + e.X - m_clickLoc.Value.X, this.Size.Height + e.Y - m_clickLoc.Value.Y);
    bool needsRedraw = false;
    // Handle width and heigh resizing separately so that when we hit the minimum size for one, we can still resize the other.
    // Also, only allow sizing if the particular dimension of the new size is greater than the corresponding minimum.
    // Finally, if we do a resize, we need to force a redraw and update the click location so we always resize based on a delta movement.
    if (newSize.Width > m_minimumSize.Width)
    {
        this.Size = new Size(newSize.Width, this.Size.Height);
        m_clickLoc = new Point(e.X, m_clickLoc.Value.Y);
        needsRedraw = true;
    }
    if (newSize.Height > m_minimumSize.Height)
    {
        this.Size = new Size(this.Size.Width, newSize.Height);
        m_clickLoc = new Point(m_clickLoc.Value.X, e.Y);
        needsRedraw = true;
    }
    if (needsRedraw)
        this.Invalidate();
    break;
}
}
}
else
{
// No desired button pressed lets clear all our states
m_moveMode = MoveMode.NotMoving;
m_clickLoc = null;
// Update the cursor based on what it moved over
if (this.TitleBarRectangle.Contains(e.Location))
    this.Cursor = Cursors.SizeAll; else if (this.ResizeHandleRectangle.Contains(e.Location))
    this.Cursor = Cursors.SizeNWSE;
else
    this.Cursor = Cursors.Default;
}
}
base.OnMouseMove(e);
}
#endregion
}
}


 1388
1388

 被折叠的 条评论
为什么被折叠?
被折叠的 条评论
为什么被折叠?
 到【灌水乐园】发言


