


 随着JDK 8达到其生命周期的终点,本文档提供了一个逐步指南,详细说明如何将Java项目更新到JDK 11,包括安装JDK 11,升级依赖,更新Gradlefile,更改IDE设置,以及在终端上使用新版本,并最终测试和清理过程。
The Java version 8 has reached its end of life. Since January 2019 the free, commercial version doesn't receive updates anymore (see oracle.com).
So (unless you want to switch to non-mainstream JDK providers like AdoptOpenJDK or Amazon Corretto) it's time to upgrade all Java projects to the latest version. Or at least to the latest long-term support version.
这篇博客文章是有关该路径上需要执行的步骤的经验报告。
Assessing status quo
Environment
将要更新的项目很小。 它是春季靴使用的应用Apache Wicket作为网络框架和摇篮用于构建管理。 主要的开发环境是MacBook Pro和IntelliJIDE。
Overview over installed JVMs
在MacOS上,使用终端上的此命令,可以列出系统上安装的所有JVM:
$ /usr/libexec/java_home -V
Matching Java Virtual Machines (3):
    10.0.1, x86_64: "Java SE 10.0.1"    /Library/Java/JavaVirtualMachines/jdk-10.0.1.jdk/Contents/Home
    9.0.1, x86_64:  "Java SE 9.0.1" /Library/Java/JavaVirtualMachines/jdk-9.0.1.jdk/Contents/Home
    1.8.0_152, x86_64:  "Java SE 8" /Library/Java/JavaVirtualMachines/jdk1.8.0_152.jdk/Contents/Home

/Library/Java/JavaVirtualMachines/jdk-10.0.1.jdk/Contents/Home
In this case they were installed via Homebrew, so an overview can also be provided by the following command:
brew cask list
Gradle使用的JDK由环境变量确定JAVA_HOME。 像这样的指示.bash_profile,可以轻松切换版本:
export JAVA_8_HOME=$(/usr/libexec/java_home -v1.8)
export JAVA_9_HOME=$(/usr/libexec/java_home -v9)
export JAVA_10_HOME=$(/usr/libexec/java_home -v10)

alias java8='export JAVA_HOME=$JAVA_8_HOME'
alias java9='export JAVA_HOME=$JAVA_9_HOME'
alias java10='export JAVA_HOME=$JAVA_10_HOME'

# use JDK 8 by default
export JAVA_HOME=$JAVA_8_HOME
Installing JDK 11
通过Homebrew,可以按以下方式安装OpenJDK 11:
brew update
brew tap homebrew/cask-versions
brew search java
brew cask install java11
(See stackoverflow.com) for further details.
现在可以将Java 11添加到.bash_profile:
export JAVA_11_HOME=$(/usr/libexec/java_home -v11)

alias java11='export JAVA_HOME=$JAVA_11_HOME'
启动新的终端选项卡后,现在应该可以使用了:
$ java11
$ java -version
openjdk version "11.0.2" 2019-01-15
OpenJDK Runtime Environment 18.9 (build 11.0.2+9)
OpenJDK 64-Bit Server VM 18.9 (build 11.0.2+9, mixed mode)
Upgrading the Java project
Upgrade dependencies
My most urgent advice for you today then, is this: If you're using Java 9 or later, upgrade to the latest versions of all your tools and dependencies. -- Mark Reinhold
From Java 8 to Java 9 some breaking changes where introduced in the language. So projects might run into problems, if the libraries they have included depend upon changed language features. So it is a good idea to start the actual migration by updating all the dependencies to their latest version. With Gradle this process is supported by the Gradle Versions Plugin:
$ gradle dependencyUpdates -Drevision=release

------------------------------------------------------------
: Project Dependency Updates (report to plain text file)
------------------------------------------------------------

The following dependencies are using the latest release version:
 - com.giffing.wicket.spring.boot.starter:wicket-spring-boot-starter:2.1.5
 - javax.xml.bind:jaxb-api:2.3.1
...

The following dependencies have later release versions:
 - com.google.guava:guava [27.0.1-jre -> 27.1-jre]
     https://github.com/google/guava
 - io.spring.dependency-management:io.spring.dependency-management.gradle.plugin [1.0.6.RELEASE -> 1.0.7.RELEASE]
 - org.projectlombok:lombok [1.18.4 -> 1.18.6]
     https://projectlombok.org
 - org.springframework.boot:spring-boot-gradle-plugin [2.1.2.RELEASE -> 2.1.3.RELEASE]
     https://projects.spring.io/spring-boot/#/spring-boot-parent/spring-boot-tools/spring-boot-gradle-plugin
...
 - org.wicketstuff:wicketstuff-annotation [8.2.0 -> 8.3.0]
     http://wicketstuff.org
另外Gradle应该更新为最新版本:
brew upgrade gradle
此外,IDE及其所有插件都应该是最新的。
Update the language level in the Gradlefile
现在我们准备增加Java版本中的build.gradle文件:
subprojects {
    sourceCompatibility = 11
    targetCompatibility = 11
Use JDK 11 in the IDE
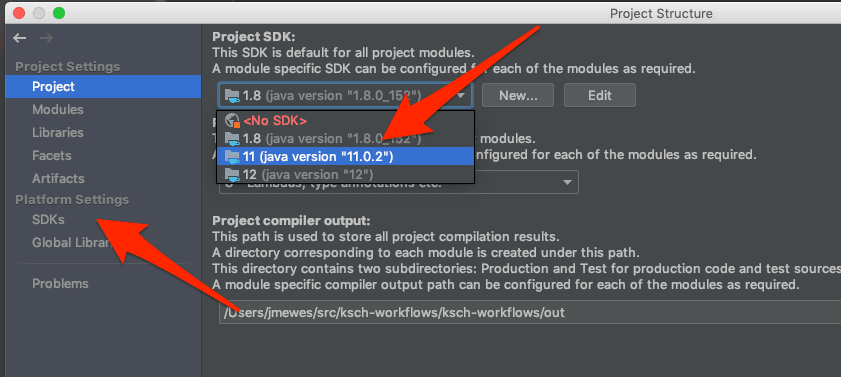
之后,我们需要切换到IntelliJ中的JDK 11。 这可以通过转到菜单条目“文件>项目结构”来完成。 可以在Project SDK下拉菜单中选择新版本和语言级别。 如果尚不可用,可以将其添加到“平台设置”部分。
另外,在“首选项”中检查是否正在使用新的编译目标:

现在构建项目并运行单元测试。 如果幸运的话,没有错误。
Use JDK 11 on the terminal
然后尝试在终端中这样做:
gradle clean check
In the case of this project, there was only one problem: The build via the terminal failed because the Lombok library could not be loaded. The fix for this was fairly simple, just adding those two dependency declarations in the build.gradle file:
annotationProcessor("org.projectlombok:lombok:${lombokVersion}")
testAnnotationProcessor("org.projectlombok:lombok:${lombokVersion}")
Final test
在完成所有更新之后,请验证该应用程序仍在正常运行:
gradle clean bootRun -Dspring.profiles.active=qa
没有发生进一步的问题。 因此,总而言之,升级到Java 11比预期的要容易:
Https://github.com/ksch-workflows/ksch-workflows/commit/f5724e627eeaab2b7fb7a2e4a581091f4d0ee628
Cleanup
最后但并非最不重要的一点,可以从开发环境中删除过时的Java版本:
Uninstall via Homebrew
brew uninstall java9
brew uninstall java10
Hard deletion
如果未通过Homebrew安装它们,则这是删除旧Java版本的方法:
$ cd /Library/Java/JavaVirtualMachines
$ sudo rm -rf jdk-9.0.1.jdk jdk-10.0.1.jdk


 被折叠的 条评论
为什么被折叠?
被折叠的 条评论
为什么被折叠?
 到【灌水乐园】发言


