


When a custom control is placed on the toolbox, if it is a professionally made control, it usually has a really nice icon associated with it instead of the default custom control icon that Visual Studio inserts when no icon is available. When you build your own custom control, you can add an icon for the control and embed it in your component's DLL assembly so that it is shown on the toolbox whenever someone adds your control.
当自定义控件放置在工具箱上时,如果它是专业制作的控件,则通常会与它关联一个非常漂亮的图标,而不是在没有可用图标时Visual Studio插入的默认自定义控件图标。 当您构建自己的自定义控件时,可以为该控件添加图标并将其嵌入到组件的DLL程序集中,以便在有人添加控件时在工具箱中显示该图标。
you need to follow below steps to add icon in your custom control.
您需要按照以下步骤在自定义控件中添加图标。
Step 1:
第1步:
Create your icon and save it as a bmp file (16x16), named as shown below.
创建您的图标,并将其另存为bmp文件(16x16),如下所示。
ProjectNameSpace.ControlNa
ProjectNameSpace.ControlNa 我
e.g. Project Name : CustomGrid
例如,项目名称:CustomGrid
Control Name : MyGridControl
控件名称:MyGridControl
Bmp File Name : CustomGrid.MyGridControl.b
Bmp文件名:CustomGrid.MyGridControl.b mp
Step 2: Add in Project and Change Build Action Properties to "Embedded Resources".
步骤2:添加项目,并将“构建操作”属性更改为“嵌入式资源”。
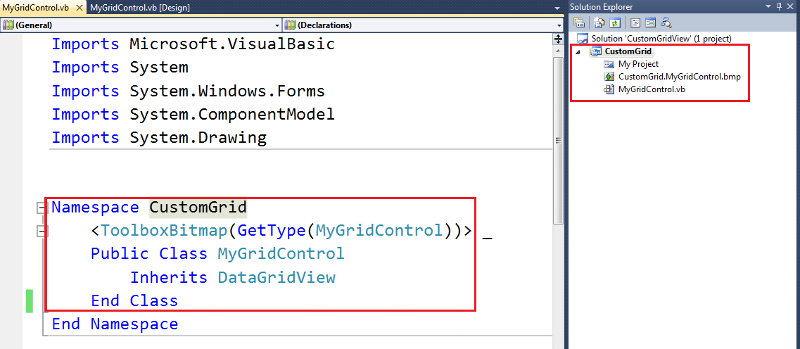
Stpe 3: Add ToolboxBitmap line in your class file as per screenshot.
步骤3:按照屏幕快照在类文件中添加ToolboxBitmap行。
Step 4 : Compile your Project as "Class Library".
步骤4:将您的项目编译为“类库”。
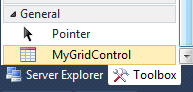
Step 5: Add this control in Different Solution Project Toolbox using choose items and icon will display like below ( In Same Project icon can not display).
第5步:使用选择项在“不同解决方案项目工具箱”中添加此控件,图标将显示如下(在“相同项目”中无法显示图标)。
Download Sample Project : CustomGrid.zip
下载示例项目: CustomGrid.zip


 被折叠的 条评论
为什么被折叠?
被折叠的 条评论
为什么被折叠?
 到【灌水乐园】发言


