


 本文详细介绍Elasticsearch 2.4.3的安装过程、配置修改方法、基本操作指令,包括索引库的设计与管理、IK分词器集成、集群配置及验证,并涉及Elasticsearch 5.4.1的安装配置流程。
Elasticsearch 2.4.3安装
下载地址:Elasticsearch 2.4.3 | Elastic
»启动
ES安装验证:
http://your ip:9200
注意:默认启动的时候es绑定的网络ip是本机127.0.0.1,只能通过这个ip访问
两种修改方式
1:修改config/elasticsearch.yml文件
network.host: 192.168.1.100
2:在启动es的时候指定参数【指定0.0.0.0也可以】
bin/elasticsearch-Dnetwork.host=192.168.1.100
CURL使用
简单认为是可以在命令行下访问url的一个工具
curl是利用URL语法在命令行方式下工作的开源文件传输工具,使用curl可以简单实现常见的get/post请求。
curl
-x 指定http请求的方法
GET POST PUT DELETE
-d 指定要传递的参数
CURL创建索引库:
curl -XPUT 'http://localhost:9200/yehua/'
PUT/POST都可以
CURL创建索引:
curl -XPOSThttp://localhost:9200/yehua/emp/1
-d '{
"name" : "tom",
"age" : 25
}'
索引库名称必须要全部小写,不能以下划线开头,也不能包含逗号
如果没有明确指定索引数据的ID,那么es会自动生成一个随机的ID,需要使用POST参数
curl -XPOSThttp://localhost:9200/yehua/emp/ -d '{"name" : "tom"}'
如果想要确定我们创建的都是全新的数据
1:使用随机ID(post方式)
2:在url后面添加参数
curl -XPUThttp://localhost:9200/yehua/emp/2/_create -d'{"name":"tom","age":25}'
ES查询:
根据员工id查询
curl -XGEThttp://localhost:9200/yehua/emp/1?pretty
在任意的查询字符串中添加pretty参数,es可以得到易于识别的json结果。
检索文档中的一部分,如果只需要显示指定字段
curl -XGET 'http://localhost:9200/yehua/emp/1?_source=name,age&pretty'
查询指定索引库指定类型所有数据
ES更新:
局部更新,可以添加新字段或者更新已有字段(必须使用POST)
curl -XPOSThttp://localhost:9200/yehua/emp/1/_update -d'{"doc":{"name":"mack","age":18}}'
ES删除:
curl -XDELETE http://localhost:9200/yehua/emp/1
ES 2.4 删除 type
1.需要安装插件 bin/plugin install delete-by-query
2.指导文档位置: https://www.elastic.co/guide/en/elasticsearch/reference/2.4/docs-delete.html
curl -XDELETE 'localhost:9200/yuqing/wx_news/_query?pretty' -H 'Content-Type: application/json' -d'
{
"query": {
"match_all": {}
}
}
'
curl -XDELETE 'localhost:9200/yuqing/news/_query?pretty' -H 'Content-Type: application/json' -d'
{
"query": {
"term": {
"time": 0
}
}
}
'
Head Plugin
在线安装bin/plugin install mobz/elasticsearch-head
集群配置(修改conf/elasticsearch.yml文件)
discovery.zen.ping.unicast.hosts:["host1", "host2:9300"]
ES安装IK分词器
elasticsearch官方默认的分词插件,对中文分词效果不理想
curl'http://localhost:9200/yehua/_analyze?pretty=true' -d '{"text":"我们是中国人"}'
如何集成IK分词工具【注意:需要先编译才能使用】
1:下载es的IK插件https://github.com/medcl/elasticsearch-analysis-ik/tree/2.x
2:使用maven对下载的es-ik源码进行编译(mvnclean package -DskipTests)
3:把编译后的target/releases下的elasticsearch-analysis-ik-1.10.3.zip文件拷贝到ES_HOME/plugins/ik目录下面,然后使用unzip命令解压
如果unzip命令不存在,则安装:yum install -y unzip
4:重启es服务
5:测试分词效果:
curl'http://localhost:9200/yehua/_analyze?analyzer=ik_max_word&pretty=true' -d'{"text":"我们是中国人"}'
索引库设计
curl -XPOST 'localhost:9200/yehua' -d@yehua.json
如果上面报错就用:
curl -X PUT --header 'Content-Type: application/json' --header 'Accept: application/json' 'http://127.0.0.1:9200/yehua' -d@yehua.json
vi yehua.json
{
    "settings":{
        "number_of_shards":5,
        "number_of_replicas":0
    },
    "mappings":{
        "article":{
            "dynamic":"strict",
            "_all":{
                "enabled":false
            },
            "properties":{
                "title":{
                    "type":"string",
                    "index":"analyzed",
                    "analyzer":"ik_max_word",
                    "search_analyzer":"ik_max_word"
                },
                "describe":{
                    "type":"string",
                    "index":"analyzed",
                    "analyzer":"ik_max_word",
                    "search_analyzer":"ik_max_word"
                },
                "content":{
                    "type":"string",
                    "index":"analyzed",
                    "analyzer":"ik_max_word",
                    "search_analyzer":"ik_max_word"
                },
                "author":{
                    "type":"string",
                    "index":"no"
                },
                "time":{
                    "type":"date",
                    "index":"not_analyzed",
                    "format":"yyyy-MM-dd HH:mm:ss"
                }
            }
        }
    }
}
注意:
dynamic可以有三个选项值:true是开启动态映射,false忽略没有定义的字段,strict当遇到未知字段时抛出异常
index可以有三个选项值:not_analyzed是不分词建立索引,no是指不建立索引,analyzed是指分词建立索引
mapping中的数据类型:
字符串string
数字(byte,short,integer,long,float,double)
日期date
日期的话可以设置格式
{"type":"date","format":"yyyy-MM-dd"}
布尔型boolean
二进制binary
修改mapping示例
curl -XPOST "http://127.0.0.1:9200/test/test/_mapping?pretty" -d '{
"test": {
"dynamic":"true"
}
}
}'
ElasticSearch5.4.1索引搭建
文件准备:
1.elastic-cluster.tar.gz es索引集群文件
2.jdk-8u11-linux-x64.tar.gz jdk文件
https://www.elastic.co/cn/downloads/past-releases/elasticsearch-5-4-1
一、新建ES启动 账户
使用root账户登录,新建账户如fenxi或elastic
因为集群启动不能使用root账户,所以要新建一个索引账户。
如:
useradd fenxi;
passwd xxx;
二、安装jdk,版本为1.8
1.使用 fenxi账户登录
ssh fenxi@192.xx.xx.1
2.新建java目录,解压jdk压缩包
mkdir java
tar -zxvf jdk-8u11-linux-x64.tar.gz
mv jdk-8u11-linux-x64 jdk
解压完如下:
3.配置jdk环境,验证java版本
只需要给 fenxi账户,配置java环境即可;
vim .bash_profile
source .bash_profile
java -version
三、修改系统配置
使用root 账户登录系统,进行修改配置。
因为索引集群需要的文件数、虚拟内存等较多,所以要修改系统配置,如下
问题一:ERROR: bootstrap checks failed
max file descriptors [4096] for elasticsearch process likely too low, increase to at least [65536]
max number of threads [1024] for user [lishang] likely too low, increase to at least [2048]
解决:切换到root用户,编辑limits.conf 添加类似如下内容
vi /etc/security/limits.conf
添加如下内容:
* soft nofile 65536
* hard nofile 131072
* soft nproc 2048
* hard nproc 4096
问题二:max number of threads [1024] for user [lish] likely too low, increase to at least [2048]
解决:切换到root用户,进入limits.d目录下修改配置文件。
vi /etc/security/limits.d/90-nproc.conf
修改如下内容:
* soft nproc 1024
#修改为
* soft nproc 2048
问题三:max virtual memory areas vm.max_map_count [65530] likely too low, increase to at least [262144]
解决:切换到root用户修改配置sysctl.conf
vi /etc/sysctl.conf
添加下面配置:
vm.max_map_count=655360
并执行命令:
sysctl -p
[1]: max file descriptors [4096] for elasticsearch process is too low, increase to at least [65536]
[2]: max virtual memory areas vm.max_map_count [65530] is too low, increase to at least [262144]
sysctl -w vm.max_map_count=262144
sysctl -a|grep vm.max_map_count
四、安装配置启动ES
1.解压ES集群文件
tar -zxvf elastic-indexer.tar.gz
2.修改配置文件
cd /home/fenxi/elastic-cluster/elasticsearch-nodes/elasticsearch-node1/config
2.1 修改jvm参数,最大内存应不超过32G
vim jvm.options
根据服务器配置情况设置内存,但内存最大不应超过32G,超过32G后jvm 工作效率会降低。
2.2 修改elasticsearch 配置
文件中 飘红的地方,为必须修改和确认项,可根据当前服务器环境进行参考修改!
vim elasticsearch.yml
# ---------------------------------- Cluster -----------------------------------
#配置集群名称
cluster.name: isiteam-fbm-data-nodes
# ------------------------------------ Node ------------------------------------
#配置节点名称
node.name: 192.168.6.124-node1
#节点属性,是否可称为主节点 和是否为数据节点,一般都为true即可
node.master: true
node.data: true
# ----------------------------------- Paths ------------------------------------
#配置数据存储路径 多个路径之间使用“,”进行分割
path.data: /u01/elastic/elastic-cluster/node-datas/node1_1,/u01/elastic/elastic-cluster/node-datas/node1_2
# Path to log files:
#日志文件路径
path.logs: /u01/elastic/elastic-cluster/node-logs/node1/logs
# ---------------------------------- Network -----------------------------------
#绑定IP
network.host: 192.xx.xx.11
#配置端口
http.port: 9200
transport.tcp.port: 9300
# --------------------------------- Discovery ----------------------------------
#配置集群扫描项(可配置多个)
discovery.zen.ping.unicast.hosts: ["192.xx.xx.11:9300"]
#discovery.zen.ping.unicast.hosts: ["192.168.x.122:9300",i"192.168.x.123:9300","192.168.x.124:9300"]
#防止脑裂
# Prevent the "split brain" by configuring the majority of nodes (total number of master-eligible nodes / 2 + 1):
#discovery.zen.minimum_master_nodes: 3
3.启动ES服务
修改启动关闭脚本路径,然后
./start-es-all.sh
启动服务
4.验证服务
curl ip:9200
出现上图结果则表明索引节点启动成功!
五、客户端
安装ES-head插件
安装浏览器插件即可
elasticsearch-head chrome 插件安装_chrome es插件_Thai_的博客-优快云博客
2.浏览器访问 http://IP:9200/
如果带认证:http://ip:9200/?auth_user=elastic&auth_password=elastic
安装es-client客户端
下载地址:https://gitee.com/qiaoshengda/es-client/releases
![]()
新增链接
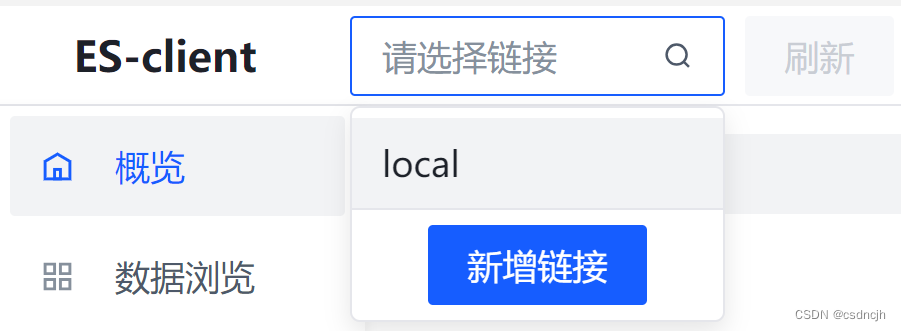
概览-新建
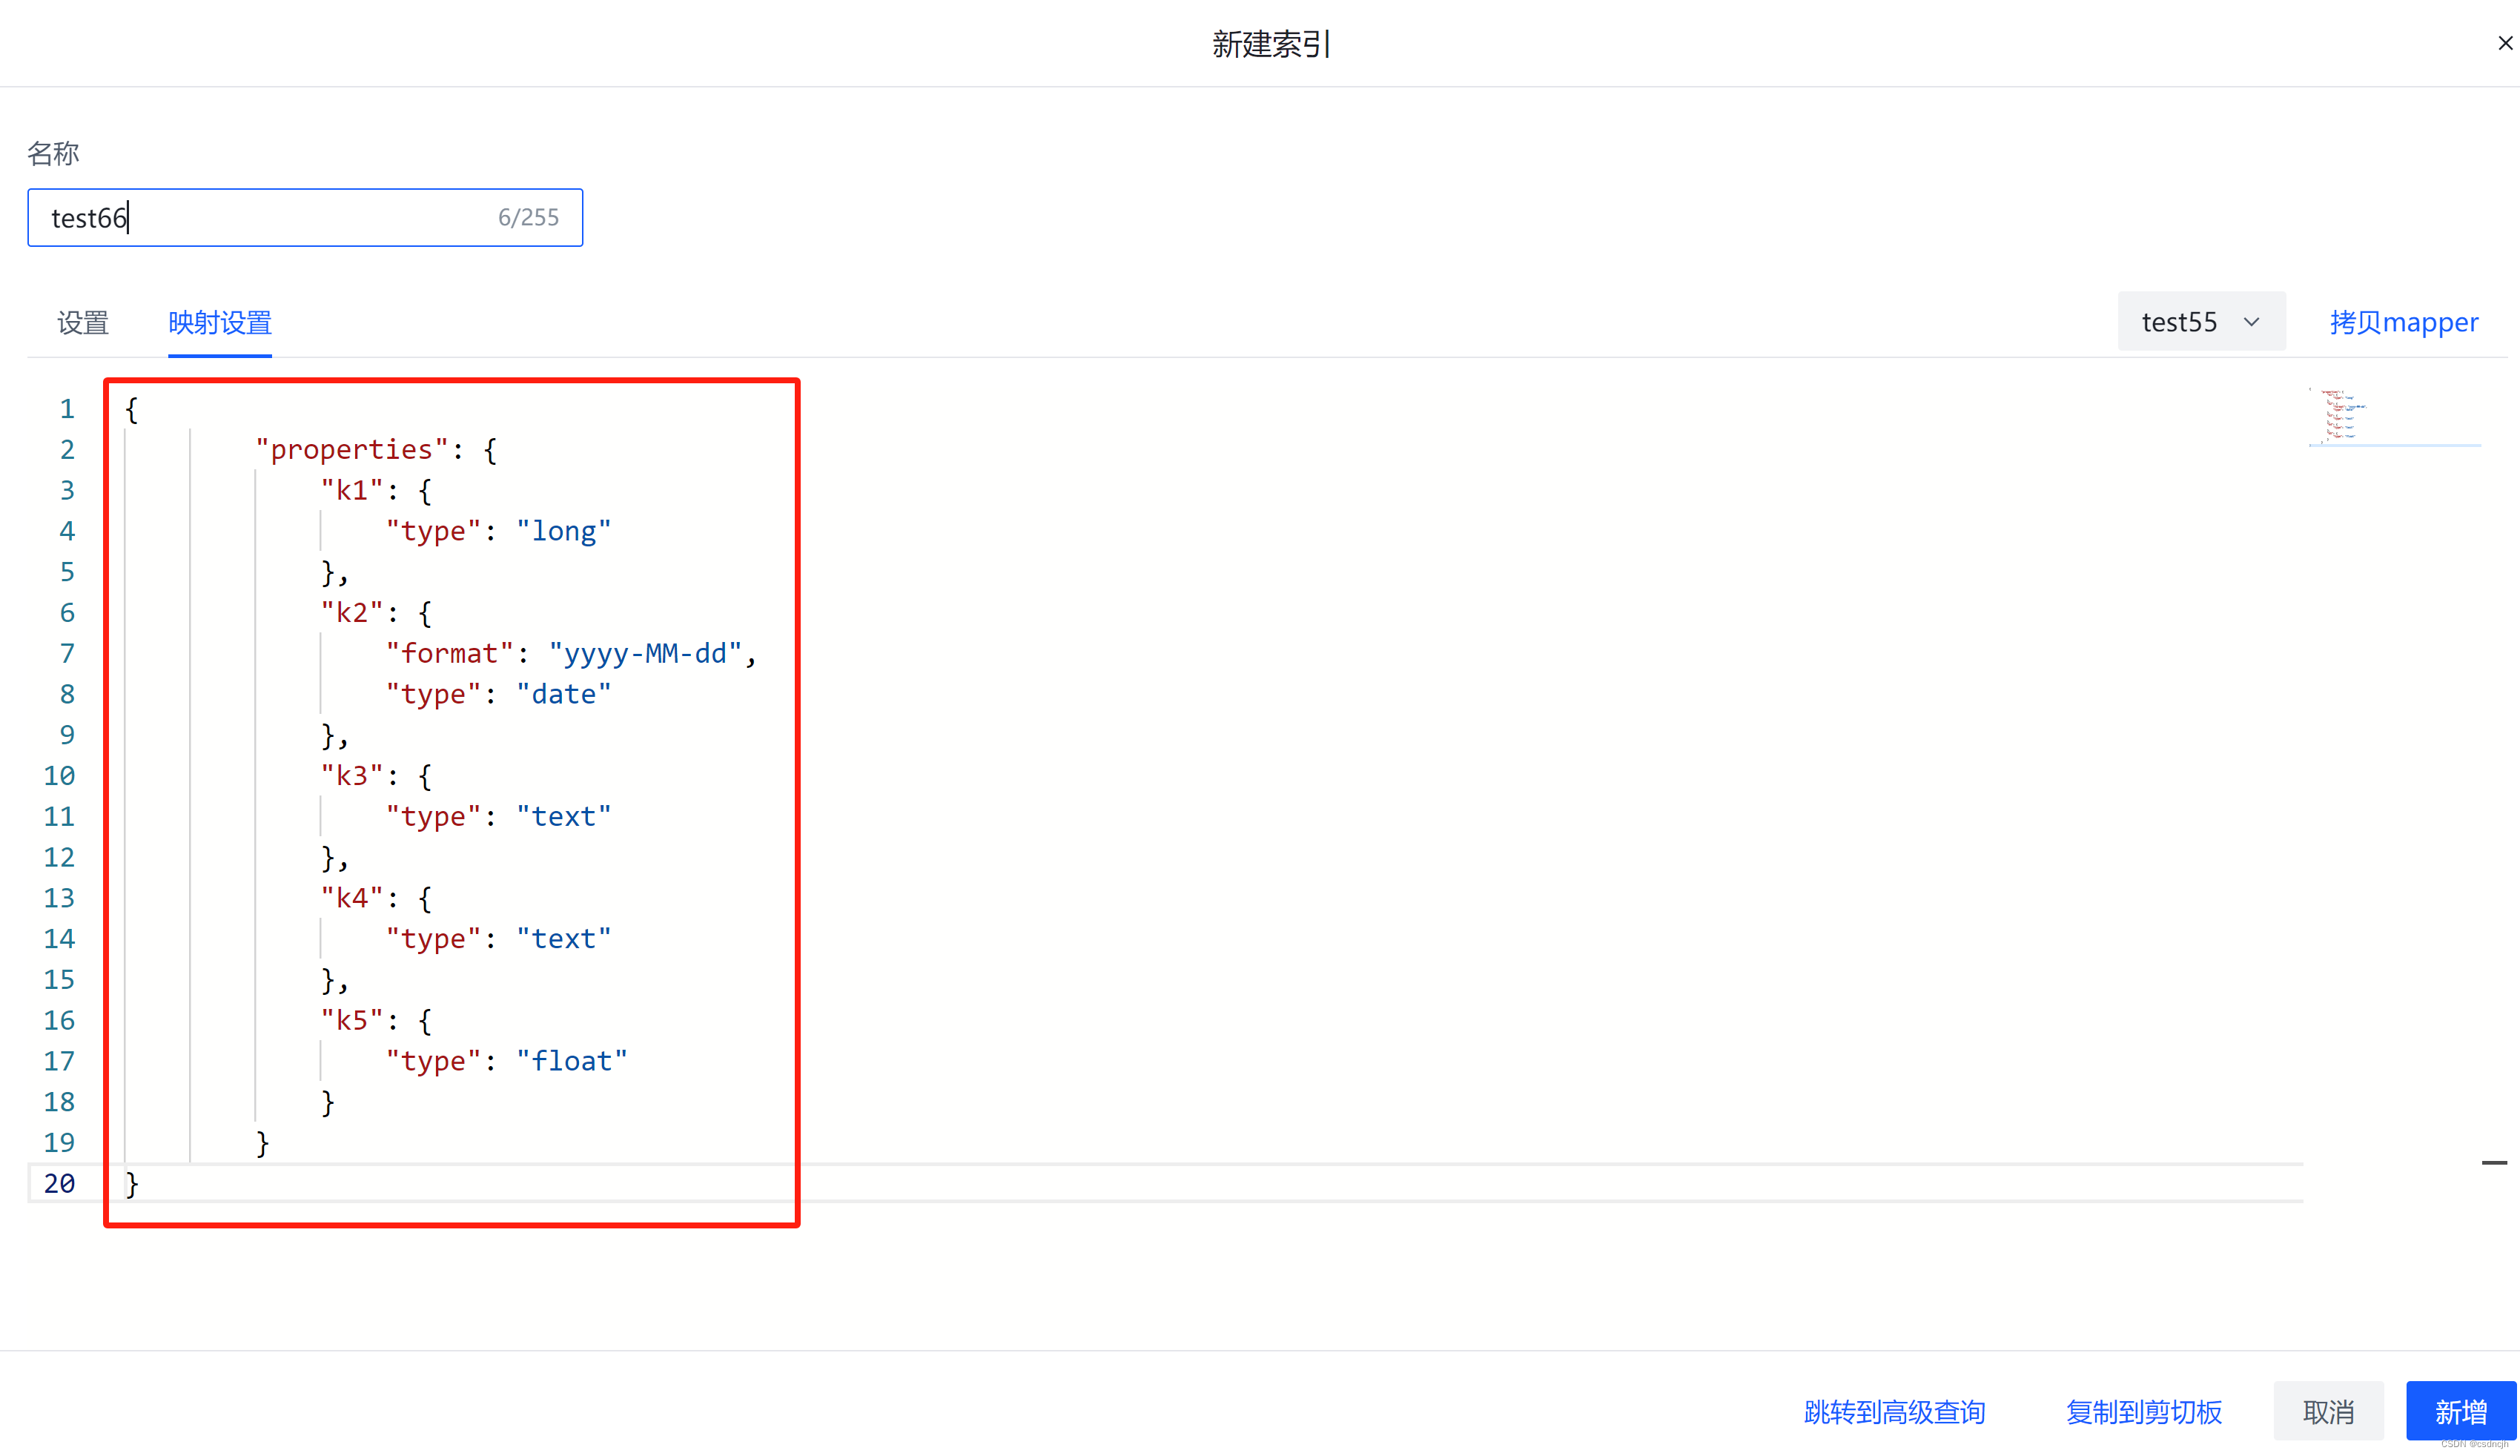
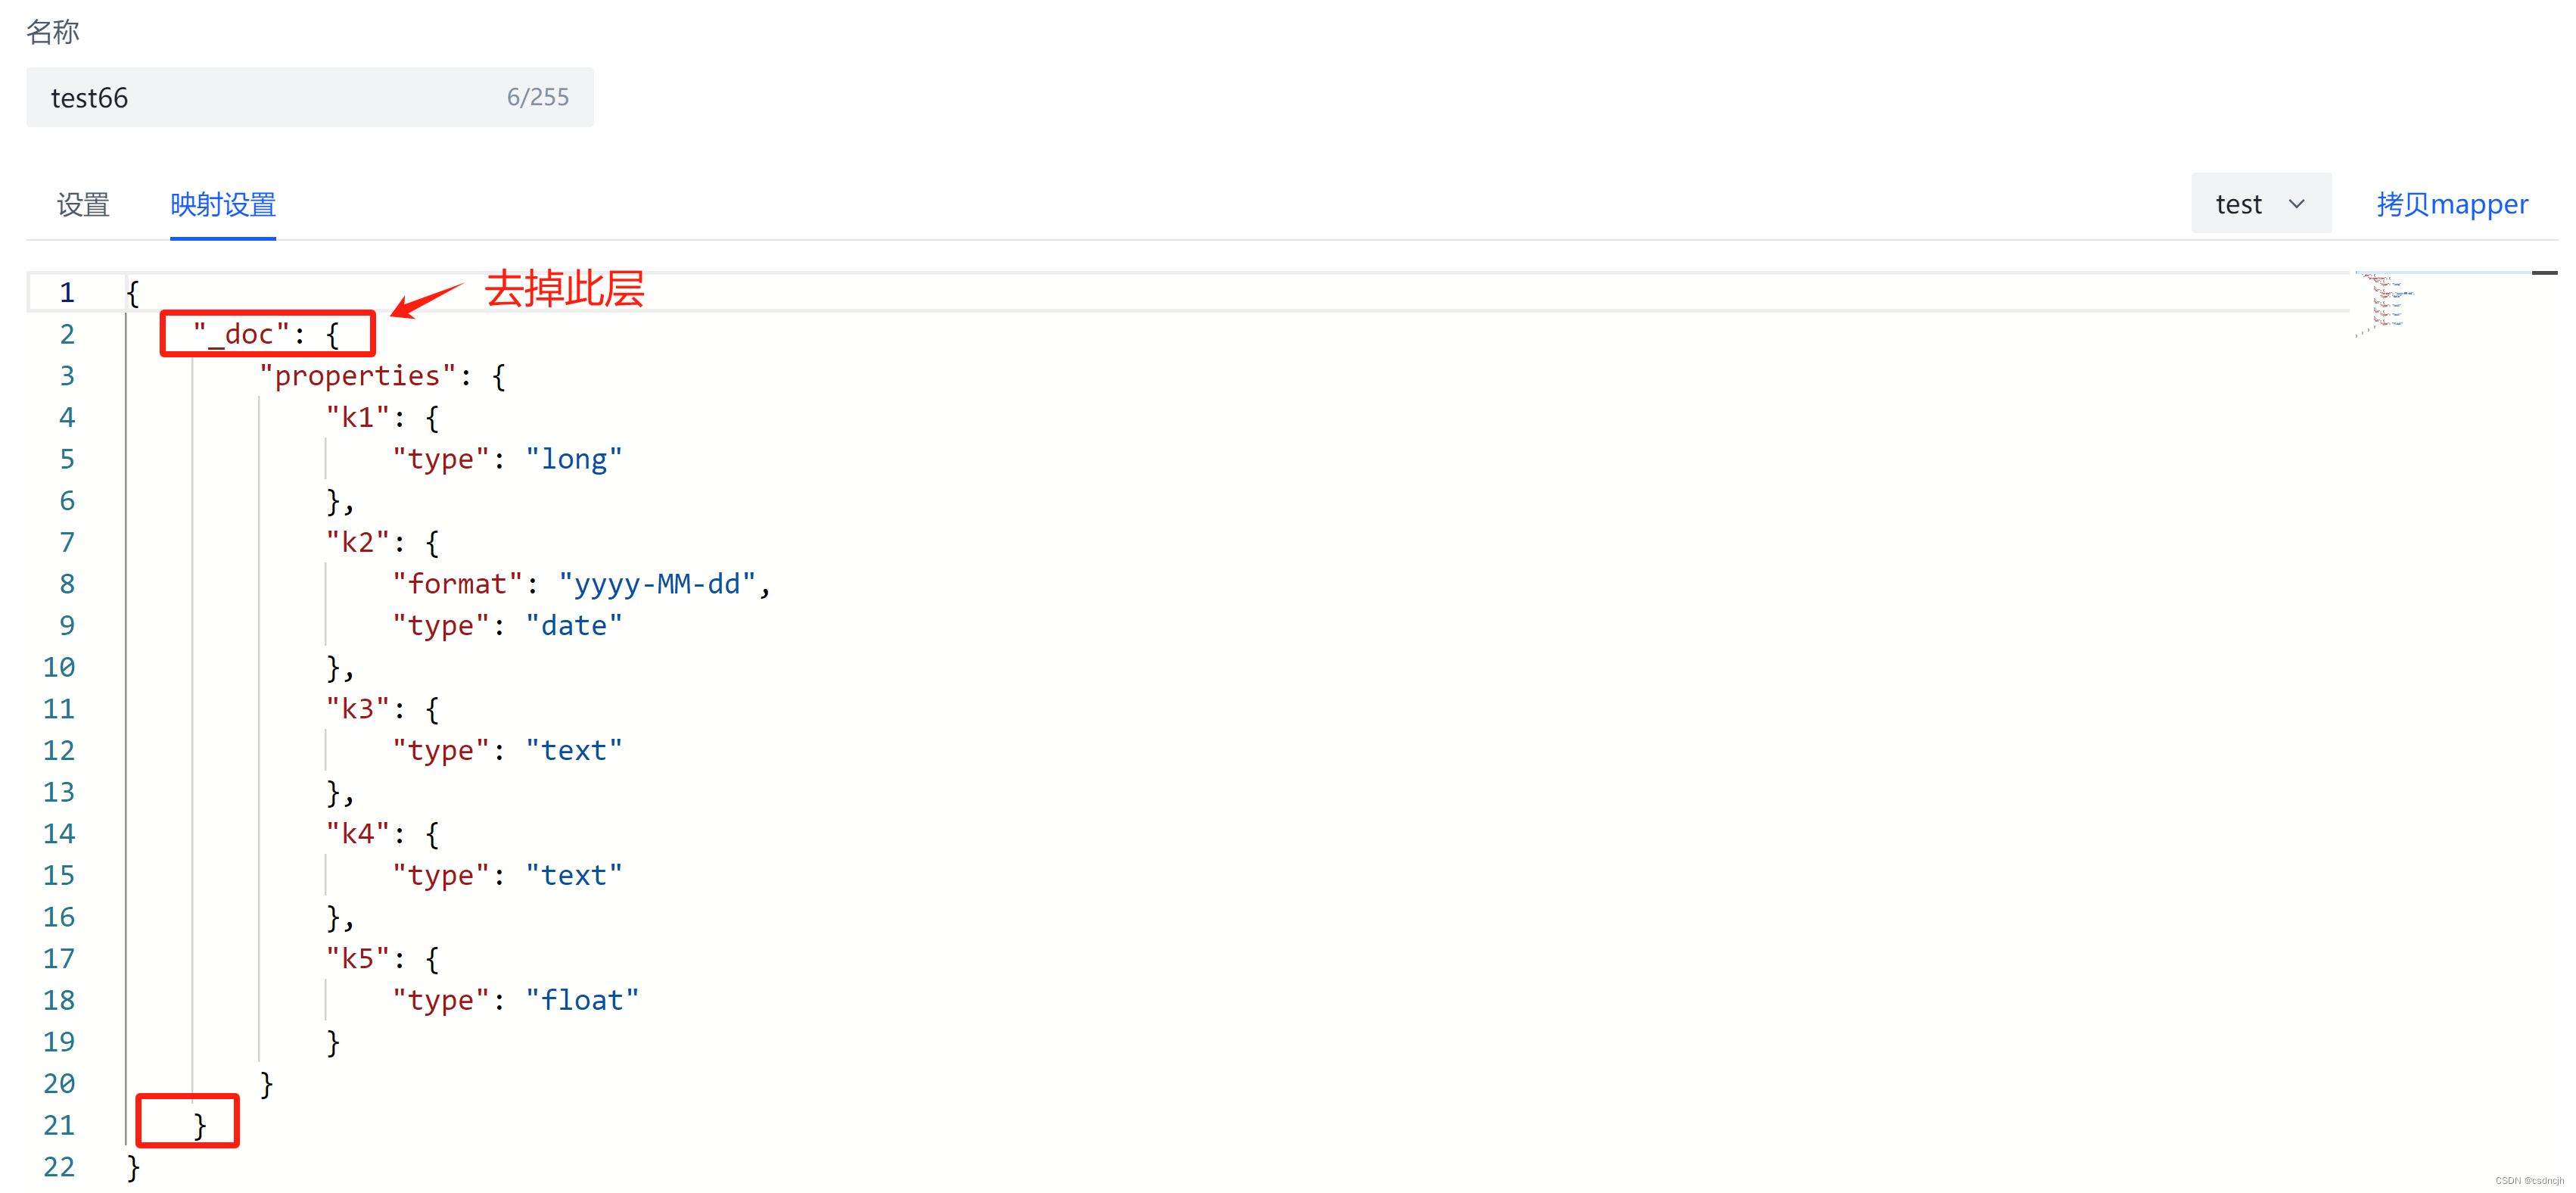
概览-新建-拷贝mapping
这个功能很实用,可以基于已有的mapping新建索引,但是需要稍微调整一下
概览-建立别名

数据浏览

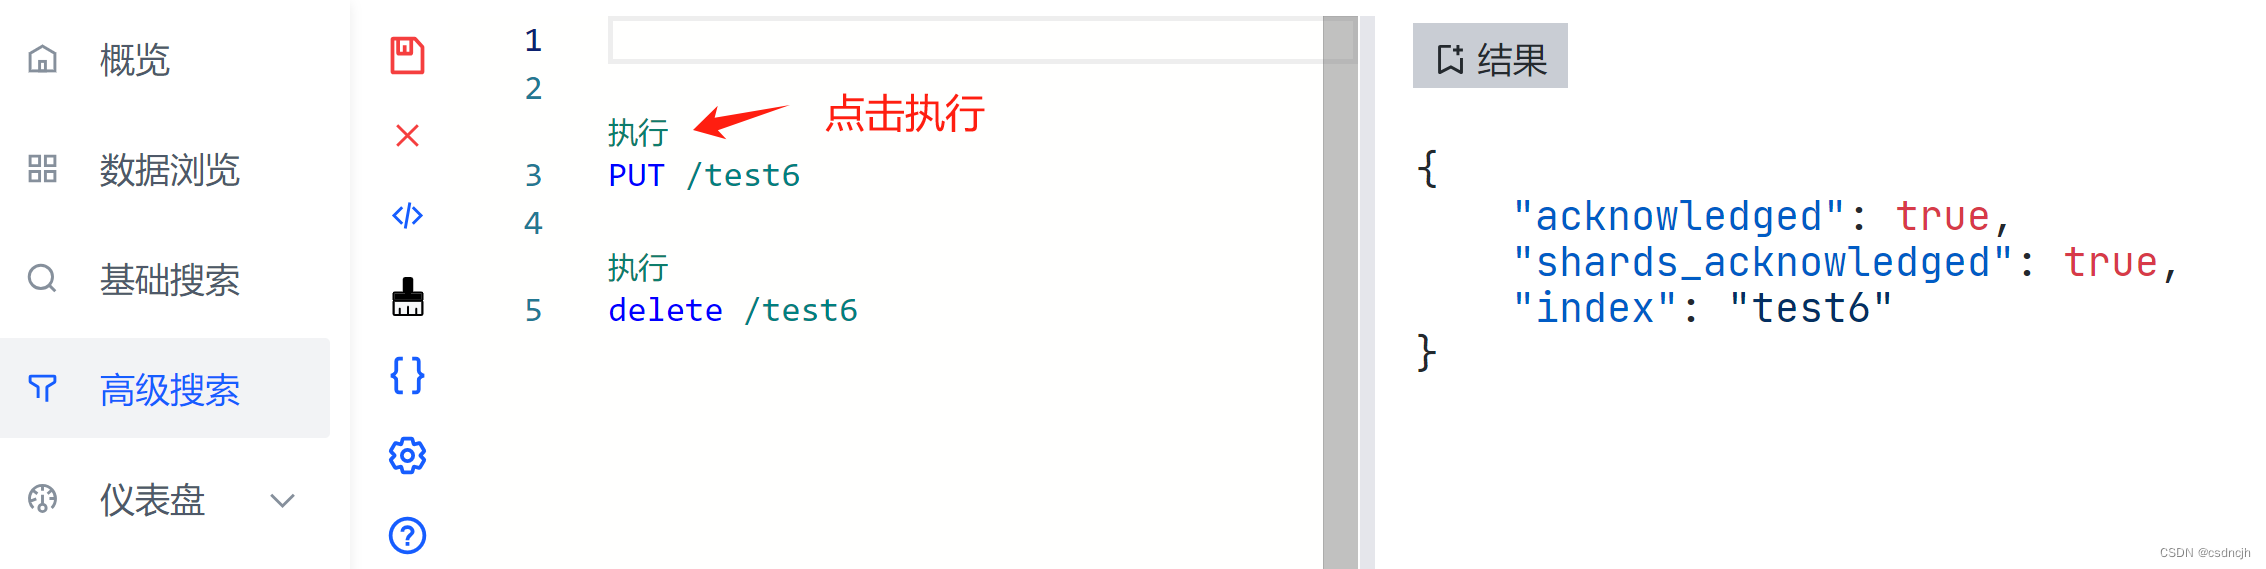
高级搜索
此处可以和kibina一样执行DSL语句,点击上访的汉字即是执行。
Kibana使用
docker方式安装
注意:这种适用于测试环境
Docker 安装 ElasticSearch 和 Kibana - 链滴
kibana操作elasticsearch(增删改查)-优快云博客
DSL测试
创建索引
PUT     /student
{
       "mappings":  {
           "properties":  {
               "id":  {
                   "type":  "long"
               },
               "name":  {
                   "type":  "keyword"
               },
               "content":  {
                   "type":  "text"
               },
               "birthday":  {
                   "type":  "date",
                   "format":  "yyyy-MM-dd  HH:mm:ss"
               },
               "age":  {
                   "type":  "integer"
               }
           }
       }
}
单挑插入
POST   /student/_doc
{
     "id":   "1",
     "name":   "张三",
     "content":   "这是一个优秀的学生",
     "birthday":   "2000-01-01",
     "age":   20
}
批量插入
POST /student/_bulk
{ "index": { "_id": 1 }}
{"name":   "张三111","content":   "这是一个优秀的学生aa","birthday":   "2000-01-01","age":   20}
{ "index": { "_id": 2 }}
{"name":   "张三222","content":   "这是一个一般的学生bb","birthday":   "2000-01-01","age":   20}
{ "index": { "_id": 3 }}
{"name":   "张三333","content":   "这是一个优秀的学生cc","birthday":   "2000-01-01","age":   20}
{ "index": { "_id": 4 }}
{"name":   "张三444","content":   "这是一个优秀的学生dd","birthday":   "2000-01-01","age":   20}
{ "index": { "_id": 5 }}
{"name":   "张三444","content":   "这是一个优秀的学生bb ff","birthday":   "2000-01-01","age":   20}
query_string测试
GET /student/_search
{
  "query": {
    "query_string": {
      "query": "(   (content :\"一个\"  AND content : \"aa\") or (content :\"优秀\"  AND content : \"bb\")       NOT content : \"ff\" )"
    }
  }
}
Doris+DBeaver使用
使用Doris将ES作为外表,然后用DBeaver可以很方便以sql方式查询ES
测试步骤(以下是用windows下的docker desktop进行的测试)
1.docker安装doris
创建子网网桥
docker network create --driver bridge --subnet=172.20.80.0/24 doris-network
启动FE
docker run -itd ^
--name=fe ^
--env FE_SERVERS="fe1:172.20.80.2:9010" ^
--env FE_ID=1 ^
-p 8030:8030 ^
-p 9030:9030 ^
-v D:\Docker\doris\data\fe\doris-meta:\opt\apache-doris\fe\doris-meta ^
-v D:\Docker\doris\data\fe\log:\opt\apache-doris\fe\log ^
--network=doris-network ^
--ip=172.20.80.2 ^
apache/doris:1.2.2-fe-x86_64docker run -itd ^
--name=be ^
--env FE_SERVERS="fe1:172.20.80.2:9010" ^
--env BE_ADDR="172.20.80.3:9050" ^
-p 8040:8040 ^
-v D:\Docker\doris\data\be\storage:\opt\apache-doris\be\storage ^
-v D:\Docker\doris\data\be\log:\opt\apache-doris\be\log ^
--network=doris-network ^
--ip=172.20.80.3 ^
apache/doris:1.2.2-be-x86_64
启动BE
docker run -itd ^
--name=be ^
--env FE_SERVERS="fe1:172.20.80.2:9010" ^
--env BE_ADDR="172.20.80.3:9050" ^
-p 8040:8040 ^
-v D:\Docker\doris\data\be\storage:\opt\apache-doris\be\storage ^
-v D:\Docker\doris\data\be\log:\opt\apache-doris\be\log ^
--network=doris-network ^
--ip=172.20.80.3 ^
apache/doris:1.2.2-be-x86_64
2.docker安装ES
单机Docker部署ELK(ElasticSearch、Kibana、Logstash)
docker run -d --name es ^
-p 9200:9200 ^
-p 9300:9300 ^
-e ES_JAVA_OPTS="-Xms256m -Xmx256m" ^
-e "discovery.type=single-node" ^
--network doris-network -h "es" ^
elasticsearch:7.16.3
docker run -d ^
-e ELASTICSEARCH_HOSTS=http://es:9200 ^
-p 5601:5601 ^
-e I18N_LOCALE=zh-CN ^
--name kibana ^
--network doris-network -h "kibana" ^
kibana:7.16.3
3.doris on ES
测试索引的mapping
PUT /test
{
"mappings": {
"properties": {
"k1": {
"type": "long",
"index": "true"
},
"k3": {
"type": "text"
},
"k4": {
"type": "text"
},
"k5": {
"type": "float"
},
"k2": {
"type": "date",
"format": "yyyy-MM-dd"
}
}
}
}
批量添加测试数据(kibana中操作)
POST /_bulk
{"index":{"_index":"test"}}
{ "k1" : 100, "k2": "2020-01-01", "k3": "Trying out Elasticsearch", "k4": "Trying out Elasticsearch", "k5": 10.0}
{"index":{"_index":"test"}}
{ "k1" : 100, "k2": "2020-01-01", "k3": "Trying out Doris", "k4": "Trying out Doris", "k5": 10.0}
{"index":{"_index":"test"}}
{ "k1" : 100, "k2": "2020-01-01", "k3": "Doris On ES", "k4": "Doris On ES", "k5": 10.0}
{"index":{"_index":"test"}}
{ "k1" : 100, "k2": "2020-01-01", "k3": "Doris", "k4": "Doris", "k5": 10.0}
{"index":{"_index":"test"}}
{ "k1" : 100, "k2": "2020-01-01", "k3": "ES", "k4": "ES", "k5": 10.0}
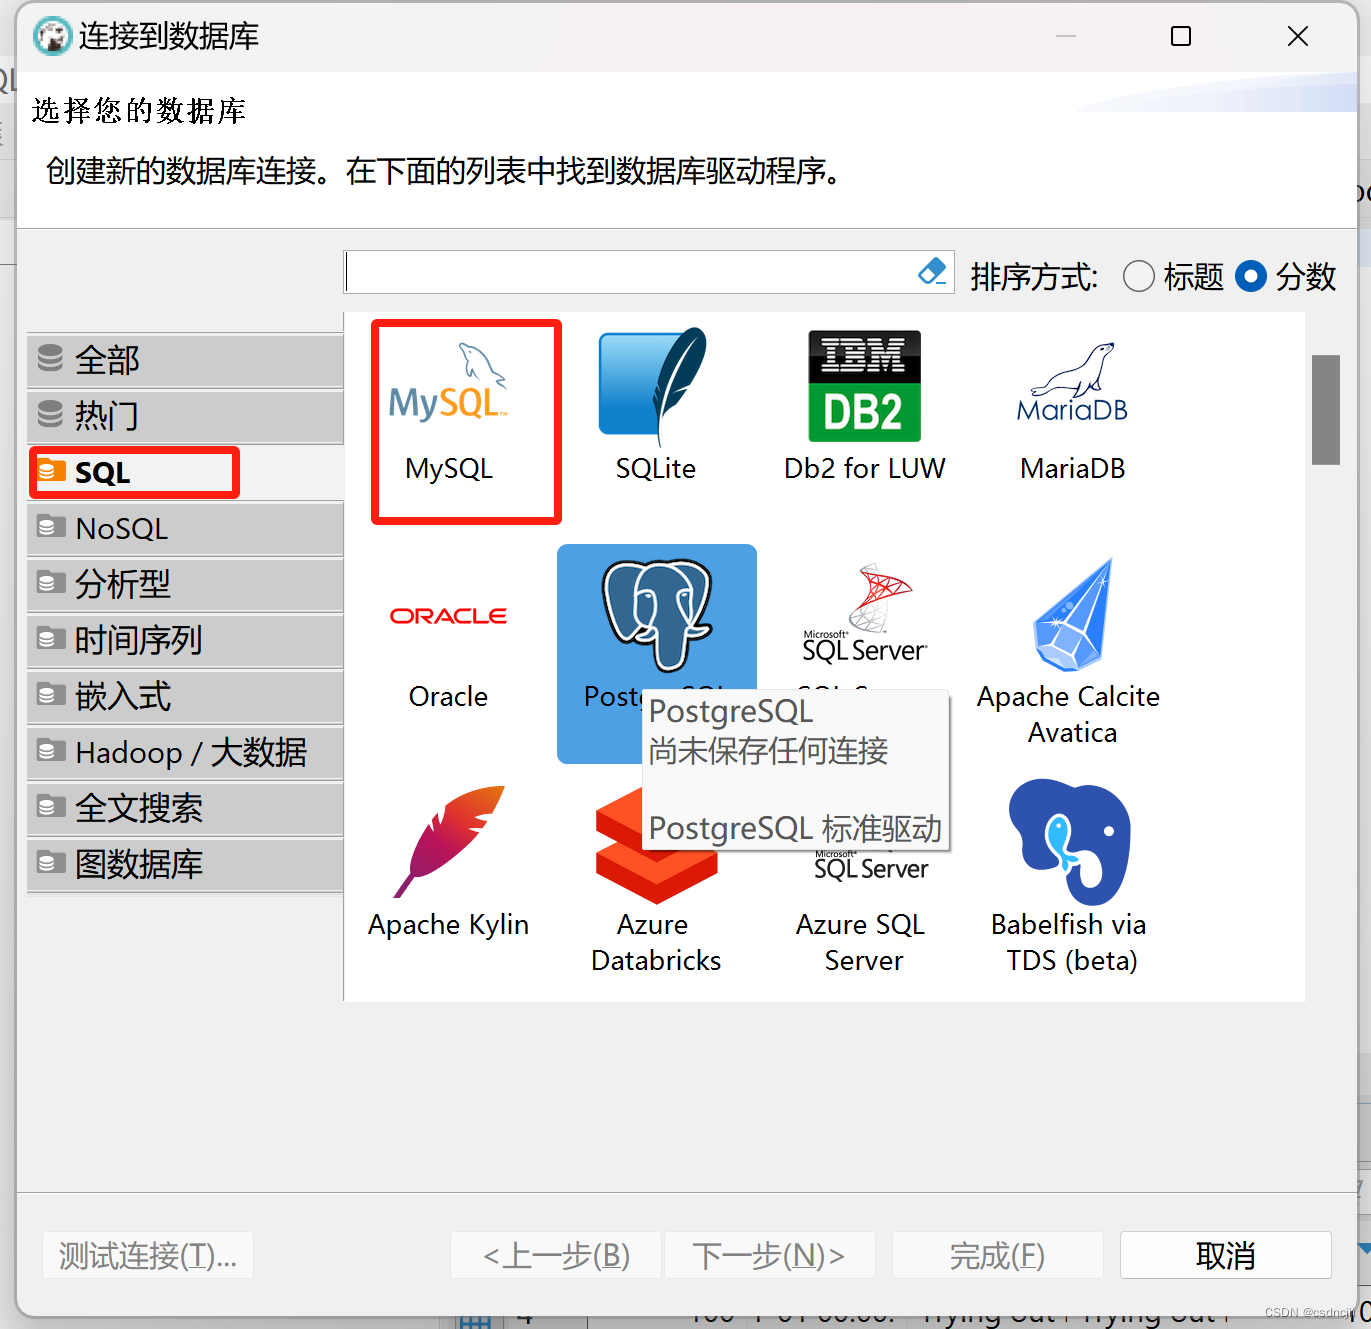
4.下载DBeaver 社区版下载
DBeaver Community | Free Universal Database Tool
创建-连接-创建mysql连接
create database demo;
use demo;
CREATE EXTERNAL TABLE `es_table` (
`k1` bigint(20) NULL,
`k2` datetime NULL,
`k3` varchar(20) NULL,
`k4` varchar(100) NULL,
`k5` float NULL
) ENGINE=ELASTICSEARCH
COMMENT 'ELASTICSEARCH'
PARTITION BY RANGE(`k1`)
()
PROPERTIES (
"hosts" = "http://es:9200",
"user" = "",
"password" = "",
"index" = "test",
"enable_docvalue_scan" = "true",
"max_docvalue_fields" = "20",
"enable_keyword_sniff" = "true",
"nodes_discovery" = "true",
"http_ssl_enabled" = "false"
);
在sql编辑器中执行
SELECT * from es_table et


 2744
2744

 被折叠的 条评论
为什么被折叠?
被折叠的 条评论
为什么被折叠?
 到【灌水乐园】发言


