


前言
最近遇到注册登陆按钮需要添加防抖功能,在进行了简单了解和实践之后,将其整理记录下来。
附:个人目前对防抖节流函数的最佳(更准确清晰)实现:
防抖函数及其使用示例
节流函数及其使用示例
一、什么是防抖和节流?
防抖和节流是针对响应跟不上触发频率这类问题的两种解决方案。针对此类快速连续触发和不可控的高频触发问题,debounce 和 throttle 给出了两种解决策略。在阅读本篇文章之前需要对闭包和超时调用(setTimeout)的相关知识有一定的了解。
二、防抖
简单介绍
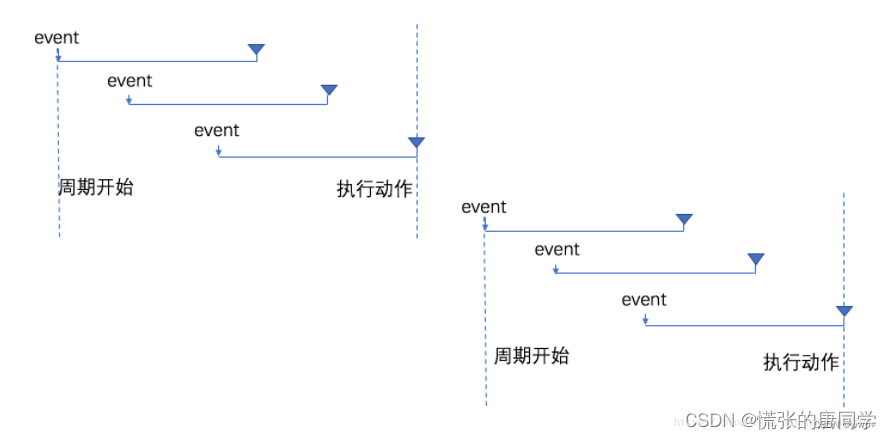
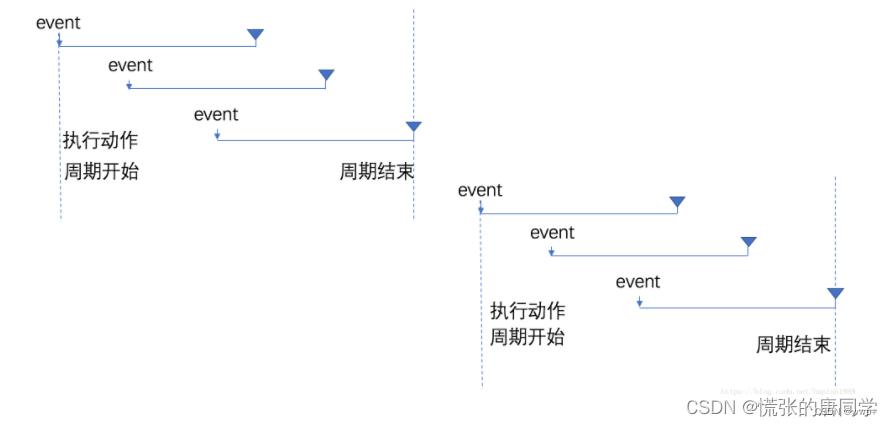
防抖分为两种,一种是延迟执行的,叫做延迟防抖;另外一种是立即执行的,叫做前缘防抖。
注:(图解及部分代码思路参考自文末参考文档,个人觉得此图解较为清晰,另外,非常感谢前人留下的宝贵经验)
图解
延迟防抖图解:
前缘防抖图解:
代码如下(示例):
// 真正需要执行的函数,事件处理之类的
fn=()=>{
	console.log('发起网络请求');
}
1.一个简单的防抖函数
// 延迟防抖基础版
  debounceOne=(fn,delay)=>{  // 它只执行一次
    let timer = null;
    console.log('延迟防抖函数基础版')
    return(
      ()=>{ // 匿名函数(闭包)
        clearTimeout(timer);
        timer = setTimeout(
          ()=>{ //这里用箭头函数
            fn(); // 调用回调函数后将timer置空
            timer=null;
          },delay
        );
      }
    )
  }
下面的代码中注意此处,this.debounceOne(this.func,2000)表示立即调用执行,一加载到debounceOne()这里就执行,然后当我们点击按钮的时候,执行的就是返回来的闭包函数了,而写在debounceOne函数中的非返回部分只在最初立即执行时执行一次,我们可以在那部分进行一些初始化工作。
<Button type='primary' onClick={this.debounceOne(this.fn,2000)} style={{marginBottom:'10px',display:'block'}}>点击发起请求(延迟防抖基础版)</Button>
2.在上面的基础上进行优化
// 延迟防抖优化版,不用多次清除,创建定时器,而是改变开始时间,在点击按钮到fn函数执行的期间内最多只创建了两次定时器,提高了性能
  debounceTwo = (fn,delay)=>{
    let timer = null;
    let triggerTime;
    console.log('延迟防抖函数优化版')
    let run =(wait)=>{
      timer = setTimeout(()=>{
        let executeTime = (new Date()).getTime();
        let alreadyWait = executeTime - triggerTime; // 计算开始时间戳(点击按钮时会被修改)与执行时间戳的差值
        if(alreadyWait < wait){
          run(delay-alreadyWait); //此处用delay不用wait
        }else {
          fn();
          timer = null;
        }
      },wait)
    }

    return (()=>{
      triggerTime = (new Date()).getTime(); // 点击按钮记录(修改)开始时间戳
      if(!timer){
        run(delay);
      }
    })
  }
<Button type='primary' onClick={this.debounceTwo(this.fn,2000)} style={{marginBottom:'10px',display:'block'}}>点击发起请求(延迟防抖优化版)</Button>
3.再向其中添加一个参数immediate,值为true时表示采用前缘防抖,该值也可由外部传入进行更改,具体代码有一些不同,下面有标注
  // 前缘防抖优化版
  debounceThree=(fn,delay,immediate=true)=>{
    let timer = null;
    let triggerTime;
    console.log('前缘防抖函数优化版'); // 只执行一次
    let run=(wait)=>{
      timer= setTimeout(()=>{
        let executeTime = (new Date()).getTime();
        let alreadyWait = executeTime-triggerTime; // 计算开始时间戳(点击时会被修改)与执行时间戳的差值
        if(alreadyWait < wait){
          run(delay-alreadyWait); //此处用delay
        }else {
          if(!immediate){ // 相对于延迟版本的变化
            fn();
          }
          // fn();

          timer = null;
        }
      },wait);
    }

    return (()=>{
      triggerTime = (new Date()).getTime(); // 点击记录(修改)开始时间戳
      if(!timer){
        if(immediate){ // 相对于延迟版本增加的部分
          fn();
        }
        run(delay);
      }
    })
  }
<Button type='primary' onClick={this.debounceThree(this.fn,2000)} style={{marginBottom:'10px',display:'block'}}>点击发起请求(前缘防抖优化版)</Button>
4.看到这里的话,基本上就可以理解防抖函数该怎么使用了。但是此时fn()函数是没有给它传入参数的,如果我们需要在fn()函数使用外部传入的参数,要怎样将参数传给fn()呢?来看接下来的拓展。
  //真正需要执行的函数,事件处理之类的,带arguments版本,使用普通函数
  funcWithArguments(){
    console.log('发起网络请求');
    console.log('传入参数:',arguments);

    // .......将arguments用于后续代码中
  }
拓展1:
// 延迟防抖优化带参数版,使用arguments,此处使用function 而不使用箭头函数
  debounceTwoWithArguments (fn,delay){
    let timer = null;
    let triggerTime;
    console.log('延迟防抖函数高性能带参数版');  // 只执行一次
    let run=function (wait){ //此处为了接受点击闭包时的arguments,用普通函数
      timer = setTimeout(()=>{
        let executeTime = (new Date()).getTime();
        let alreadyWait = executeTime - triggerTime; // 计算开始时间戳(点击时会被修改)与执行时间戳的差值
        if(alreadyWait < wait){
          run(delay-alreadyWait); //此处用delay更准确,不用wait
        }else {
          console.log('参数:',arguments);
          fn.apply(this,arguments);

          // fn();
          timer = null;
        }
      },wait)
    }

    return (function() { // 此处为了使用arguments,用普通函数
      triggerTime = (new Date()).getTime(); // 点击记录(修改)开始时间戳
      if(!timer){
        console.log(arguments); //点击时闭包函数的arguments
        run(delay,arguments); // 将闭包函数的arguments作为参数传入run,以供在run函数内的fn函数使用
      }
    })
  }
<Button type='primary' onClick={this.debounceTwoWithArguments(this.funcWithArguments,2000)} style={{marginBottom:'10px',display:'block'}}>点击发起请求(延迟防抖带参数优化版)</Button>
拓展2:
  // 前缘防抖优化带参数版,使用arguments,注意此时多处使用function 而不使用箭头函数
  debounceThreeWithArguments(fn,delay,immediate=true){
    let timer = null;
    let triggerTime;
    console.log('前缘防抖函数带参数优化版')
    let run=(wait)=>{
      timer= setTimeout(()=>{
        let executeTime = (new Date()).getTime();
        let alreadyWait = executeTime-triggerTime; // 计算开始时间戳(点击时会被修改)与执行时间戳的差值
        if(alreadyWait < wait){
          run(delay-alreadyWait); //此处用delay更准确,不用wait
        }else {
          if(!immediate){ // 相对于延迟版本的变化
            fn();
          }
          // fn();

          timer = null;
        }
      },wait);
    }

    return (function() {
      triggerTime = (new Date()).getTime(); // 点击记录(修改)开始时间戳
      if(!timer){
        if(immediate){ // 相对于延迟版本的增加
          // fn();

          //相比前缘优化版变动
          console.log('回调参数',arguments); // 获取到当我们点击按钮时,传入闭包函数的参数列表
          fn.apply(this,arguments);
        }

        run(delay);
      }
    })
  }
<Button type='primary' onClick={this.debounceThreeWithArguments(this.funcWithArguments,2000)} style={{marginBottom:'10px',display:'block'}}>点击发起请求(前缘防抖带参数优化版)</Button>
关于这里为什么使用function,原因在于箭头函数没有arguments属性,在需要传递未知数量的参数时用arguments会更方便,在使用时要注意this指向。另外一个地方是apply,一般用法为fn.apply(this,arguments),有兴趣的小伙伴可以去了解一下,这里不做详述。
二、节流
简单介绍
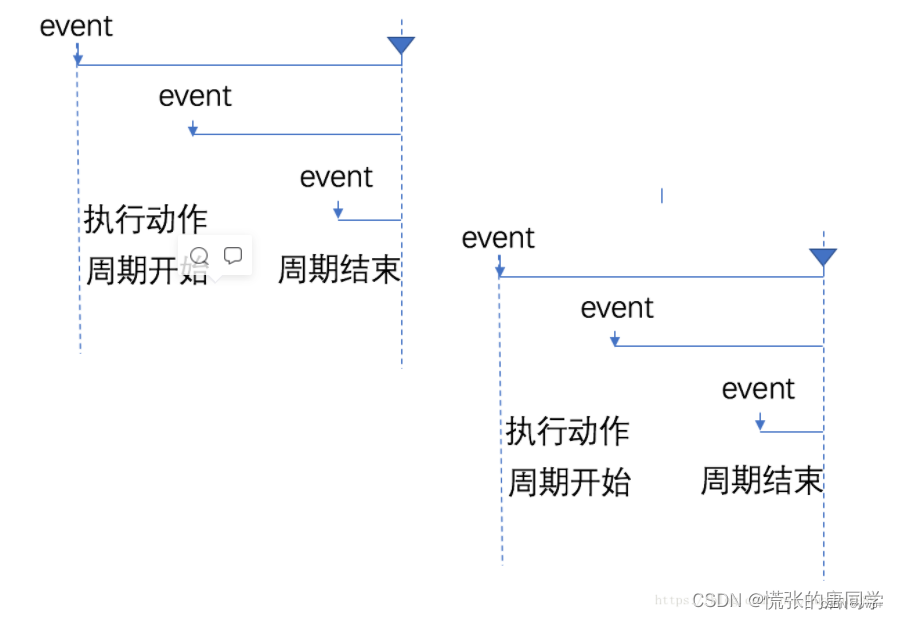
节流主要用于控制某项操作,在规定的时间(delay)内,只能执行一次,当经过了该时间周期后,才能再次执行。与防抖类似,节流也分为立即执行和非立即执行两种。
图解
延迟节流图解:

前缘节流图解:
代码如下(示例):
// 真正需要执行的函数,事件处理之类的
fn=()=>{
	console.log('发起网络请求');
}
1.节流函数,可选是否立即执行
//immediate=true表示前缘节流,否则为延迟节流
  throttle=(fn,delay,immediate=true)=>{
    let timer = null;
    return(
      ()=>{
        if(!timer){
          if(immediate){
            fn();
          }
          timer=setTimeout(()=>{
            if(!immediate){
              fn();
            }
            timer = null;
          },delay)
        }
      }
    )
  }
//一个简单的节流函数就完成了
下面的代码中注意此处,this.throttle(this.func,2000)表示立即调用执行,一加载到throttle()这里就执行,然后当我们点击按钮的时候,执行的就是返回来的闭包函数了,而写在throttle函数中的非返回部分只在最初立即执行时执行一次,我们可以在那部分进行一些初始化工作。
<Button type='primary' onClick={this.throttle(this.func,2000)} style={{marginBottom:'10px',display:'block'}}>点击发起请求(前缘节流版)</Button>
2.在上面的基础上进行拓展
// 真正需要执行的函数,事件处理之类的
funcWithArguments (){
    console.log('发起网络请求');
    console.log('参数arguments:',arguments);
  }
//immediate=true表示前缘节流,否则为延迟节流,带参数Arguments版
  throttleWithArguments (fn,delay,immediate=true){ // 使用普通函数
    let timer = null;
    return(
      function(){
        if(!timer){
          console.log(arguments); // 能够访问到点击后调用闭包函数时的arguments,该arguments可用于fn函数
          if(immediate){
            // fn();
            fn.apply(this,arguments); // arguments的使用,可将其传给fn函数
          }
          timer=setTimeout(function(){ // 此处需用普通函数,否则下面apply那里的this会有误
            if(!immediate){
              // fn();
              fn.apply(this,arguments); // arguments的使用,可将其传给fn函数
            }
            timer = null;
          },delay)
        }
      }
    )
  }
<Button type='primary' onClick={this.throttleWithArguments(this.funcWithArguments,2000)} style={{marginBottom:'10px',display:'block'}}>点击发起请求(前缘节流带参数版)</Button>
三.防抖与节流的使用场景
函数节流与函数防抖都是为了限制函数的执行频率,防止函数触发频率过高导致的响应速度跟不上触发频率,出现延迟,假死或卡顿的现象,但是需要根据实际场景需求采用不同的防抖和节流方式。
防抖:防止抖动,单位时间内事件触发会被重置,避免事件被误触发多次造成资源浪费。如果事件是高频触发且有一定停顿,可用防抖进行处理,如用户在短时间内多次点击登陆,搜索框根据输入的一部分值进行联想搜索(y也可以使用节流),短信验证码,resize等。
节流:控制流量,单位时间内事件只能触发一次,如scroll 事件,mouseover事件,播放事件等。
当事件可能高频触发且只需要执行一次时可选用防抖;当事件可能高频触发,需要执行多次且触发相对平滑时最好使用节流。


 1162
1162

 被折叠的 条评论
为什么被折叠?
被折叠的 条评论
为什么被折叠?
 到【灌水乐园】发言


