


 本文介绍了Android 4.4引入的沉浸式状态栏(Translucent Bars)概念,详细阐述了如何实现透明栏效果,包括原始效果、设置`android:windowTranslucentStatus`带来的问题以及两种改进方法:通过`android:fitsSystemWindows`和添加额外布局来补偿状态栏高度。还提到了`android:fitsSystemWindows`属性的作用和调整布局适应系统窗口的方法。
什么是沉浸式状态栏:
准确来说应该是“透明栏”,英文名“Translucent Bars”,是安卓 4.4 新定义的设计规范。简单来说就是在软件打开的时候通知栏和软件顶部颜色融为一体,这样可以使软件和系统本身更加融为一体,同时通知栏的颜色不再是白色、黑色简单的两种了。如果是图片可以让其顶上去,如果或者可以设置状态栏的颜色。
比如Toolbar 和 顶部状态栏一体的颜色。
效果展示
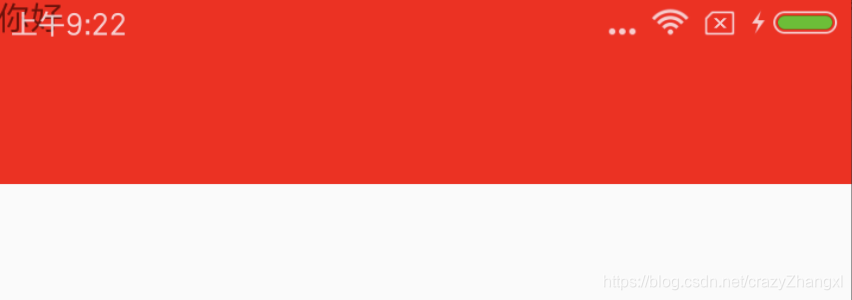
状态1:不包含任何其他主题效果---原始效果

    <style name="AppTheme" parent="Theme.AppCompat.Light.NoActionBar">
        <!-- Customize your theme here. -->
        <item name="colorPrimary">@color/colorPrimary</item>
        <item name="colorPrimaryDark">@color/colorPrimaryDark</item>
        <item name="colorAccent">@color/colorAccent</item>
        <item name="windowNoTitle">true</item>
        <item name="windowActionBar">false</item>
    </style>
<?xml version="1.0" encoding="utf-8"?>
<LinearLayout xmlns:android="http://schemas.android.com/apk/res/android"
android:layout_width="match_parent"
android:layout_height="match_parent"
android:orientation="vertical">
<LinearLayout
android:background="#ff0000"
android:layout_width="match_parent"
android:layout_height="80dp">
</LinearLayout>
</LinearLayout>状态2: 主题增加属性windowTranslucentStatus
此时的效果是:状态栏存在并且设置为了透明颜色,此时该页面可以拉伸到顶部状态栏
相当于透明的状态栏盖在了布局上面
<item name="android:windowTranslucentStatus">true</item>
styles.xml
<style name="JingTheme" parent="AppTheme"/>

v19/styles.xml
<style name="JingTheme" parent="AppTheme">
     <item name="android:windowTranslucentStatus">true</item>
 </style>

v21/styles.xml
 <style name="JingTheme" parent="AppTheme">
       <item name="android:windowTranslucentStatus">true</item>
 </style>
注意:通过xml来设置主题,与如下在Activity中设置的代码等价
    @Override
    protected void onCreate(Bundle savedInstanceState) {
        super.onCreate(savedInstanceState);
        if (Build.VERSION.SDK_INT >= Build.VERSION_CODES.KITKAT) {
            getWindow().addFlags(WindowManager.LayoutParams.FLAG_TRANSLUCENT_STATUS);
        }
        setContentView(R.layout.activity_activity);
}但是此时的体验是特别差劲的,本来标题显示的好好的,突然给顶上去了,体验是真的差劲。
含Bug的解决方法:首先是这个LinearLayout的Padding 红色还是80dp吖,没发现下面变短了嘛;
再有当包含有ScrollView,且ScrollView包含有EditText时,就会出现软键盘一弹起就会把toolbar拉下来,很难看,所以这里还是很坑的。如果没有ScrollView可以用。。
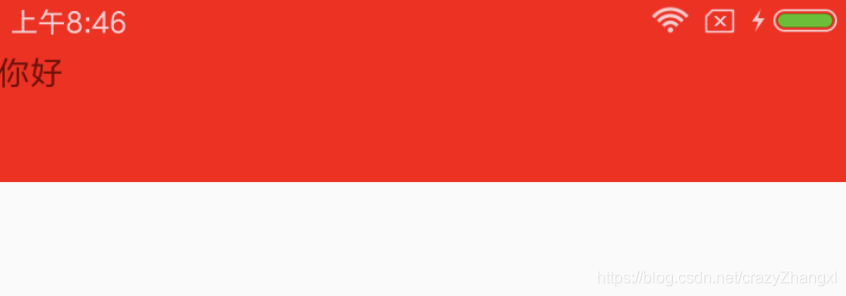
添加: android:fitsSystemWindows="true"
<?xml version="1.0" encoding="utf-8"?>
<LinearLayout
    xmlns:android="http://schemas.android.com/apk/res/android"
    android:layout_width="match_parent"
    android:layout_height="match_parent"
    android:orientation="vertical">
    // 注意添加了fitSystemWindows
    <LinearLayout
        android:fitsSystemWindows="true"
        android:background="#ff0000"
        android:layout_width="match_parent"
        android:layout_height="80dp">
        <TextView
            android:text="你好"
            android:layout_width="wrap_content"
            android:layout_height="wrap_content" />
    </LinearLayout>
</LinearLayout>
改进方式1:
那么只能通过给最外层设置 android:fitsSystemWindows,虽然比较笨,也存在过渡渲染的问题,但是简单且无BUG
<?xml version="1.0" encoding="utf-8"?>
<LinearLayout
    xmlns:android="http://schemas.android.com/apk/res/android"
    android:layout_width="match_parent"
    android:layout_height="match_parent"
    android:background="#ff0000"
    android:fitsSystemWindows="true"
    android:orientation="vertical">
    <LinearLayout
        android:background="#ff0000"
        android:layout_width="match_parent"
        android:layout_height="80dp">
        <TextView
            android:text="你好"
            android:layout_width="wrap_content"
            android:layout_height="wrap_content" />
    </LinearLayout>
    <LinearLayout
        android:background="@color/white"
        android:layout_width="match_parent"
        android:layout_height="match_parent">
    </LinearLayout>
</LinearLayout>
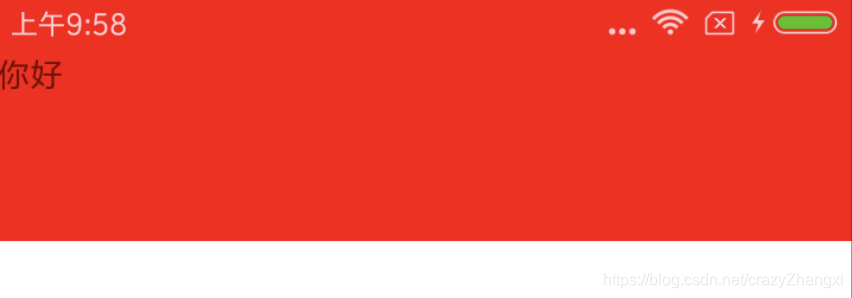
改进方式2:
既然知道有一部分的布局会被状态栏掠夺走,那么我们就可以给对应的布局再增加上状态栏的高度,是的把。
<?xml version="1.0" encoding="utf-8"?>
<LinearLayout
    xmlns:android="http://schemas.android.com/apk/res/android"
    android:layout_width="match_parent"
    android:layout_height="match_parent"
    android:orientation="vertical">
    <LinearLayout
        android:fitsSystemWindows="true"
        android:id="@+id/linear"
        android:background="#ff0000"
        android:layout_width="match_parent"
        android:layout_height="80dp">
        <TextView
            android:text="你好"
            android:layout_width="wrap_content"
            android:layout_height="wrap_content" />
    </LinearLayout>

</LinearLayout>
@Override
protected void onCreate(Bundle savedInstanceState) {
super.onCreate(savedInstanceState);
setContentView(R.layout.activity_activity);
mLinearLayout = findViewById(R.id.linear);
ViewGroup.LayoutParams layoutParams = mLinearLayout.getLayoutParams();
layoutParams.height += getStatusBarHeight();
mLinearLayout.setLayoutParams(layoutParams);
}
public int getStatusBarHeight() {
int result = 0;
//获取状态栏高度的资源id
int resourceId = getResources().getIdentifier("status_bar_height", "dimen", "android");
if (resourceId > 0) {
result = getResources().getDimensionPixelSize(resourceId);
}
return result;
}附属:
        mLinearLayout = findViewById(R.id.linear);
        ViewGroup.LayoutParams layoutParams = mLinearLayout.getLayoutParams();
        layoutParams.height += getStatusBarHeight();
        mLinearLayout.setLayoutParams(layoutParams);
        //设置pddingTop以达到状态栏不遮挡ll的内容
        mLinearLayout.setPadding(mLinearLayout.getPaddingLeft(),
                mLinearLayout.getPaddingTop()+getStatusBarHeight()+getStatusBarHeight(),
        mLinearLayout.getPaddingLeft(),mLinearLayout.getPaddingBottom());
改进方式三:
给其再包裹一层,设置PaddingBottom补充了被填充的布局了。这样也是比较简单的,值得学习。
<?xml version="1.0" encoding="utf-8"?>
<LinearLayout
    xmlns:android="http://schemas.android.com/apk/res/android"
    android:layout_width="match_parent"
    android:layout_height="match_parent"
    android:orientation="vertical">
    <LinearLayout
        android:fitsSystemWindows="true"
        android:orientation="vertical"
        android:id="@+id/linear"
        android:background="#ff0000"
        android:layout_width="match_parent"
        android:layout_height="wrap_content">
        <RelativeLayout
            android:paddingBottom="24dp"
            android:id="@+id/rlTitle"
            android:layout_width="match_parent"
            android:layout_height="80dp">
            <TextView
                android:text="你好"
                android:layout_width="wrap_content"
                android:layout_height="wrap_content" />
        </RelativeLayout>
    </LinearLayout>
</LinearLayout>状态3: 修改如下的主题效果
style.xml
    <style name="chengjing" parent="AppTheme">
        //是否半透明
        <item name="android:windowIsTranslucent">false</item>
    </style>

v19/style.xml
    <style name="chengjing" parent="AppTheme">
        <item name="android:windowTranslucentStatus">true</item>
        // 默认就是false的,所以和上面的主题是一样的吖
        <item name="android:windowIsTranslucent">false</item>
    </style>
android:fitsSystemWindows这个属性,主要是通过调整当前设置这个属性的view的padding(paddingTop)去为我们的status_bar留下空间。原来没有状态栏空间,现在有一个padding可以预留出来。
设置布局时,是否考虑当前系统窗口的布局,如果为true就会调整整个系统窗口布局来适应你的布局。
值得学习的:Android 沉浸式状态栏的实现


 1029
1029

 被折叠的 条评论
为什么被折叠?
被折叠的 条评论
为什么被折叠?
 到【灌水乐园】发言


