


文章目录
SpringBoot的理念是:约定大于配置! Convention Over Configuration。 所以大部分文件的摆放位置都是有约定的,不能随便放! 这样子使得开发变得简便
1、创建入门:
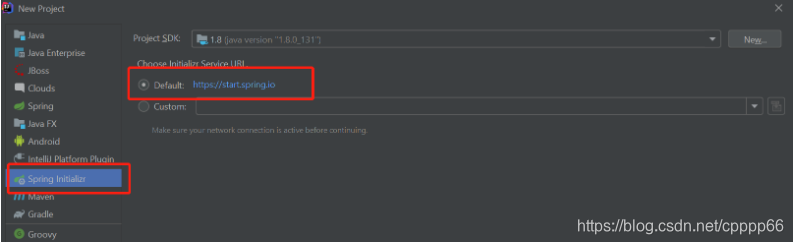
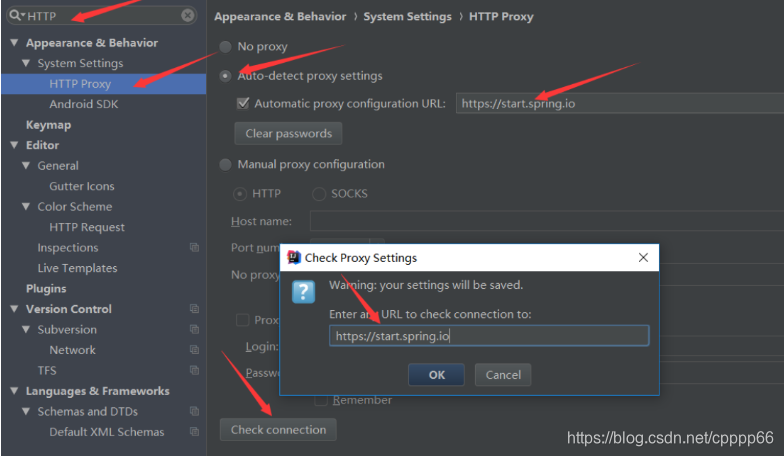
如果出现Please check URL, network and proxy settings弹错的话,区settings里的HTTP Proxy里修改下URL:
https://start.spring.io
然后就是配置的选择:
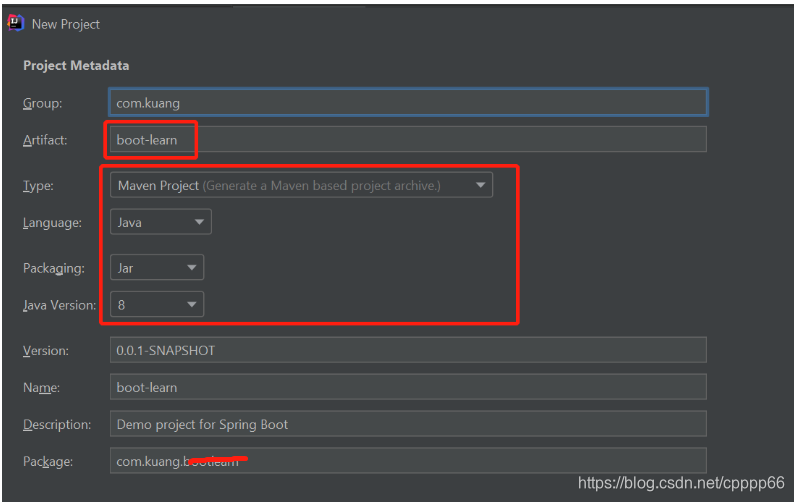
artifact名字只能小写,并且注意后期建package只能在Group子目录下,并且与启动类在同一目录中!所以这里一般可以在最后一栏Package栏将Package只设置为com.kuang,就不需要建多个bootlearn包了
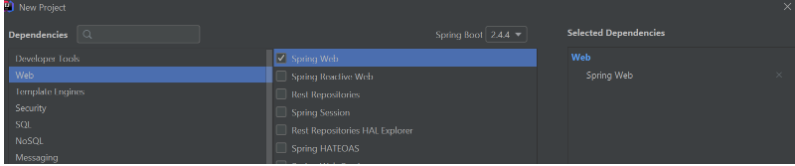
新项目只添加一个Spring Web就可以。
目录结构如下:
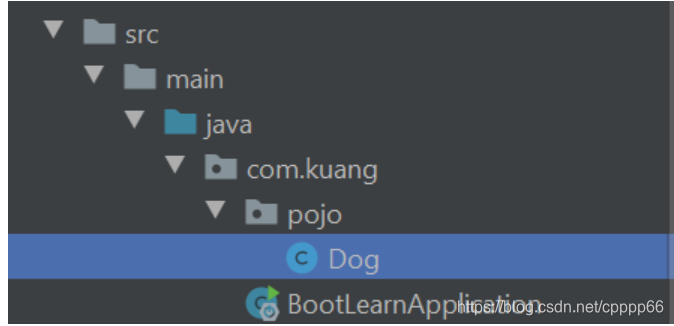
pojo包和启动类是同级目录的。
约定大于配置
2、初讲解SpringBoot
<parent> <groupId>org.springframework.boot</groupId> <artifactId>spring-boot-dependencies</artifactId> <version>2.2.5.RELEASE</version> <relativePath>../../spring-boot-dependencies</relativePath></parent
boot项目的父依赖中找到这个spring-boot-dependencies,存放了真正使用到的大量依赖。
-
在
spring-boot-starter-parent中,配置了资源过滤等 -
springboot-boot-starter-xx:就是spring-boot的场景启动器.SpringBoot将所有的功能场景都抽取出来,做成一个个的starter (启动器),只需要在项目中引入这些starter即可,所有相关的依赖都会导入进来 , 我们要用什么功能就导入什么样的场景启动器即可 ;我们未来也可以自己自定义 starter;
关于@SpringBootConfiguration
springboot 在启动的时候扫描启动类同级包,然后加载对应的自动配置类,所有自动配置类都在spring.factories,然而并非全部装配,需要有对应starter才会装配生效
启动类的main方法只调用了一个:SpringApplication.run(),启动了一个服务。
3、全局配置文件
3.1两种全局配置文件的书写格式
springboot使用一个全局配置文件(名称固定为application,但格式分为properties和yml)
# application.properties
server.port=80
properties文件等号后面不能有空格!
但一般我们使用yml来做全局配置!
## application.yml
#根据缩进严格区分
#对象
server:
  port: 80
#对象行内写法
student: {key1: value,key2: value2}

#数组
pets:
  - cat
  - dog
#数组行内写法
petss: [cat,dog,pig]
yml文件冒号后面必须有一个空格!,且根据缩进严格区分附属关系。
yaml是一种语言,文件是以yml后缀结尾。
YAML是 “YAML Ain’t a Markup Language” (YAML不是一种标记语言)的递归缩写。在开发的这种语言时,YAML 的意思其实是:“Yet Another Markup Language”(仍是一种标记语言)
这种语言以数据为中心,而不是以标记语言为重点!
yml文件中还可以给pojo注入属性,先展示原生的属性注入方法:
3.2原生pojo属性注入方式
com.kuang.pojo.Dog:
@Data
@AllArgsConstructor
@NoArgsConstructor
@Component("DOGG")  //注册组件,相当于Spring时候的bean
public class Dog {
    @Value("happyy")
    private String name;
    @Value("3")
    private Integer age;
}
在pojo中@Component注册组件,使用@Value来注入值
test:
@SpringBootTest
class BootLearnApplicationTests {
    @Autowired
    @Qualifier(value = "DOGG")
    private Dog dog;

    @Test
    void contextLoads() {
        System.out.println(dog.toString());
    }
}
@Autowired自动装配
3.3全局yml配置注入pojo属性
下面新建一个Peoson类:
@Data
@AllArgsConstructor
@NoArgsConstructor
@Component
@ConfigurationProperties(prefix = "personn")  //此注解支持配置文件注入属性,但需要导入依赖,prefix是配置文件中指定名
public class Person {
    private String name;
    private Date birthday;
    private List<Object> hobbies;
    private Map<String,Object> info;
}
需要导入的依赖是:
<!--        导入后支持利用配置文件注入pojo属性-->
        <dependency>
        <groupId>org.springframework.boot</groupId>
            <artifactId>spring-boot-configuration-processor</artifactId>
            <optional>true</optional>
        </dependency>
使用application.yml配置如下:
personn:
  name: Jack
  birthday: 2000/01/01
  hobbies:
    - code
    - basketball
  info:
    address: 外环西路
    height: 180cm
即可实现属性注入!
但若全部都这样来配置会使得全局配置文件肿大,故可以使用下面的方式
3.4@PropertySource实现pojo属性注入
还有一种方式是在resources下创建个xx.properties
然后在pojo类上@PropertySource(value = “classpath:xx.properties”) 去连接指定配置文件,然后再属性上面一个个@Value("${name}")
例如:
@Data
@AllArgsConstructor
@NoArgsConstructor
@Component
@PropertySource(value = "classpath:person2.properties")
public class Person2 {
    @Value("${namee}")
    private String name;
}
注意 需要先在settings–>FileEncodings 中配置properties文件编码:
[外链图片转存失败,源站可能有防盗链机制,建议将图片保存下来直接上传(img-r6U12teF-1620746994386)(C:\Users\Razer\AppData\Roaming\Typora\typora-user-images\image-20210411214903307.png)]
Transparent native-to-ascii conversion的意思是:自动转换ASCII编码。工作原理是:在文件中输入文字时他会自动的转换为Unicode编码,然后在idea中发开文件时他会自动转回文字来显示。 这样做是为了防止文件乱码。 设置成UTF-8是双重保险。
若不全局设置的话则需要在@PropertySource( value=“xx.properties”,encoding=“utf-8”)内加多一参数设置编码
#person2.properties:
namee=杰克
但是@Value使用起来并不友好!我们需要为每个属性单独注解赋值, List Map 对象都需要另外处理。
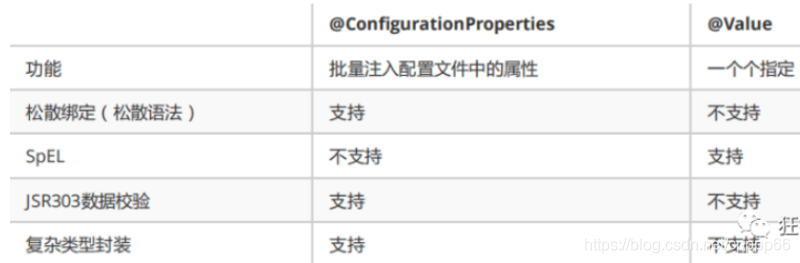
4、JSR303数据约束
需要导入依赖:
<!--        JSR303数据校验-->
        <dependency>
            <groupId>org.springframework.boot</groupId>
            <artifactId>spring-boot-starter-validation</artifactId>
        </dependency>
并且要在pojo包的类上注释==@Validated== //数据校验
然后在属性上注释具体要做的验证,错误后报错message
空检查
@Null(message = "名字不能为空") 验证对象是否为null
@NotNull 验证对象是否不为null,无法查检长度为0的字符串
@NotBlank 检查约束字符串是不是Null还有被Trim的长度是否大于0, 只对字符串, 且会去掉前后空格.
@NotEmpty 检查约束元素是否为NULL或者是EMPTY.
@Max(value = 120, message = "年龄最大不能查过120")

Booelan检查
@AssertTrue 验证Boolean 对象是否为 true
@AssertFalse 验证 Boolean对象是否为 false

长度检查
@Size(min =, max =)验证对象(Array,Collection,Map,String)
长度是否在给定的范围之内
@Length(min =, max =)string is between min and
max included.

日期检查
@Past 验证Date 和java.util.Calendar 对象是否在当前时间之前
@Future 验证 Date和 Calendar对象是否在当前时间之后
@Pattern 验证 String 对象是否符合正则表达式的规则

.......等等除此以外,我们还可以自定义一些数据校验规则
javax.validation/constraints下查看拥有的所有constraints
5、多环境配置
利用全局配置文件中使用spring.profiles.active来选择环境
#选择application-dev.yml作为全局配置文件
spring:
  profiles:
    active: dev
#application-dev.properties作为全局配置文件
spring.profiles.active=dev
5.1配置文件存放路径及优先级
关于springboot 2.4.4项目配置文件的放置位置以及被寻找的优先级:
Spring Boot will automatically find and load application.properties and application.yaml files from the following locations when your application starts:
- The classpath root
- The classpath
/configpackage - The current directory
- The
/configsubdirectory in the current directory - Immediate child directories of the
/configsubdirectory
The list is ordered by precedence (with values from lower items overriding earlier ones).
按照优先级升序排列,排最后的是被寻找时优先级最高的。
但一般我们先从优先级最低的位置也就是classpath开始放。也就是IDEA中的src/main/resources下。
/config文件夹只能叫做config,
The current directory就是项目根目录
Documents from the loaded files are added as PropertySources to the Spring Environment.
You can also refer to an explicit location by using the spring.config.location environment property
也启动项目时在外部指定配置文件路径:
$ java -jar myproject.jar --spring.config.location=F:/application.yml
6、Thymeleaf
Thymeleaf 是一个流行的模板引擎,该模板引擎采用 Java 语言开发,它基于 HTML ,以 HTML 标签为载体。Thymeleaf 对网络环境不存在严格的要求,既能用于 Web 环境下,也能用于非 Web 环境下。SpringBoot 2.X集成了 Thymeleaf 模板技术。传统的JavaWeb使用的jsp 需要翻译编译运行,效率低。
约 定 将 模 板 文 件 放 置 在src/main/resource/templates 目录下,静态资源放置在 src/main/resource/static 目录下
如果在新建boot项目时没有在Template Engines中勾选Thymeleaf则要手动导依赖,并且需要在html文件中声明命名空间:
6.1依赖
<!--SpringBoot 集成 Thymeleaf 的起步依赖-->
<dependency>
 	<groupId>org.springframework.boot</groupId>
 	<artifactId>spring-boot-starter-thymeleaf</artifactId>
</dependency>
在 Spring boot 的核心配置文件 application.properties中可以对Thymeleaf 进行配置
#thymeleaf 页面的缓存开关,默认 true 开启缓存
#关闭缓存后在启动项里面勾选Update resources可以实现热部署
spring.thymeleaf.cache=false

#设置访问前缀和后缀,可以不写,使用默认值即可
spring.thymeleaf.suffix=.html
spring.thymeleaf.prefix=classpath:/templates/
6.2html中声明
在src/main/resources/templates下新建html文件,并且需要在开头的标签中加上声明
<html xmlns:th="http://www.thymeleaf.org">
[外链图片转存失败,源站可能有防盗链机制,建议将图片保存下来直接上传(img-ZsMdAn4R-1620746994390)(C:\Users\Razer\AppData\Roaming\Typora\typora-user-images\image-20210412182341163.png)]
6.3基础语法:
1、对于变量的操作主要有$、*、#、@4种方式:
-
${…}是获取容器上下文变量的值,用的最多
-
*{} ,th:object="${}"绑定好了对象后,可以用*{}直接取对象属性名
-
#{ } 国际化信息
-
@{} 可以获得路径,一般用法类似于th:href="@{/css/bootstrap.min.css}"
/ 类似根路径,当html文件在templates下时,默认直接读取static下资源,不可以 @{/static/…} 这样子就找不到了
-
~{source::fragmentName } , 使用fragment 具体用法:
<!-- 注册碎片 --> <nav class="col-md-2 sidebar" th:fragment="sideBar"> </nav> <!--插入/templates/dashboard.html中名为sideBar的碎片 --> <div th:insert="~{dashboard::topBar}"></div>th:insert:保留自己的主标签,保留th:fragment的主标签。th:replace:不要自己的主标签,保留th:fragment的主标签。
-
内联表达式: [[…]] 等价于 th:text(内容将被 HTML 转义),[( … )] 等价于 th:utext(内容不会执⾏HTML转义)。
@Controller
public class Controller1 {
    @RequestMapping("/text1")
    public String text1(Model model){
        Dog doggy = new Dog("doggy", 6);
        String url="https://www.baidu.com/";
        List<String> lists=new ArrayList<>();
        lists.add("item1");
        lists.add("item2");
        model.addAttribute("dog",doggy);
        model.addAttribute("urlBaidu",url);
        model.addAttribute("lists",lists);
        return "index";
    }
}
<!DOCTYPE html>
<html lang="en" xmlns:th="http://www.thymeleaf.org">
<head>
    <meta charset="UTF-8">
    <title>Title</title>
</head>
<body>
<div th:object="${dog}">
<!--    展示*{}的使用 ,前提需要先选定object ! -->
   <p> dogName:<span th:text="*{name}"></span> </p>
    <p> dogAge:<span th:text="*{age}"></span>  </p>
</div>


<h3 th:each="x:${lists}" >
    <li th:text="${x}"></li>
</h3>
</body>
</html>
6.4复用导航栏实现点击哪个图标哪个亮(三目运算符)
在employees.html页面中插入公用碎片时,加上一参数标示页面,相当于只有访问本页面employees.html才能传递active=‘employees.html’ 。
<div th:insert="~{commons/commons::sideBar(active='employees.html')}"></div>
在公用碎片commons/commons.html的各栏目中,加对应各自的判断:
<a th:class="${active=='employees.html'?'nav-link active':'nav-link'}" th:href="@{/emps}">
三目运算常用: a==b? c : d
6.5自定义视图控制
package com.kuang.config;
import org.springframework.context.annotation.Configuration;
import org.springframework.web.servlet.config.annotation.ViewControllerRegistry;
import org.springframework.web.servlet.config.annotation.WebMvcConfigurer;
@Configuration
public class MyMvcConfig implements WebMvcConfigurer {
    @Override
    public void addViewControllers(ViewControllerRegistry registry) { //这个方法可以自己设置视图控制
        registry.addViewController("/text2").setViewName("text2");
    }
}
自建类,@Configuration注解将该类配置到spring容器(应用上下文)。实现WebMvcConfigurer接口,并重写addViewControllers( )方法,注意由于使用的是thymeleaf模板引擎,会默认到classpath:/templates/下找html文件
6.6工具类
- 提供些工具类如#strings,用例如:
th:if="${! #strings.isEmpty(msg)}"来判断msg属性为不为空
- 如#dates ,将date属性的时间格式做转化
${#dates.format(date, 'dd/MM/yyyy HH:mm:ss')}
dd日,MMM月,yyyy年,HH小时,mm分, ss秒。可以自由选择需要哪些。
注意,全局配置文件spring.mvc.date-format默认为dd/MMM/yyyy ,如果想修改要去配置
6.7th: 用法
- checked
<input th:checked="${empp.getGender()==0}" class="form-check-input" type="radio" name="gender"value="0" >

 <input th:checked="${empp.getGender()==1}" class="form-check-input" type="radio" name="gender"  value="1">

checked 属性规定在页面加载时应该被预先选定的 input 元素。
checked 属性 与 <input type="checkbox"> 或 <input type="radio"> 配合使用
- selected
<select class="form-control" name="department.id">
    <option th:selected="${deps.getId()==empp.getDepartment().getId()}"
            th:each="deps:${departments}" th:text="${deps.departmentName}"
            th:value="${deps.id}" ></option>
</select>

预先选择一个选项。
与<select/> 配合使用
- href
<a class="btn-primary" th:href="@{'/toUpdate/'+${emp.getId()}}">edit</a>

拼接参数,让其出现在url上。
可在后台利用@PathVariable(" ")去提取url中的参数
如下:
@RequestMapping("/toUpdate/{idd}")
public String toUpdate(
    @PathVariable("idd") Integer id,Model model){}
7、国际化
i18n : internationalization
利用Resource Bundle可以快速完成国际化的key value对应编写。
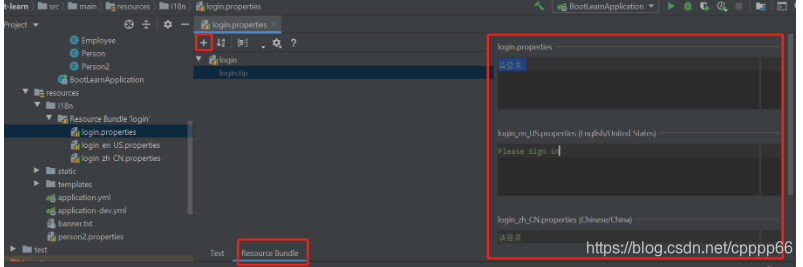
在全局配置文件中配置:
spring:
  messages:  #国际化
    basename: i18n.login   #选定国际化的Bundle name
7.1常用资源文件命名规范:
i18n_en.properties:所有英文语言的资源
i18n_en_US.properties:美国地区,英文语言的资源
i18n_zh.properties:所有中文语言的资源
i18n_zh_CN.properties:中国大陆的,中文语言的资源
i18n_zh_HK.properties:中国香港,中文语言的资源
基名.properties:默认资源文件,如果请求相应的资源文件不存在,将使用此资源文件
7.2html中取变量
<h1 class="h3 mb-3"
    th:text="#{login.tip}">Please sign in</h1>

<input type="text" class="form-control" th:placeholder="#{login.username}" required="" autofocus="">

<button class="btn" type="submit">
    [[#{login.btn}]] </button>
7.3跳转页面传参
<!--	这是个index.html页面,直接在@{ /...( ) } 小括号中带参数就行 -->
<a class="btn btn-sm" th:href="@{/index(lan='zh_CN')}">中文</a>
<a class="btn btn-sm" th:href="@{/index(lan='en_US',yoyo='check')}">English</a>
这里的参数作用域是request,在url上显示。
-
传递参数后可以在自定义地区解析器中
request.getParameter( )获取。 -
在html页面中可以用
${param.lan}取得
7.4自定义地区解析器
7.4.1、先写好一自定义地区解析器:
package com.kuang.config;
import org.springframework.web.servlet.LocaleResolver;
import org.thymeleaf.util.StringUtils;
import javax.servlet.http.HttpServletRequest;
import javax.servlet.http.HttpServletResponse;
import java.util.Locale;
public class MyLocaleResolver implements LocaleResolver {  //实现好后需要注册到Spring容器上下文( 这里注册到了MyMvcConfig中)
    @Override
    public Locale resolveLocale(HttpServletRequest request) {
        Locale locale = Locale.getDefault(); //先实例化默认地区
        String language=request.getParameter("lan"); //获取请求中的语言参数
        if(!StringUtils.isEmpty(language)){//只要非空
            String[] localeInfos=language.split("_"); //以  _  为分隔符locale = new Locale(localeInfos[0],localeInfos[1]);  //实例化地区
            locale=new Locale(localeInfos[0],localeInfos[1]);  //实例化所选地区
        }
        return locale;
    }
    @Override
    public void setLocale(HttpServletRequest request, HttpServletResponse response, Locale locale) {
           // 实现接口需要重写该方法,但无需使用到此方法体
    }
}
7.4.2、然后注册到Spring容器上下文
package com.kuang.config;
import org.springframework.context.annotation.Bean;
import org.springframework.web.servlet.LocaleResolver;
@Configuration
public class XxConfig implements WebMvcConfigurer{
    @Bean  //注册 自定义地区解析器
    public LocaleResolver localeResolver(){
        return new MyLocaleResolver(); //将写好的地区解析器返回
    }
}
8、拦截器
为防止客户未登录直接进入页面,故需要拦截器。后面使用Spring Security更方便
8.1先写好一个拦截器
package com.kuang.config;
import org.springframework.web.servlet.HandlerInterceptor;
import javax.servlet.http.HttpServletRequest;
import javax.servlet.http.HttpServletResponse;

public class LoginHandlerInterceptor implements HandlerInterceptor {  //实现这个接口
    @Override
    public boolean preHandle(HttpServletRequest request, HttpServletResponse response, Object handler) throws Exception {  //访问前拦截
        Object loginUser=request.getSession().getAttribute("loginUser");  //取出session中的attribute
        if(loginUser==null){  //如果session中属性loginUser为null
            request.setAttribute("msg","还未登录,请先登录");
            request.getRequestDispatcher("/index").forward(request,response);  //转发
          //  response.sendRedirect("/index");   用重定向的话会拿不到request的属性
            return false;//不放行
        }
        else {
            return true;  //放行
        }
    }
}
8.2配置到Spring容器上下文
@Configuration
public class MyMvcConfig implements WebMvcConfigurer {
    @Override
    public void addInterceptors(InterceptorRegistry registry) {
        registry.addInterceptor(new LoginHandlerInterceptor())
                .addPathPatterns("/**")
            //拦截所有路径
                .excludePathPatterns("/","/index","/login","/css/**","/img/**","/js/**");   //放行这些路径
    }
}
9、后台接收前台提交属性
后台@RequestMapping的形参有自定义类的话,可以根据类属性名寻找前台的<input name=""> 或 <select name=""> 根据name自动装配成类
10、整合mybatis
10.1、依赖
需要额外导以下3个依赖

<dependency>
    <groupId>org.mybatis.spring.boot</groupId>
    <artifactId>mybatis-spring-boot-starter</artifactId>
    <version>2.1.1</version>
</dependency>

 <dependency>
           <groupId>org.springframework.boot</groupId>
            <artifactId>spring-boot-starter-jdbc</artifactId>
        </dependency>

        <dependency>
            <groupId>mysql</groupId>
            <artifactId>mysql-connector-java</artifactId>
            <scope>runtime</scope>
        </dependency>
10.2、全局配置
在application.yml中配置数据源以及mybatis
spring:
  datasource: #配置数据源,springboot默认为HikariDataSource
    username: root
    password: 123456
    url: jdbc:mysql://localhost:3306/employees?useUnicode=true&characterEncoding=utf-8&useSSL=false&serverTimezone=UTC
    driver-class-name: com.mysql.cj.jdbc.Driver

mybatis:  #mybatis配置
  mapper-locations: classpath:mybatis/mapper/*.xml #实现类xml文件的位置
  type-aliases-package: com.kuang.pojo #别名是类名首字母小写
  config-location: classpath:mybatis/mybatis-config.xml  #里面有日志的设置
[外链图片转存失败,源站可能有防盗链机制,建议将图片保存下来直接上传(img-8Q13f3Uq-1620746994392)(C:\Users\Razer\AppData\Roaming\Typora\typora-user-images\image-20210415220837642.png)]
mybatis-cofig.xml 主要是配置了日志
<?xml version="1.0" encoding="UTF-8" ?>
<!DOCTYPE configuration
        PUBLIC "-//mybatis.org//DTD Config 3.0//EN"
        "http://mybatis.org/dtd/mybatis-3-config.dtd">
<configuration>
    <settings>
        <setting name="logImpl" value="STDOUT_LOGGING"/>
    </settings>
</configuration>


<!--        mybatis-cofig.xml-->
10.3、XxMapper接口创建
package com.kuang.dao;

import com.kuang.pojo.Department;
import org.apache.ibatis.annotations.Mapper;
import org.apache.ibatis.annotations.Param;
import org.springframework.stereotype.Repository;

//@Mapper //本接口在编译之后生成相应的实现类,并被Spring接管
@Repository
public interface DepartmentMapper {
    Department getDepartmentByID(@Param("idd") int id);
    //单参数可以不使用@Param,但参数多时建议使用,令Mapper实现类xml文件能准确接收参数
}
Note: 也可以在启动类中直接扫描一个包,包下的接口类都会被编译生成实现类并被Spring接管。例如下:
@MapperScan("com.kuang.dao") //包下面的所有接口在编译之后都会生成相应的实现类
@SpringBootApplication
public class BootLearnApplication {
    public static void main(String[] args) {
     SpringApplication.run(BootLearnApplication.class, args);
    }
}
10.4、接口实现:XxMapper.xml
<?xml version="1.0" encoding="UTF-8"?>
<!DOCTYPE mapper PUBLIC "-//mybatis.org//DTD Mapper 3.0//EN"
        "http://mybatis.org/dtd/mybatis-3-mapper.dtd">
<mapper namespace="com.kuang.dao.DepartmentMapper">

<select id="getDepartmentByID" parameterType="int" resultType="com.kuang.pojo.Department">
select * from departments
      where id = #{idd}
</select>
</mapper>
10.5、service层调用dao层
package com.kuang.service;

import com.kuang.dao.DepartmentMapper;
import com.kuang.pojo.Department;
import org.springframework.beans.factory.annotation.Autowired;
import org.springframework.stereotype.Service;

@Service
public class DepartmentService {
    @Autowired
    DepartmentMapper departmentMapper;

    public Department getDepartmentByID(int id){
        return departmentMapper.getDepartmentByID(id);
    }

}
10.*MVC三层的注释形式
-
1、controller [ @Controller ]
-
2、service 【 @Service 】
-
3、dao 【 @Repository 】
11、Spring Security
1、导依赖
<dependency>
    <groupId>org.springframework.boot</groupId>
    <artifactId>spring-boot-starter-security</artifactId>
</dependency>
2、自定义一个类
需要继承WebSecurityConfigurerAdapter,并且注释上@Configuration
@EnableWebSecurity
在这个类里一般需要重写2个方法,写一个@Bean
package com.kuang.config;
@Configuration
@EnableWebSecurity
package com.kuang.config;
@Configuration
@EnableWebSecurity
public class MyWebSecurityConfig extends WebSecurityConfigurerAdapter {

    @Override
    protected void configure(HttpSecurity http) throws Exception {
        //访问控制
    }

    @Override
protected void configure(AuthenticationManagerBuilder auth) throws Exception {
          //管理权限
}


     /**
 * 配置密码的加密方式,需要配置,否则无法运行
 */
    @Bean
    public PasswordEncoder passwordEncoder(){ }
}
2.1 加密注册PasswordEncoder
/**
 * 配置密码的加密方式,需要配置,否则无法运行
 * @return
 */
@Bean
public PasswordEncoder passwordEncoder(){
    return new PasswordEncoder() {
        @Override
        public String encode(CharSequence rawPassword) {
            // 这里一般返回的是加密好的密码
            return rawPassword.toString();
        }

        /**
         * 在登陆时会自动调用matches方法,判断输入的原生密码与已有的加密后的密码是否匹配
         *
         * @param rawPassword
         * @param encodedPassword
         * @return
         */
        @Override
        public boolean matches(CharSequence rawPassword, String encodedPassword) {
            return Objects.equals(rawPassword.toString(), encodedPassword);
        }
    };
}
上面这个是为了剖析PasswordEncoder接口自带的两个函数。一般在SpringSecurity中我们使用BCryptPasswordEncoder()
@Bean
public PasswordEncoder passwordEncoder() {
    return new BCryptPasswordEncoder();
}
然后在设置用户权限时,相应的使用密码需要是加密后的
.withUser("jack").password(passwordEncoder().encode("123")).roles("userr")
2.2 访问控制configure(HttpSecurity http)
/**
 *
 * 链式编程
 * @param http
 * @throws Exception
 */
@Override
protected void configure(HttpSecurity http) throws Exception {
    http.authorizeRequests()
            // 访问"/toAdd"需要有admin权限才能访问
            .antMatchers("/toAdd").hasRole("admin")
            // 访问所有页面都需要先登录
             .anyRequest().authenticated()

            // loginPage()默认是GET方式,url是"/login" ,是一个由SpringSecurity自动的生成登录页面
            // 这里loginPage指定到了我们自定义的"/index"登录界面
            // loginProcessingUrl() 默认是Post方式, 前端自定义的LoginPage的form表单提交方式一定要指定为Post!
            // 默认接收名为"username","password”的参数,若前端参数名不是这两个
            // ,可以在这里使用.usernameParameter()和.passwordParameter()指定寻找的前端参数名
            .and().formLogin().loginPage("/index").loginProcessingUrl("/login")
            .usernameParameter("username").passwordParameter("password")
            .permitAll()

            //登陆成功后重定向到指定页面(如果验证前没有指定访问页面)
            .defaultSuccessUrl("/main",true)

            // 注销功能,默认当用户访问"/logout"url时,便会调用此功能,注销HTTP Session,然后重定向到/login?success
            .and().logout()

            // 开启记住我功能,即便session失效了也能继续访问
            // 默认从loginPage中读取name="remember-me"的标签
            // 或者在这里使用.rememberMeParameter()指定loginPage页面中自定义的rememberMe的标签名
            .and().rememberMe().rememberMeParameter("remember-me")

            // cross-site request forgery跨站请求伪造
            .and().csrf().disable();
}
注意:
-
.loginProcessingUrl("/login")默认是Post方式, 前端自定义的LoginPage的form表单提交方式 **一定要指定为Post! **并且表单提交的url与loginProcessingUrl()指定的一致。 -
rememberMeParameter("remember-me"),passwordParameter("password"),usernameParameter("username")对应的默认名要记得
2.3 认证管理configure(AuthenticationManagerBuilder auth)
  /**
     * 设置用户的权限,以下示例用auth.inMemoryAuthentication(),在企业中一般使用auth.jdbcAuthentication()使用数据库中数据
     * @param auth
     * @throws Exception
     */
    @Override
    protected void configure(AuthenticationManagerBuilder auth) throws Exception {
        auth.inMemoryAuthentication()

             .withUser("jack").password("123").roles("userr")
                // 利用.and()拼接设置更多用户权限
                .and()
                .withUser("root").password("123").roles("userr","admin");
    }
12、集成邮箱
1、导入依赖以及全局配置
<!--        邮件-->
        <dependency>
            <groupId>org.springframework.boot</groupId>
            <artifactId>spring-boot-starter-mail</artifactId>
        </dependency>
需要在qq邮箱中开启pop3和smtp服务
spring:
  mail: #邮箱配置
    host: smtp.qq.com  #qq邮箱的host
    username: 1076623xxxx@qq.com
    password: tekjwztyrxxxxxxx #授权码,在qq邮箱中获得
    properties:
      mail:
        smtp:
          ssl:
            enable: true # qq邮箱需要配置ssl,但试了下没配也可以
需要注意的是,如果使用dev环境,也需要在application.yml中出现spring.mail.host, 因为这是一个trigger,否则后面的JavaMailSenderImpl无法@Autowired
2、实现类的编写
package com.kuang.service;

import org.springframework.beans.factory.annotation.Autowired;
import org.springframework.mail.javamail.JavaMailSenderImpl;
import org.springframework.mail.javamail.MimeMessageHelper;
import org.springframework.stereotype.Service;

import javax.mail.MessagingException;
import javax.mail.internet.MimeMessage;

@Service
public class MailServiceImpl implements MailService{
    /**
     * 尽管使用的是dev环境,JavaMailSenderImpl的自动装配,需要在application.yml中有spring.mail.host出现,这是一个trigger
     */
    @Autowired
    private JavaMailSenderImpl mailSender;
    private String from = "107662xxxxx@qq.com";  //发送方
    private String to = "107662xxxx@qq.com";  //接收方
    private String subject = "This is subject";
    private String text = "Hello World!";

    @Override
    public void sendMail() throws MessagingException {
        // MimeMessage为复杂邮件, 简单的邮件有SimpleMailMessage
        MimeMessage mimeMessage = mailSender.createMimeMessage();
        // 利用MimeMessageHelper来设置邮件内容
        MimeMessageHelper messageHelper = new MimeMessageHelper(mimeMessage);
        messageHelper.setFrom(from);
        messageHelper.setTo(to);
        messageHelper.setSubject(subject);
        messageHelper.setText(text);

        // 还可以添加附件如addAttachment();等...

        // 利用JavaMailSenderImpl来发送MimeMessage
        mailSender.send(mimeMessage);
    }
}
13、定时器
1、在启动类上注解开启@EnableScheduling 调度
2、在需要设定时间调度的方法上注释@Scheduled(cron = “” )
package com.kuang.serviceImpl;

import com.kuang.service.ScheduleService;
import org.springframework.scheduling.annotation.Scheduled;
import org.springframework.stereotype.Service;

@Service
public class ScheduleServiceImpl implements ScheduleService {

    @Override
    /**
     *     *表示匹配所有值
     *     crom表达式 = "秒   分   时   日   月  周几"
     *     如下案例是容器运行后每5秒执行一次以下函数
     *     可以去https://www.bejson.com/othertools/cron/在线生成cron表达式
      */
    @Scheduled(cron = "0/5 * * * * *" )
    public void sayHi() {
        System.out.println("Hi");
    }
}
当springboot项目容器启动时,被@Scheduled注释的方法会在cron表达式设定的时间自动运行。
14、SpringBoot项目在IDEA中的目录结构
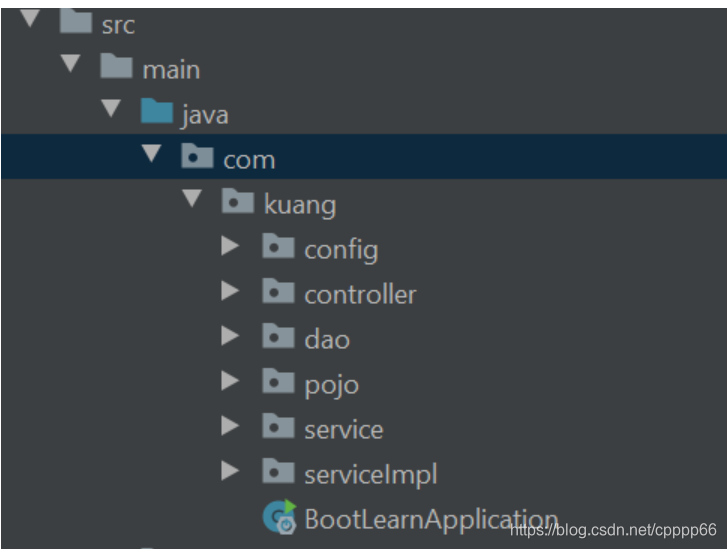
src/main/java 中,最底下这些包(config等等)必须与启动类平级!
这是由于@SpringBootApplication中的@ComponentScan扫描的是启动类的同级包。
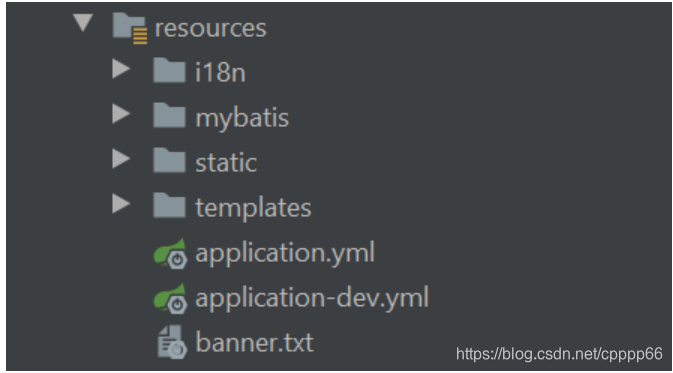
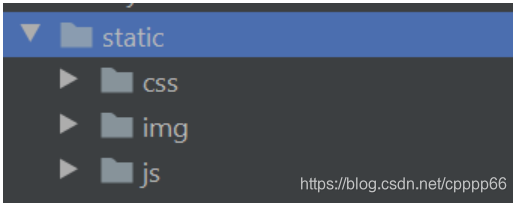
其中static和templates文件夹是自动建的(名字不要改),在static中存放静态资源如下
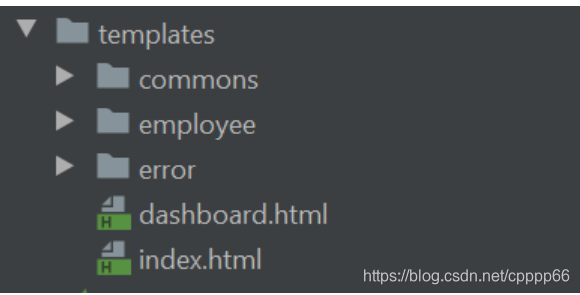
templates中存放所有的页面(页面都得是html,因为@Controller范围的模板配置默认spring.mvc.view.prefix=classpath:/templates/ ,suffix=.html),
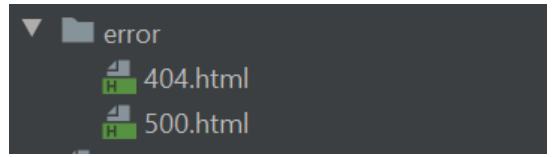
其中error文件夹是新建的,但是里面的html文件直接以状态号来命名,可以在遇到错误时springboot直接找到
15、springboot一些原理
pom.xml的parent artifactId:
1、pom.xml的parent artifact: spring-boot-starter-parent中设置了一些plugin以及配置文件的过滤导出
2、spring-boot-starter-parent的parent artifact: spring-boot-dependencies 管理了所有boot项目的依赖,有时候在pom.xml中导入spring-boot-starter-xx依赖时,不需要指定版本号就是因为boot会自动来这里找版本号。 ps: springboot将一个个功能场景封装成了一个个spring-boot-starter-xx,导入时该starter会将本功能需要使用到的所有依赖导入。
自动配置
容器启动时如何自动加载配置的?
启动类的@SpringBootApplication 的
@EnableAutoConfiguration的 @Import()中的AutoConfigurationImportSelector.class中,使用了SpringFactoriesLoader.loadFactoryNames(ClassLoader classLoader)方法,
去寻找了"META-INF/spring.factories":
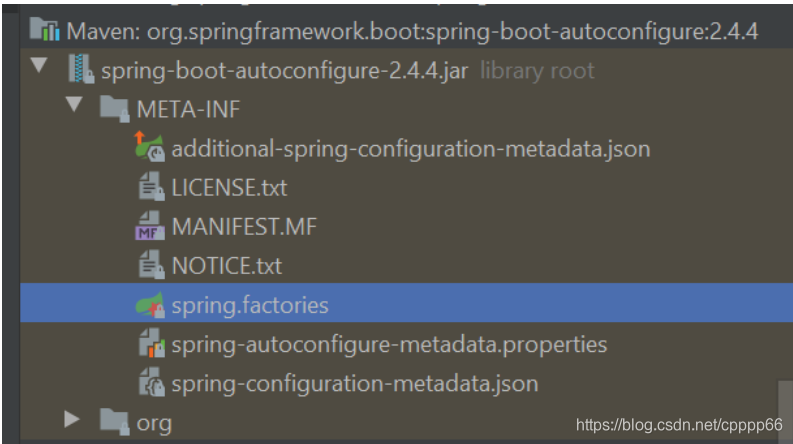
spring.factories文件中具有大量的XxAutoConfiguration类,springboot会根据这些自动配置类去配置。
具体配置过程
:XxAutoConfiguration类上一般都有@EnableConfigurationProperties(XxProperties.class)注解,而XxProperties类上又有@ConfigurationProperties(prefix = "spring.xx")
由此便能去全局配置文件中加载好相关的配置了。
那为什么这些大量的自动配置类没有全部生效呢?
原因是,自动配置类上具有例如:
@ConditionalOnClass(Xx.class)注解,判断当前classpath下是否存在Xx类,若存在则将当前的配置类XxAutoConfiguration装载入spring容器。@ConditionalOnBean(Xx.class),判断当前spring的applicationContext中是否存在Xx类,若存在则将当前的配置类装载入spring容器。
需要满足对应条件才会生效。
Note:
1、banner.txt
在resources目录下新建banner.txt,可以在其中添加springboot启动时所用的banner
2、关于IDEA的classpath
[外链图片转存失败,源站可能有防盗链机制,建议将图片保存下来直接上传(img-CGP8RhHt-1620746994400)(C:\Users\Razer\AppData\Roaming\Typora\typora-user-images\image-20210423185234831.png)]
在IDEA中classpath指的是target/classes/, resources文件夹下的配置文件都会生成到target/classes/下,
| src目录下文件 | 生成到target文件夹中位置 |
|---|---|
| src/main/resources | target/classes |
| src/main/java/com | target/classes/com |
| src/test | target/test-classes |
 2148


 扫一扫


 被折叠的 条评论
为什么被折叠?
 到【灌水乐园】发言


