


公司的maven私服跑了两年多了,最近朋友让帮忙给他搭建maven私服。这里做个总结吧。首先,先问个问题,有公共的maven仓库服务器,为什么还要搭建maven私服呢?在本地搭建后有如下几个优点:1、加速构建;2、节省带宽;3、节省中央maven仓库的带宽;4、稳定(应动一旦中央服务器出问题的情况);5、控制和审计;6、能够部署第三方构件;7、可以建立本地内部仓库;8、可以建立公共仓库。有这么多优点还不足以吸引你吗?
一、nexus下载安装
1、nexus的安装
官方下载归档页面为:News and Notes from the makers of Nexus | Sonatype Blog
在上面的页面上可以下载到目前的所有版本的nexus ,目前的最新版本为2.7.2 ,官方提供了tar、war、zip三种格式的下载。我这里下载的是zip包。
#cd /App
#mkdir nexus
#cd nexus
#wget http://download.sonatype.com/nexus/oss/nexus-2.7.2-bundle.zip
#unzip nexus-2.7.2-bundle.zip
#cd nexus-2.7.2/bin
#sh nexus start
注:nexus由于是java语言开发的,所以依赖java环境,要先确认主机上有java环境,如果是windows主机请启动nexus.bat或bin/jsw/windows-x86-32(或64)的相应目录下去启动或安装服务。
报错1:
[root@localhost bin]# sh nexus start
****************************************
WARNING - NOT RECOMMENDED TO RUN AS ROOT
****************************************
If you insist running as root, then set the environment variable RUN_AS_USER=root before running this script.
上面的错误原因很简单,因为使用了root用户。解决方法很简单,新建一个用户nexus也好,www也好,然后赋予权,重启。
#useradd www
#chown www:www /App/nexus
#su  www
#sh nexus start
报错2:
wrapper  | JVM exited while loading the application.
jvm 5    | Exception in thread "main" java.lang.UnsupportedClassVersionError: org/sonatype/nexus/bootstrap/jsw/JswLauncher : Unsupported major.minor version 51.0
jvm 5    |      at java.lang.ClassLoader.defineClass1(Native Method)
jvm 5    |      at java.lang.ClassLoader.defineClassCond(ClassLoader.java:631)
jvm 5    |      at java.lang.ClassLoader.defineClass(ClassLoader.java:615)
jvm 5    |      at java.security.SecureClassLoader.defineClass(SecureClassLoader.java:141)
jvm 5    |      at java.net.URLClassLoader.defineClass(URLClassLoader.java:283)
jvm 5    |      at java.net.URLClassLoader.access$000(URLClassLoader.java:58)
jvm 5    |      at java.net.URLClassLoader$1.run(URLClassLoader.java:197)
jvm 5    |      at java.security.AccessController.doPrivileged(Native Method)
jvm 5    |      at java.net.URLClassLoader.findClass(URLClassLoader.java:190)
jvm 5    |      at java.lang.ClassLoader.loadClass(ClassLoader.java:306)
jvm 5    |      at sun.misc.Launcher$AppClassLoader.loadClass(Launcher.java:301)
jvm 5    |      at java.lang.ClassLoader.loadClass(ClassLoader.java:247)
jvm 5    | Could not find the main class: org.sonatype.nexus.bootstrap.jsw.JswLauncher.  Program will exit.
wrapper  | There were 5 failed launches in a row, each lasting less than 300 seconds.  Giving up.
wrapper  |   There may be a configuration problem: please check the logs.
wrapper  | <-- Wrapper Stopped
经在网上查到原因是,最新版本的maven需要依赖java1.7,该问题在公司的nexus升级时也遇到过。这里只是为了做演示,懒得在测试机上更换jdk了,直接下了nexus-2.5的版本。然后重新做上面的步骤。
报错3:
ception: Address already in use
jvm 1    | java.net.BindException: Address already in use
jvm 1    |      at sun.nio.ch.Net.bind(Native Method) ~[na:1.6.0_29]
因为默认的8081端口,已经被另外一个程序占有了,vim /App/nexus/nexus-2.5.0-04/conf/nexus.properties ,找到application-port=8081更改下端口,然后重新启动。通过http://IP:端口就可以访问了,登录以后,右上角有登录选项,默认用户名密码是admin/admin123 。
2、nginx反向代理nexus
server {
listen 80;
server_name maven.361way.com; //配置的域名
location / {
 proxy_pass  http://127.0.0.1:8081; //跳转到的地址
 proxy_redirect  off;
 proxy_set_header Host $host;
 proxy_set_header X-Real-IP $remote_addr;
 proxy_set_header X-Forwarded-For
 $proxy_add_x_forwarded_for;
 }
 }
二、nexus配置
1、ldap认证
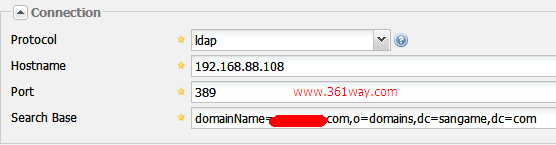
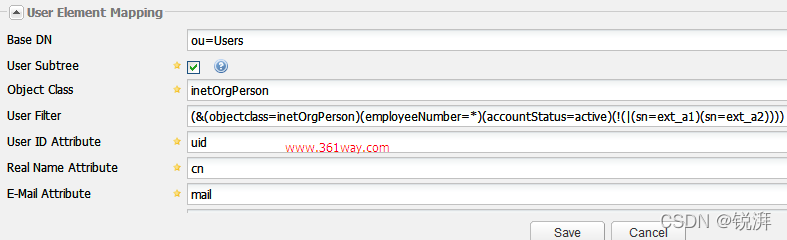
如下图所示,依次选择左侧的security-->LDAP Configuration,后按下面的配置进行配置:
操作方法security->roles->add->External Role
Mapping,Realm选择LDAP,Role里如果没有数据,说明ldap没设置好,Role里选择一个组,点击create mapping。
然后在configuration中选择add,添加两个权限,一个是Nexus deployment role,一个是All maven repositories (Full control)。
然后在对应组的小伙伴们就有权限了。
2、nexus仓库
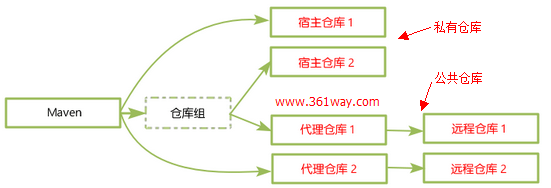
nexus有四种仓库:
group(仓库组):Nexus 通过仓库组的概念统一管理多个仓库,这样我们在项目中直接请求仓库组即可请求到仓库组管理的多个仓库;
hosted(宿主):主要用于部署无法从公共仓库获取的构件(如 oracle 的 JDBC 驱动)以及自己或第三方的项目构件;
proxy(代理):代理公共的远程仓库;
virtual(虚拟):用于适配 Maven 1 。
首次登录后会发现一个公共组仓库,其包含以下内容。
Public Repositories: 仓库组
- 3rd party: 无法从公共仓库获得的第三方发布版本的构件仓库
- Apache Snapshots: 用了代理ApacheMaven仓库快照版本的构件仓库
- Central: 用来代理maven中央仓库中发布版本构件的仓库
- Central M1 shadow: 用于提供中央仓库中M1格式的发布版本的构件镜像仓库
- Codehaus Snapshots: 用来代理CodehausMaven 仓库的快照版本构件的仓库
- Releases: 用来部署管理内部的发布版本构件的宿主类型仓库
- Snapshots:用来部署管理内部的快照版本构件的宿主类型仓
3、配置远程索引
新搭建的neuxs环境只是一个空的仓库,需要手动和远程中心库进行同步,nexus默认是关闭远程索引下载,最重要的一件事情就是开启远程索引下载。点击左边Administration菜单下面的Repositories,找到右边仓库列表中的三个仓库Apache
Snapshots,Codehaus Snapshots和Maven
Central,然后再没有仓库的configuration下把Download Remote Indexes修改为true。
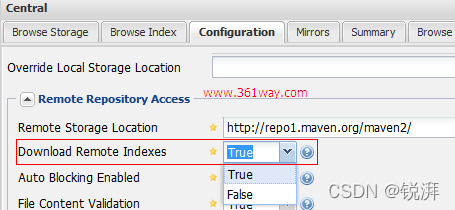
这样设置以后, Nexus会自动从远程中央仓库下载索引文件, 为了检验索引文件自动下载是否生效,可以却换到Browse Index ,如查看到有索引目录,表示已经OK 。
注:这个可以根据自己的实际需要去设置,以避免都开启的话一是会占用带宽(大量的下载远程文件),二是有可能会有爆仓的可能(这个在后面也会提到) 。
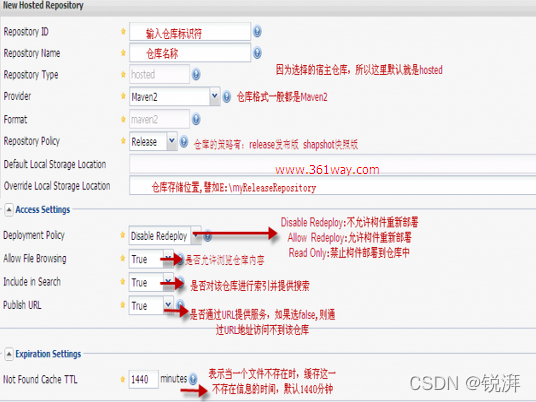
4、建立宿主仓库
新 建公司的内部仓库,步骤为Repositories –> Add –> Hosted Repository,在页面的下半部分输入框中填入Repository ID和Repository Name即可,比如分别填入test 和 test repostiory,另外把Deployment Policy设置为Allow Redeploy,点击save就创建完成了。

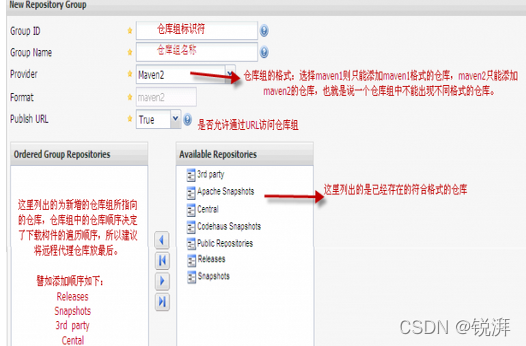
5、Nexus仓库组
Nexus中仓库组的概念是Maven没有的,在Maven看来,不管你是hosted也好,proxy也好,或者group也好,对我都是一样的,我只管根据groupId,artifactId,version等信息向你要构件。为了方便Maven的配置,Nexus能够将多个仓库,hosted或者proxy合并成一个group,这样,Maven只需要依赖于一个group,便能使用所有该group包含的仓库的内容。
neuxs默认自带了一个名为“Public Repositories”组,点击该组可以对他保护的仓库进行调整,把刚才建立的公司内部仓库test repostiory加入其中,这样就不需要再在maven中明确指定内部仓库 的地址了。同时创建一个Group
ID为public-snapshots、Group Name为Public Snapshots Repositories的组,把Apache Snapshots、Codehaus Snapshots、Snapshots和zfyrepostiory加入其中。

三、maven客户端配置
maven客户端的settings.xml文件
#vim /App/maven/conf/settings.xml
<?xml version="1.0" encoding="UTF-8"?>
<settings xmlns="http://maven.apache.org/SETTINGS/1.0.0"
          xmlns:xsi="http://www.w3.org/2001/XMLSchema-instance"
          xsi:schemaLocation="http://maven.apache.org/SETTINGS/1.0.0 http://maven.apache.org/xsd/settings-1.0.0.xsd">
  <pluginGroups></pluginGroups>
  <proxies></proxies>
  <servers>
      <server>
      <id>nexus-releases</id>
      <username>admin</username>
      <password>admin123</password>
    </server>
    <server>
      <id>nexus-snapshots</id>
      <username>admin</username>
      <password>admin123</password>
    </server>
  </servers>
  <mirrors>
    <mirror>
      <id>nexus-releases</id>
      <mirrorOf>*</mirrorOf>
      <url>http://maven.361way.com/nexus/content/groups/public</url>
    </mirror>
    <mirror>
      <id>nexus-snapshots</id>
      <mirrorOf>*</mirrorOf>
      <url>http://maven.361way.com/nexus/content/groups/public-snapshots</url>
    </mirror>
  </mirrors>
  <profiles>
   <profile>
      <id>nexus</id>
      <repositories>
        <repository>
          <id>nexus-releases</id>
          <url>http://nexus-releases</url>
          <releases><enabled>true</enabled></releases>
          <snapshots><enabled>true</enabled></snapshots>
        </repository>
        <repository>
          <id>nexus-snapshots</id>
          <url>http://nexus-snapshots</url>
          <releases><enabled>true</enabled></releases>
          <snapshots><enabled>true</enabled></snapshots>
        </repository>
      </repositories>
      <pluginRepositories>
         <pluginRepository>
                <id>nexus-releases</id>
                 <url>http://nexus-releases</url>
                 <releases><enabled>true</enabled></releases>
                 <snapshots><enabled>true</enabled></snapshots>
               </pluginRepository>
               <pluginRepository>
                 <id>nexus-snapshots</id>
                  <url>http://nexus-snapshots</url>
                <releases><enabled>true</enabled></releases>
                 <snapshots><enabled>true</enabled></snapshots>
             </pluginRepository>
         </pluginRepositories>
    </profile>
  </profiles>
  <activeProfiles>
      <activeProfile>nexus</activeProfile>
  </activeProfiles>
</settings>
注:settings文件中在配置ldap认证时,由于默认保存的是明文密码,这样就导致不十分安全,可以通过mvn --encrypt-master-password 密码的方式生成加密过的密码文件。这个是需要mvn版本支持的,具体可以查看官方文档及配置说明。
maven项目下的pom.xml文件
<distributionManagement>
    <!-- 两个ID必须与 setting.xml中的<server><id>nexus-releases</id></server>保持一致-->  <repository>
        <id>nexus-releases</id>
        <name>Nexus Release Repository</name>
        <url>http://maven.361way.com/nexus/content/repositories/releases</url>
    </repository>
    <snapshotRepository>
        <id>nexus-snapshots</id>
        <name>Nexus Snapshot Repository</name>
        <url>http://maven.361way.com/nexus/content/repositories/snapshots</url>
    </snapshotRepository>
</distributionManagement>
四、注意事项
1、爆仓问题的解决方法
login->scheduled tasks->add,添加一个定时清理目录的计划任务即可。最后一个选项“remove if released”需要慎重,平时开发可能不是特别正规的时候可能会snapshot和release都需要。
2、减少后端压力
该方法也是从网上了解到的,可以通过前端nginx开启cache功能减少后端nexus maven仓库的压力。


 142
142

 被折叠的 条评论
为什么被折叠?
被折叠的 条评论
为什么被折叠?
 到【灌水乐园】发言


