


 本文深入探讨Vue.js的基础知识,包括组件、指令、计算属性、表单绑定、组件通信及插槽使用,同时讲解了Axios网络请求、Vuex状态管理和Vue CLI项目构建流程。
vue入门
-
1.安装下查看vue2.x和vue3.x安装要求
- node版本必须大于等于8.9(使用 node -v查看)
- vue-cli3.x: npm / cnpm install -g @vue/cli //cnpm是npm的淘宝镜像
- vue-cli2.x: npm/cnpm install -g @vue/cli-init
-
2.创建项目
-
vue init webpack my-project
提示目录已存在,是否继续:Y
Project name(工程名):回车
Project description(工程介绍):回车
Author:作者名
Vue build(是否安装编译器):回车
Install vue-router(是否安装Vue路由):回车
Use ESLint to lint your code(是否使用ESLint检查代码,我们使用idea即可):n
Set up unit tests(安装测试工具):n
Setup e2e tests with Nightwatch(也是测试相关):n
Should we runnpm installfor you after the project has been created? (recommended):选择:No, I will handle that myself
-
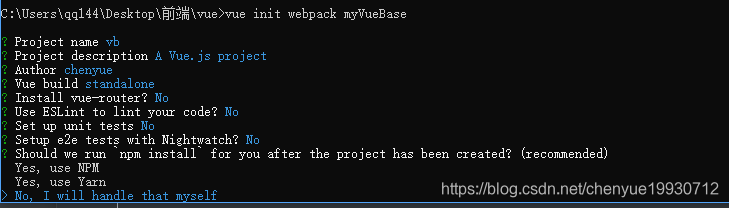
- 安装依赖的时候,选择最后一个,就是自己安装
-
3.启动项目
- cd my-project //跳到自己项目
- npm install //安装项目
- npm start / npm run dev //启动项目
-
4.工程目录
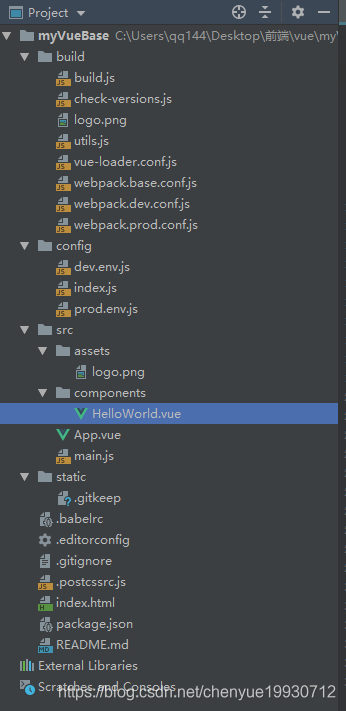
build: webpack配置文件 config: 针对开发时服务器的配置 src: 代码源文件(我们只关心写代码的src目录) src/assets: css,image等 src/components: 其他子组件 src/App.vue: 最顶层的主组件 src/main.js: 入口文件 static: 静态文件 .babelrc: es6的解析文件和vue解析依赖文件(es6特性浏览器还没有全部支持,babel用来将es6代码转换成浏览器能够识别的代码,babel是下一代JavaScript 语法的编译器) .editorconfig: 配置文件 .postcssrc.js: css的配置文件 index.html: 项目根视图 package.json: 配置,比如 启动命令 "scripts": { "dev": "webpack-dev-server --inline --progress --config build/webpack.dev.conf.js", "start": "npm run dev", "lint": "eslint --ext .js,.vue src", "build": "node build/build.js" },├── App.vue // APP入口文件
├── api // 接口调用工具文件夹
│ └── index.js // 接口调用工具
├── components // 组件文件夹
├── frame // 子路由文件夹
├── main.js // 项目配置文件
├── page // 页面组件文件夹
├── router // 路由配置文件夹
│ └── index.js // 路由配置文件
├── style // scss 样式存放目录
│ ├── base // 基础样式存放目录
│ │ ├── _base.scss // 基础样式文件
│ │ ├── _color.scss // 项目颜色配置变量文件
│ │ ├── _mixin.scss // scss 混入文件
│ │ └── _reset.scss // 浏览器初始化文件
│ ├── scss // 页面样式文件夹
│ └── style.scss // 主样式文件
└── utils // 常用工具文件夹
└── index.js // 常用工具文件-
模板语法
vue中由三个标签构成
-
Vue CLI >= 3 和旧版使用了相同的 vue 命令,所以 Vue CLI 2 (vue-cli) 被覆盖了。如果你仍然需要使用旧版本的 vue init 功能,你可以全局安装一个桥接工具:
npm install -g @vue/cli-init
# `vue init` 的运行效果将会跟 `vue-cli@2.x` 相同
vue init webpack my-project
#项目初始化
1.安装vue-cli

    npm install -g vue-cli

2.初始化项目

    vue init webpack my-project

3.进入项目

    cd my-project

4.安装依赖

    npm install

5.启动项目

    npm run dev
#项目目录结构
index.html:  项目根试图
.postcssrc.js:  postcssrc配置文件
static: 静态文件
config:  针对开发时服务器的配置
src: 代码源文件
src/main.js: 入口文件
src/App.vue: 最顶层的组件
src/components: 其他子组件
src/assets: css,image等
VUE基础
Vue组件:
包含三个部分:
Template:视图部分
template中只有一个根元素,只有一个
script: 逻辑部分
//创建Vue实例
new Vue({
el: ‘#app’, //element 元素挂载到id为app的div上
components: { App }, //加载组件
template: ‘’, //加载模板,引入App然后当成组件使用 import App from ‘./App’
store,
router
})
Mustache: 模板
    表现形式: {{语法}}

    {{ hello }}

    <h2>{{1 + 1}}</h2>

    <h1>{{'xsdsffr'}}</h1>

    <!-- <a>{{0<10 ? '对的' : '错的'}}</a> -->

    {{'注意:只能存在单行语句'}}
VUE 基本指令
    v-html: 渲染文本,可以解析html语法

    v-text: 渲染文本,html就是字符串

    v-bind: 绑定

    v-if: 条件指令

    v-else:

    v-show: display:block/none

        v-if 是“真正”的条件渲染,因为它会确保在切换过程中条件块内的事件监听器和子组件适当地被销毁和重建。

        v-if 也是惰性的:如果在初始渲染时条件为假,则什么也不做——直到条件第一次变为真时,才会开始渲染条件块。

        相比之下,v-show 就简单得多——不管初始条件是什么,元素总是会被渲染,并且只是简单地基于 CSS 进行切换。

        一般来说,v-if 有更高的切换开销,而 v-show 有更高的初始渲染开销。因此,如果需要非常频繁地切换,则使用 v-show 较好;如果在运行时条件很少改变,则使用 v-if 较好。
列表渲染:
v-for: 数组(for…in…)遍历
每个列表都需要添加key
事件监听:
v-on:
methods:
事件参数
修饰符
为了解决这个问题,Vue.js 为 v-on 提供了事件修饰符。
之前提过,修饰符是由点开头的指令后缀来表示的。
.stop
.prevent
.capture
.self
.once
.passive
        简写方法:@click 代替 v-on:
    数组更新检测:
        变异方法(改变了原数组):引起视图更新
        替换数组(创建新数组):不会引起视图更新
   显示
计算属性: computed
computed和method的区别
计算属性是基于它们的依赖进行缓存的。只在相关依赖发生改变时它们才会重新求值。这就意味着只要 message 还没有发生改变,多次访问 reversedMessage 计算属性会立即返回之前的计算结果,而不必再次执行函数
表单输入绑定
v-model双向数据绑定
修饰符:lazy,trim,number
watch: 实时监听数据变化,写在
// watch: {
// msg: function (data) {
// if (data === ‘hello’) {
// console.log(‘输入了你好’)
// }
// }
// }
组件之间通信
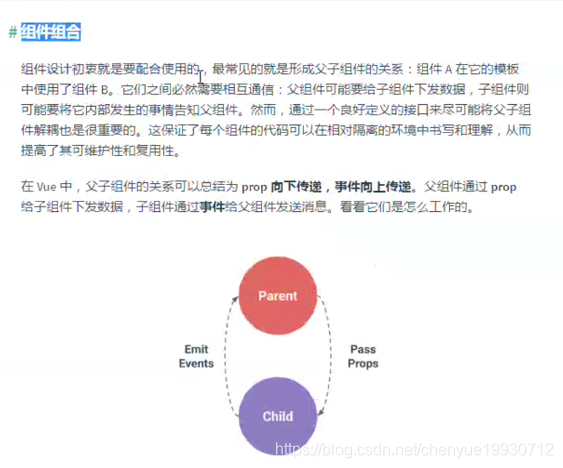
    父 -> 子:props  支撑
    每个 prop 都有指定的值类型。这时,你可以以对象形式列出 prop,这些属性的名称和值分别是 prop 各自的名称和类型:
       props: {
          title: String,
          likes: Number,
          isPublished: Boolean,
          commentIds: Array,
          author: Object,
          callback: Function,
          contactsPromise: Promise // or any other constructor
        }
        数据传递类型限制
      props: {
          title: [String,Number],//父模块传递title类型是String或者Number
          lifemsg: {
              type: String,
              required: true	//添加必选项
          },
          num: {
              type: Number,
              default: 1		//没值的时候,默认值
          },
          obj: {
              type: Object,
              default: () => {  //es6语法
                  return {
                      name: 'lily',
                      age: 21
                  }
              }
          }
   	 }
    子 -> 父:emit  发出
父组件
<template>
  <div>
    父组件<input type="text" v-model.number="num">
    <Child @sendmsg="getMsg" :num="convertNumber"/>
    <div>接受子组件传递的数据:
      <span>{{info}}</span>
    </div>
  </div>
</template>

<script>
  import Child from './Child'

  export default {
    name: "parent",
    data() {
      return {
        info: "hih",
        num:0
      }
    },
    components: {
      Child
    },
    computed:{
      convertNumber(){
        return this.num - 0
      }
    },
    methods: {
      getMsg(data) {
        this.info = data
      }
    }
  }
</script>

<style scoped>
</style>
子组件
<template>
  <div>
    子组件
    <button @click="sendMsg">传递</button>
    <div>子组件获取父组件数据
      <span>{{num}}</span>
    </div>
  </div>
</template>

<script>
    export default {
      name: "child",
      data(){
        return{
          msg:"我是子组件数据"
        }
      },
      props:{
        num:{
          type:Number,
          default:-1
        }
      },
      methods:{
        sendMsg(event){
          // 两个参数:1:key,名字自己取,会在父组件中获取对应名字的数据, 2:数据
          this.$emit('sendmsg', this.msg)
        }
      }
    }
</script>

<style scoped>
</style>
插槽 slot(子组件使用父组件内容)
1. 基本使用方法
父组件
<navigation-link url="/profile">
  Your Profile
</navigation-link>
子组件的template
<a
  v-bind:href="url"
  class="nav-link"
>
  <slot></slot>
</a>
渲染, <slot></slot> 将会被替换为“Your Profile”。插槽内可以包含任何模板代码,包括 HTML:
<navigation-link url="/profile">
  <!-- 添加一个 Font Awesome 图标 -->
  <span class="fa fa-user"></span>
  Your Profile
</navigation-link>
父级模板里的所有内容都是在父级作用域中编译的;子模板里的所有内容都是在子作用域中编译的。
2. 插槽的默认展示内容
父组件
<submit-button></submit-button>
子组件的template
<button type="submit">
  <slot>Submit</slot>
</button>
渲染:
<button type="submit">
  Submit
</button>
如果父组件是
<submit-button>
  Save
</submit-button>
渲染
<button type="submit">
  Save
</button>
3. 具名插槽
自 2.6.0 起有所更新。
父组件
<base-layout>
  <template v-slot:header>
    <h1>Here might be a page title</h1>
  </template>

    <!-- 缩写 <template #default> -->
	<template v-slot:default>
  		<p>A paragraph for the main content.</p>
  		<p>And another one.</p>
    </template>
  <!--
具名插槽缩写
<template #footer>
或者<child #default></child>
-->
  <template v-slot:footer>
    <p>Here's some contact info</p>
  </template>
</base-layout>
子组件base-layout的template
<div class="container">
  <header>
    <slot name="header"></slot>
  </header>
  <main>
      <!-- 一个不带 name 的 <slot> 出口会带有隐含的名字“default”。 -->
    <slot></slot>
  </main>
  <footer>
    <slot name="footer"></slot>
  </footer>
</div>
渲染
<div class="container">
  <header>
    <slot name="header"></slot>
  </header>
  <main>
    <slot></slot>
  </main>
  <footer>
    <slot name="footer"></slot>
  </footer>
</div>
4. 作用域插槽(传值)
父组件
在父组件上使用slot-scope属性,user.data就是子组件传过来的值
<current-user>
  <template v-slot:default="slotProps">
    {{ slotProps.childData.firstName }}
  </template>
</current-user>
子组件的template
<span>
  <slot v-bind:childData="user">
    {{ user.lastName }}
  </slot>
</span>
在这个例子中,我们选择将包含所有插槽 prop 的对象命名为 slotProps,但你也可以使用任意你喜欢的名字。
5. 作用域插槽使用解构对象传值
<current-user v-slot="{ user:u = { firstName: 'Guest' } }">
  {{ u.firstName }}
</current-user>
结构对象
//基本赋值
let{p,d} = {p: 42, q: true};
//无声明赋值
({a, b} = {a: 1, b: 2});
//别名赋值
({p: foo, q: bar}= {p: 42, q: true})
//默认值
var {a:aa = 10, b:bb = 5} = {a: 3};
6. 动态插槽名
2.6.0 新增
动态指令参数也可以用在 v-slot 上,来定义动态的插槽名:
父组件
<base-layout>
  <template v-slot:[dynamicSlotName]>
    ...
  </template>
</base-layout>
单个插槽
具名插槽: <slot> 元素有一个特殊的特性:name。这个特性可以用来定义额外的插槽
作用域插槽:数据是子传父 slot-scope
动态组件:keep-alive
主要用于保留组件状态或避免重新渲染
不会在函数式组件中正常工作,因为它们没有缓存实例
include 和 exclude 属性允许组件有条件地缓存
## 过渡和动画(css)
-
在 CSS 过渡和动画中自动应用 class
-
可以配合使用第三方 CSS 动画库,如 Animate.css
在css过渡和动画中自动应用class
过渡类名:
v-enter:定义进入过渡的开始状态。在元素被插入之前生效,在元素被插入之后的下一帧移除。
            v-enter-active:定义进入过渡生效时的状态。在整个进入过渡的阶段中应用,在元素被插入之前生效,在过渡/动画完成之后移除。这个类可以被用来定义进入过渡的过程时间,延迟和曲线函数。

            v-enter-to: 2.1.8版及以上 定义进入过渡的结束状态。在元素被插入之后下一帧生效 (与此同时 v-enter 被移除),在过渡/动画完成之后移除。

            v-leave: 定义离开过渡的开始状态。在离开过渡被触发时立刻生效,下一帧被移除。

            v-leave-active:定义离开过渡生效时的状态。在整个离开过渡的阶段中应用,在离开过渡被触发时立刻生效,在过渡/动画完成之后移除。这个类可以被用来定义离开过渡的过程时间,延迟和曲线函数。

            v-leave-to: 2.1.8版及以上 定义离开过渡的结束状态。在离开过渡被触发之后下一帧生效 (与此同时 v-leave 被删除),在过渡/动画完成之后移除。
    可以配合使用第三方 CSS 动画库,如 Animate.css
自定义指令(directive)
1. 全局指令
注册一个全局自定义指令 `v-focus`
    // Vue.directive('focus', {
    //   // 当被绑定的元素插入到 DOM 中时……
    //   inserted: function (el) {
    //     // 聚焦元素
    //     el.focus()
    //   }
    // })
2.  局部指令和data平级
    directives: {
        focus: {
        // 指令的定义
        inserted: function (el) {
            el.focus()
        }
        },
        mycss: {
        inserted: function (el) {
            el.style.color = 'blue'
        }
        }
    }
过滤器
    过滤器可以用在两个地方:双花括号插值和 v-bind 表达式 (后者从 2.1.0+ 开始支持)。过滤器应该被添加在 JavaScript 表达式的尾部,由“管道”符号指示:
    <!-- 在双花括号中 -->
    {{ message | capitalize }}

    <!-- 在 `v-bind` 中 -->
    <div v-bind:id="rawId | formatId"></div>
        在一个组件的选项中定义本地的过滤器:
            filters: {
                capitalize: function (value) {
                    if (!value) return ''
                    value = value.toString()
                    return value.charAt(0).toUpperCase() + value.slice(1)
                }
            }
Axios:
-
安装
npm install axios
-
引入加载
import Axios from “axios”
Vue.protptype.$axios = Axios
-
请求
get请求:
created(){//和data平级
    this.$axios(“http://www.wwtliu.com/sxtstu/news/juhenews.php”,{//默认get请求
        params:{
            type:"junshi",
            count:30
        }
    }).then(res => {//请求成功
        this.newsData = res.data;
        console.log(res.data);
    }).catch(error => {//请求失败
        console.log(error);
    })
}
post请求:
created(){//和data平级
    this.$axios.post(“http://www.wwtliu.com/sxtstu/blueberrypai/login.php”,
    qs.stringify({
        user_id:"iwen@qq.com",
        password:"iwen123",
        verification_code:"crfvw"
    })).then(res => {//请求成功
        this.newsData = res.data;
        console.log(res.data);
    }).catch(error => {//请求失败
        console.log(error);
    })
}
post请求注意事项:
axios接受的post请求的参数格式必须为form-data格式
① formData格式:?name=‘aa’&pwd=‘123’
我们是x-www-form-urlencoded: {name:“iwen”,age:20}
可以引入第三方库 qs库全名 querystring,做参数转换
import qs from “qs”
qs.stringify({
user_id:“iwen@qq.com”,
password:“iwen123”,
verification_code:“crfvw”
})
全局的 axios 配置:写在main.js中
// The Vue build version to load with the `import` command
// (runtime-only or standalone) has been set in webpack.base.conf with an alias.
import Vue from 'vue'
import App from './App'
import Axios from 'axios'
import qs from 'qs'
import store from './store'
import router from './router'
import VueResource from 'vue-resource'
import VueAwesomeSwiper from 'vue-awesome-swiper'
import 'swiper/dist/css/swiper.css'
Vue.prototype.$axios = Axios
// Vue.prototype.HOST = 'api'

Axios.defaults.baseURL = 'http://www.wwtliu.com'
// Axios.defaults.headers.common['Authorization'] = AUTH_TOKEN
Axios.defaults.headers.post['Content-Type'] = 'application/x-www-form-urlencoded'
Vue.config.productionTip = false

// 注册一个全局自定义指令 `v-focus`
// Vue.directive('focus', {
//   // 当被绑定的元素插入到 DOM 中时……
//   inserted: function (el) {
//     // 聚焦元素
//     el.focus()
//   }
// })
// 添加请求拦截器  拦截器:在请求或响应被 then 或 catch 处理前拦截它们。
Axios.interceptors.request.use(function (config) {
  // 在发送请求之前做些什么
  // console.log('request', config)
  if (config.method === 'post') {
    config.data = qs.stringify(config.data)
  }
  return config
}, function (error) {
  // 对请求错误做些什么
  return Promise.reject(error)
})

// 添加响应拦截器
Axios.interceptors.response.use(function (response) {
  // 对响应数据做点什么
  // console.log('response', response)
    if(config.method == "post"){
        config.data = qs.stringify(config.data)
    }
  return response
}, function (error) {
  // 对响应错误做点什么
  return Promise.reject(error)
})
Vue.use(VueAwesomeSwiper)
Vue.use(VueResource)
/* eslint-disable no-new */
new Vue({
  el: '#app',
  components: { App },
  template: '<App/>',
  store,
  router
})
在get和post请求中key简化url地址只要写“/sxtstu/blueberrypai/login.php”
        axios.defaults.baseURL = 'https://api.example.com'; // 请求接口基础路径
        axios.defaults.headers.common['Authorization'] = AUTH_TOKEN; // 作者认证
        axios.defaults.headers.post['Content-Type'] = 'application/x-www-form-urlencoded';  // post 请求时转码
    拦截器:
        在请求或响应被 then 或 catch 处理前拦截它们
    跨域处理:
        config/index.js":
            // 跨域解决方案
            proxyTable: {
                '/api': {
                    target: 'http://localhost:3000', // 开发
                    changeOrigin: true,
                    pathRewrite: {
                    '^/api': ''
                    }
                }
            }
        main.js:HOST
            Vue.prototype.HOST = 'api'
mock: 数据模拟
    方案:
        1.前端静态JSON文件,get请求形式访问数据(只能get请求)
        2.项目中集成服务器,模拟各种接口(多为前后端分离同步开发时采用)
        3.直接使用线上数据(多为重构时采用)
        4.mock.js
#Vuex
1.是什么
Vuex 是一个专为 Vue.js 应用程序开发的状态管理模式。它采用集中式存储管理应用的所有组件的状态,并以相应的规则保证状态以一种可预测的方式发生变化。
2.什么情况下我应该使用 Vuex?
如果您不打算开发大型单页应用,使用 Vuex 可能是繁琐冗余的。确实是如此——如果您的应用够简单,您最好不要使用 Vuex。一个简单的 store 模式就足够您所需了。但是,如果您需要构建一个中大型单页应用,您很可能会考虑如何更好地在组件外部管理状态,Vuex 将会成为自然而然的选择。
3.Vuex状态管理
mutations:
        只能同步执行

    action:

        1.Action 提交的是 mutation,而不是直接变更状态

        2.Action 可以包含任意异步操作
#vue-resource
1.1.0以后已弃用,具体参考Axios


 1204
1204

 被折叠的 条评论
为什么被折叠?
被折叠的 条评论
为什么被折叠?
 到【灌水乐园】发言


