


 本文介绍阿里巴巴开源的Sentinel限流熔断器的使用方法,包括服务端和客户端的启动配置,以及如何在SpringBoot项目中集成并实现接口限流。Sentinel具备丰富的应用场景、实时监控和广泛的开源生态,适用于微服务稳定性保护。
Sentinel是阿里巴巴开源的限流器熔断器,并且带有可视化操作界面。
在日常开发中,限流功能时常被使用,用于对某些接口进行限流熔断,譬如限制单位时间内接口访问次数;或者按照某种规则进行限流,如限制ip的单位时间访问次数等。
Sentinel 介绍
随着微服务的流行,服务和服务之间的稳定性变得越来越重要。 Sentinel 以流量为切入点,从流量控制、熔断降级、系统负载保护等多个维度保护服务的稳定性。
Sentinel 具有以下特征:
-
丰富的应用场景: Sentinel 承接了阿里巴巴近 10 年的双十一大促流量的核心场景,例如秒杀(即突发流量控制在系统容量可以承受的范围)、消息削峰填谷、实时熔断下游不可用应用等。
-
完备的实时监控: Sentinel 同时提供实时的监控功能。您可以在控制台中看到接入应用的单台机器秒级数据,甚至 500 台以下规模的集群的汇总运行情况。
-
广泛的开源生态: Sentinel 提供开箱即用的与其它开源框架/库的整合模块,例如与 Spring Cloud、Dubbo、gRPC 的整合。您只需要引入相应的依赖并进行简单的配置即可快速地接入 Sentinel。
-
完善的 SPI 扩展点: Sentinel 提供简单易用、完善的 SPI 扩展点。您可以通过实现扩展点,快速的定制逻辑。例如定制规则管理、适配数据源等。
来简单使用一下Sentinel。
Sentinel包括服务端和客户端,服务端有可视化界面,客户端需引入jar后即可和服务端通信并完成限流功能。
启动服务端的jar
https://github.com/alibaba/Sentinel/releases 在这个地址,下载release的jar,然后启动即可。
这个jar是个标准的Springboot应用,可以通过
java -jar sentinel-dashboard-1.6.0.jar来启动,这样就是默认的设置,启动在8080端口。也可以加上一些自定义配置来启动
java -Dserver.port=8080 -Dcsp.sentinel.dashboard.server=localhost:8080 -Dproject.name=sentinel-dashboard -jar sentinel-dashboard.jar。具体配置的解释,可以到GitHub上看一下文档。
这里我们直接使用默认java -jar sentinel-dashboard-1.6.0.jar来启动,之后访问localhost:8080。可以看到界面:

输入账号密码sentinel后进入主界面

此时因为我们并没有启动客户端,所以界面是空的。
启动客户端
新建一个Springboot项目,pom如下:
<?xml version="1.0" encoding="UTF-8"?>
<project xmlns="http://maven.apache.org/POM/4.0.0" xmlns:xsi="http://www.w3.org/2001/XMLSchema-instance"
	xsi:schemaLocation="http://maven.apache.org/POM/4.0.0 https://maven.apache.org/xsd/maven-4.0.0.xsd">
	<modelVersion>4.0.0</modelVersion>
	<parent>
		<groupId>org.springframework.boot</groupId>
		<artifactId>spring-boot-starter-parent</artifactId>
		<version>2.1.5.RELEASE</version>
		<relativePath/> <!-- lookup parent from repository -->
	</parent>
	<groupId>com.github.chengbin</groupId>
	<artifactId>sentinel</artifactId>
	<version>0.0.1-SNAPSHOT</version>
	<name>sentinel</name>
	<description>Demo project for Spring Boot</description>

	<properties>
		<java.version>1.8</java.version>
	</properties>

	<dependencies>
		<dependency>
			<groupId>org.springframework.boot</groupId>
			<artifactId>spring-boot-starter-web</artifactId>
		</dependency>

		<!--sentinel-->
		<dependency>
			<groupId>org.springframework.cloud</groupId>
			<artifactId>spring-cloud-starter-alibaba-sentinel</artifactId>
		</dependency>
		<!--sentinel end-->


		<dependency>
			<groupId>org.springframework.boot</groupId>
			<artifactId>spring-boot-starter-test</artifactId>
			<scope>test</scope>
		</dependency>
	</dependencies>

	<dependencyManagement>
		<dependencies>
			<dependency>
				<groupId>org.springframework.cloud</groupId>
				<artifactId>spring-cloud-dependencies</artifactId>
				<version>${spring-cloud.version}</version>
				<type>pom</type>
				<scope>import</scope>
			</dependency>

			<dependency>
				<groupId>org.springframework.cloud</groupId>
				<artifactId>spring-cloud-alibaba-dependencies</artifactId>
				<version>0.2.2.RELEASE</version>
				<type>pom</type>
				<scope>import</scope>
			</dependency>
		</dependencies>
	</dependencyManagement>

	<build>
		<plugins>
			<plugin>
				<groupId>org.springframework.boot</groupId>
				<artifactId>spring-boot-maven-plugin</artifactId>
			</plugin>
		</plugins>
	</build>

</project>
需要注意引用的SpringCloud-alibaba的版本是0.2.2,当前的最新版,如果是Springboot2.x的项目,需要引0.2.x的。Springboot1.x的引0.1.x的。
Sentinel的客户端依赖也很简单,spring-cloud-starter-alibaba-sentinel加这一个引用即可。
之后在application.yml里添加server的地址配置:
spring:
  application:
   name: bingo
  cloud:
    sentinel:
      transport:
        dashboard: localhost:8080

server:
  port: 8083
    #eager: true
另外由于8080端口已被占用,自行设置一个端口,如8083
做完这些,新建一个controller,
@RestController
public class HelloController {

    @GetMapping("/hello")
    public String hello(){
        return "hello,world";
    }
}
就是一个普通的controller接口。
之后启动该项目。启动后回到server的控制台界面

发现并没有什么变化。然后我们调用一下hello接口。之后再次刷新server控制台。

界面已经出现了我们的项目,并且有一堆规则。

因为Sentinel采用延迟加载,只有在主动发起一次请求后,才会被拦截并发送给服务端。如果想关闭这个延迟,就在上面的yml里把eager的注释放掉。
然后在簇点链路里hello接口的流控那里设置限流规则,将单机阈值设为1.就代表一秒内最多只能通过1次请求到达该hello接口。

之后再次连续访问hello接口。
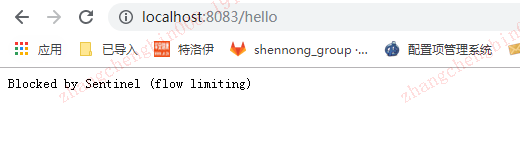
发现已经被拦截了,限流已经生效。
这样就完成了一次简单的限流操作,并且能看到各接口的QPS的统计。
后续我们来研究集群的限流、降级等功能。
转载:https://blog.youkuaiyun.com/tianyaleixiaowu/article/details/89916891


 1万+
1万+

 被折叠的 条评论
为什么被折叠?
被折叠的 条评论
为什么被折叠?
 到【灌水乐园】发言


