


FastDFS 介绍及安装部署
https://github.com/happyfish100
FastDFS 是一款开源的轻量级分布式文件系统,
- 纯C实现,支持Linux、FreeBSD等类UNIX系统;
- 类Google FS,不是通用的文件系统,只能通过专有的API访问,目前提供了 C、Java和PHP API;
- 为互联网应用量身定做,追求高性能和高扩展型;
- FastDFS可以看做是基于文件系统的key/value pair存储系统,称作分布式文件存储服务更为合适;
- 更倾向于存储中小型文件(4KB~500MB);
FastDFS 组成
Tracker Server
跟踪服务器,主要做调度工作,在访问时起负载均衡的作用。在内存中记录 集群中group和storage服务器的状态信息,是连接客户端和Storage服务端的枢纽。因为相关信息全部在内存中,Tracker服务器的性能非常高,一个较大的集群(比如上百个group)中有3台就足够了。
Storage Server
存储服务器,文件和文件属性(meta data)都保存到存储服务器上。
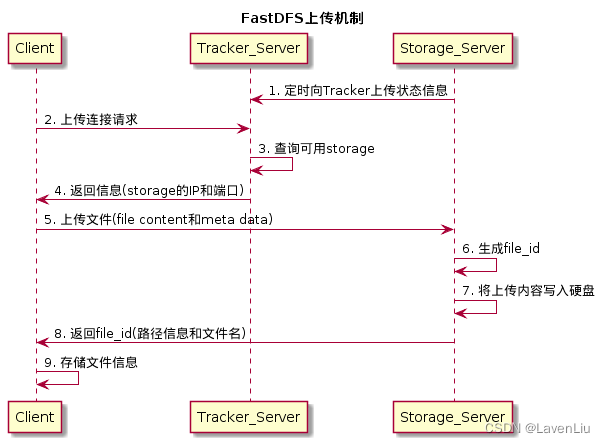
FastDFS上传机制
title FastDFS上传机制
participant Client
participant Tracker_Server
participant Storage_Server

Storage_Server -> Tracker_Server: 1. 定时向Tracker上传状态信息
Client -> Tracker_Server: 2. 上传连接请求
Tracker_Server -> Tracker_Server: 3. 查询可用storage
Client <- Tracker_Server: 4. 返回信息(storage的IP和端口)
Client -> Storage_Server: 5. 上传文件(file content和meta data)
Storage_Server -> Storage_Server: 6. 生成file_id
Storage_Server -> Storage_Server: 7. 将上传内容写入硬盘
Client <- Storage_Server: 8. 返回file_id(路径信息和文件名)
Client -> Client: 9. 存储文件信息
FastDFS使用场景
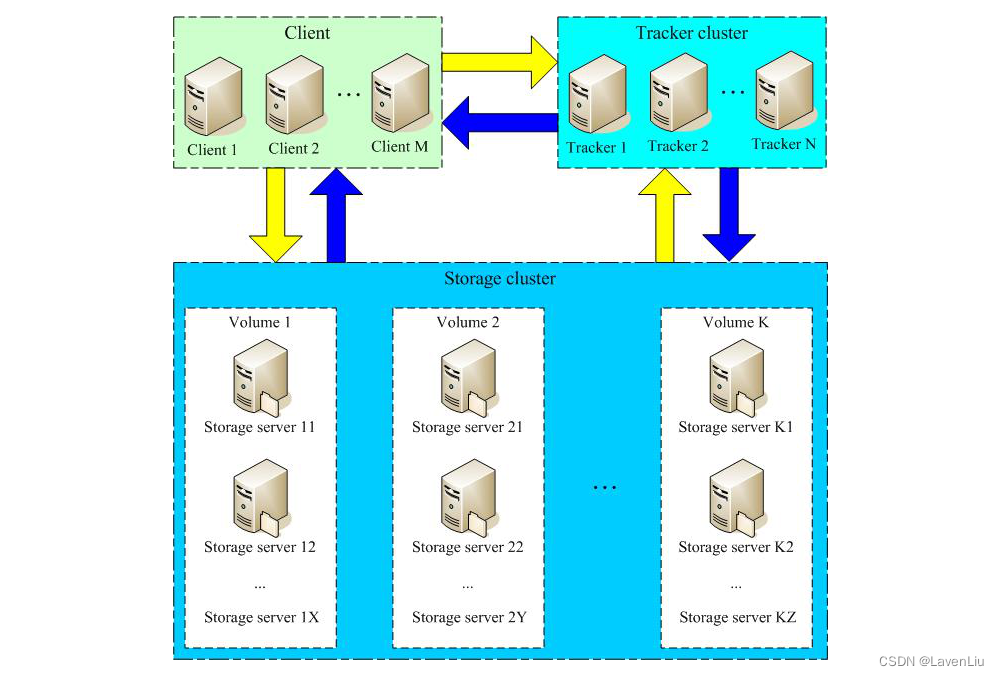
FastDFS架构
FastDFS 架构图如下:
实验环境
| 主机名 | IP地址 | 说明 |
|---|---|---|
| tracker01.lavenliu.com | 192.168.20.160 | 追踪服务器01 |
| tracker02.lavenliu.com | 192.168.20.161 | 追踪服务器02 |
| storage01.lavenliu.com | 192.168.20.162 | 存储服务器01 |
| storage02.lavenliu.com | 192.168.20.163 | 存储服务器02 |
| client01.lavenliu.com | 192.168.20.164 | 客户端01 |
上述表作废,以下面的为准,所有服务安装在一台机器上。
| 主机名 | IP地址 | 说明 |
|---|---|---|
| tracker.lavenliu.com | 192.168.16.137 | 追踪服务器 |
| storage.lavenliu.com | 192.168.16.137 | 存储服务器 |
| client.lavenliu.com | 192.168.16.137 | 客户端 |
| xxx | 10.20.20.35 | 迁移用服务器 |
实验环境中用到的版本信息:
- Nginx 1.21.1
- FastDFS 6.0.7
- FastDFS libfastcommon 1.0.48
- Nginx FastDFS Module 1.22
部署 FastDFS
安装依赖
官方文档如下:
# step 1. download libfastcommon source codes and install it,
#   github address:  https://github.com/happyfish100/libfastcommon.git
#   gitee address:   https://gitee.com/fastdfs100/libfastcommon.git
# command lines as:

   git clone https://github.com/happyfish100/libfastcommon.git
   cd libfastcommon; git checkout V1.0.47
   ./make.sh clean && ./make.sh && ./make.sh install


# step 2. download fastdfs source codes and install it,
#   github address:  https://github.com/happyfish100/fastdfs.git
#   gitee address:   https://gitee.com/fastdfs100/fastdfs.git
# command lines as:

   git clone https://github.com/happyfish100/fastdfs.git
   cd fastdfs; git checkout V6.07
   ./make.sh clean && ./make.sh && ./make.sh install


# step 3. setup the config files
#   the setup script does NOT overwrite existing config files,
#   please feel free to execute this script (take easy :)

./setup.sh /etc/fdfs


# step 4. edit or modify the config files of tracker, storage and client
such as:
 vi /etc/fdfs/tracker.conf
 vi /etc/fdfs/storage.conf
 vi /etc/fdfs/client.conf

 and so on ...


# step 5. run the server programs
# start the tracker server:
/usr/bin/fdfs_trackerd /etc/fdfs/tracker.conf restart

# start the storage server:
/usr/bin/fdfs_storaged /etc/fdfs/storage.conf restart

# (optional) in Linux, you can start fdfs_trackerd and fdfs_storaged as a service:
/sbin/service fdfs_trackerd restart
/sbin/service fdfs_storaged restart


# step 6. (optional) run monitor program
# such as:
/usr/bin/fdfs_monitor /etc/fdfs/client.conf


# step 7. (optional) run the test program
# such as:
/usr/bin/fdfs_test <client_conf_filename> <operation>
/usr/bin/fdfs_test1 <client_conf_filename> <operation>

# for example, upload a file for test:
/usr/bin/fdfs_test /etc/fdfs/client.conf upload /usr/include/stdlib.h


tracker server config file sample please see conf/tracker.conf

storage server config file sample please see conf/storage.conf

client config file sample please see conf/client.conf

Item detail
1. server common items
---------------------------------------------------
|  item name            |  type  | default | Must |
---------------------------------------------------
| base_path             | string |         |  Y   |
---------------------------------------------------
| disabled              | boolean| false   |  N   |
---------------------------------------------------
| bind_addr             | string |         |  N   |
---------------------------------------------------
| network_timeout       | int    | 30(s)   |  N   |
---------------------------------------------------
| max_connections       | int    | 256     |  N   |
---------------------------------------------------
| log_level             | string | info    |  N   |
---------------------------------------------------
| run_by_group          | string |         |  N   |
---------------------------------------------------
| run_by_user           | string |         |  N   |
---------------------------------------------------
| allow_hosts           | string |   *     |  N   |
---------------------------------------------------
| sync_log_buff_interval| int    |  10(s)  |  N   |
---------------------------------------------------
| thread_stack_size     | string |  1M     |  N   |
---------------------------------------------------
memo:
   * base_path is the base path of sub dirs:
     data and logs. base_path must exist and it's sub dirs will
     be automatically created if not exist.
       $base_path/data: store data files
       $base_path/logs: store log files
   * log_level is the standard log level as syslog, case insensitive
     # emerg: for emergency
     # alert
     # crit: for critical
     # error
     # warn: for warning
     # notice
     # info
     # debug
   * allow_hosts can ocur more than once, host can be hostname or ip address,
     "*" means match all ip addresses, can use range like this: 10.0.1.[1-15,20]
      or host[01-08,20-25].domain.com, for example:
        allow_hosts=10.0.1.[1-15,20]
        allow_hosts=host[01-08,20-25].domain.com

2. tracker server items
---------------------------------------------------
|  item name            |  type  | default | Must |
---------------------------------------------------
| port                  | int    | 22000   |  N   |
---------------------------------------------------
| store_lookup          | int    |  0      |  N   |
---------------------------------------------------
| store_group           | string |         |  N   |
---------------------------------------------------
| store_server          | int    |  0      |  N   |
---------------------------------------------------
| store_path            | int    |  0      |  N   |
---------------------------------------------------
| download_server       | int    |  0      |  N   |
---------------------------------------------------
| reserved_storage_space| string |  1GB    |  N   |
---------------------------------------------------

memo:
  * the value of store_lookup is:
    0: round robin (default)
    1: specify group
    2: load balance (supported since V1.1)
  * store_group is the name of group to store files.
    when store_lookup set to 1(specify group),
    store_group must be set to a specified group name.
  * reserved_storage_space is the reserved storage space for system
    or other applications. if the free(available) space of any stoarge
    server in a group <= reserved_storage_space, no file can be uploaded
    to this group (since V1.1)
    bytes unit can be one of follows:
      # G or g for gigabyte(GB)
      # M or m for megabyte(MB)
      # K or k for kilobyte(KB)
      # no unit for byte(B)

3. storage server items
-------------------------------------------------
|  item name          |  type  | default | Must |
-------------------------------------------------
| group_name          | string |         |  Y   |
-------------------------------------------------
| tracker_server      | string |         |  Y   |
-------------------------------------------------
| port                | int    | 23000   |  N   |
-------------------------------------------------
| heart_beat_interval | int    |  30(s)  |  N   |
-------------------------------------------------
| stat_report_interval| int    | 300(s)  |  N   |
-------------------------------------------------
| sync_wait_msec      | int    | 100(ms) |  N   |
-------------------------------------------------
| sync_interval       | int    |   0(ms) |  N   |
-------------------------------------------------
| sync_start_time     | string |  00:00  |  N   |
-------------------------------------------------
| sync_end_time       | string |  23:59  |  N   |
-------------------------------------------------
| store_path_count    | int    |   1     |  N   |
-------------------------------------------------
| store_path0         | string |base_path|  N   |
-------------------------------------------------
| store_path#         | string |         |  N   |
-------------------------------------------------
|subdir_count_per_path| int    |   256   |  N   |
-------------------------------------------------
|check_file_duplicate | boolean|    0    |  N   |
-------------------------------------------------
| key_namespace       | string |         |  N   |
-------------------------------------------------
| keep_alive          | boolean|    0    |  N   |
-------------------------------------------------
| sync_binlog_buff_interval| int |   60s |  N   |
-------------------------------------------------

memo:
  * tracker_server can ocur more than once, and tracker_server format is
    "host:port", host can be hostname or ip address.
  * store_path#, # for digital, based 0
  * check_file_duplicate: when set to true, must work with FastDHT server,
    more detail please see INSTALL of FastDHT. FastDHT download page:
    http://code.google.com/p/fastdht/downloads/list
  * key_namespace: FastDHT key namespace, can't be empty when
    check_file_duplicate is true. the key namespace should short as possible
简化的步骤:
git clone https://gitee.com/fastdfs100/libfastcommon.git
cd libfastcommon
git checkout V1.0.48
./make.sh clean && ./make.sh && ./make.sh install
安装服务端
git clone https://gitee.com/fastdfs100/fastdfs.git
cd fastdfs
git checkout V6.07
./make.sh clean
./make.sh
[root@node01 fastdfs]# ./make.sh install
mkdir -p /usr/bin
mkdir -p /etc/fdfs
cp -f fdfs_trackerd /usr/bin
if [ ! -f /etc/fdfs/tracker.conf ]; then cp -f ../conf/tracker.conf /etc/fdfs/tracker.conf; fi
if [ ! -f /etc/fdfs/storage_ids.conf ]; then cp -f ../conf/storage_ids.conf /etc/fdfs/storage_ids.conf; fi
mkdir -p /usr/bin
mkdir -p /etc/fdfs
cp -f fdfs_storaged  /usr/bin
if [ ! -f /etc/fdfs/storage.conf ]; then cp -f ../conf/storage.conf /etc/fdfs/storage.conf; fi
mkdir -p /usr/bin
mkdir -p /etc/fdfs
mkdir -p /usr/lib64
mkdir -p /usr/lib
cp -f fdfs_monitor fdfs_test fdfs_test1 fdfs_crc32 fdfs_upload_file fdfs_download_file fdfs_delete_file fdfs_file_info fdfs_appender_test fdfs_appender_test1 fdfs_append_file fdfs_upload_appender fdfs_regenerate_filename /usr/bin
if

 4833


 扫一扫


 被折叠的 条评论
为什么被折叠?
 到【灌水乐园】发言


