用 Python 把你的朋友变成表情包

论文翻译:2024 High-Confidence Computing A survey on large language model (LLM) security and privacy: The 大型语言模型(LLMs),如ChatGPT和Bard,已经彻底改变了自然语言理解和生成。它们具有深度语言理解能力、类似人类的文本生成能力、上下文意识和强大的问题解决技能,使它们在各个领域(例如搜索引擎、客户支持、翻译)中变得不可或缺。同时,LLMs也在安全领域获得了关注,揭示了安全漏洞并展示了它们在安全相关任务中的潜力。本文探讨了LLMs与安全性和隐私的交集。具体来说,我们研究了LLMs如何积极影响安全性和隐私,与它们使用相关的潜在风险和威胁,以及LLMs内部的固有漏洞。 阅读详情
点击上方“菜鸟学Python”,选择“星标”公众号
重磅干货,第一时间送达

来源:

https://blog.youkuaiyun.com/qq_36758914/article/details/106303928

一、项目说明

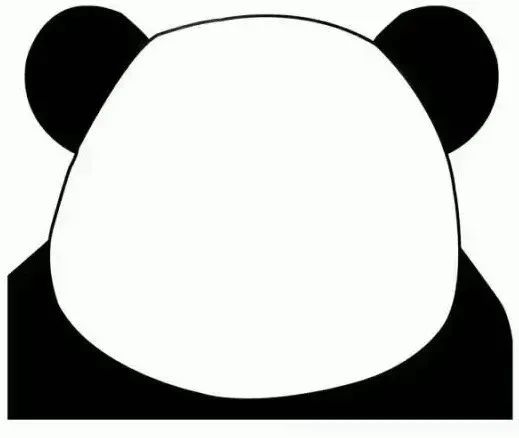
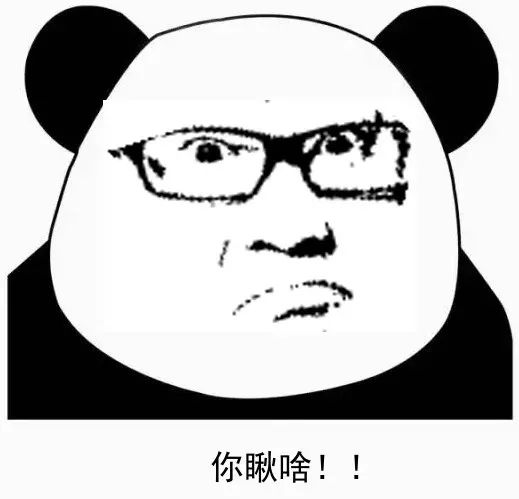
在日常生活中,我们经常会存取一些朋友们的丑照,在这个项目中,我们以萌萌哒的熊猫头作为背景,然后试着在背景图上加入朋友们的照片。效果如下图所示:

二、实现步骤

  1. 导入朋友的照片(前景照片);

  2. 处理前景照片(缩放、旋转,填充);

  3. 导入熊猫头照片(背景照片);

  4. 将前景和背景拼接起来形成表情包;

  5. 在表情包下面添加文字。

三、Python 实现

1、导入需要的库

import cv2
import numpy as mp
import matplotlib.pyplot as plt
from PIL import Image, ImageDraw, ImageFont

这个项目主要是通过 opencv 完成,但如果要在表情包下面写中文的话,PIL(pillow)库是必不可少的。

2、绘图函数

这里写一个绘图函数,方便绘图操作。

def plt_show(img):
    imageRGB = cv2.cvtColor(img, cv2.COLOR_BGR2RGB)
    plt.imshow(imageRGB)
    plt.show()

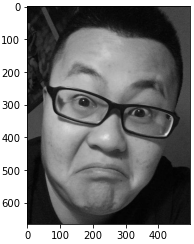
3、导入前景照片

image = cv2.imread('SXC.jpg', 0)  # 导入灰度图即可
plt_show(image)
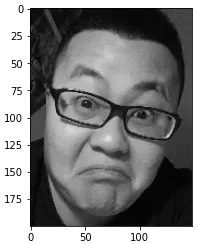
4、等比例缩放前景照片

因为我们发现前景照片的尺寸比背景尺寸还要大,这显然是不合适的,所以要先对其进行等比例(0.3)缩放。

image_resize = cv2.resize(image, None, fx=0.3, fy=0.3, interpolation = cv2.INTER_CUBIC)
plt_show(image_resize)
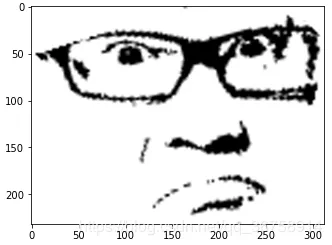
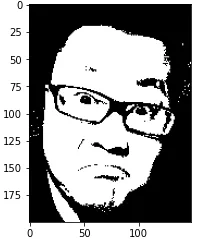
5、对前景照片进行二值化处理

在这里,我们将像素值大于 80 的区域设置为 255;小于 80 的区域设置成 0。

ret, image_binary = cv2.threshold(image_resize, 80, 255, cv2.THRESH_BINARY)
plt_show(image_binary)
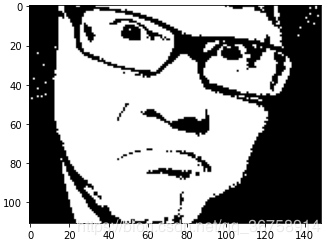
6、提取出感兴趣区域

image_roi = image_binary[74: 185, 0: 150]
plt_show(image_roi)
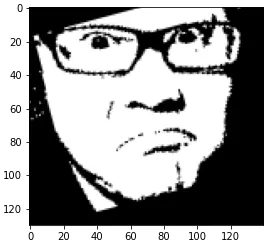
7、旋转图片

因为我们的背景图片(熊猫头)是正的,而前景图片有些向右倾斜,所以要先对其进行旋转操作(大概逆时针旋转 15 度即可)。

rows, cols = image_roi.shape
M = cv2.getRotationMatrix2D(((cols-1)/2.0, (rows-1)/2.0), 15, 1)  # (旋转中心,逆时针旋转角度,各个方向同等扩大比例)
image_rotate = cv2.warpAffine(image_roi, M, (140, 130))  # (140, 130) 是指旋转后的画布大小
plt_show(image_rotate)
8、将一些不需要的黑色区域删除掉

在这里我们使用 cv2.fillPoly 函数对不需要的区域用白色进行填充。

h, w = image_rotate.shape

image_rotate_copy = image_rotate.copy()
pts1 = np.array([[0, 20],  [64, 0], [0, 0]], np.int32)
pts2 = np.array([[0, 18],  [0, h], [80, h]], np.int32)
pts3 = np.array([[0, 100],  [0, h], [w, h], [w, 100]], np.int32)
pts4 = np.array([[111, 0],  [w, 0], [w, 30]], np.int32)
pts5 = np.array([[124, 0],  [115, h], [w, h]], np.int32)
pts6 = np.array([[120, 40],  [95, 100], [120, 100]], np.int32)
foreground = cv2.fillPoly(image_rotate_copy, [pts1], (255, 255, 255))  # (图片,填充区域,填充颜色)
foreground = cv2.fillPoly(image_rotate_copy, [pts2], (255, 255, 255))
foreground = cv2.fillPoly(image_rotate_copy, [pts3], (255, 255, 255))
foreground = cv2.fillPoly(image_rotate_copy, [pts4], (255, 255, 255))
foreground = cv2.fillPoly(image_rotate_copy, [pts5], (255, 255, 255))
foreground = cv2.fillPoly(image_rotate_copy, [pts6], (255, 255, 255))

plt_show(foreground)
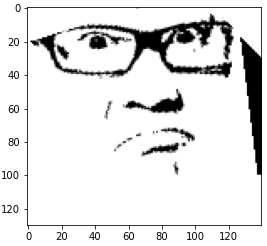
9、再次提取感兴趣区域并缩放

foreground_roi = foreground[0: 93, 0: 125]
plt_show(foreground_roi)

foreground_roi_resize = cv2.resize(foreground_roi, None, fx=2.5, fy=2.5, interpolation = cv2.INTER_CUBIC)
plt_show(foreground_roi_resize)
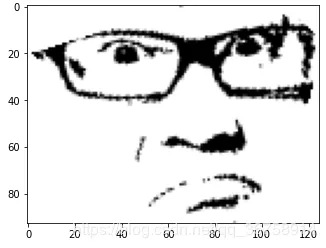
10、导入背景图片

background = cv2.imread('back.jpg', 0)
plt_show(background)
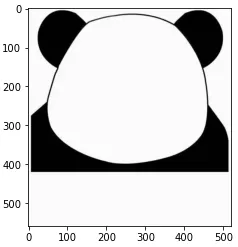
11、组合两张图片成表情包

h_f, w_f = foreground.shape
h_b, w_b = background.shape

left = (w_b - w_f)//2  # 前景图片在背景图片中的左边的横坐标
right = left + w_f  # 前景图片在背景图片中的右边的横坐标
top = 100  # 前景图片在背景图片中的上边的纵坐标
bottom = top + h_f  # 前景图片在背景图片中的下边的纵坐标

emoji = background
emoji[top: bottom, left: right] = foreground
plt_show(emoji)
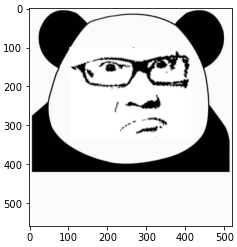
12、在表情包下面添加文本

12.1 添加英文文本

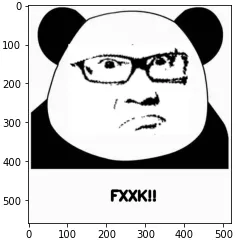
如果只是要添加英文文本,用 opencv 就可以解决:

emoji_copy = emoji.copy()
# (图片,文本,位置,字体,文本大小,文本颜色,文本粗细)
cv2.putText(emoji_copy, "FXXK!!", (210, 500), cv2.FONT_HERSHEY_SIMPLEX, 1.2, (0, 0, 0), 5)
plt_show(emoji_copy)
12.2 添加中文文本

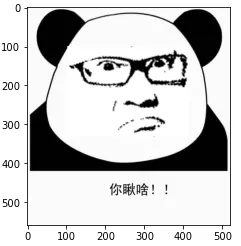
如果要添加中文文本,我们需要借助 PIL 库来实现。

PilImg = Image.fromarray(emoji)  # cv2 转 PIL
draw = ImageDraw.Draw(PilImg)  # 创建画笔
ttfront = ImageFont.truetype('simhei.ttf', 34)  # 设置字体
draw.text((210, 450),"你瞅啥!!",fill=0, font=ttfront)  # (位置,文本,文本颜色,字体)
emoji_text = cv2.cvtColor(np.array(PilImg),cv2.COLOR_RGB2BGR)  # PIL 转回 cv2
plt_show(emoji_text)
13、保存表情包

cv2.imwrite('./emoji.png', np.array(emoji_text))

四、完整代码

import cv2
import numpy as mp
import matplotlib.pyplot as plt
from PIL import Image, ImageDraw, ImageFont

def plt_show(img):
    imageRGB = cv2.cvtColor(img, cv2.COLOR_BGR2RGB)
    plt.imshow(imageRGB)
    plt.show()

image = cv2.imread('SXC.jpg', 0)  # 导入前景图片

image_resize = cv2.resize(image, None, fx=0.3, fy=0.3, interpolation = cv2.INTER_CUBIC)  # 缩放

ret, image_binary = cv2.threshold(image_resize, 80, 255, cv2.THRESH_BINARY)  # 图片二值化

image_roi = image_binary[74: 185, 0: 150]  # 感兴趣区域

rows, cols = image_roi.shape
# 旋转
M = cv2.getRotationMatrix2D(((cols-1)/2.0, (rows-1)/2.0), 15, 1)
image_rotate = cv2.warpAffine(image_roi, M, (140, 130))
# 填充不需要的区域
h, w = image_rotate.shape
image_rotate_copy = image_rotate.copy()
pts1 = np.array([[0, 20],  [64, 0], [0, 0]], np.int32)
pts2 = np.array([[0, 18],  [0, h], [80, h]], np.int32)
pts3 = np.array([[0, 100],  [0, h], [w, h], [w, 100]], np.int32)
pts4 = np.array([[111, 0],  [w, 0], [w, 30]], np.int32)
pts5 = np.array([[124, 0],  [115, h], [w, h]], np.int32)
pts6 = np.array([[120, 40],  [95, 100], [120, 100]], np.int32)
foreground = cv2.fillPoly(image_rotate_copy, [pts1], (255, 255, 255))
foreground = cv2.fillPoly(image_rotate_copy, [pts2], (255, 255, 255))
foreground = cv2.fillPoly(image_rotate_copy, [pts3], (255, 255, 255))
foreground = cv2.fillPoly(image_rotate_copy, [pts4], (255, 255, 255))
foreground = cv2.fillPoly(image_rotate_copy, [pts5], (255, 255, 255))
foreground = cv2.fillPoly(image_rotate_copy, [pts6], (255, 255, 255))

foreground_roi = foreground[0: 93, 0: 125]
foreground_roi_resize = cv2.resize(foreground_roi, None, fx=2.5, fy=2.5, interpolation = cv2.INTER_CUBIC)

background = cv2.imread('back.jpg', 0)  # 导入背景图片
# 拼接两张图片
h_f, w_f = foreground_roi_resize.shape
h_b, w_b = background.shape
left = (w_b - w_f)//2
right = left + w_f
top = 80
bottom = top + h_f
emoji = background
emoji[top: bottom, left: right] = foreground_roi_resize

PilImg = Image.fromarray(emoji)  # cv2 转 PIL
draw = ImageDraw.Draw(PilImg)  # 创建画笔
ttfront = ImageFont.truetype('simhei.ttf', 34)  # 设置字体
draw.text((210, 450),"你瞅啥!!",fill=0, font=ttfront)  # (位置,文本,文本颜色,字体)
emoji_text = cv2.cvtColor(np.array(PilImg),cv2.COLOR_RGB2BGR)  # PIL 转回 cv2

cv2.imwrite('./emoji.png', np.array(emoji_text))  # 保存表情包

(完)
推荐阅读:入门: 最全的零基础学Python的问题  | 零基础学了8个月的Python  | 实战项目 |学Python就是这条捷径干货:爬取豆瓣短评,电影《后来的我们》 | 38年NBA最佳球员分析 |   从万众期待到口碑扑街!唐探3令人失望  | 笑看新倚天屠龙记 | 灯谜答题王 |用Python做个海量小姐姐素描图 |趣味:弹球游戏  | 九宫格  | 漂亮的花 | 两百行Python《天天酷跑》游戏!AI: 会做诗的机器人 | 给图片上色 | 预测收入 | 碟中谍这么火,我用机器学习做个迷你推荐系统电影年度爆款文案1).卧槽!Pdf转Word用Python轻松搞定!2).学Python真香!我用100行代码做了个网站,帮人PS旅行图片,赚个鸡腿吃3).首播过亿,火爆全网,我分析了《乘风破浪的姐姐》,发现了这些秘密 4).80行代码!用Python做一个哆来A梦分身 5).你必须掌握的20个python代码,短小精悍,用处无穷 6).30个Python奇淫技巧集 7).我总结的80页《菜鸟学Python精选干货.pdf》,都是干货 8).再见Python!我要学Go了!2500字深度分析!9).发现一个舔狗福利!这个Python爬虫神器太爽了,自动下载妹子图片点这里,直达菜鸟学PythonB站!!
竞赛经验——挑战杯、互联网加、北斗杯、微软创新杯、计算机设计等比赛教训与经验 最近参加一些比赛,北斗杯、挑战者杯、微软创新杯等比赛,每次比赛都有不少需要总结的地方,特别是项目展示上技巧很多,总结一下。 首先最重要的是作品自身硬!自身的作品完成度不高,或者是没有创新点,就没必要参加了。 比如是出去比赛的话,我反正每次碰到最多的是智慧农场、智慧家居之类,不知道为啥这种的太多了。如果是创业型比赛,评委基本会问小米已经做得很好了很便宜了,你的优势在哪里?这些都是常见的问题提前要... 阅读详情

相关推荐

当Flowable遇上AI:智能流程决策的未来探索

本文探讨了Flowable工作流引擎与AI技术的融合,构建智能流程决策系统的前沿实践。通过动态流程控制、机器学习优化表达式、自然语言生成规则等创新方法,显著提升业务流程的自动化水平和决策效率。重点解析了AI如何赋能Flowable核心引擎,实现从静态规则到动态智能的跨越式发展。

weixin_29271053的博客 392

不用PS,一键生成熊猫头表情包(二)

摘要 技术栈如下: 代码演示:python 面部关键点识别:dlib 图像处理:pillow,opencv 环境的配置,可自行查找。尤其是dlib的安装,具体安装过程我也忘记了。 人脸关键点

weixin_43048291的博客 2881

一步一步实现基于COMSOL的单模光纤波导仿真

一步一步实现基于COMSOL的单模光纤波导仿真,简单易懂,跟着博客就能实现

君莫笑lucky的博客 1万+

Python爬虫之模拟登录总结

备注:python 2.7.9,32位 有些网站需要登录后才能爬取所需要的信息,此时可以设计爬虫进行模拟登录,原理是利用浏览器cookie。 一、浏览器访问服务器的过程:     (1)浏览器(客户端)向Web服务器发出一个HTTP请求(Http request);     (2)Web服务器收到请求,发回响应信息(Http Response);     (3)浏览器解析内容呈现

竹聿Simon的专栏 5万+

CAPL自动化测试

通过本文的学习,读者应该对CAPL自动化测试有了初步的了解,并能够编写复杂的CAPL脚本。在实际项目中,CAPL的应用非常广泛,希望读者能够通过不断的学习和实践,掌握更多的CAPL技巧,提高自己的开发能力。

闲人编程的博客 1528

Flask基础项目:从零到一搭建用户管理系统

本文介绍了一个基于Flask的用户管理系统,具有完整的增删改查功能。系统采用SQLAlchemy ORM进行数据库操作,自动处理SQL注入并首次运行时创建表结构。主要特点包括:实时统计用户总数和平均年龄、智能即时搜索、前后端双重数据验证、邮箱唯一性检查、流畅动画效果和响应式设计。后端使用Flask框架实现RESTful API,前端采用现代化UI设计,支持异步操作不阻塞界面。系统安装简单,只需创建数据库并安装依赖即可运行,适合作为基础用户管理系统的参考实现。

数据知道的博客 3837

如何将多张图片制作成GIF表情包

不管是图片还是视频都是我们日常要使用的,但是随着科技的发展,我们使用GIF也越来越多,特别是在平时的聊天中,那制作GIF其实也是需要一定的技巧的,如何将多张图片制作成GIF表情包呢? 1、首先需要在电脑上运行迅捷GIF制作工具,可以将图片、视频转为GIF,也可以直接录制成GIF,打开会有两个现在,后者“启动GIF编辑器”可以将图片编辑成GIF; 2、然后会自动跳到一个编辑框,点击“添加...

夏末的博客 3653

华为嵌入式面试题及参考答案(持续更新)

异步是指在程序执行过程中,某些任务不需要等待立即完成就可以继续执行其他任务的过程。在计算机编程中,异步通常用于处理长时间运行的操作,如文件读写、网络通信等,以避免阻塞主线程。异步处理通常涉及到回调函数、事件循环、协程或未来的概念。使用宏定义来避免命名冲突。#else#endif堆和栈是计算机程序中用于存储数据的两种不同类型的内存区域。

大模型大数据攻城狮的专栏 2484

Python网络爬虫之模拟登录(以知乎为例)

实践模拟登陆知乎

think_ycx的专栏 9133

2026国内Claude Code保姆级教程:安装、避坑、防串台全优化

安装 Claude Code CLI + 切换 npm 国内镜像优先配置固定关闭:自动联网、自动项目扫描VSCode 内置终端直接用,不装多余插件会话隔离+指令约束,彻底解决 Rust、小程序 跨语言串台。

lpfasd123的博客 2552

在VINS-FUSION上处理KITTI数据集(双目+GPS)

VINS-Fusion 是一个开源的实时多传感器状态估计库,主要由香港科技大学的沈邵劼教授领导的研究团队开发。它是 VINS-Mono(单目视觉惯性系统)的扩展,支持多种传感器组合,如双目、立体相机和IMU。

如果想成为中心,那么就到中心去吧。 1206

【Python爬虫历程】使用Cookie来模拟登陆

前面讲了cookie的概念,现在来实战操作一下:

Demo.demo的博客 875

MGC3130 3D手势识别传感器原理图设计,已量产(交互传感器)

最近在落地一款互动艺术装置的控制模块,选了 Microchip 的 MGC3130 做核心 —— 这颗芯片算是 GestIC® 近场传感技术的 “熟面孔” 了,把 3D 手势识别、运动跟踪的信号处理都集成在一颗芯片里,0-10cm 的检测距离刚好适配桌面级互动场景,挥挥手就能控设备的体验,放在艺术装置里确实很出效果。今天扒一下实际跑通的原理图,聊聊每个模块的设计思路。

不脱发的程序猿 371

用Python把你的朋友变成表情包

项目说明=======在日常生活中,我们经常会存取一些朋友们的丑照,在这个项目中,我们以萌萌哒的熊猫头作为背景,然后试着在背景图上加入朋友们的照片。

m0_59236602的博客 837

VC中sqlite的使用

在VC中对sqlite的使用,实现数据库大批数据的快速插入,读取数据库中的数据在ListCtrl中显示

Outlook Express 6 (OE6) for Win7/Win8/Win10

英文版 Outlook Express6.0, 兼容Win7/Win10/WinXP,解压就可用。

python恶搞表情包-哈哈!我用 Python 把你的朋友变成表情包了

点击上方“Python学习与数据挖掘”,关注公众号设为“星标”,好文章不错过!来自:csdn | 代码已上传,文末附下载方式在日常生活中,我们经常会存取一些朋友们的丑照,在这个项目中,我们以萌萌哒的熊猫头作为背景,然后试着在背景图上加入朋友们的照片。效果如下图所示。需要完整版代码文末获取! 实现步骤导入朋友的照片(前景照片);处理前景照片(缩放、旋转,填充);导入熊猫头照片(背景照片);将前景...

weixin_37988176的博客 975

深度学习工具包 DeepLearningToolbox

深度学习工具包Deprecation notice.-----This toolbox is outdated and no longer maintained.There are much better tools available for deep learning than this toolbox, e.g. [Theano](http://deeplearning.net/software/theano/), [torch](http://torch.ch/) or [tensorflow](http://www.tensorflow.org/)I would suggest you use one of the tools mentioned above rather than use this toolbox.Best, Rasmus.DeepLearnToolbox================A Matlab toolbox for Deep Learning.Deep Learning is a new subfield of machine learning that focuses on learning deep hierarchical models of data.It is inspired by the human brain's apparent deep (layered, hierarchical) architecture.A good overview of the theory of Deep Learning theory is[Learning Deep Architectures for AI](http://www.iro.umontreal.ca/~bengioy/papers/ftml_book.pdf)For a more informal introduction, see the following videos by Geoffrey Hinton and Andrew Ng.* [The Next Generation of Neural Networks](http://www.youtube.com/watch?v=AyzOUbkUf3M) (Hinton, 2007)* [Recent Developments in Deep Learning](http://www.youtube.com/watch?v=VdIURAu1-aU) (Hinton, 2010)* [Unsupervised Feature Learning and Deep Learning](http://www.youtube.com/watch?v=ZmNOAtZIgIk) (Ng, 2011)If you use this toolbox in your research please cite [Prediction as a candidate for learning deep hierarchical models of data](http://www2.imm.dtu.dk/pubdb/views/publication_details.php?id=6284)```@MASTERSTHESIS\{IMM2012-06284, author = "R. B. Palm", title = "Prediction as a candidate for learning deep hierarchical models of data", year = "2012",}```Contact: rasmusbergpalm at gmail dot comDirectories included in the toolbox-----------------------------------`NN/` - A library for Feedforward Backpropagation Neural Networks`CNN/` - A library for Convolutional Neural Networks`DBN/` - A library for Deep Belief Networks`SAE/` - A library for Stacked Auto-Encoders`CAE/` - A library for Convolutional Auto-Encoders`util/` - Utility functions used by the libraries`data/` - Data used by the examples`tests/` - unit tests to verify toolbox is workingFor references on each library check REFS.mdSetup-----1. Download.2. addpath(genpath('DeepLearnToolbox'));Example: Deep Belief Network---------------------```matlabfunction test_example_DBNload mnist_uint8;train_x = double(train_x) / 255;test_x = double(test_x) / 255;train_y = double(train_y);test_y = double(test_y);%% ex1 train a 100 hidden unit RBM and visualize its weightsrand('state',0)dbn.sizes = [100];opts.numepochs = 1;opts.batchsize = 100;opts.momentum = 0;opts.alpha = 1;dbn = dbnsetup(dbn, train_x, opts);dbn = dbntrain(dbn, train_x, opts);figure; visualize(dbn.rbm{1}.W'); % Visualize the RBM weights%% ex2 train a 100-100 hidden unit DBN and use its weights to initialize a NNrand('state',0)%train dbndbn.sizes = [100 100];opts.numepochs = 1;opts.batchsize = 100;opts.momentum = 0;opts.alpha = 1;dbn = dbnsetup(dbn, train_x, opts);dbn = dbntrain(dbn, train_x, opts);%unfold dbn to nnnn = dbnunfoldtonn(dbn, 10);nn.activation_function = 'sigm';%train nnopts.numepochs = 1;opts.batchsize = 100;nn = nntrain(nn, train_x, train_y, opts);[er, bad] = nntest(nn, test_x, test_y);assert(er < 0.10, 'Too big error');```Example: Stacked Auto-Encoders---------------------```matlabfunction test_example_SAEload mnist_uint8;train_x = double(train_x)/255;test_x = double(test_x)/255;train_y = double(train_y);test_y = double(test_y);%% ex1 train a 100 hidden unit SDAE and use it to initialize a FFNN% Setup and train a stacked denoising autoencoder (SDAE)rand('state',0)sae = saesetup([784 100]);sae.ae{1}.activation_function = 'sigm';sae.ae{1}.learningRate = 1;sae.ae{1}.inputZeroMaskedFraction = 0.5;opts.numepochs = 1;opts.batchsize = 100;sae = saetrain(sae, train_x, opts);visualize(sae.ae{1}.W{1}(:,2:end)')% Use the SDAE to initialize a FFNNnn = nnsetup([784 100 10]);nn.activation_function = 'sigm';nn.learningRate = 1;nn.W{1} = sae.ae{1}.W{1};% Train the FFNNopts.numepochs = 1;opts.batchsize = 100;nn = nntrain(nn, train_x, train_y, opts);[er, bad] = nntest(nn, test_x, test_y);assert(er < 0.16, 'Too big error');```Example: Convolutional Neural Nets---------------------```matlabfunction test_example_CNNload mnist_uint8;train_x = double(reshape(train_x',28,28,60000))/255;test_x = double(reshape(test_x',28,28,10000))/255;train_y = double(train_y');test_y = double(test_y');%% ex1 Train a 6c-2s-12c-2s Convolutional neural network %will run 1 epoch in about 200 second and get around 11% error. %With 100 epochs you'll get around 1.2% errorrand('state',0)cnn.layers = { struct('type', 'i') %input layer struct('type', 'c', 'outputmaps', 6, 'kernelsize', 5) %convolution layer struct('type', 's', 'scale', 2) %sub sampling layer struct('type', 'c', 'outputmaps', 12, 'kernelsize', 5) %convolution layer struct('type', 's', 'scale', 2) %subsampling layer};cnn = cnnsetup(cnn, train_x, train_y);opts.alpha = 1;opts.batchsize = 50;opts.numepochs = 1;cnn = cnntrain(cnn, train_x, train_y, opts);[er, bad] = cnntest(cnn, test_x, test_y);%plot mean squared errorfigure; plot(cnn.rL);assert(er<0.12, 'Too big error');```Example: Neural Networks---------------------```matlabfunction test_example_NNload mnist_uint8;train_x = double(train_x) / 255;test_x = double(test_x) / 255;train_y = double(train_y);test_y = double(test_y);% normalize[train_x, mu, sigma] = zscore(train_x);test_x = normalize(test_x, mu, sigma);%% ex1 vanilla neural netrand('state',0)nn = nnsetup([784 100 10]);opts.numepochs = 1; % Number of full sweeps through dataopts.batchsize = 100; % Take a mean gradient step over this many samples[nn, L] = nntrain(nn, train_x, train_y, opts);[er, bad] = nntest(nn, test_x, test_y);assert(er < 0.08, 'Too big error');%% ex2 neural net with L2 weight decayrand('state',0)nn = nnsetup([784 100 10]);nn.weightPenaltyL2 = 1e-4; % L2 weight decayopts.numepochs = 1; % Number of full sweeps through dataopts.batchsize = 100; % Take a mean gradient step over this many samplesnn = nntrain(nn, train_x, train_y, opts);[er, bad] = nntest(nn, test_x, test_y);assert(er < 0.1, 'Too big error');%% ex3 neural net with dropoutrand('state',0)nn = nnsetup([784 100 10]);nn.dropoutFraction = 0.5; % Dropout fraction opts.numepochs = 1; % Number of full sweeps through dataopts.batchsize = 100; % Take a mean gradient step over this many samplesnn = nntrain(nn, train_x, train_y, opts);[er, bad] = nntest(nn, test_x, test_y);assert(er < 0.1, 'Too big error');%% ex4 neural net with sigmoid activation functionrand('state',0)nn = nnsetup([784 100 10]);nn.activation_function = 'sigm'; % Sigmoid activation functionnn.learningRate = 1; % Sigm require a lower learning rateopts.numepochs = 1; % Number of full sweeps through dataopts.batchsize = 100; % Take a mean gradient step over this many samplesnn = nntrain(nn, train_x, train_y, opts);[er, bad] = nntest(nn, test_x, test_y);assert(er < 0.1, 'Too big error');%% ex5 plotting functionalityrand('state',0)nn = nnsetup([784 20 10]);opts.numepochs = 5; % Number of full sweeps through datann.output = 'softmax'; % use softmax outputopts.batchsize = 1000; % Take a mean gradient step over this many samplesopts.plot = 1; % enable plottingnn = nntrain(nn, train_x, train_y, opts);[er, bad] = nntest(nn, test_x, test_y);assert(er < 0.1, 'Too big error');%% ex6 neural net with sigmoid activation and plotting of validation and training error% split training data into training and validation datavx = train_x(1:10000,:);tx = train_x(10001:end,:);vy = train_y(1:10000,:);ty = train_y(10001:end,:);rand('state',0)nn = nnsetup([784 20 10]); nn.output = 'softmax'; % use softmax outputopts.numepochs = 5; % Number of full sweeps through dataopts.batchsize = 1000; % Take a mean gradient step over this many samplesopts.plot = 1; % enable plottingnn = nntrain(nn, tx, ty, opts, vx, vy); % nntrain takes validation set as last two arguments (optionally)[er, bad] = nntest(nn, test_x, test_y);assert(er < 0.1, 'Too big error');```[![Bitdeli Badge](https://d2weczhvl823v0.cloudfront.net/rasmusbergpalm/deeplearntoolbox/trend.png)](https://bitdeli.com/free "Bitdeli Badge")

python恶搞表情包-用 Python 把你的朋友变成表情包

实现步骤导入朋友的照片(前景照片);处理前景照片(缩放、旋转,填充);导入熊猫头照片(背景照片);外汇返佣将前景和背景拼接起来形成表情包;在表情包下面添加文字。Python 实现1、导入需要的库import cv2import numpy as mpimport matplotlib.pyplot as pltfrom PIL import Image, ImageDraw, ImageFont这...

weixin_37988176的博客 737

一起学python表情包_哈哈!我用 Python 把你的朋友变成表情包了

点击上方“Python学习与数据挖掘”,关注公众号设为“星标”,好文章不错过!来自:csdn | 代码已上传,文末附下载方式在日常生活中,我们经常会存取一些朋友们的丑照,在这个项目中,我们以萌萌哒的熊猫头作为背景,然后试着在背景图上加入朋友们的照片。效果如下图所示。需要完整版代码文末获取! 实现步骤导入朋友的照片(前景照片);处理前景照片(缩放、旋转,填充);导入熊猫头照片(背景照片);将前景...

weixin_39887577的博客 200

用python画表情包_用 Python 把你的朋友变成表情包

实现步骤导入朋友的照片(前景照片);处理前景照片(缩放、旋转,填充);导入熊猫头照片(背景照片);外汇返佣将前景和背景拼接起来形成表情包;在表情包下面添加文字。Python 实现1、导入需要的库import cv2import numpy as mpimport matplotlib.pyplot as pltfrom PIL import Image, ImageDraw, ImageFont这...

weixin_39534873的博客 277

python画图表情包_哈哈!我用 Python 把你的朋友变成表情包了

源自:Python学习与数据挖掘在日常生活中,我们经常会存取一些朋友们的丑照,在这个项目中,我们以萌萌哒的熊猫头作为背景,然后试着在背景图上加入朋友们的照片。效果如下图所示。需要完整版代码文末获取! 实现步骤导入朋友的照片(前景照片);处理前景照片(缩放、旋转,填充);导入熊猫头照片(背景照片);将前景和背景拼接起来形成表情包;在表情包下面添加文字。1、导入需要的库import cv2impo...

weixin_39646695的博客 193

python恶搞表情包下载大全_用 Python 把你的朋友变成表情包

标签:rgbgetpytho尺寸imp像素lanhref不可实现步骤导入朋友的照片(前景照片);处理前景照片(缩放、旋转,填充);导入熊猫头照片(背景照片);外汇返佣将前景和背景拼接起来形成表情包;在表情包下面添加文字。Python 实现1、导入需要的库import cv2import numpy as mpimport matplotlib.pyp...

weixin_42511157的博客 347

python你_用Python把你的朋友变成表情包

项目说明在日常生活中,我们经常会存取一些朋友们的丑照,在这个项目中,我们以萌萌哒的熊猫头作为背景,然后试着在背景图上加入朋友们的照片。效果如下图所示:实现步骤导入朋友的照片(前景照片);处理前景照片(缩放、旋转,填充);导入熊猫头照片(背景照片);将前景和背景拼接起来形成表情包;在表情包下面添加文字。Python 实现1、导入需要的库import cv2import numpy as npimpo...

weixin_39743622的博客 72

把你的朋友变成表情包?Python:So easy

点击上方蓝色小字,关注“涛哥聊Python”重磅干货,第一时间送达源自:Python学习与数据挖掘阅读文本大概需要 5分钟在日常生活中,我们经常会存取一些朋友们的丑照,在这个项目中,我...

涛哥聊Python 541
上一篇: 都 2021 年了,为什么想回看 5 分钟前写的代码就这么难!
下一篇: 知乎高赞:拼多多和国家电网,选哪个?
菜鸟学Python
博客等级 码龄9年 8061粉丝 571原创
评论
成就一亿技术人!
拼手气红包6.0元
还能输入1000个字符
 
 条评论被折叠 查看
添加红包

请填写红包祝福语或标题

个

红包个数最小为10个

元

红包金额最低5元

当前余额3.43元 前往充值 >
需支付:10.00元
成就一亿技术人!
领取后你会自动成为博主和红包主的粉丝 规则
hope_wisdom
发出的红包
实付元
使用余额支付
点击重新获取
扫码支付
钱包余额 0

抵扣说明:

1.余额是钱包充值的虚拟货币,按照1:1的比例进行支付金额的抵扣。
2.余额无法直接购买下载,可以购买VIP、付费专栏及课程。

余额充值