


 本文解决在TensorFlow2.1中实现模型可视化时遇到的pydot和graphviz安装问题,通过详细步骤指导如何正确配置环境,最终成功生成模型结构图。
TensorFlow2.1实现模型可视化
问题描述
Failed to import pydot. You must install pydot and graphviz for pydotprint to work.
or
ImportError: ('Failed to import pydot. You must pip install pydot and install graphviz (https://graphviz.gitlab.io/download/), ', ‘for pydotprint to work.’)
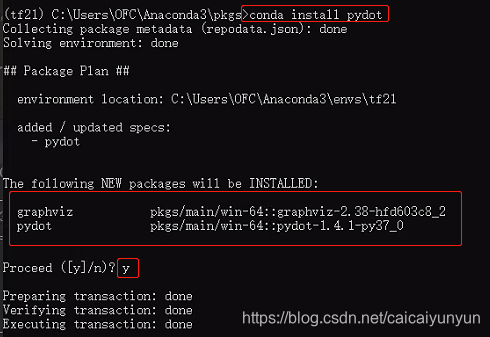
首先:conda install pydot
输入dot -version 显示如下则配置成功
 仍出错如下:
ImportError: Failed to import pydot. You must install pydot and graphviz for `pydotprint` to work.
最后需要安装pydot-ng,才能正确使用。
pip install pydot-ng

验证代码
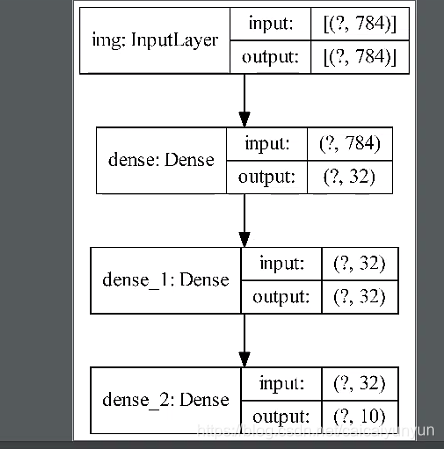
from __future__ import absolute_import, division, print_function
import tensorflow as tf
import tensorflow.keras.layers as layers
tf.keras.backend.clear_session()

inputs = tf.keras.Input(shape=(784,), name='img')
# 以上一层的输出作为下一层的输入
h1 = layers.Dense(32, activation='relu')(inputs)
h2 = layers.Dense(32, activation='relu')(h1)
outputs = layers.Dense(10, activation='softmax')(h2)
model = tf.keras.Model(inputs=inputs, outputs=outputs, name='mnist_model')  # 名字字符串中不能有空格

model.summary()
tf.keras.utils.plot_model(model, to_file='Mymodel.png', show_shapes=True, show_layer_names=True,rankdir='TB', dpi=900, expand_nested=True)


 1万+
1万+

 被折叠的 条评论
为什么被折叠?
被折叠的 条评论
为什么被折叠?
 到【灌水乐园】发言


