


 本文详细介绍如何在Linux环境下安装和配置Elasticsearch,包括创建目录、导入文件、配置环境变量、调整系统参数、分配权限及启动服务。同时,文章还介绍了如何远程拷贝配置,确保另一台虚拟机拥有相同环境。
Elasticsarch安装
- Elasticsarch
- 首先进入opt目录
- 创建bigdata和install目录
- 打开Xftp 5将文件导入opt/install目录下
- 进入install目录解压jdk-8u111-linux-x64.tar.gz
- 进入jdk18 , 配置/etc/profile
- 回到install解压elasticsearch-6.2.2.tar.gz到bigdate
- 配置/bigdate/els622/config目录下的elasticsearch.yml
- 配置/etc/sysctl.conf
- 配置/etc/security/limits.conf 配进程数
- (elasticsarch 不允许root 用户启动)故把els622的使用权给另外一个用户caicai
- (如果启动不成功,要清理data,logs目录里的所有文件,然后在运行elasticsearch)
- 如果结果出不来,记得
- 去浏览器输入虚拟机地址,若出现以下图片所示,即表示成功
- 远程拷贝给另一台虚拟机,让其也拥有配置好的jdk,els
- 查看另一个虚拟机是不是通过拷贝也完成了jdk配置
- elshead,node8,kidbana安装
注:安装前的准备工作
安装unzip
yum install -y unzip zip (安装zip解压包)
主机名修改
[root@zhang ~]# hostname master
[root@zhang ~]# vim /etc/hostname
master
hostnamectl set-hostname cai1 (用这个全部都改了)
hostname查看主机名
vi /etc/hostname 编辑与 hostnamectl set-hostname cai1 两者不一样
用vi /etc/hostname编辑完以后,hostname查看并没有改变,但是vi /etc/hostname进去看确实是改了,用hostnamectl set-hostname cai1修改以后,再用hostname查看就可以
目前不知道有何区别,在此记录
操作完毕后,重新登录下就能发现hostname已经改好了。
IP地址修改
模板机的IP为:172.16.1.100/10.0.0.100;
克隆后的虚拟机IP改为:172.16.1.110/10.0.0.110【也可以改为其他IP地址】
操作步骤如下:
vim /etc/sysconfig/network-scripts/ifcfg-eth33
ONBOOT=yes
IPADDR=192.168.101.132
GATEWAY=192.168.101.2
NETMASK=255.255.255.0
DNS1=8.8.8.8
将其他的的地址去除
systemctl restart network.service
修改vi /etc/hosts
修改成izji的主机ip 和 主机名

重启网络服务:restart network.service
关闭防火墙:systemctl disable firewalld //systemctl stop firewalld
Elasticsarch
首先进入opt目录
[root@vmware /]# ll
total 20
lrwxrwxrwx.   1 root root    7 Mar  3 00:56 bin -> usr/bin
dr-xr-xr-x.   5 root root 4096 Mar  3 00:59 boot
drwxr-xr-x.  20 root root 3200 Mar  8 16:46 dev
drwxr-xr-x.  75 root root 8192 Mar  8 18:11 etc
drwxr-xr-x.   3 root root   20 Mar  3 00:58 home
lrwxrwxrwx.   1 root root    7 Mar  3 00:56 lib -> usr/lib
lrwxrwxrwx.   1 root root    9 Mar  3 00:56 lib64 -> usr/lib64
drwxr-xr-x.   2 root root    6 Apr 11  2018 media
drwxr-xr-x.   2 root root    6 Apr 11  2018 mnt
drwxr-xr-x.   4 root root   36 Mar  8 21:55 opt
dr-xr-xr-x. 244 root root    0 Mar  8 16:46 proc
dr-xr-x---.   4 root root  172 Mar  8 18:49 root
drwxr-xr-x.  23 root root  660 Mar  8 16:46 run
lrwxrwxrwx.   1 root root    8 Mar  3 00:56 sbin -> usr/sbin
drwxr-xr-x.   2 root root    6 Apr 11  2018 srv
dr-xr-xr-x.  13 root root    0 Mar  8 16:46 sys
drwxrwxrwt.  12 root root 4096 Mar  8 18:49 tmp
drwxr-xr-x.  13 root root  155 Mar  3 00:56 usr
drwxr-xr-x.  19 root root  267 Mar  3 00:58 var
[root@vmware /]# cd opt
创建bigdata和install目录
[root@vmware opt]# mkdir bigdata
[root@vmware opt]# mkdir install
[root@vmware opt]# ll
total 0
drwxr-xr-x. 2 root root 6 Mar  8 22:14 bigdate
drwxr-xr-x. 2 root root 6 Mar  8 22:14 install
打开Xftp 5将文件导入opt/install目录下
进入install目录解压jdk-8u111-linux-x64.tar.gz
[root@vmware opt]# cd install/
[root@vmware install]# tar -xzvf jdk-8u111-linux-x64.tar.gz -C ../bigdate/
进入bigdate目录,重命名jdk
[root@vmware install]# cd ../bigdate/
[root@vmware bigdate]# ll
total 0
drwxr-xr-x. 8 10 143 255 Sep 23  2016 jdk1.8.0_111
[root@vmware bigdate]# mv jdk1.8.0_111/ jdk18
[root@vmware bigdate]# ll
total 0
drwxr-xr-x. 8 10 143 255 Sep 23  2016 jdk18
进入jdk18 , 配置/etc/profile
[root@vmware bigdate]# cd jdk18/
[root@vmware jdk18]# vi /etc/profile
将下面几行写在文件最下方
export JAVA_HOME=/opt/bigdata/jdk18
export CLASSPATH=.:$JAVA_HOME/lib/dt.jar:$JAVA_HOME/lib/tools.jar
export PATH=$PATH:$JAVA_HOME/bin

[root@vmware jdk18]# source /etc/profile            刷新profile文件
[root@vmware jdk18]# echo $JAVA_HOME            输出jdk地址
/opt/bigdate/jdk180

[root@vmware jdk18]# rm -rf src.zip                 删除不必要的大文件
回到install解压elasticsearch-6.2.2.tar.gz到bigdate
[root@vmware jdk18]# pwd
/opt/bigdate/jdk18
[root@vmware jdk18]# cd ..
[root@vmware bigdate]# cd ..
[root@vmware opt]# cd install/
[root@vmware install]# tar zxvf elasticsearch-6.2.2.tar.gz -C ../bigdate/
[root@vmware bigdate]# mv elasticsearch-6.2.2/ els622         回到bigdate并重命名els
[root@vmware bigdate]# ls
els622  jdk18
[root@vmware bigdate]# cd els622/
[root@vmware els622]# ls
bin  config  lib  LICENSE.txt  logs  modules  NOTICE.txt  plugins  README.textile
[root@vmware els622]# cd ./config/
[root@vmware config]# ls
elasticsearch.yml  jvm.options  log4j2.properties
配置/bigdate/els622/config目录下的elasticsearch.yml
[root@vmware config]# vi elasticsearch.yml
cluster.name: caies
node.name: master
node.master: true
#本机地址
network.host: 192.168.101.137
#本机和另一台虚拟机地址
discovery.zen.ping.unicast.hosts: ["192.168.101.137","192.168.101.130"]
#跨域访问
http.cors.enabled: true
http.cors.allow-origin: "*"

cluster.name: caies
node.name: master
node.master: true
network.host: 192.168.101.201
discovery.zen.ping.unicast.hosts: ["192.168.101.202","192.168.101.203","192.168.101.204"]
http.cors.enabled: true
http.cors.allow-origin: "*"
配置/etc/sysctl.conf
[root@vmware config]# vi /etc/sysctl.conf
vm.max_map_count=655360
配置/etc/security/limits.conf 配进程数
[root@vmware config]# vi /etc/security/limits.conf
* soft nofile 65536
* hard nofile 65536
* soft nproc 4096
* hard nproc 4096

[root@vmware config]# sysctl -p       让配置生效
vm.max_map_count = 655360
(elasticsarch 不允许root 用户启动)故把els622的使用权给另外一个用户caicai
回到bigdate将els622权限赋给caicai用户
[root@lijia1 bigdata]# chown -R  caicai:caicai  ./els622/

[root@lijia1 bigdata]# cd ./els622/
[root@lijia1 els622]# cd ./bin/
切换到caicai用户(退出当前用户为:ctrl+d)
[root@lijia1 bin]#  su  caicai
[gree@lijia1 bin]$ ./elasticsearch

./bin/elasticsearch -d    // 后台启动
(如果启动不成功,要清理data,logs目录里的所有文件,然后在运行elasticsearch)
[root@lijia1 elshead]# jps
4266 Elasticsearch
4911 Jps
Kill -9 4266 结束发布
如果结果出不来,记得
一:重新关闭防火墙
二:重新刷新/etc/profile(source /etc/profile)
三:sysctl -p激活/etc/security/limits.conf )
四:一定要先开次节点,再开主节点,不然次节点ping不通主节点
五:删除els622文件目录下的data和logs下面的所有内容
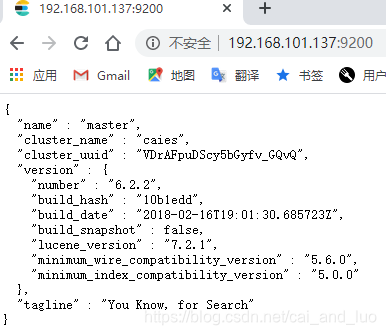
去浏览器输入虚拟机地址,若出现以下图片所示,即表示成功
远程拷贝给另一台虚拟机,让其也拥有配置好的jdk,els
scp -r /opt/install/ root@VMware2:/opt/
scp /etc/profile root@VMware2:/etc/

scp -r /opt/bigdata/ root@ware2:/opt/
  150  scp -r /opt/install/ root@ware2:/opt/
  151  scp -r /etc/profile root@ware2:/etc/
  152  scp -r /etc/security/limits.conf root@ware2:/etc/
  153  scp -r /etc/sysctl.conf root@ware2:/etc/
一:
另一台虚拟机也要进行chown -R caicai:caicai ./els622赋给其它用户权限
二:
以下的配置无法配置,需要自己手动进行
[root@vmware config]# vi /etc/security/limits.conf
* soft nofile 65536
* hard nofile 65536
* soft nproc 4096
* hard nproc 4096
[root@vmware config]# sysctl -p       让配置生效
三:复制过去的bigdata/els622/config/elasticsearch.yml也需要修改
四:
source /etc/profile            刷新profile文件
echo $JAVA_HOME            输出jdk地址
查看另一个虚拟机是不是通过拷贝也完成了jdk配置
[root@vmware6 jdk180]# ssh root@VMware (此处要先设置多台虚拟机之间的免密互相访问)
Last login: Sun Mar  8 18:38:58 2020 from vmware6
[root@vmware ~]# source /etc/profile
[root@vmware ~]# echo $JAVA_HOME/
/opt/install/jdk180/
[root@vmware ~]# java -version
java version "1.8.0_111"
Java(TM) SE Runtime Environment (build 1.8.0_111-b14)
Java HotSpot(TM) 64-Bit Server VM (build 25.111-b14, mixed mode)
elshead,node8,kidbana安装
启动es
(如果启动不成功,要清理data,logs目录里的所有文件,然后在运行elasticsearch)
./bin/elasticsearch -d    // 后台启动
[root@lijia1 elshead]# jps
4266 Elasticsearch
4911 Jps
安装unzip
yum install -y unzip zip (安装zip解压包)
把head在install解压转移到到bigdate 改成elashead
同理将node解压到bigdate 改成node8
[root@lijia1 node8]# vi /etc/profile
export NODE_HOME=/opt/bigdata/node8
export PATH=$PATH:$NODE_HOME/bin

[root@lijia1 node8]# source /etc/profile
[root@lijia1 node8]# node -v
v8.9.1
eshead
[root@lijia1 elshead]# npm install -g grunt-cli
淘宝那个镜像 换源安装
npm install -g cnpm --registry=https://registry.npm.taobao.org
[root@lijia1 elshead]# npm install
[root@lijia1 elshead]# npm run start
[root@lijia1 elshead]# nohup grunt server & //后台启动
es-head web
http://192.168.101.200:9100/
es web
http://192.168.153.141:9200/
kibana
[root@lijia1 bigdata]# mv kibana-6.2.2-linux-x86_64/ kibana622

[root@lijia1 config]# vi ./kibana.yml
server.host: "192.168.101.202"
elasticsearch.url: "http://192.168.101.202:9200"

[root@lijia1 kibana622]# ./bin/kibana  //前台启动
[root@lijia1 config]# nohup ../bin/kibana & 后台启动

kibana web
http://192.168.101.200:5601/
安装ik中文分词器
将elasticsearch-analysis-ik-6.2.2.zip文件解压到/opt/bigdata/els622/plugins即可,注意plugins文件夹下只能有ik中文分词器的解压文件,不能有压缩包等其它文件
最后重启elasticsearch,看到loaded plugin [analysis-ik]标识插件加载完成。
安装 logstash-6.2.2.tar.gz
安装过程
①解压文件(不要将Logstash安装到包含冒号(:)字符的目录路径中)
tar -zxvf logstash-6.2.1.tar.gz
②重命名
mv logstash-6.2.1 logstash
到此就安装完成了,是不是很简单。
启动logstash,显示Pipelines running代表启动成功
.bin/logstash -e 'input { stdin { } } output { stdout {} }'
[caicai@ware1 logstash622]$ ./bin/logstash -e 'input{ stdin{}} output{ stdout{} }'
[caicai@ware1 logstash622]$ ./bin/logstash -e 'input{ stdin{}} output{ stdout{codec=>rubydebug} }'


[caicai@ware1 logstash622]$ mkdir logdemo
[caicai@ware1 logdemo]$ touch logstash1.conf
[caicai@ware1 logdemo]$ vi logstash1.conf
将以下内容输入进去新建的文件中去
input{
	file{
		path => "/opt/bigdata/log622/demo.log"
		start_position => "beginning"
		sincedb_path=>"/dev/null"
	}
}

filter {
    ruby {
        code => "event.timestamp.time.localtime"
    }
}

output{
	stdout{
		codec=>rubydebug
	}
	elasticsearch{
		hosts=>["192.168.101.200:9200"]
	}
}

[caicai@ware1 logstash622]$ touch demo.log

往新建的demo.log文件里输入内容
测试是否成功
[caicai@ware1 logdemo]$ …/bin/logstash -f ./logstash1.conf -t
运行
[caicai@ware1 logdemo]$ …/bin/logstash -f ./logstash1.conf


 1479
1479

 被折叠的 条评论
为什么被折叠?
被折叠的 条评论
为什么被折叠?
 到【灌水乐园】发言


