


 本文详细介绍如何在Android应用中使用DesignSupportLibrary实现BottomSheet,包括创建、显示、部分显示及使用BottomSheetFragment的方法。
Design support library 提供的 API 一定程度上帮助开发者在开发控件时节省时间,并在 23.2 发布的版本中提供了底部工作条(Bottom Sheets)。而本博文的目的就是教大家在自家的 App 中实现 Bottom Sheet,博文中的示例代码可以在 GitHub 上面下载。
1. 创建 Bottom Sheet
实现 Bottom Sheet 有两种办法:
在布局文件中为容器 View 添加 BottomSheetBehavior
使用 BottomSheetDialogFragment
但不管你用哪种办法,都需要添加 Design support library 的依赖,且该支持库的版本要大于 23.2。在 build.gradle 中添加下面的代码就可以完成这一步操作:
`
compile 'com.android.support:design:23.2.0'
`
添加依赖并同步完成后,你就可以在布局文件中添加 Bottom Sheet,在本文的示例项目中,布局如下:
<android.support.design.widget.CoordinatorLayout
    xmlns:android="http://schemas.android.com/apk/res/android"
    xmlns:app="http://schemas.android.com/apk/res-auto"
    android:id="@+id/main_content"
    android:layout_width="match_parent"
    android:layout_height="match_parent"
    android:fitsSystemWindows="true">

    <ScrollView
        android:layout_width="match_parent"
        android:layout_height="match_parent"
        app:layout_behavior="@string/appbar_scrolling_view_behavior">

        <LinearLayout
            android:layout_width="match_parent"
            android:layout_height="match_parent"
            android:orientation="vertical"
            android:paddingTop="24dp">

            <Button
                android:id="@+id/button_1"
                android:layout_width="match_parent"
                android:layout_height="wrap_content"
                android:text="Button 1"
                android:padding="16dp"
                android:layout_margin="8dp"
                android:textColor="@android:color/white"
                android:background="@android:color/holo_green_dark"/>

            <Button
                android:id="@+id/button_2"
                android:layout_width="match_parent"
                android:layout_height="wrap_content"
                android:padding="16dp"
                android:layout_margin="8dp"
                android:text="Button 2"
                android:textColor="@android:color/white"
                android:background="@android:color/holo_blue_light"/>

            <Button
                android:id="@+id/button_3"
                android:layout_width="match_parent"
                android:layout_height="wrap_content"
                android:padding="16dp"
                android:layout_margin="8dp"
                android:text="Button 3"
                android:textColor="@android:color/white"
                android:background="@android:color/holo_red_dark"/>

        </LinearLayout>

    </ScrollView>

    <android.support.v4.widget.NestedScrollView
        android:id="@+id/bottom_sheet"
        android:layout_width="match_parent"
        android:layout_height="350dp"
        android:clipToPadding="true"
        android:background="@android:color/holo_orange_light"
        app:layout_behavior="android.support.design.widget.BottomSheetBehavior"
        >

        <TextView
            android:layout_width="match_parent"
            android:layout_height="match_parent"
            android:text="@string/ipsum"
            android:padding="16dp"
            android:textSize="16sp"/>

    </android.support.v4.widget.NestedScrollView>

</android.support.design.widget.CoordinatorLayout>
该布局文件的显示效果如
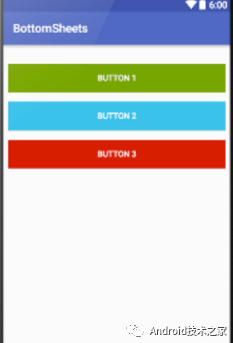
该 xml 中有几点需要注意:
要使用 Bottom Sheet,必须用 CoordinatorLayout 作为该布局的根布局。
在布局的底部,我们添加了一个容纳 TextView 的 NestedScrollView。Bottom Sheet 确实可以添加任意的 View,但前提是你使用了支持嵌套滚动的容器,否则不能显示出正确的滚动效果。(NestedScrollView 和 RecyclerView 都是具有此特性的可选项。)
要让容器 View 被 Design Support Library 识别为 Bottom Sheet 容器 View,需要添加 layout_behavior 属性,并将该属性赋值为 android.support.design.widget.BottomSheetBehavior。
此外,无论容器 View 使用什么尺寸值,或以什么方式控制 Bottom Sheet 的显示,都要注意 Bottom Sheet 容器 View 的 layout_height。如果你使用 CoordinatorLayout,为了让其他 View 移动,例如 CollapsingToolbarLayout,当 Bottom Sheet 的高度发生改变,可能出现布局跳动的情况。
2. 基于 Bottom Sheet 显示布局
一旦你在布局文件中正确地创建了容器 View,你就可以在 Activity/Fragment 中使用 Bottom Sheet 了。示例项目在 MainActivity 中使用 Bottom Sheet。
为了让 Bottom Sheet 处于可显示状态,需要创建 BottomSheetBehavior,该 BottomSheetBehavior 持有容器 View 的引用。示例项目中还创建了三个按钮对应的引用:
private BottomSheetBehavior mBottomSheetBehavior;

@Override
protected void onCreate(Bundle savedInstanceState) {
    super.onCreate(savedInstanceState);
    setContentView(R.layout.activity_main);

    View bottomSheet = findViewById( R.id.bottom_sheet );
    Button button1 = (Button) findViewById( R.id.button_1 );
    Button button2 = (Button) findViewById( R.id.button_2 );
    Button button3 = (Button) findViewById( R.id.button_3 );

    button1.setOnClickListener(this);
    button2.setOnClickListener(this);
    button3.setOnClickListener(this);

    mBottomSheetBehavior = BottomSheetBehavior.from(bottomSheet);
}
创建 BottomSheetBehavior 后,就可以显示 Bottom Sheet 了,完成这一步只需要将 BottomSheetBehavior 设置为 STATE_EXPANDED。本例的代码如下:
@Override
public void onClick(View v) {
    switch( v.getId() ) {
        case R.id.button_1: {
            mBottomSheetBehavior.setState(BottomSheetBehavior.STATE_EXPANDED);
            break;
        }
    }
}
具体效果如下:
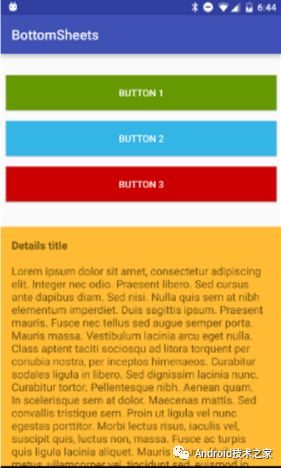
隐藏 Bottom Sheet 只需要将 BottomSheetBehavior 设置为 STATE_COLLAPSED。
3. 部分显示 Bottom Sheet
在许多 Android 应用或 Google 控件中,都可以预览 Bottom Sheet 的部分信息,并且能展开该 Bottom Sheet 显示完整的信息,例如 Places API 提供的地点选择功能。这个效果可以通过 setPeekHeight() 方法为 View 设置 collapsed 尺寸,结合 Design Support Library 的 Bottom Sheet 实现。如果你想显示 Bottom Sheet 的部分内容,也可以将 BottomSheetBehavior 设置为 STATE_COLLAPSED。
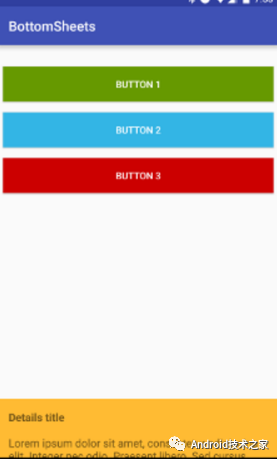
mBottomSheetBehavior.setPeekHeight(300);
mBottomSheetBehavior.setState(BottomSheetBehavior.STATE_COLLAPSED);
当中间的按钮被点击,就会看到该效果,将它向上拉起就会看到完整的视图:
你可能注意到:当你将 Bottom Sheet 向下拉动时,只能折叠为之前的高度。如果你想让它完全隐藏的话,可以为 BottomSheetBehavior 添加 BottomSheetCallback 回调,在用户折叠 Bottom Sheet 时将 peekSize 设置为 0。
mBottomSheetBehavior.setBottomSheetCallback(new BottomSheetBehavior.BottomSheetCallback() {
    @Override
    public void onStateChanged(View bottomSheet, int newState) {
        if (newState == BottomSheetBehavior.STATE_COLLAPSED) {
            mBottomSheetBehavior.setPeekHeight(0);
        }
    }

    @Override
    public void onSlide(View bottomSheet, float slideOffset) {
    }
});
4. 使用 BottomSheetFragment
正如本文开始时提到的,我们还能利用 BottomSheetDialogFragment 显示 Bottom Sheet,那么要怎么操作呢?首先创建 BottomSheetDialogFragment 的子类,在 setupDialog() 方法中初始化新的布局文件,并获得布局中的 BottomSheetBehavior。在获得 Behavior 的引用后,创建 BottomSheetCallback 并通过其回调方法在 Bottom Sheet 隐藏后关闭 Fragment。
public class TutsPlusBottomSheetDialogFragment extends BottomSheetDialogFragment {

    private BottomSheetBehavior.BottomSheetCallback mBottomSheetBehaviorCallback = new BottomSheetBehavior.BottomSheetCallback() {

        @Override
        public void onStateChanged(@NonNull View bottomSheet, int newState) {
            if (newState == BottomSheetBehavior.STATE_HIDDEN) {
                dismiss();
            }

        }

        @Override
        public void onSlide(@NonNull View bottomSheet, float slideOffset) {
        }
    };

    @Override
    public void setupDialog(Dialog dialog, int style) {
        super.setupDialog(dialog, style);
        View contentView = View.inflate(getContext(), R.layout.fragment_bottom_sheet, null);
        dialog.setContentView(contentView);

        CoordinatorLayout.LayoutParams params = (CoordinatorLayout.LayoutParams) ((View) contentView.getParent()).getLayoutParams();
        CoordinatorLayout.Behavior behavior = params.getBehavior();

        if( behavior != null && behavior instanceof BottomSheetBehavior ) {
            ((BottomSheetBehavior) behavior).setBottomSheetCallback(mBottomSheetBehaviorCallback);
        }
    }
}
最终可以通过 Fragment 实例的 show() 方法在 Bottom Sheet 中显示该 Fragment:
BottomSheetDialogFragment bottomSheetDialogFragment = new TutsPlusBottomSheetDialogFragment();
bottomSheetDialogFragment.show(getSupportFragmentManager(), bottomSheetDialogFragment.getTag());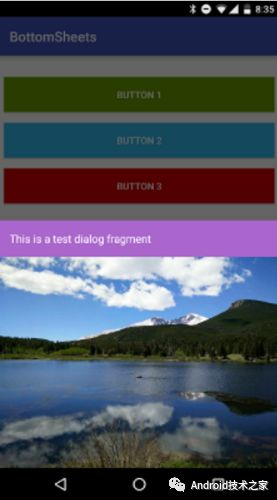
结论使用 Design Support Library 显示 Bottom Sheet 不但方法多样,还简单,我们能利用它显示详细的信息,也可以显示 picker,因此 Bottom Sheet 能替代 DialogFragment 被使用。希望本篇博文能帮助你理解 Bottom Sheet,并将它应用到你的 App 中。
喜欢 就关注吧,欢迎投稿!


 1103
1103

 被折叠的 条评论
为什么被折叠?
被折叠的 条评论
为什么被折叠?
 到【灌水乐园】发言


