- 安装
- 下载直接解压就可以
- nexus-3.15.2-01 nexus服务的主目录
- sonatype-work 工作目录,包含nexus生成的配置文件,日志文件、仓库文件、索引文件、插件文件、缓存文件等等。
- 启动
[test@richard123maliyun ~]$ nexus  start

2019-10-29 11:02:24,718+0800 INFO  [jetty-main-1]  *SYSTEM org.eclipse.jetty.server.AbstractConnector - Started ServerConnector@782fb6e1{HTTP/1.1,[http/1.1]}{0.0.0.0:9803}
2019-10-29 11:02:24,718+0800 INFO  [jetty-main-1]  *SYSTEM org.eclipse.jetty.server.Server - Started @21024ms
2019-10-29 11:02:24,719+0800 INFO  [jetty-main-1]  *SYSTEM org.sonatype.nexus.bootstrap.jetty.JettyServer -
-------------------------------------------------

Started Sonatype Nexus OSS 3.15.2-01

-------------------------------------------------
- 配置
- 默认端口:8081
- 用户名密码: admin/admin123
- 配置文件 ${NEUXS_HOME}/etc/nexus-default.properties
- 仓库类型
- proxy 代理类型
主要是用于去远程仓库拉取jar包 - hosted 宿主,主机
1.) 主要用于存放公司内部的jar包
2.) Releases、Snapshots
版本中带SNAPSHOT传到snapshots中,带RELEASES的传到Releases中 - group 组类型
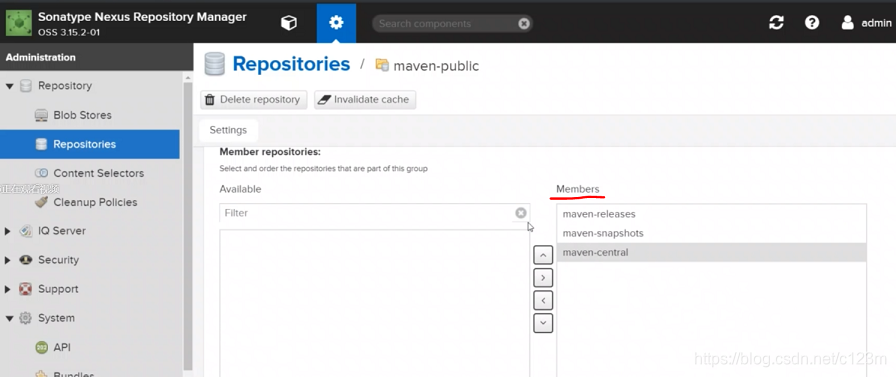
不是单独的类型,而是多个type的集合。主要作用对外暴露访问。
此类型描述的仓库,把其他的仓库使用同一个地址暴露出去,组仓库用来方便开发人员进行设置的仓库,不具有实际的功能,只是一个概念,简单说就是访问这个group设置的一个地址,其他仓库的jar都能获取到。 - virtual 虚拟类型 ,nexus2有
主要是解决1.x的兼容问题 - nexus3中出现的nuget不用管,非java的. 是.net的类型
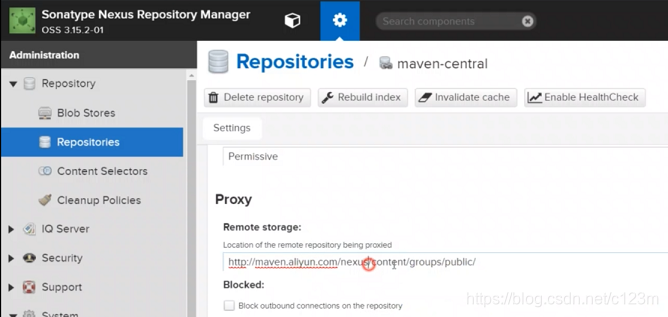
- 下载jar包
- 修改proxy为阿里云镜像地址为http://maven.aliyun.com/nexus/content/groups/public
- 将settings.xml中的镜像仓库注释掉,以防本地maven跳过私服直接访问代理仓库
- pom.xml
#对单个项目起作用
 <repositories>
     <repository>
        <id>central</id>
         <name>central</name>
         <!-- http://richard123maliyun:9803/repository/maven-public/ -->
        <url>http://richard123maliyun:9803/repository/maven-central/</url>
     </repository>
  </repositories>
- 也可以换为group,即对proxy、hosted类型的集合、打包
- settings.xml
#对全部项目起作用
<mirror>
    <id>nexus-get</id>
    <name>nexus-get</name>
    <url>http://richard123maliyun:9803/repository/maven-public/</url>
    <mirrorOf>central</mirrorOf>
</mirror>
- 命令上传jar包
- 使用hosts宿主仓库类型完成此功能。
- pom.xml
<distributionManagement>
   <!-- #发布版本的仓库  -->
    <repository>
      <id>release</id>
      <name>release</name>
      <url>http://richard123maliyun:9803/repository/maven-releases/</url>
    </repository>

   <!-- #快照版本的仓库  -->
    <snapshotRepository>
      <id>snapshot</id>
      <name>snapshot</name>
      <url>http://richard123maliyun:9803/repository/maven-snapshots/</url>
    </snapshotRepository>
  </distributionManagement>
#添加nexus的用户密码
#里面的id与pom.xml中的distributionManagement中repository的id要相同
<server>
   <id>release</id>
   <username>admin</username>
   <password>Aa123456</password>
</server>

<server>
    <id>snapshot</id>
    <username>admin</username>
    <password>Aa123456</password>
</server>
- 右击项目-> Run as -> maven build … -> 在goals输入deploy,运行
- 手动上传
- 在nexus中upload中上传,地址 maven-release


 本文介绍Nexus 3的安装步骤,包括下载、解压、启动及默认配置,涵盖端口、用户名密码等信息。同时,详细解析Nexus仓库类型:proxy、hosted、group和virtual,以及如何通过settings.xml和pom.xml配置私服,实现jar包的下载与上传。


 3826
3826

 被折叠的 条评论
为什么被折叠?
被折叠的 条评论
为什么被折叠?
 到【灌水乐园】发言


