


 本文介绍了使用Numpy进行数组操作的两种实用技巧:一是利用np.transpose实现数组维度间的灵活转换;二是利用np.insert在特定维度上添加数据。这些技巧对于处理图像等多维数据尤其有用。
Numpy 操作非常灵活,效率很高,这里记录几个在写代码过程中遇到过的问题以及实现方法。
1. Array 维度之间的交换
比如在处理一组图像的时候, shape 是 (10, 200, 300, 3),就是十张 300x200 的彩色图像,这时候你想让张数到最后一维,如何实现? 其中用的的方法就是 np.transpose
image = np.ones([10, 200, 300, 3])
print(image.shape)
# (10L, 200L, 300L, 3L)

trans_image = np.transpose(image, [1,2,3,0])
print(trans_image.shape)
# (200L, 300L, 3L, 10L)
非常简单,不是吗?有同学可能说这里完全没看懂啊,这个 [1,2,3,0] 是怎么来的。其实你明白这个 np.transpose 是通过下角标来实现之后,就非常简单了。
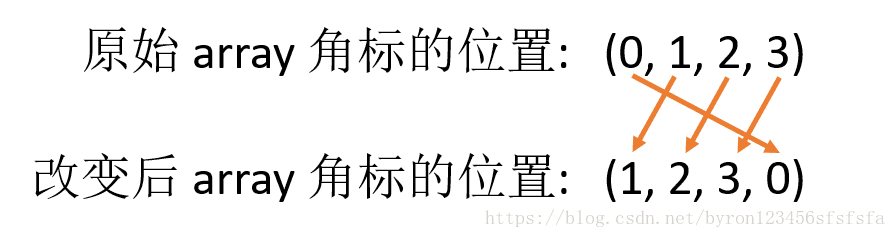
再来举个例子:
orig_array = np.array(range(10)).reshape(2,5,1)
print(orig_array[1,2,0])
# 7

trans_array = np.transpose(orig_array, [2,0,1])
print(trans_array[0,1,2])
# 7
2. Array 某一维度添加数据
这个和简单的 expand 不一样,说一个例子,比如,有一张图片 shape (200, 300, 3),你想在第三个维度加一个通道,让图片变为4通道,怎么实现?np.insert 来实现。
image = np.zeros([200, 300, 3])
print(image.shape)
# (200L, 300L, 3L)

out = np.insert(image, 3, 1.0, axis=2)
print(out.shape)
# (200L, 300L, 4L)
print(out[0])
# [[0. 0. 0. 1.]
#  [0. 0. 0. 1.]
#  [0. 0. 0. 1.]
#  ...
#  [0. 0. 0. 1.]
#  [0. 0. 0. 1.]
#  [0. 0. 0. 1.]]

out = np.insert(image, 0, 1.0, axis=2)
print(out[0])
#  [[1. 0. 0. 0.]
#   [1. 0. 0. 0.]
#   [1. 0. 0. 0.]
#   ...
#   [1. 0. 0. 0.]
#   [1. 0. 0. 0.]
#   [1. 0. 0. 0.]]
这个 np.insert 的参数要好好解释一番:
arr: 这个就是输入的 array
obj: 要插入指定维度的哪个位置
values: 要插入的值,标量和数组都行
axis: 要插入的维度
更具体的描述请参考 官方API讲解


 被折叠的 条评论
为什么被折叠?
被折叠的 条评论
为什么被折叠?
 到【灌水乐园】发言


