


 深入解析SpringBoot启动过程中的环境准备步骤,包括参数解析、Profile激活及配置文件加载机制。
第四步 环境准备(与profile和application文件相关)
第四步主要对下面两行代码进行讲解:
//4. 创建DefaultApplicationArguments(该类含有args),然后调用prepareEnvironment()
ApplicationArguments applicationArguments = new DefaultApplicationArguments(args);
ConfigurableEnvironment environment = prepareEnvironment(listeners,applicationArguments);
1. DefaultApplicationArguments
首先是创建DefaultApplicationArguments,构造函数如下:
	public DefaultApplicationArguments(String[] args) {
		Assert.notNull(args, "Args must not be null");
		this.source = new Source(args);
		this.args = args;
	}
这里的args是命令行中传入的参数。重点实际上是第二行的Source类,接下来会对这个类进行详细介绍。
private static class Source extends SimpleCommandLinePropertySource {
	Source(String[] args) {
			super(args);
		}
}
可以看到,Source类的构造函数调用的是父类,因此看SimpleCommandLinePropertySource类的构造方法。
public class SimpleCommandLinePropertySource extends CommandLinePropertySource<CommandLineArgs> {
    public SimpleCommandLinePropertySource(String... args) {
        super((new SimpleCommandLineArgsParser()).parse(args));
    }
    ...
}
在对parse()进行讲解之前,需要先介绍CommandLineArgs类:
class CommandLineArgs {

	private final Map<String, List<String>> optionArgs = new HashMap<String, List<String>>();
	private final List<String>  = new ArrayList<String>();
	...略
}
可以看到,CommandLineArgs类含有一个名为optionArgs的HashMap和一个名为nonOptionArgs的list。
接下来看parse方法:
	public CommandLineArgs parse(String... args) {
		CommandLineArgs commandLineArgs = new CommandLineArgs();
		for (String arg : args) {
			//1. 参数中有"--"的,加到optionArgs中
			if (arg.startsWith("--")) {
				String optionText = arg.substring(2, arg.length());
				String optionName;
				String optionValue = null;
				if (optionText.contains("=")) {
					optionName = optionText.substring(0, optionText.indexOf("="));
					optionValue = optionText.substring(optionText.indexOf("=")+1, optionText.length());
				}
				else {
					optionName = optionText;
				}
				if (optionName.isEmpty() || (optionValue != null && optionValue.isEmpty())) {
					throw new IllegalArgumentException("Invalid argument syntax: " + arg);
				}
				commandLineArgs.addOptionArg(optionName, optionValue);
			}
			//2. 不含有“--”的加到nonOptionArgs中
			else {
				commandLineArgs.addNonOptionArg(arg);
			}
		}
		return commandLineArgs;
	}
上面的代码可以看到,如果arg中有"–",则加到CommandLineArgs类的optionArgs中,没有的话加入到nonOptionArgs中。
假设我们在命令行传入参数“- -server.port=8081”,此时optionName=server.port,optionValue=8081。
2. prepareEnvironment
预备知识:
在阅读prepareEnvironment前,需要对environment以及PropertySource有清楚的认识,可以阅读我的另一篇博客:
spring 之 PropertySource和Environment:https://blog.youkuaiyun.com/bintoYu/article/details/104310068
在这里提炼一下博客的重要知识:
- PropertySource是spring体系用于存放key-value的property属性的基本单位,贯穿整个springboot的启动与初始化。
- 同时,需要知道这么一个概念:environment类中含有一个属性propertySources。
这个类实际上是List<PropertySource<?>> propertySourceList,会存储所有的Property,后面会一直重复用到environment的propertySources属性:
private final MutablePropertySources propertySources = new MutablePropertySources(this.logger);
正式开始:
在applicationArguments被new出来后,接下来进入第二部分
ConfigurableEnvironment environment = prepareEnvironment(listeners, applicationArguments);
	private ConfigurableEnvironment prepareEnvironment(
			SpringApplicationRunListeners listeners,
			ApplicationArguments applicationArguments) {
		// 1. 获取或者创建Environment
		ConfigurableEnvironment environment = getOrCreateEnvironment();
		// 2. 配置环境的信息
		configureEnvironment(environment, applicationArguments.getSourceArgs());
		//3. 通知所有的观察者,环境已经配置好了
		listeners.environmentPrepared(environment);
		if (!this.webEnvironment) {
			environment = new EnvironmentConverter(getClassLoader())
					.convertToStandardEnvironmentIfNecessary(environment);
		}
		return environment;
	}
首先是getOrCreateEnvironment(),该方法根据具体环境选择创建StandardServletEnvironment或StandardEnvironment:
	private ConfigurableEnvironment getOrCreateEnvironment() {
		if (this.environment != null) {
			return this.environment;
		}
		if (this.webEnvironment) {
			return new StandardServletEnvironment();
		}
		return new StandardEnvironment();
	}
因为我们一般都会使用web环境,所以这里讲StandardServletEnvironment,先讲它的父类的父类AbstractEnvironment。
public AbstractEnvironment() {
	private final MutablePropertySources propertySources = new MutablePropertySources(this.logger);
	...
	customizePropertySources(this.propertySources);
	...
}
因为AbstractEnvironment的构造方法调用了customizePropertySources()方法,所以构造StandardServletEnvironment类时也会调用customizePropertySources(),下面是StandardServletEnvironment的代码:
public class StandardServletEnvironment extends StandardEnvironment implements ConfigurableWebEnvironment {

    public StandardServletEnvironment() {
    }

	//构造该类时会调用customizePropertySources()
    protected void customizePropertySources(MutablePropertySources propertySources) {
    	//配置servletConfigInitParams
        propertySources.addLast(new StubPropertySource("servletConfigInitParams"));
        //配置servletContextInitParams
        propertySources.addLast(new StubPropertySource("servletContextInitParams"));
        //配置JNDI,这里会用到SpringProperties类,略
        if (JndiLocatorDelegate.isDefaultJndiEnvironmentAvailable()) {
            propertySources.addLast(new JndiPropertySource("jndiProperties"));
        }

        super.customizePropertySources(propertySources);
    }

}
接着会调用父类StandardServletEnvironment的customizePropertySources():
public class StandardEnvironment extends AbstractEnvironment {
	@Override
	protected void customizePropertySources(MutablePropertySources propertySources) {
		propertySources.addLast(new MapPropertySource("systemProperties", getSystemProperties()));
		propertySources.addLast(new SystemEnvironmentPropertySource("systemEnvironment", getSystemEnvironment()));
	}
}
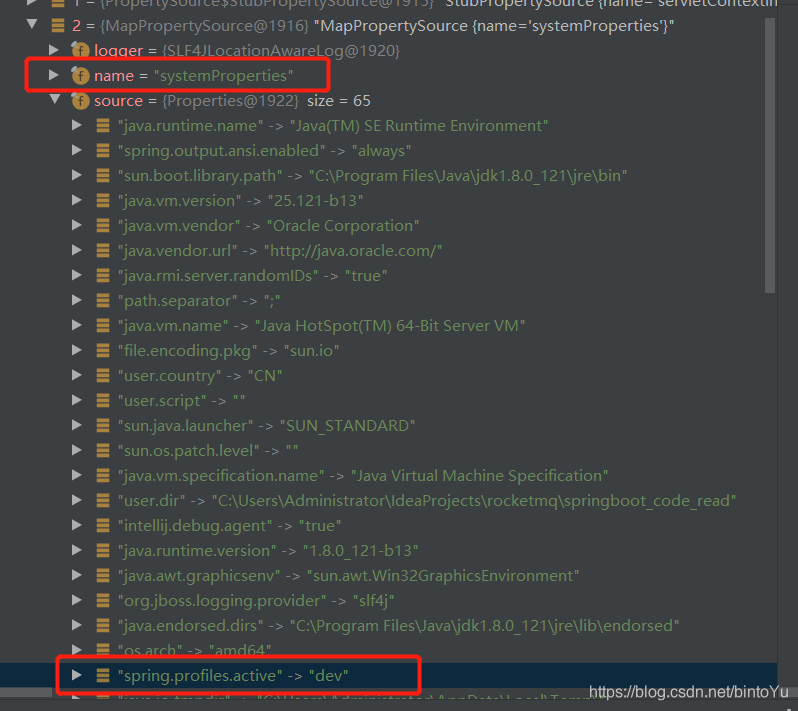
因此,新建StandardServletEnvironment相当于往内置的propertySources中添加4或5个property。
其中本文需要关注的是里面的“systemProperties”,从下图中可以看到,systemProperties中的source里,含有spring.profiles.active->dev的属性,也就是本文要找的profile。
接着我仔细对SystemProperties的获取方法进行查看:
	@Override
	@SuppressWarnings({"unchecked", "rawtypes"})
	public Map<String, Object> getSystemProperties() {
		try {
			return (Map) System.getProperties();
		}
		catch (AccessControlException ex) {
			...略
		}
	}
可以看到,SystemProperties是调用的System.getProperties()方法进行设置,因此个人猜测,当用户在application.properties中配置"spring.profiles.active"属性时,会自动加入到JAVA系统属性中(具体方式我没有找到)。
接着,开始调用configureEnvironment()配置环境的信息
	protected void configureEnvironment(ConfigurableEnvironment environment,
			String[] args) {
		//配置PropertySources,就是往propertySources追加再追加几个Property,不是很重要,略
		configurePropertySources(environment, args);
		//将profile配置到environment中
		configureProfiles(environment, args);
	}

	protected void configureProfiles(ConfigurableEnvironment environment, String[] args) {
		//1. 使用PropertySourcesPropertyResolver遍历内部所有的propertySources(上文已经添加过),
		//寻找key为"spring.profiles.active"的propertySources,并设置到activeProfiles
		environment.getActiveProfiles();
		//2. 创建profiles,添加profile到profiles中,并设置到environment里
		Set<String> profiles = new LinkedHashSet<String>(this.additionalProfiles);
		profiles.addAll(Arrays.asList(environment.getActiveProfiles()));
		environment.setActiveProfiles(profiles.toArray(new String[profiles.size()]));
	}
首先,先调用getActiveProfiles()方法:
Class AbstractEnvironment:
	@Override
	public String[] getActiveProfiles() {
		return StringUtils.toStringArray(doGetActiveProfiles());
	}

	protected Set<String> doGetActiveProfiles() {
		synchronized (this.activeProfiles) {
			if (this.activeProfiles.isEmpty()) {
				//寻找key为"spring.profiles.active"的propertySources,
				String profiles = getProperty("spring.profiles.active");
				if (StringUtils.hasText(profiles)) {
					//设置profiles到activeProfiles中,并返回
					setActiveProfiles(StringUtils.commaDelimitedListToStringArray(
							StringUtils.trimAllWhitespace(profiles)));
				}
			}
			return this.activeProfiles;
		}
	}
先看getProperty()
	@Override
	public String getProperty(String key) {
		return this.propertyResolver.getProperty(key);
	}

public class PropertySourcesPropertyResolver{
	@Override
	public String getProperty(String key) {
		return getProperty(key, String.class, true);
	}

	protected <T> T getProperty(String key, Class<T> targetValueType, boolean resolveNestedPlaceholders) {
		if (this.propertySources != null) {
			//使用PropertySourcesPropertyResolver遍历内部所有的propertySources(上文已经添加过),
			//寻找key为"spring.profiles.active"的propertySources,
			//而SystemProperties中含有spring.profiles.active极其对应value:dev,因此可以找到。
			for (PropertySource<?> propertySource : this.propertySources) {
				if (logger.isTraceEnabled()) {
					logger.trace("Searching for key '" + key + "' in PropertySource '" +
							propertySource.getName() + "'");
				}
				Object value = propertySource.getProperty(key);
				if (value != null) {
					if (resolveNestedPlaceholders && value instanceof String) {
						value = resolveNestedPlaceholders((String) value);
					}
					logKeyFound(key, propertySource, value);
					return convertValueIfNecessary(value, targetValueType);
				}
			}
		}

		return null;
	}
}
3. 通知所有的观察者
将profile配置到environment后,就会通知所有的观察者,环境已经配置好了。
//3. 通知所有的观察者,环境已经配置好了
listeners.environmentPrepared(environment);
	public void environmentPrepared(ConfigurableEnvironment environment) {
		for (SpringApplicationRunListener listener : this.listeners) {
			listener.environmentPrepared(environment);
		}
	}

	@Override
	public void environmentPrepared(ConfigurableEnvironment environment) {
		//使用multicastEvent方法通知ApplicationEnvironmentPreparedEvent对应的listeners,最终会调用listeners的onApplicationEvent(event)方法
		this.initialMulticaster.multicastEvent(new ApplicationEnvironmentPreparedEvent(
				this.application, this.args, environment));
	}
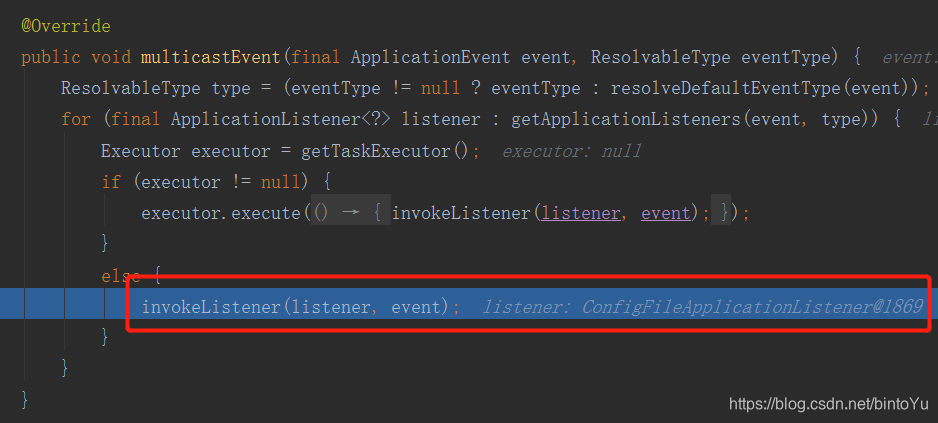
通知监听者会调用multicastEvent()方法,该方法在第三大步的时候已经具体介绍过,这里不重复介绍。而该方法的功能是:通知ApplicationEnvironmentPreparedEvent对应的listeners,listeners最终会调用onApplicationEvent(event)方法。
这里面的listeners中,有一个很重要的listner:ConfigFileApplicationListener(如下图),因此接下来将对该类进行详细讲解。
4. ConfigFileApplicationListener
public class ConfigFileApplicationListener implements EnvironmentPostProcessor, SmartApplicationListener, Ordered {
	...
	@Override
	public void onApplicationEvent(ApplicationEvent event) {
		//此时还处于环境准备阶段,因此会进入这个分支
		if (event instanceof ApplicationEnvironmentPreparedEvent) {
			onApplicationEnvironmentPreparedEvent(
					(ApplicationEnvironmentPreparedEvent) event);
		}
		if (event instanceof ApplicationPreparedEvent) {
			onApplicationPreparedEvent(event);
		}
	}

	private void onApplicationEnvironmentPreparedEvent(ApplicationEnvironmentPreparedEvent event) {
		//1. 获得几个EnvironmentPostProcessor
		List<EnvironmentPostProcessor> postProcessors = loadPostProcessors();
		//2. 将ConfigFileApplicationListener自身也加入到其中
		postProcessors.add(this);
		//3. 排序
		AnnotationAwareOrderComparator.sort(postProcessors);
		//4. 每个处理器都会调用postProcessEnvironment()方法。
		for (EnvironmentPostProcessor postProcessor : postProcessors) {
			postProcessor.postProcessEnvironment(event.getEnvironment(),
					event.getSpringApplication());
		}
	}
	...
}
2、3、4都不需要详细介绍,只需要介绍第1步获取几个环境后置处理器:
	List<EnvironmentPostProcessor> loadPostProcessors() {
		//loadFactories()最早就提到过,用于解析spring.properties文件并获取对应类
		return SpringFactoriesLoader.loadFactories(EnvironmentPostProcessor.class,
				getClass().getClassLoader());
	}
spring.properties片段:
# Environment Post Processors
org.springframework.boot.env.EnvironmentPostProcessor=\
org.springframework.boot.cloud.CloudFoundryVcapEnvironmentPostProcessor,\
org.springframework.boot.env.SpringApplicationJsonEnvironmentPostProcessor
可以看到,这里会获得两个环境后置处理器,但这两个类并不重要,所以接下来只介绍ConfigFileApplicationListener自身的postProcessEnvironment()方法。
	@Override
	public void postProcessEnvironment(ConfigurableEnvironment environment,
			SpringApplication application) {
		//1. 很重要,用于解析配置文件(例如application.properties)并添加到environment中
		addPropertySources(environment, application.getResourceLoader());
		//2. 不重要,略
		configureIgnoreBeanInfo(environment);
		//3.将environment的属性绑定到SpringApplication中,因篇幅关系,不进行详细介绍。
		bindToSpringApplication(environment, application);
	}

	protected void addPropertySources(ConfigurableEnvironment environment,
			ResourceLoader resourceLoader) {
		//往environment的propertySources中添加random的property,不重要
		RandomValuePropertySource.addToEnvironment(environment);
		new Loader(environment, resourceLoader).load();
	}
接着进入Loader类的load方法:
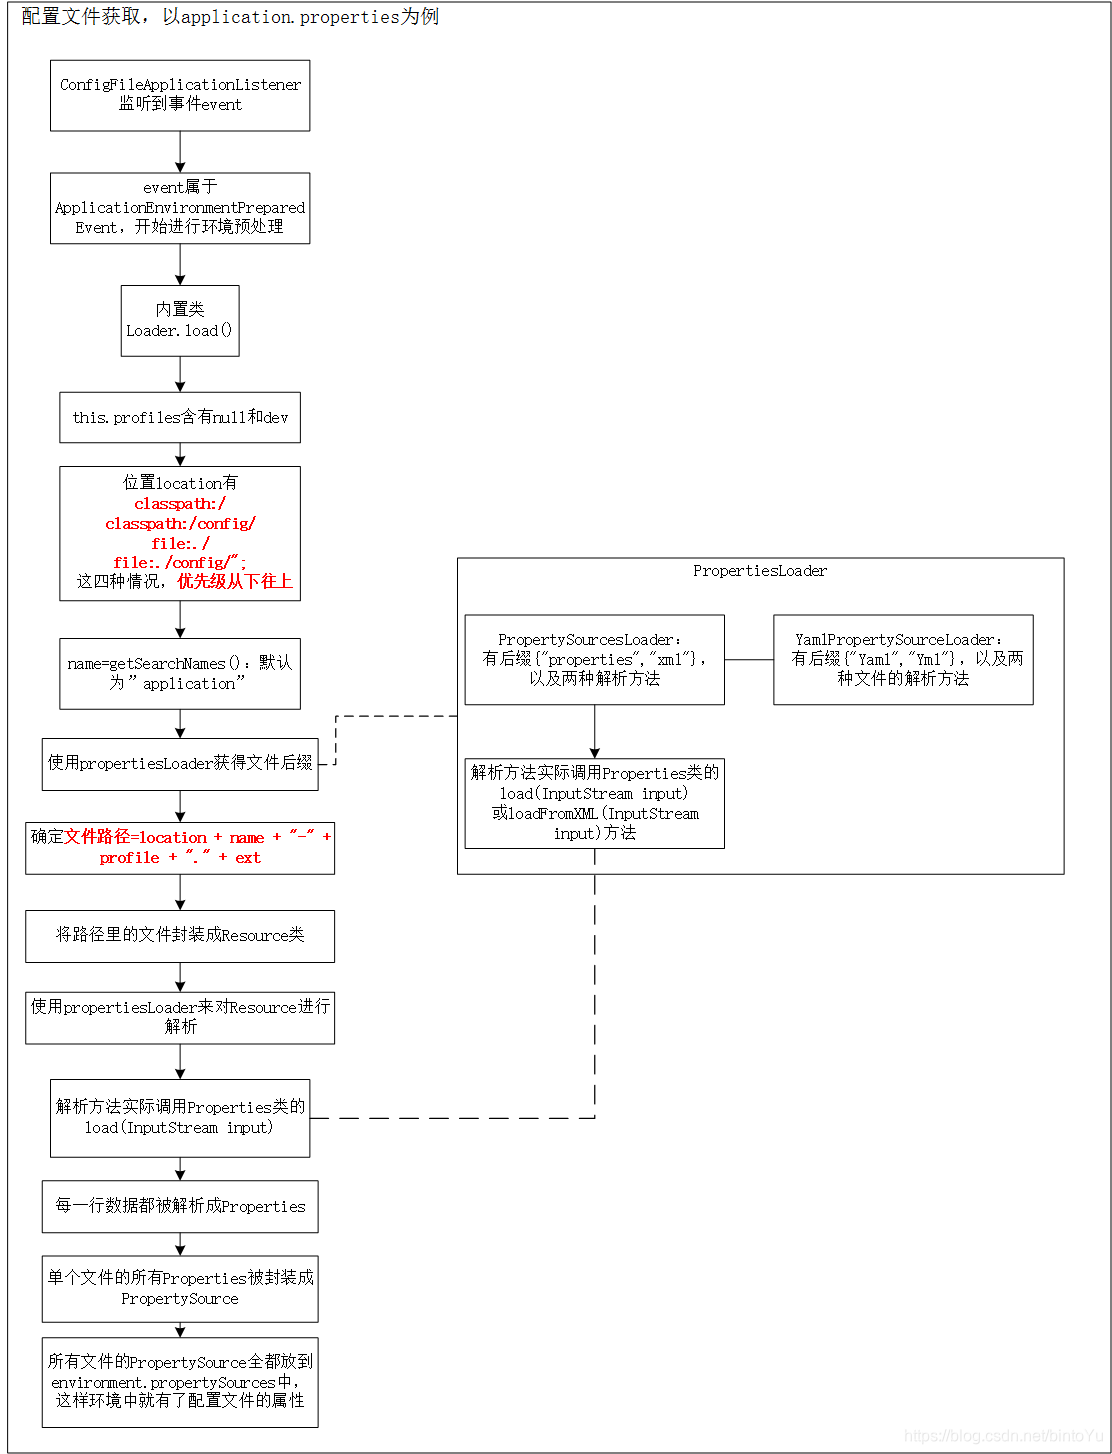
内置类Loader.class(非常重要!涉及到application.properties的解析):
public void load() {
			this.propertiesLoader = new PropertySourcesLoader();
			this.activatedProfiles = false;
			this.profiles = Collections.asLifoQueue(new LinkedList<Profile>());
			this.processedProfiles = new LinkedList<Profile>();

			//1. 具体功能不需要关注,只需要知道这一步之后,this.profiles含有两个属性:null和dev(因为我前面设置的是dev)
			Set<Profile> initialActiveProfiles = initializeActiveProfiles();
			this.profiles.addAll(getUnprocessedActiveProfiles(initialActiveProfiles));
			//这个分支不会进入,略
			if (this.profiles.isEmpty()) {
				for (String defaultProfileName : this.environment.getDefaultProfiles()) {
					Profile defaultProfile = new Profile(defaultProfileName, true);
					if (!this.profiles.contains(defaultProfile)) {
						this.profiles.add(defaultProfile);
					}
				}
			}


			this.profiles.add(null);

			while (!this.profiles.isEmpty()) {
				Profile profile = this.profiles.poll();
					//2. 遍历"classpath:/,classpath:/config/,file:./,file:./config/"; 这几个位置
				for (String location : getSearchLocations()) {
					//这个分支不会走
					if (!location.endsWith("/")) {
						load(location, null, profile);
					}
					else {
						//3.  getSearchNames()在没有配置的情况下,默认会得到"application"
						for (String name : getSearchNames()) {
							//4.解析
							load(location, name, profile);
						}
					}
				}
				this.processedProfiles.add(profile);
			}
			//5. 将this.propertiesLoader中的propertySources取出来,并存到environment.propertySources中
			addConfigurationProperties(this.propertiesLoader.getPropertySources());
		}
在上面的load()方法中,profiles分别包含了null和dev,而location有"classpath:/",“classpath:/config/”,“file:./”,"file:./config/"四种情况,接下来就是对name-profile和location两两组合调用load(location,name, profile);方法,同时,默认情况下name=“application”。
注:
- 因为profiles中的顺序是先null再dev,所以会先调用application.properties再调用application-dev.properties
- 上面四个路径下都存在application.properties时,后面会覆盖前面的,因此优先级实际上是反着来的,即:
– file:./config/
– file:./
– classpath:/config/
– classpath:/
	private PropertySourcesLoader propertiesLoader;

	private void load(String location, String name, Profile profile) {
		//1. group = (profile=null)或者(profile=dev)
		String group = "profile=" + (profile == null ? "" : profile);
		//这个分支不会走
		if (!StringUtils.hasText(name)) {
			loadIntoGroup(group, location, profile);
		}
		else {
			// 2. 获得扩展名,下面会细说,一共有"properties","xml","yml"和“yaml”四种后缀
			for (String ext : this.propertiesLoader.getAllFileExtensions()) {
				if (profile != null) {
					// Try the profile-specific file
					loadIntoGroup(group, location + name + "-" + profile + "." + ext,null);
					for (Profile processedProfile : this.processedProfiles) {
						if (processedProfile != null) {
							loadIntoGroup(group, location + name + "-"
									+ processedProfile + "." + ext, profile);
						}
					}
					//4.这里就是解析application-dev.properties的出处!!!!
					loadIntoGroup(group, location + name + "-" + profile + "." + ext,profile);
				}
				//3. 解析profile为空的时候(例如application.properties!!!!!)
				loadIntoGroup(group, location + name + "." + ext, profile);
				}
			}
		}
可以看到,上面的load方法中,主要有两部分,一个getAllFileExtensions()获得扩展名,另一个是loadIntoGroup(…)进行解析。
先对扩展名进行讲解:
class PropertySourcesLoader:
	public Set<String> getAllFileExtensions() {
		Set<String> fileExtensions = new LinkedHashSet<String>();
		//从loaders从取出PropertySourceLoader,再取出里面的扩展名
		for (PropertySourceLoader loader : this.loaders) {
			fileExtensions.addAll(Arrays.asList(loader.getFileExtensions()));
		}
		return fileExtensions;
	}
this.loaders含有下图的两个PropertySourceLoader,其中PropertiesPropertySourceLoader含有后缀名 { “properties”, “xml” },
而YamlPropertySourceLoader含有后缀名{“yml”,“yaml”}

接着讲loadIntoGroup()方法:
	private PropertySource<?> loadIntoGroup(String identifier, String location,Profile profile) {
		try {
			return doLoadIntoGroup(identifier, location, profile);
		}
		...
	}

	private PropertySource<?> doLoadIntoGroup(String identifier, String location,
				Profile profile) throws IOException {
			//1. 将location中的文件封装成Resource类,注:这里的resourceLoader是DefaultResourceLoader
			Resource resource = this.resourceLoader.getResource(location);
			PropertySource<?> propertySource = null;
			StringBuilder msg = new StringBuilder();
			if (resource != null && resource.exists()) {
				String name = "applicationConfig: [" + location + "]";
				String group = "applicationConfig: [" + identifier + "]";
				//2. 关键代码:将resource解析为property
				propertySource = this.propertiesLoader.load(resource, group, name,
				...忽略部分代码
			return propertySource;
		}
首先第一步getResource()方法会将location所在的所有文件转化成Resource 接口,Resource接口是spring用来满足各种底层的资源访问需求的接口。本文不对其进行展开叙述,感兴趣的同学可以阅读:Spring Resource接口进行资源访问
而l第二步this.propertiesLoader.load(…)方法非常重要,该方法会将Resource接口解析成PropertySource类,同时添加到this.propertySources中。
	public PropertySource<?> load(Resource resource, String group, String name,
			String profile) throws IOException {
		if (isFile(resource)) {
			String sourceName = generatePropertySourceName(name, profile);
			for (PropertySourceLoader loader : this.loaders) {
				if (canLoadFileExtension(loader, resource)) {
					//1.遍历所有PropertySourceLoader然后调用loader解析
					PropertySource<?> specific = loader.load(sourceName, resource,
							profile);
					//2. 将解析好的结果添加到this.propertySources中
					addPropertySource(group, specific, profile);
					return specific;
				}
			}
		}
		return null;
	}
对于PropertySourceLoader,我们以.properties的解析器PropertiesPropertySourceLoader为例进行讲解:
public class PropertiesPropertySourceLoader implements PropertySourceLoader {

	@Override
	public String[] getFileExtensions() {
		return new String[] { "properties", "xml" };
	}

	@Override
	public PropertySource<?> load(String name, Resource resource, String profile)
			throws IOException {
		if (profile == null) {
			Properties properties = PropertiesLoaderUtils.loadProperties(resource);
			if (!properties.isEmpty()) {
				return new PropertiesPropertySource(name, properties);
			}
		}
		return null;
	}

}
可以看到,load()方法实际上调用PropertiesLoaderUtils.loadProperties(resource);
	public static Properties loadProperties(Resource resource) throws IOException {
		Properties props = new Properties();
		fillProperties(props, resource);
		return props;
	}

	public static void fillProperties(Properties props, Resource resource) throws IOException {
		InputStream is = resource.getInputStream();
		try {
			String filename = resource.getFilename();
			if (filename != null && filename.endsWith(XML_FILE_EXTENSION)) {
				props.loadFromXML(is);
			}
			else {
				props.load(is);
			}
		}
		finally {
			is.close();
		}
	}
Properties是java.util的一个通用类,用于解析properties或xml文件。在这里便不具体介绍了。
这样,application.properties文件就被解析成Properties类,然后再将Properties类封装到PropertiesPropertySource类中。
而yml和yaml的解析器YamlPropertySourceLoader对文件的解析也大同小异,它按照文件特定的格式一步一步解析成key和value,然后存放到Map<String, Object> source中,最后将map封装到PropertiesPropertySource类中
这样,解析过程就结束了,最后还要将解析好的结果存放到environment中
		//5. 将this.propertiesLoader中的propertySources取出来,并存到environment.propertySources中
		addConfigurationProperties(this.propertiesLoader.getPropertySources());
该方法一直往下走,会到下面的代码中:
		private void addConfigurationProperties(
				ConfigurationPropertySources configurationSources) {
			//1.获取environment.propertySources
			MutablePropertySources existingSources = this.environment
					.getPropertySources();
			//2.存放
			if (existingSources.contains(DEFAULT_PROPERTIES)) {
				existingSources.addBefore(DEFAULT_PROPERTIES, configurationSources);
			}
			else {
				existingSources.addLast(configurationSources);
			}
		}
这样,Loader类的load()方法就走完了,现在总结一下该方法的流程:
最后还有bindToSpringApplication(environment, application);将environment的属性绑定到SpringApplication中,因篇幅关系,不进行详细介绍。
最后配置文件大致以这种形式存放到environment中:
this.environment
		.propertySources
			.propertySourceList[5]    ->ConfigurationPropertySources {name='applicationConfigurationProperties'}
				.source[0]			  ->PropertySources {name='applicationConfig: [profile=dev]'}
					.source[0]		  ->PropertySource
						.source		  ->Property:存放配置文件的key和value
				.source[1]			  ->PropertySources {name='applicationConfig: [profile=]'}
					.source[0]		  ->PropertySource
						.source		  ->Property:存放配置文件的key和value


 566
566

 被折叠的 条评论
为什么被折叠?
被折叠的 条评论
为什么被折叠?
 到【灌水乐园】发言


