


 本文详细介绍了如何在SpringBoot项目中配置并使用MySQL数据库。包括pom.xml文件中引入jdbc和MySQL连接依赖,application.properties或application.yml配置数据源信息,以及通过SpringBoot测试类进行功能验证。
pom.xml文件配置
- 引入jdbc支持
<dependency>
    <groupId>org.springframework.boot</groupId>
    <artifactId>spring-boot-starter-jdbc</artifactId>
</dependency>
- 引入MySQL连接依赖包
<dependency>
    <groupId>mysql</groupId>
    <artifactId>mysql-connector-java</artifactId>
</dependency>
src/main/resources/application.properties配置数据源信息
spring.datasource.url=jdbc:mysql://localhost:3306/test
spring.datasource.username=root
spring.datasource.password=123456
spring.datasource.driver-class-name=com.mysql.jdbc.Driver
其中test为数据库名称,3306为默认的端口号。
src/main/resources/application.yml配置数据源信息
spring:
  datasource:
    driver-class-name: com.mysql.jdbc.Driver
    url: jdbc:mysql://localhost:3306/bank?useUnicode=true&characterEncoding=utf8
    username: root
    password: ljf123456
二者选其一。
使用SpringBoot测试类进行测试
@RunWith(SpringJUnit4ClassRunner.class)
@SpringBootTest
public class SpringbootTestApplicationTests {
    @Autowired
    private UserService userService;

    @Before
    public void setUp() {
        userService.deleteAllUsers();
        System.out.println("清空user表");
    }

    @Test
    public void test() throws Exception {
        System.out.println("插入5个用户");
        userService.create("a", 1);
        userService.create("b", 2);
        userService.create("c", 3);
        userService.create("d", 4);
        userService.create("e", 5);
        // 查数据库,应该有5个用户
        Assert.assertEquals(5, userService.getAllUsers().intValue());
        // 删除两个用户
        userService.deleteByName("a");
        userService.deleteByName("e");
        // 查数据库,应该有5个用户
        Assert.assertEquals(3, userService.getAllUsers().intValue());
    }
}
UserService类实现
@Service
public class UserServiceImpl implements UserService {
    @Autowired
    private JdbcTemplate jdbcTemplate;

    @Override
    public void create(String name, Integer age) {
        jdbcTemplate.update("insert into USER(NAME, AGE ) values(?, ?)", name, age);
    }

    @Override
    public void deleteByName(String name) {
        jdbcTemplate.update("delete from USER where NAME = ?", name);
    }

    @Override
    public Integer getAllUsers() {
        return jdbcTemplate.queryForObject("select count(1) from USER", Integer.class);
    }

    @Override
    public void deleteAllUsers() {
        jdbcTemplate.update("delete from USER");
    }
UserService 接口
public interface UserService {
    void create(String name, Integer age);
    void deleteByName(String name);
    Integer getAllUsers();
    void deleteAllUsers();
}
在命令行查询的结果
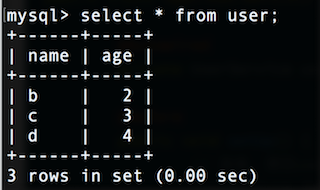
asd.png


 810
810

 被折叠的 条评论
为什么被折叠?
被折叠的 条评论
为什么被折叠?
 到【灌水乐园】发言


