


 本文围绕Java多线程与线程通信展开。介绍了Java内存模型,指出非原子操作会导致“脏读”,可通过synchronized和lock保证线程安全。还讲解了volatile关键字的作用,以及synchronized、lock与condition的使用和通信方法。此外,阐述了生产者消费者模式和线程顺序执行的多种实现方式。
继续错误的代价由别人来承担,而承认错误的代价由自己来承担
本文将记录在多线程的情况下数据安全共享的学习心得,数据安全共享就是保证共享数据访问正确性。对于线程内部的数据,则不存在共享的问题。对于final类型的共享数据,由于是不可变的数据,所以是绝对安全的。所以需要特别处理的是可变的共享数据,多线程的操作可能会造成数据“脏读”的情况。首先先介绍java的内存模型来了解出现不安全的原因。
一、JAVA内存模型
Java内存模型包括主内存和工作内存两大块,主内存是整个进程共有的,进程内的线程共享主内存,Java中的变量则存储在主内存中。每个线程拥有自己的工作内存,线程内使用的变量则为工作内存中保存的主内存的副本,线程执行读取、赋值操作只能直接操作工作内存中的变量。Java的线程模型如下图所示。
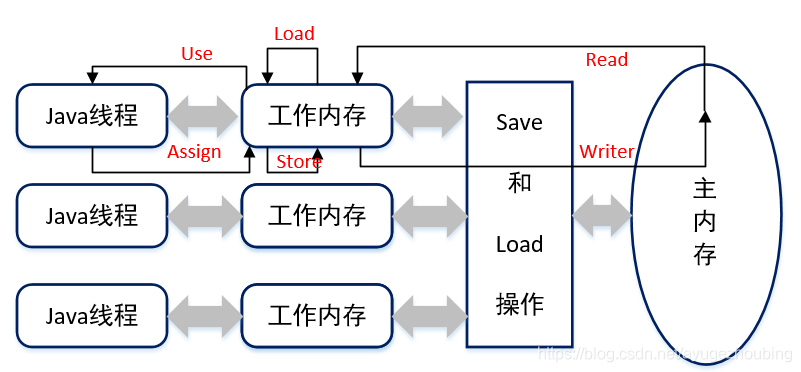
图中的流程为一个线程执行共享数据操作的执行过程,包括read,load,use,assign,store,write。(图中的流向表述数据由某一位置加载到指向位置)
read:表示主内存加载到工作内存中,以便load操作
load:将加载到工作内存中的变量存到对应的副本中。
use:将工作内存中的变量加载到执行引擎使用。
assign:将执行引擎中的变量更新到工作内存的副本中。
store:将工作内存中的副本存到主内存中,以便后续的write操作。
write:将store到主内存中的变量存到主内存对应变量中。
由于不同的线程执行变量的操作都要按照上面的流程进行,但是上述整个流程并非原子性操作,所以执行过程中存在线程调度的情况,则会造成不同的线程读取到的数据并非是其他线程操作完的数据,造成“脏读”的情况,则出现数据错误。
原子性操作的定义:一个或某几个操作只能在一个线程执行完之后,另一个线程才能开始执行该操作,也就是说这些操作是不可分割的,线程不能在这些操作上交替执行。java中非long、double的基本数据类型变量或者引用的赋值或者读取操作是原子性操作。所以,只需要将认为会造成读写错误的操作编程原子性操作就可以保证线程安全了,主要采用synchronized和lock方式。
二、volatile介绍
volatile关键字主要有两个作用,保证此变量对所有线程可见性和禁止指令重排序优化。
1、可见性:是指当一个线程修改了变量的一个值,另一个线程立即可见。其保证了线程对一变量执行use操作前必须的从主内存中read、load读取最新的值,当线程assign后立即会执行store和write操作,保证修改立即更新到主内存中。
2、禁止指令重排优化:防止编译优化对程序指令的重新排序。主要操作是volatile修饰的变量在赋值操作后增加了一道内存屏障,禁止之后的语句排到该内存屏障之前。同时,碰到这道内存屏障后,会将修改的数据立即更新到主内存中,对其他线程立即可见。也就是说当线程A的assign操作先于线程B的assign操作时,那么线程A的store和write操作先于线程B的store和write操作。特别注意,volatile修饰并不能保证原子性操作。若没有原子性操作的保障,volatile变量是不安全的。如A use(最新值)–> B use(最新值)–>A assign(A修改值)–>A的sotre和writer -->B assign(B修改值) -->B的store和write 此时A的修改被丢失,不安全。
public class volatileTest {
    public static void main(String[] args) throws InterruptedException
    {
        VolatileThread thread = new VolatileThread();
        thread.start();
        Thread.sleep(2000);
        thread.setStop(true);
    }
}

class VolatileThread extends Thread{
    //当此变量不加volatile时,线程将无法停止,由于线程一直在自己的工作栈中取数据,而主线程修改的数据保存在
    //内存模型的主内存中,则线程无法停止。若加上volatile后则保证此参数的线程可见性,则可以顺利停止线程
    public volatile boolean isStop = false;

    public void setStop(boolean isStop)
    {
        this.isStop = isStop;
    }

    @Override
    public void run() {
        System.out.println("线程启动");
        while(!isStop){}
        System.out.println("线程结束");
    }
}

class Single{
    //若无volatile修饰,无法达到单例的效果
    private volatile static Single instance = null;
    private Single(){}

    public static Single getInstance(){
        if(instance == null)
        {
            synchronized (Single.class)
            {
                if(instance == null)
                    instance = new Single();
            }
        }
        return instance;
    }
}
三、synchronized
1、synchronized使用
synchronized可以保证原子性操作,可见性和有序性,其持有的是对象锁,可以是实例对象,也可以是类对象。当某一线程持有该对象锁时,其他线程如果想要持有锁则必须等待,但是非synchronized方法或代码块则可以异步执行不受影响。任何对象都可以作为锁对象,但是建议不要使用字符串,由于常量池的原因,可能会造成部分线程无法执行。
synchronized可以锁静态方法,此时锁的是类对象,与synchronized(MyObject.class)锁的是同一对象。synchronized也可以修饰普通方法,此时锁的的实例对象,与synchronized(this)一致。还可以修饰代码块,则可以锁任意对象synchronized(object)。注意只有锁同一对象时,才是同步执行,否则为异步。
java中,锁的标志保存在对象头中,当使用代码块锁时,生成的字节码有monitorenter和monitorexit两条指令,当进入monitorenter时,锁计数器则会加1,执行monitorexit时锁计数器减1,当为0时无锁状态。synchronized是一种可重入锁,当前线程获得锁时,它可以再次进入获得锁,则出现锁计数器大于1的情况,但是获得几次锁则需要释放几次锁。字节码指令中会发现有两条monitorexit指令,第一条是正常退出时释放锁,第二条时碰到异常时释放锁。当synchronized修饰方法时,该方法的字节码指令会增加标志ACC_SYNCHRONIZED,原理与上述一致。
public class SynTest {
    public static void main(String[] args)
    {
        Service service = new Service();
        ExecutorService executorService = Executors.newCachedThreadPool();
        for(int i = 1; i <= 5; i++)
        {
            executorService.execute(new Task(service,i));
        }
        executorService.shutdown();
    }
}

class Task implements Runnable{
    public Service service;
    public int id;

    public Task(Service service, int id)
    {
        this.service = service;
        this.id = id;
    }

    @Override
    public void run(){
        switch (id)
        {
            case 1:service.methodA();break;
            case 2:service.methodB();break;
            case 3:service.methodC();break;
            case 4:service.methodD();break;
            case 5:service.methodE();break;
            default:break;
        }
    }
}

class Service{
    synchronized public static void methodA(){
        for(int i = 0; i < 2; i++)
        {
            System.out.println(Thread.currentThread().getName()+" "+i);
            try {
                Thread.sleep(1000);
            }catch (InterruptedException e)
            {
                e.printStackTrace();
            }

        }
    }

    public static void methodB(){
        synchronized (Service.class)
        {
            for(int i = 0; i < 2; i++)
            {
                System.out.println(Thread.currentThread().getName()+" "+i);
            }
            try {
                Thread.sleep(1000);
            }catch (InterruptedException e)
            {
                e.printStackTrace();
            }
        }
    }

    synchronized public void methodC(){
        doWork();
    }

    public void methodD(){
        synchronized (this) {
            doWork();
        }
    }

    public void methodE(){
        doWork();
    }

    private void doWork()
    {
        for (int i = 0; i < 2; i++) {
            System.out.println(Thread.currentThread().getName() + " " + i);
            try {
                Thread.sleep(1000);
            }catch (InterruptedException e)
            {
                e.printStackTrace();
            }
        }
    }
}

上述案例的运行结果如下所示
pool-1-thread-5 0
pool-1-thread-1 0
pool-1-thread-3 0
pool-1-thread-3 1
pool-1-thread-1 1
pool-1-thread-5 1
pool-1-thread-2 0
pool-1-thread-2 1
pool-1-thread-4 0
pool-1-thread-4 1
Process finished with exit code 0
线程1,2锁的是类对象,线程3,4锁的是实例对象,线程5未上锁,这三类线程之间是异步执行的,互相交叉执行。但是1,2之间是同步的,线程3,4之间是同步的。
2、synchronized的通信
利用wait()/notify()/notifyAll()方法进行线程等待和唤醒。此线程必须持有该对象的锁时才能够调用这三个方法,否则会报IllegalMonitorStateException,调用时调用持有的锁的对象的三个方法。对象的wait()方法会使得该线程释放持有的锁,并进入等待队列,会一直等待直到被唤醒。notify()方法会随机的唤醒一个等待中的线程。notifyAll()会唤醒所有的等待线程。使用时注意等待和唤醒的时序,如果先唤醒后等待,则等待的线程可能无法唤醒。程序案例见第五部分。
四、lock与condition
java中常用的锁是ReentrantLock进行锁定,它内部实现了公平锁和非公平锁的内部类,这两个类都是基于AQS实现的,利用CAS操作维护了一个Node队列保存等待的线程。这个队列实际上是一个双向链表,当前一个节点运行释放锁时,会唤醒自己的后继节点竞争锁,是通过LockSupport的park()和unpark()方法进行线程等待和唤醒的。同时可以创建多个条件使不同的线程在不同的条件下等待,唤醒时也可以按条件针对性唤醒,这样增加灵活性,提高性能,减少上下文切换开销。
public class ReentraLockTest {
    public static void main(String[] args) throws InterruptedException
    {
        MyService service = new MyService();
        ThreadA threadA = new ThreadA(service);
        ThreadB threadB = new ThreadB(service);
        threadA.start();
        threadB.start();
        Thread.sleep(2000);
        service.notifyA();
    }
}

class MyService{
    private ReentrantLock lock = new ReentrantLock();
    private Condition conditionA = lock.newCondition();
    private Condition conditionB = lock.newCondition();

    public void waitA(){
        try{
            lock.lock();
            System.out.println("waitA方法开始运行...");
            conditionA.await();
            System.out.println("waitA方法被唤醒...");
        }catch (InterruptedException e)
        {
            e.printStackTrace();
        }finally {
            lock.unlock();
        }
    }

    public void waitB(){
        try{
            lock.lock();
            System.out.println("waitB方法开始运行...");
            conditionB.await();
            System.out.println("waitB方法被唤醒...");
        }catch (InterruptedException e)
        {
            e.printStackTrace();
        }finally {
            lock.unlock();
        }
    }

    public void notifyA(){
        try{
            lock.lock();
            System.out.println("尝试唤醒waitA方法...");
            conditionA.signal();
        }finally {
            lock.unlock();
        }
    }

    public void notifyB(){
        try{
            lock.lock();
            System.out.println("尝试唤醒waitB方法...");
            conditionB.signal();
        }finally {
            lock.unlock();
        }
    }
}

class ThreadA extends Thread{
    private MyService service;

    public ThreadA(MyService s)
    {
        service = s;
    }
    @Override
    public void run() {
        service.waitA();
    }
}

class ThreadB extends Thread{
    private MyService service;

    public ThreadB(MyService s)
    {
        service = s;
    }
    @Override
    public void run() {
        service.waitB();
    }
}
运行结果如下
waitA方法开始运行...
waitB方法开始运行...
尝试唤醒waitA方法...
waitA方法被唤醒...
五、生产者消费者模式实现
生产者消费者模式的实现方法比较多,可以采用ReentraLock和Condition的方式,也可以采用synchronized和wait方法,还可以采用BlockingQueue阻塞队列实现。控制好共享资源的访问,和线程等待和唤醒的条件即可。
1、ReentrantLock实现
public class PAndCModel {
    public static void main(String[] args)
    {
        ReentrantLock lock = new ReentrantLock();
        Condition fullCondition = lock.newCondition();
        Condition EmptyCondition = lock.newCondition();
        ArrayList<Integer> dataList = new ArrayList<>();
        int maxSize = 2;
        ProduceService pService = new ProduceService(dataList,lock,EmptyCondition,fullCondition,maxSize);
        ConsumerService cService = new ConsumerService(dataList,lock,EmptyCondition,fullCondition);
        ExecutorService service = Executors.newCachedThreadPool();
        for(int i = 0; i < 2; i++)
        {
            service.submit(pService);
            service.submit(cService);
        }
        service.shutdown();
    }
}

class ProduceService implements Runnable {
    private ArrayList<Integer> dataList;
    private int maxSize = 50;
    private Condition fullCondition;
    private Condition EmptyCondition;
    private ReentrantLock lock;
    public ProduceService(ArrayList<Integer> dataList,ReentrantLock lock,Condition EmptyCondition,
                          Condition fullCondition,int maxSize)
    {
        this.dataList = dataList;
        this.lock = lock;
        this.EmptyCondition = EmptyCondition;
        this.fullCondition = fullCondition;
        this.maxSize = maxSize;
    }
    public void produce(){
        Random random = new Random();
        while(true){
            if(Thread.currentThread().isInterrupted())
                break;
            try {
                lock.lock();
                while (dataList.size() == maxSize) {
                    fullCondition.await();
                }
                Integer data = random.nextInt(25);
                System.out.println(Thread.currentThread().getName() + "生产了" + data);
                dataList.add(data);
                EmptyCondition.signalAll();
            }catch (InterruptedException e)
            {
                e.printStackTrace();
            }finally {
                lock.unlock();
            }
        }
    }

    @Override
    public void run() {
        produce();
    }
}

class ConsumerService implements Runnable {
    private ArrayList<Integer> dataList;
    private Condition EmptyCondition;
    private Condition fullCondition;
    private ReentrantLock lock;
    public ConsumerService(ArrayList<Integer> dataList,ReentrantLock lock,Condition EmptyCondition,Condition fullCondition){
        this.dataList = dataList;
        this.EmptyCondition = EmptyCondition;
        this.fullCondition = fullCondition;
        this.lock = lock;
    }

    public void consume(){
        while(true){
            if(Thread.currentThread().isInterrupted())
                break;
            try {
                lock.lock();
                while (dataList.size() == 0) {
                    EmptyCondition.await();
                }
                Integer data = dataList.get(0);
                dataList.remove(0);
                System.out.println(Thread.currentThread().getName() + "消费了" + data);
                fullCondition.signalAll();
            }catch (InterruptedException e)
            {
                e.printStackTrace();
            }finally {
                lock.unlock();
            }
        }
    }

    @Override
    public void run() {
        consume();
    }
}
2、synchronized实现
public class PAndCTest {
    public static void main(String[] args)
    {
        DataOperator operator = new DataOperator();
        ExecutorService service = Executors.newCachedThreadPool();
        for(int i = 0; i < 4; i++)
        {
            service.submit(new Produce(operator));
            service.submit(new Comsume(operator));
        }
		service.shutdown();
    }
}

class Produce implements Runnable{
    private DataOperator operator;

    public Produce(DataOperator o)
    {
        operator = o;
    }

    @Override
    public void run() {
        operator.produce();
    }
}

class Comsume implements Runnable{
    private DataOperator operator;

    public Comsume(DataOperator o)
    {
        operator = o;
    }

    @Override
    public void run() {
        operator.consume();
    }
}

class DataOperator{
    ArrayList<Integer> dataList = new ArrayList<>();
    int maxSize = 10;
    Random random = new Random();
    public void produce(){
        while(true) {
            if (Thread.currentThread().isInterrupted())
                break;
            synchronized (dataList)
            {
                while(dataList.size() == maxSize)
                {
                    try {
                        dataList.wait();
                    } catch (InterruptedException e) {
                        e.printStackTrace();
                    }
                }
                Integer data = random.nextInt(25);
                dataList.add(data);
                dataList.notifyAll();
                System.out.println(Thread.currentThread().getName()+"生产了"+data);
            }
        }
    }

    public void consume(){
        while(true) {
            if (Thread.currentThread().isInterrupted())
                break;
            synchronized (dataList)
            {
                while(dataList.size() == 0)
                {
                    try {
                        dataList.wait();
                    } catch (InterruptedException e) {
                        e.printStackTrace();
                    }
                }
                Integer data = dataList.get(0);
                dataList.remove(0);
                dataList.notifyAll();
                System.out.println(Thread.currentThread().getName()+"消费了"+data);
            }
        }
    }
}
上述两个案例基本一致,有以下几点注意:while (dataList.size() == 0)此处采用while而不是if,是为了再次或得锁之后继续判断,放置多个线程被唤醒造成不判断直接运行出错。采用signalAll()而不是signal()是由于signal()每次唤醒的线程不确定,可能出现同类唤醒,则在极端的情况下会出现线程假死,无法继续运行。
3、BlockingQueue实现
阻塞队列内部是基于ReentraLock和Condition实现的,当队列满是,向队列中加元素则阻塞当前线程,空时亦然。
public class PAndCModel1 {
    public static void main(String[] args)
    {
        BDataOperator operator = new BDataOperator();
        ExecutorService service = Executors.newCachedThreadPool();
        for(int i = 0; i < 5; i++)
        {
            service.submit(new BProduce(operator));
            service.submit(new BConsume(operator));
        }
        service.shutdown();
    }

}

class BProduce implements Runnable{
    private BDataOperator operator;
    public BProduce(BDataOperator o)
    {
        operator = o;
    }

    @Override
    public void run() {
        operator.produce();
    }
}

class BConsume implements Runnable{
    private BDataOperator operator;
    public BConsume(BDataOperator o)
    {
        operator = o;
    }

    @Override
    public void run() {
        operator.consume();
    }
}

class BDataOperator{
    private BlockingQueue<Integer> dataList = new ArrayBlockingQueue<>(10);
    Random random = new Random();
    public void produce(){
        while(true)
        {
            if(Thread.currentThread().isInterrupted())
                break;
            Integer data = random.nextInt(25);
            try {
                dataList.put(data);
                System.out.println(Thread.currentThread().getName()+"生产了"+data);
            }catch (InterruptedException e)
            {
                e.printStackTrace();
            }

        }
    }

    public void consume(){
        while(true)
        {
            if(Thread.currentThread().isInterrupted())
                break;
            Integer data = random.nextInt(25);
            try {
                System.out.println(Thread.currentThread().getName()+"消费了"+dataList.take());
            }catch (InterruptedException e)
            {
                e.printStackTrace();
            }

        }
    }
}
六、顺序执行
线程等待执行的实现方法,采用多种方案实现线程1执行完成后执行线程2,线程2执行完成后执行线程3。
1、线程池实现
public class ThreadTest {
    public static void main(String[] args)
    {
        ExecutorService service = Executors.newSingleThreadExecutor();
        for(int i = 1; i < 4; i++)
        {
            service.submit(new TestService(i));
        }
        service.shutdown();
    }
}

class TestService implements Runnable{
    private int threadId;
    public TestService(int i)
    {
        threadId = i;
    }

    @Override
    public void run() {
        System.out.println("Thread" + threadId + "运行.....");
    }
}
2、join()方法实现
public class ThreadTest {
    public static void main(String[] args)
    {
        Thread thread1 = new Thread(new TestService(1,null));
        Thread thread2 = new Thread(new TestService(2,thread1));
        Thread thread3 = new Thread(new TestService(3,thread2));
        thread3.start();
        thread2.start();
        thread1.start();
    }
}

class TestService implements Runnable{
    private int threadId;
    private Thread thread;
    public TestService(int i,Thread thread)
    {
        threadId = i;
        this.thread = thread;
    }

    @Override
    public void run() {
        if(thread != null) {
            try {
                thread.join();
            } catch (InterruptedException e) {
                e.printStackTrace();
            }
        }
        System.out.println("Thread" + threadId + "运行.....");
    }
}
3、ReentraLock实现或synchronized实现
将程序中的锁改为ReentraLock和Condition是一致的。
public class ThreadTest {
    public static void main(String[] args)
    {
        TestService service = new TestService();
        Thread thread1 = new Thread(new STask(3,service));
        Thread thread2 = new Thread(new STask(1,service));
        Thread thread3 = new Thread(new STask(2,service));
        thread3.start();
        thread2.start();
        thread1.start();
    }
}

class STask implements Runnable{
    private int id;
    private TestService service;
    public STask(int id, TestService service)
    {
        this.id= id;
        this.service = service;
    }

    @Override
    public void run() {
        service.method(id);
    }
}
class TestService{
	//此处采用volatile修饰,使得线程可见
    private volatile int runId = 1;

    public void method(int id)
    {
        synchronized (this)
        {
            while(runId != id)
            {
                try {
                    wait();
                }catch (InterruptedException e)
                {
                    e.printStackTrace();
                }
            }
            System.out.println("thread" + runId + "运行.....");
            runId++;
            if(runId > 3)
                runId = 1;
            notifyAll();
        }
    }
}
4、CountDownLatch实现
CountDownLatch用于一个线程等待多个线程运行完后运行。
public class ThreadTest {
    public static void main(String[] args)
    {
        CountDownLatch latch1 = new CountDownLatch(1);
        CountDownLatch latch2 = new CountDownLatch(2);

        Thread1 thread1 = new Thread1(latch1,latch2);
        Thread2 thread2 = new Thread2(latch1,latch2);
        Thread3 thread3 = new Thread3(latch1,latch2);
        thread3.start();
        thread2.start();
        thread1.start();
    }
}

class Thread1 extends Thread{
    private CountDownLatch latch1;
    private CountDownLatch latch2;
    public Thread1(CountDownLatch latch1, CountDownLatch latch2)
    {
        this.latch1 = latch1;
        this.latch2 = latch2;
    }

    @Override
    public void run() {
        System.out.println("Thread1 运行了......." );
        latch1.countDown();
        latch2.countDown();
    }
}

class Thread2 extends Thread{
    private CountDownLatch latch1;
    private CountDownLatch latch2;
    public Thread2(CountDownLatch latch1, CountDownLatch latch2)
    {
        this.latch1 = latch1;
        this.latch2 = latch2;
    }

    @Override
    public void run() {
        try {
            latch1.await();
        }catch (InterruptedException e)
        {
            e.printStackTrace();
        }
        System.out.println("Thread2 运行了......." );
        latch2.countDown();
    }
}

class Thread3 extends Thread{
    private CountDownLatch latch1;
    private CountDownLatch latch2;
    public Thread3(CountDownLatch latch1, CountDownLatch latch2)
    {
        this.latch1 = latch1;
        this.latch2 = latch2;
    }

    @Override
    public void run() {
        try {
            latch2.await();
        }catch (InterruptedException e)
        {
            e.printStackTrace();
        }
        System.out.println("Thread3 运行了......." );
    }
}


 372
372

 被折叠的 条评论
为什么被折叠?
被折叠的 条评论
为什么被折叠?
 到【灌水乐园】发言


